Having a secure password is crucial, especially in these times. However, when it comes to Windows, having a secure password also means entering it multiple times during the day, each time when you want to log into your PC. Thankfully, Microsoft understands that, and allows you to leverage biometric authentication using Windows Hello. But what exactly is Windows Hello, and why and how should you use it?
Fret not, for we are here to answer all your queries. In this post, we’ll talk about how to set up Windows Hello on Windows, outlining its advantages and guiding you through every step of the process, from the initial requirements to the satisfying moment of effortless login. So, bid farewell to password fatigue and embrace the future of secure and convenient log-in with Windows Hello.
What is Windows Hello and Why To Use It
Windows Hello is Microsoft’s biometric authentication system, allowing you to sign in to your Windows 10 or 11 device using your face or fingerprint. Gone are the days of typing complex passwords – simply look at your webcam or touch the fingerprint sensor, and voila! You’re in. This is similar to using Touch ID on a Mac, except that for Windows you have the option for both face and fingerprint unlocking. This offers enhanced security with the comfort of a faster login to your Windows 10 or 11 PC.
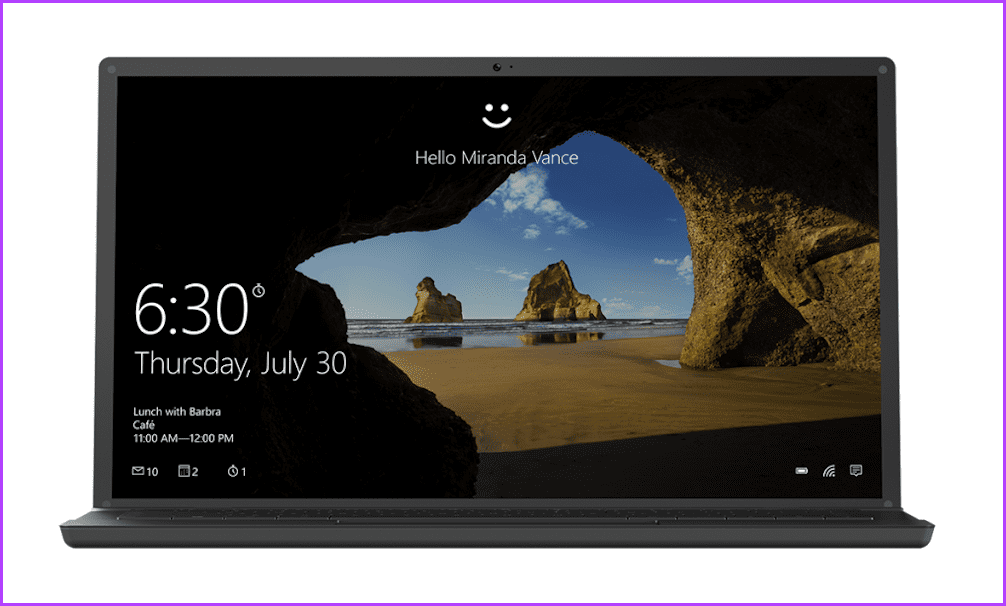
The seamless login experience offered by Windows Hello translates to increased productivity. No more lost time typing and retyping passwords, no more frustration battling login screens. In addition to that, Microsoft also allows you to use Windows Hello as an added biometric authentication for other apps on your PC. For instance, you can use Windows Hello with Google Chrome to protect your passwords.
Requirements to Use Windows Hello
Before diving into the setup process, let’s ensure that your system meets the requirements for Windows Hello. To take advantage of this cutting-edge feature, you’ll need:
- A compatible device with Windows 10 or 11.
- A camera for facial recognition or a fingerprint scanner for fingerprint authentication.
- The Windows Hello feature should be supported by your device.
Now that we’ve covered the essentials, let’s proceed to set up Windows Hello and elevate your device security.
How to Set up a PIN on Windows
Before using either Facial or Fingerprint unlock via Windows Hello on your PC, it’s important to set a PIN first. Setting up a Personal Identification Number (PIN) is the first step towards integrating Windows Hello into your daily routine. A PIN is a numeric code that provides an additional layer of security and serves as a backup authentication method. Here’s how you can set it up.
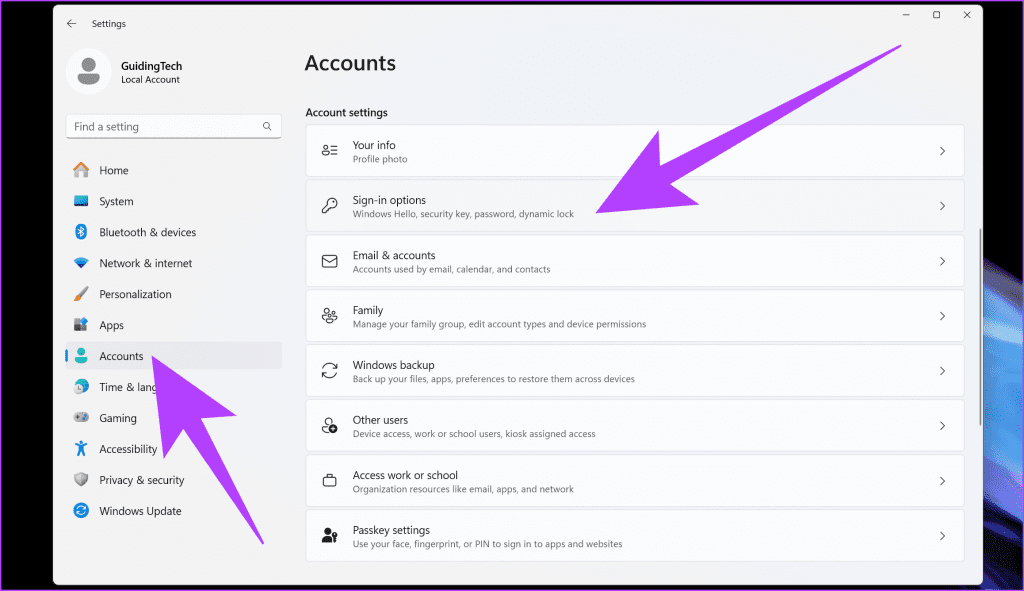
Step 1: Press the Windows + I keys to open Windows Settings. Here, select Accounts from the left sidebar. Then, on the right side, scroll down and select ‘Sign-in options’.
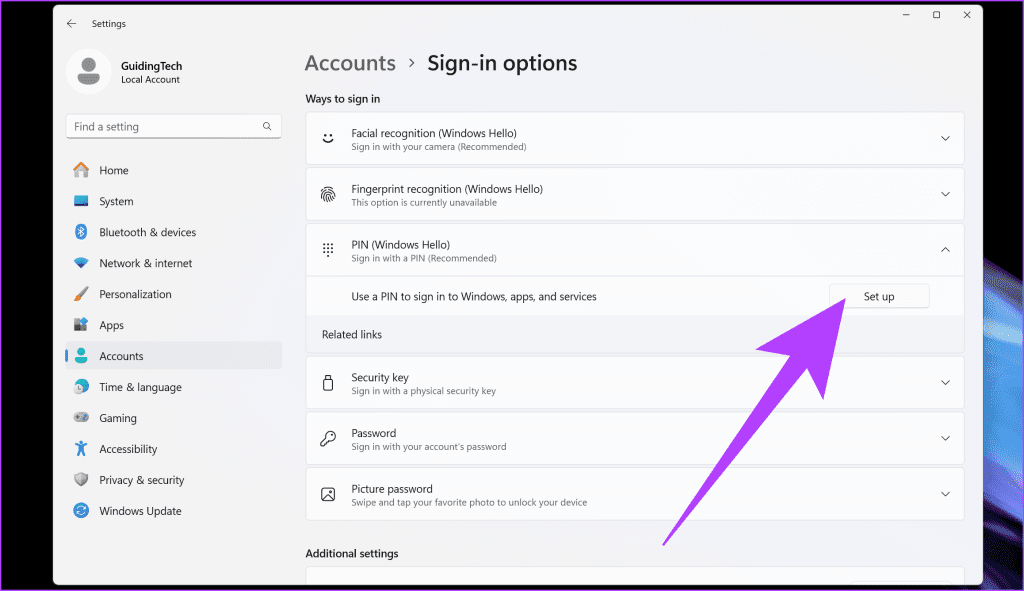
Step 2: Now, under the PIN option, click on ‘Set up’.
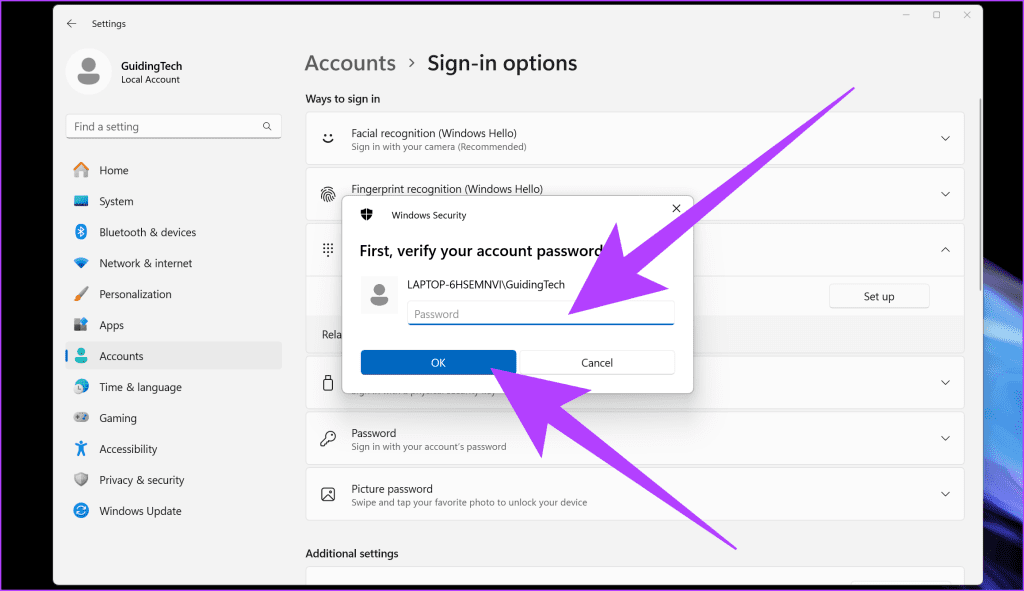
Step 3: You will first have to verify your account password. For that, simply enter your password in the Password field and click OK.
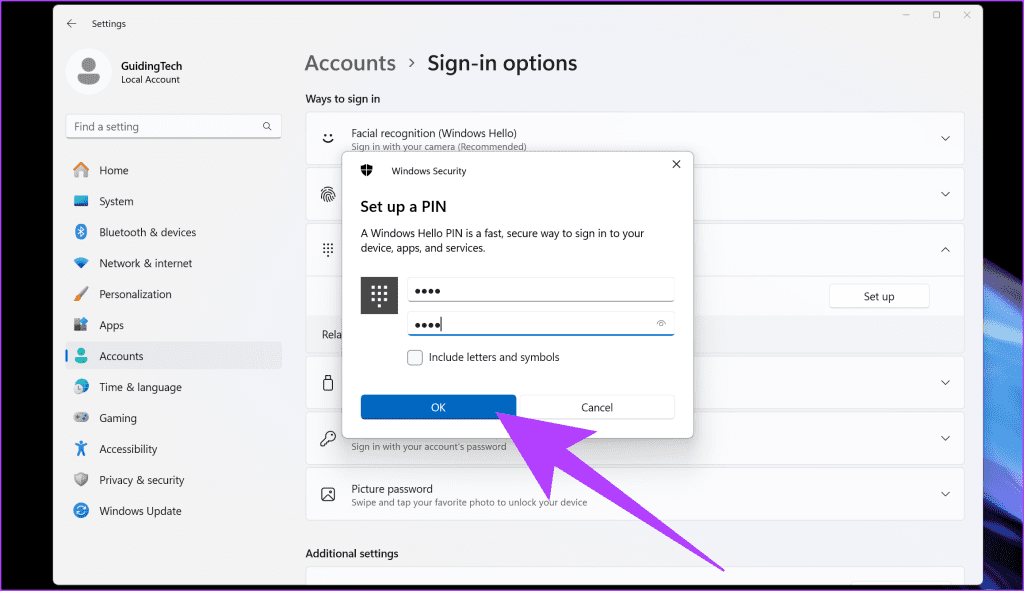
Step 4: Now, you can enter and confirm your desired PIN. Remember, choose a strong PIN that’s not easily guessable. Once done, click on OK.
That’s it. Once your PIN is set, you should get a window like this, giving you the option to either change your PIN or remove it.

This also means that you’re now ready to set up Windows Hello on your Windows PC.
How to Set up Windows Hello on Windows 11 (Face/Fingerprint)
Now, let’s dive into the core of Windows Hello – biometric authentication. The specific steps may vary depending on your hardware, but the general process remains the same. However, each method requires dedicated hardware. For instance, for facial unlock, you’ll require a Windows Hello-compatible webcam connected to your PC. Alternatively, if you wish to opt for fingerprint unlocking, your device should either have a built-in fingerprint scanner, or you can use a Windows Hello USB fingerprint reader. Once you’ve got the appropriate hardware as per your choice, here’s how to go about it.
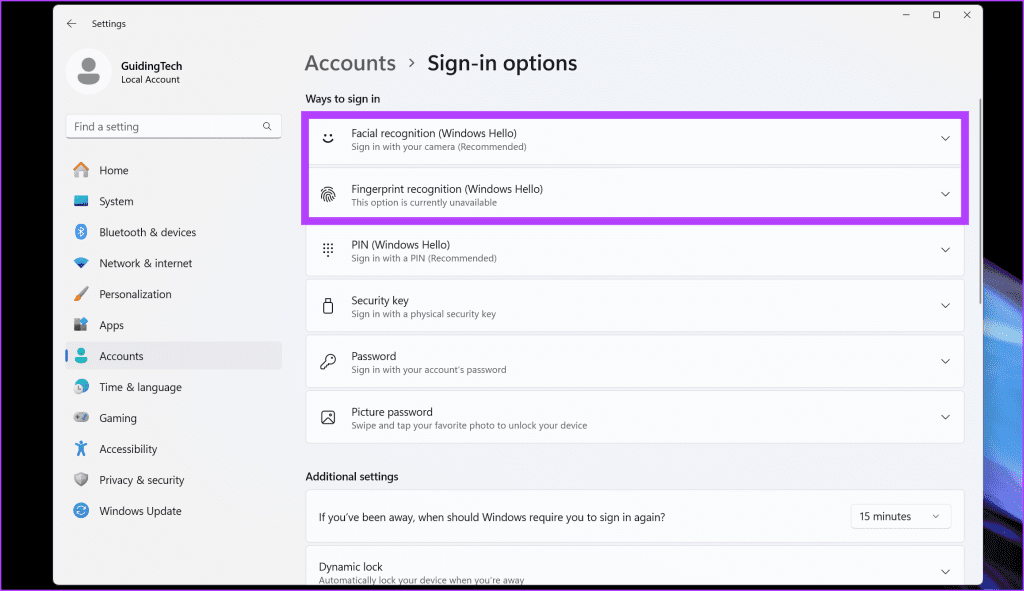
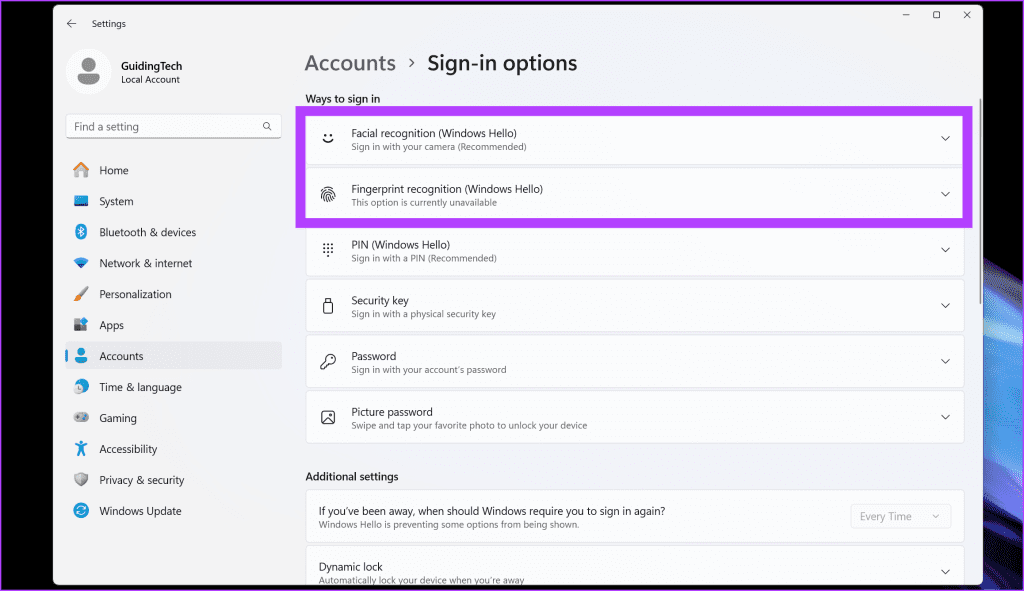
Step 1: Once again, navigate to Settings > Accounts > Sign-in options. Here, choose from either ‘Facial recognition (Windows Hello)’ or ‘Fingerprint recognition (Windows Hello)’ depending on your preferred method.
Step 2: In the drop-down screen, select ‘Set up’.

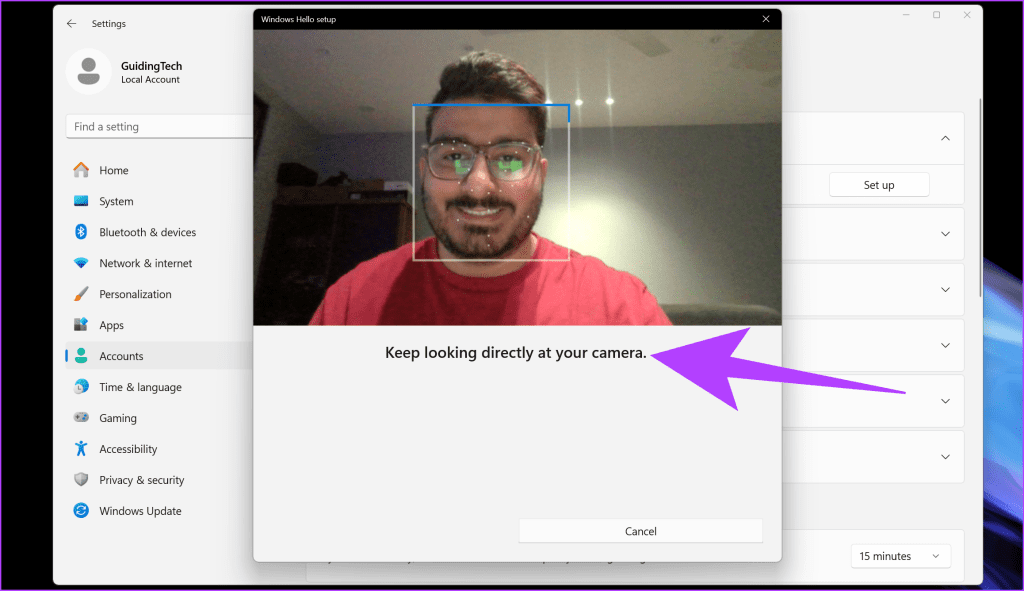
Step 3: Now, just follow the on-screen instructions. For facial unlock, you will be required to position your face in front of the camera.
Alternatively, for fingerprint unlocking, you will be required to place your thumb on the scanner multiple times.
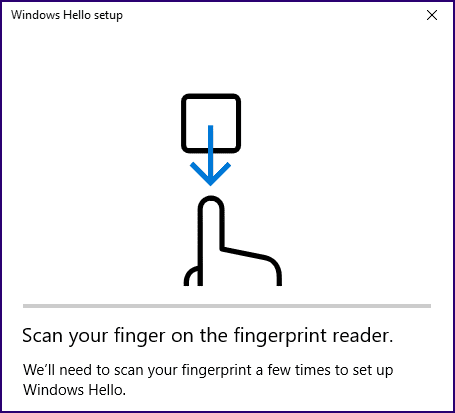
Once the setup is complete, you can test Windows Hello by locking your device and attempting to log in using your face or fingerprint.
How to Disable Windows Hello
While Windows Hello offers numerous advantages, some users may prefer traditional password logins. Should the need arise to disable Windows Hello, simply follow these steps.
Step 1: Head over to Settings > Accounts > Sign-in options. Now, click on the Windows Hello method you wish to disable (Facial recognition or Fingerprint recognition).
Step 2: There should be an option for ‘Remove this sign-in option’. Click on the Remove button next to it.

And that’s it. You might have to enter your PIN or password to confirm. Once done, Windows Hello should be disabled on your Windows 10 or 11 PC.
Don’t Struggle To Remember Passwords
Using facial recognition as a password isn’t a new thing. However, with Windows Hello, Microsoft helps you log into your PC with ease. Enjoy the convenience and enhanced security that biometric authentication brings to your daily computing experience. Not only is it easier to use, but it also promotes added security while also boosting your overall productivity. Cheers to a more secure and seamless computing experience with Windows Hello.
Was this helpful?
Last updated on 29 December, 2023
Read Next
 How to Turn off Windows Hello PIN and Setup Prompt Notification
To simplify the login process on Windows 10 computers, Microsoft came up with the Windows Hello sign-in.
How to Turn off Windows Hello PIN and Setup Prompt Notification
To simplify the login process on Windows 10 computers, Microsoft came up with the Windows Hello sign-in.
 11 Fixes for Windows Hello Fingerprint Option Unavailable or Not Working
The Windows Hello feature is quite useful to quickly unlock your device or use it to authenticate your account across various services.
11 Fixes for Windows Hello Fingerprint Option Unavailable or Not Working
The Windows Hello feature is quite useful to quickly unlock your device or use it to authenticate your account across various services.
 How to Turn Off Windows Hello for Google Chrome Passwords
Do you use Windows Hello to log in to your computer and Google Chrome to save your passwords?
How to Turn Off Windows Hello for Google Chrome Passwords
Do you use Windows Hello to log in to your computer and Google Chrome to save your passwords?
 Top 6 Fixes for Windows Hello Something Went Wrong Error
Is Windows Hello repeatedly displaying the 'Something went wrong' error during the setup or configuration of your PIN, fingerprint, or facial recognition?
Top 6 Fixes for Windows Hello Something Went Wrong Error
Is Windows Hello repeatedly displaying the 'Something went wrong' error during the setup or configuration of your PIN, fingerprint, or facial recognition?
 5 Best Windows Hello USB Fingerprint Readers for Your PC
A Windows Hello USB fingerprint reader can make the mundane task of logging in to your Windows PC an easy and convenient affair.
5 Best Windows Hello USB Fingerprint Readers for Your PC
A Windows Hello USB fingerprint reader can make the mundane task of logging in to your Windows PC an easy and convenient affair.
 6 Best Windows Hello Webcams for Face Recognition on Your PC
Entering a long password to log in to your PC can be cumbersome.
6 Best Windows Hello Webcams for Face Recognition on Your PC
Entering a long password to log in to your PC can be cumbersome.
 3 Ways to Delete Old Windows Update Files From Windows 10 and Windows 11
Method 1: Delete Old Windows Update Files via the Settings App The Storage section of the Settings app provides a detailed breakdown of all temporary files on your PC, including
3 Ways to Delete Old Windows Update Files From Windows 10 and Windows 11
Method 1: Delete Old Windows Update Files via the Settings App The Storage section of the Settings app provides a detailed breakdown of all temporary files on your PC, including
 Top 5 Ways to Fix Firefox Not Opening on Windows 10 and Windows 11
Firefox is one of the popular web browsers that's privacy-centric browsers.
Top 5 Ways to Fix Firefox Not Opening on Windows 10 and Windows 11
Firefox is one of the popular web browsers that's privacy-centric browsers.
The article above may contain affiliate links which help support Guiding Tech. The content remains unbiased and authentic and will never affect our editorial integrity.
