If you use both a Windows PC and a Mac, you might be spending quite some time fumbling around with flash drives to transfer data between them. The folks who prefer instant access and availability can resort to cloud storage services to transfer files and folders. But you’d be surprised to know that Windows and macOS also packs theability to share folders seamlessly over local networks. Thankfully, it’s not that hard to set up.
For example, you can set up local folder sharing on Windows and use your Mac to access shared files and folders easily. Or, you can do the opposite and use your PC to access the contents on your Mac. So, let’s check out how you can set up a native local folder for sharing files between a Windows PC and a Mac.
Note: Before you proceed with the instructions below, you should cross-check to confirm that your PC and Mac are connected to the same local network.
Share and Access Windows Folders on Mac
To set up folder sharing on Windows, you must turn on Network Discovery on your PC and specify the folders you want to share. You can then connect to your PC with your Mac using Finder. You can find the entire process laid out in the two sections below.
PC – Set Up Local Folder Sharing
Step 1: Open the Notification Center and select All Settings.

Step 2: Click the option labeled Network & Internet.

Step 3: Select the Wi-Fi or Ethernet side-tabs.
Step 4: Select Change Advanced Sharing Options under the Related Settings section.

Step 5: Expand Private. Then, select the radio button next to Turn on Network Discovery. Follow by checking the box next to ‘Turn on automatic setup of network connected devices.’
Additionally, enable the radio button next to ‘Turn on file and printer sharing.’

Note: If the options above were already selected, simply exit the Advanced Sharing Settings screen.
Step 6: Select Save Changes.
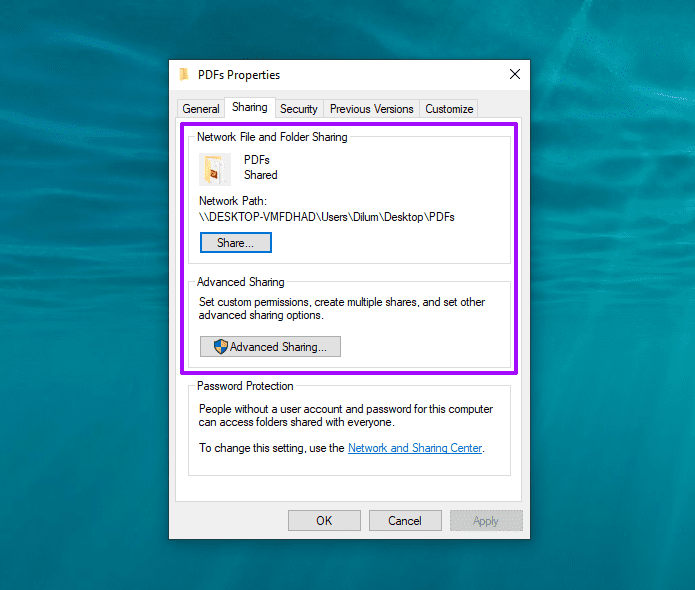
Step 7: Right-click a folder that you want to share and select Properties.
Step 8: Switch to the Sharing tab. Then, click the Share button, and then select Share to share the folder right away.
Or, select the Advanced Sharing button to determine the exact Share permissions (Full Control, Change, or Read) that you want to provide.
Step 9: Exit the Properties screen and repeat for any other folders that you want to Share.
How to Access Windows Shared Folders Sharing on Mac
Assuming you’ve setup local folders correctly on Windows, and your Mac is on the same network, here’s how you can access the shared folders.
Step 1: Open Finder.
Step 2: Open the Go menu and select Connect to Server.
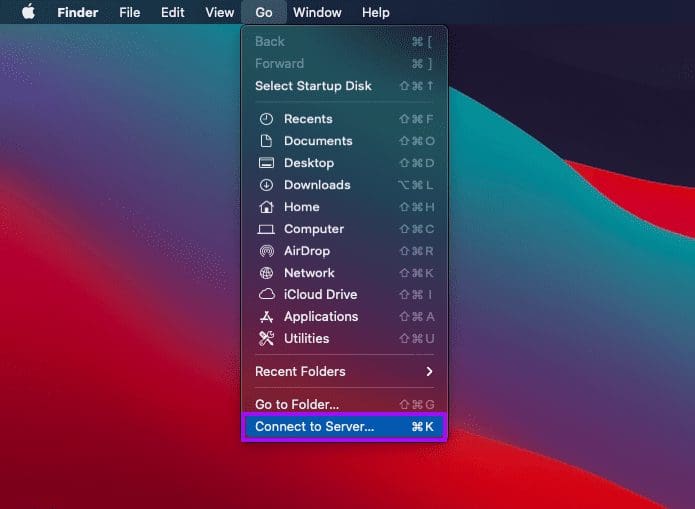
Step 3: Type smb:// followed by the name of your PC.
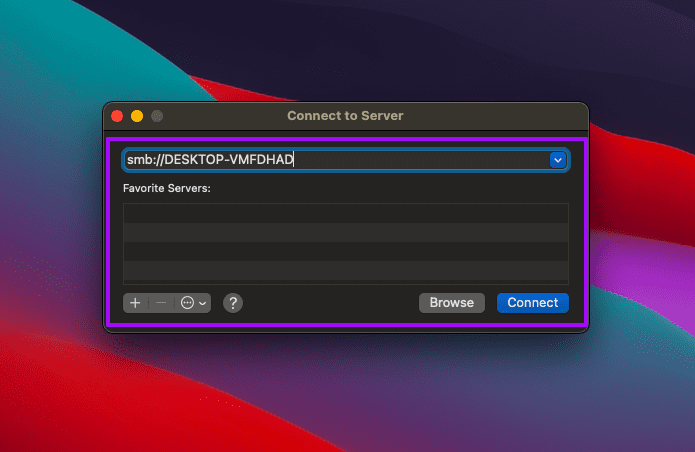
Note: If you don’t know the name of your PC, go to Start > Settings > System > About. You should then see it listed next to Device Name.
Step 4: Insert your Windows username and password to connect to your computer.

Note: If your Mac fails to detect your PC, make sure to connect both devices to the same network and are entering correct credentials of your Windows PC.
Step 5: Select your PC from the Finder sidebar to access your shared Windows folders.
Share Mac Folders on Windows
Your Mac allows you to set up folder sharing and configure the various files and folders that you can share (including the folder permissions) via the Sharing pane in System Preferences. You can then use File Explorer on your PC to access the shared items.
Set Up Local Folder Sharing on Mac
Just like Windows, the macOS allows you to set up local folder sharing with the connected computers on the same network.,
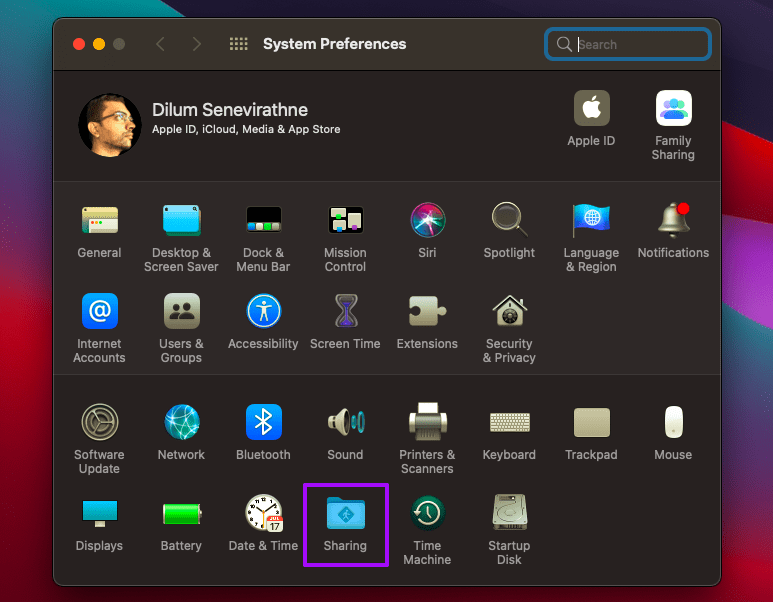
Step 1: Open the Apple menu and select System Preferences.
Step 2: Click the icon labeled Sharing.
Step 3: Check the box next to File Sharing and click the button labeled Options.
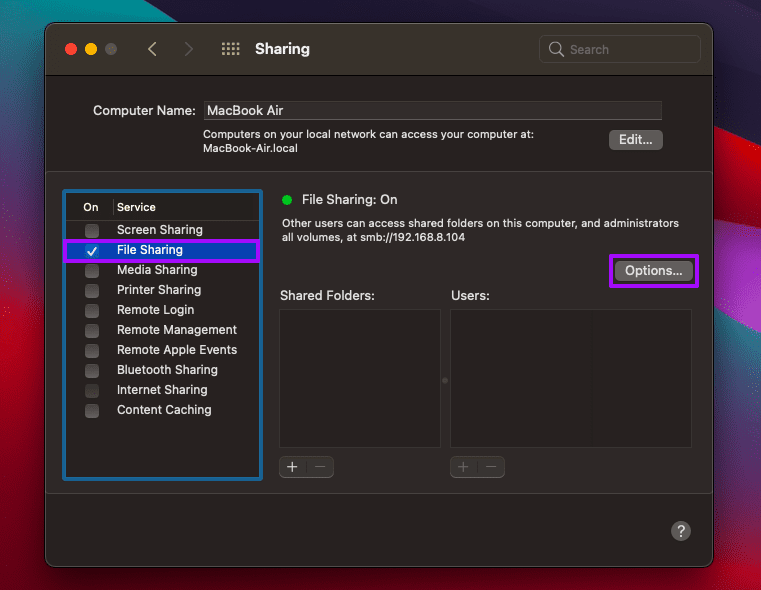
Step 4: Check the box next to ‘Share files and folders using SMB’ and select your account. Then, select Done.

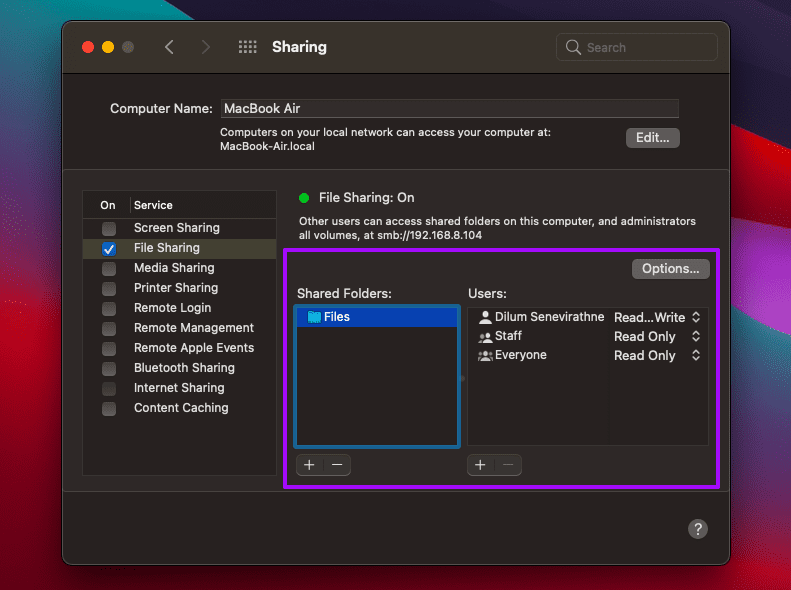
Step 5: Select the + sign underneath the Shared Folders section to add a folder that you want to share. Don’t forget to tweak the folder permissions under the Users section. Repeat for any other folders that you want to share.
Step 6: Exit the Sharing pane.
How to Access Mac’s Shared Folders on Windows
Now let’s check how you can access those Shared folders that you just setup on the Mac from your Windows PC.
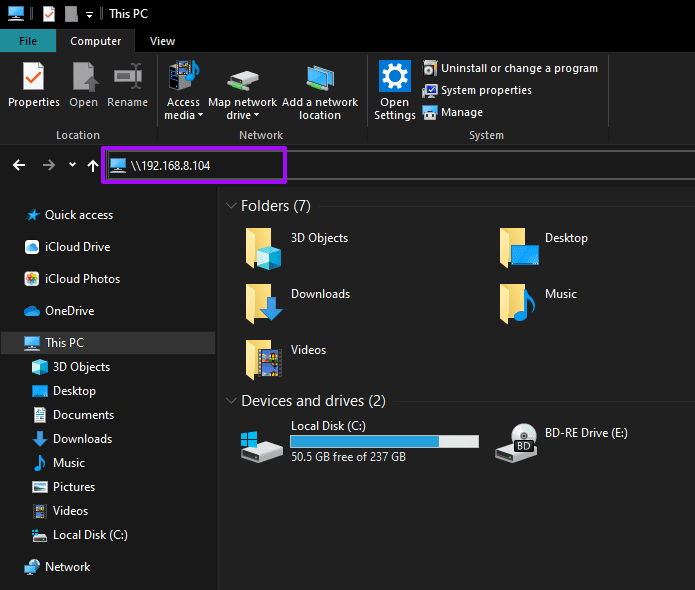
Step 1: Open File Explorer.
Step 2: Type \\ into the File Explorer address bar. Then, follow by typing the IP address of your Mac. If you don’t know the IP address, you find that on the Sharing pane on your Mac.
Note: If your Mac fails to detect your PC, make sure to connect them to the same local network.
Step 3: Enter your Mac’s user credentials to access your folders.

Step 4: View them subsequently by selecting your Mac from the File Explorer side-bar.
Start Sharing Seamlessly
Once you’ve set up local folder sharing on your Windows and Mac, it’s incredibly easy to access your files as long as both devices are connected on the same network. Of course, the quality of data transfer and the speeds will entirely depend on a couple of factors such as the size of the file, network speed, and so on. Your usual images and documents may not take too long, but if you are transferring large multimedia files, do expect some delay.
To prevent bad actors from accessing your data without your permission, you must only use this functionality on private networks that you absolutely trust. If you have any doubts, consider using alternative file sharing methods instead.
Next up: Want to transfer files from your iPhone to PC? Check these 5 best apps for transferring files from iOS to your Windows-based computer.
Was this helpful?
Last updated on 13 July, 2021
Read Next
 What’s the Difference Between Album and Folder in Photos
You may have seen the terms albums and folders in Google Photos and Apple Photos.
What’s the Difference Between Album and Folder in Photos
You may have seen the terms albums and folders in Google Photos and Apple Photos.
 Top 5 Ways to Fix the Local Device Name Is Already in Use Error on Windows 10
Windows lets you map network drives to skip typing the address every time you want to use them.
Top 5 Ways to Fix the Local Device Name Is Already in Use Error on Windows 10
Windows lets you map network drives to skip typing the address every time you want to use them.
 Top 2 Ways to Reset Local Group Policy Settings on Windows 11
The Group Policy Editor is a useful tool for making system-wide changes on PCs running Windows 11 Professional, Enterprise, and Education editions.
Top 2 Ways to Reset Local Group Policy Settings on Windows 11
The Group Policy Editor is a useful tool for making system-wide changes on PCs running Windows 11 Professional, Enterprise, and Education editions.
 8 Ways to Open Local Security Policy in Windows 10 and 11
As a Windows user, you may have encountered a situation where you needed to change your system's security settings.
8 Ways to Open Local Security Policy in Windows 10 and 11
As a Windows user, you may have encountered a situation where you needed to change your system's security settings.
 Top 4 Ways to Back Up the Local Group Policy Editor on Windows 11
On Windows 11 computer, the Local Group Policy allows you to make specific settings configurations for users and computers.
Top 4 Ways to Back Up the Local Group Policy Editor on Windows 11
On Windows 11 computer, the Local Group Policy allows you to make specific settings configurations for users and computers.
 6 Best Fixes for Apple Music Playlists Not Syncing Between Mac and iPhone
Apple Music allows you to create a playlist of your favorite songs.
6 Best Fixes for Apple Music Playlists Not Syncing Between Mac and iPhone
Apple Music allows you to create a playlist of your favorite songs.
 9 Best Fixes for Voice Memos Not Syncing Between iPhone and Mac
You can record voice memos on your iPhone for taking down notes, adding a quick voiceover for your presentation, or sending any instructions to your contact.
9 Best Fixes for Voice Memos Not Syncing Between iPhone and Mac
You can record voice memos on your iPhone for taking down notes, adding a quick voiceover for your presentation, or sending any instructions to your contact.
The article above may contain affiliate links which help support Guiding Tech. The content remains unbiased and authentic and will never affect our editorial integrity.
