Have you ever wished for an easier way to manage your emails and ensure they get sent at the most opportune time? If so, you are in the right place. In this article, we’ll guide you on how to schedule emails in Outlook, allowing you to be more efficient and organized in your communication.

Now, why would you want to schedule emails in Outlook? The answer is quite straightforward – life can get busy, and sometimes, sending emails exactly when you want them to reach your recipients is challenging. Scheduling emails enables you to plan and ensure the delivery of your messages at the most appropriate times. With this understanding, let’s begin with the article.
How to Schedule Emails in Outlook on Web
Scheduling emails in Outlook is pretty simple and easy to execute. Follow the below steps.
Step 1: Firstly, open Outlook on the web or desktop on your Windows or Mac computer and log in to your account.
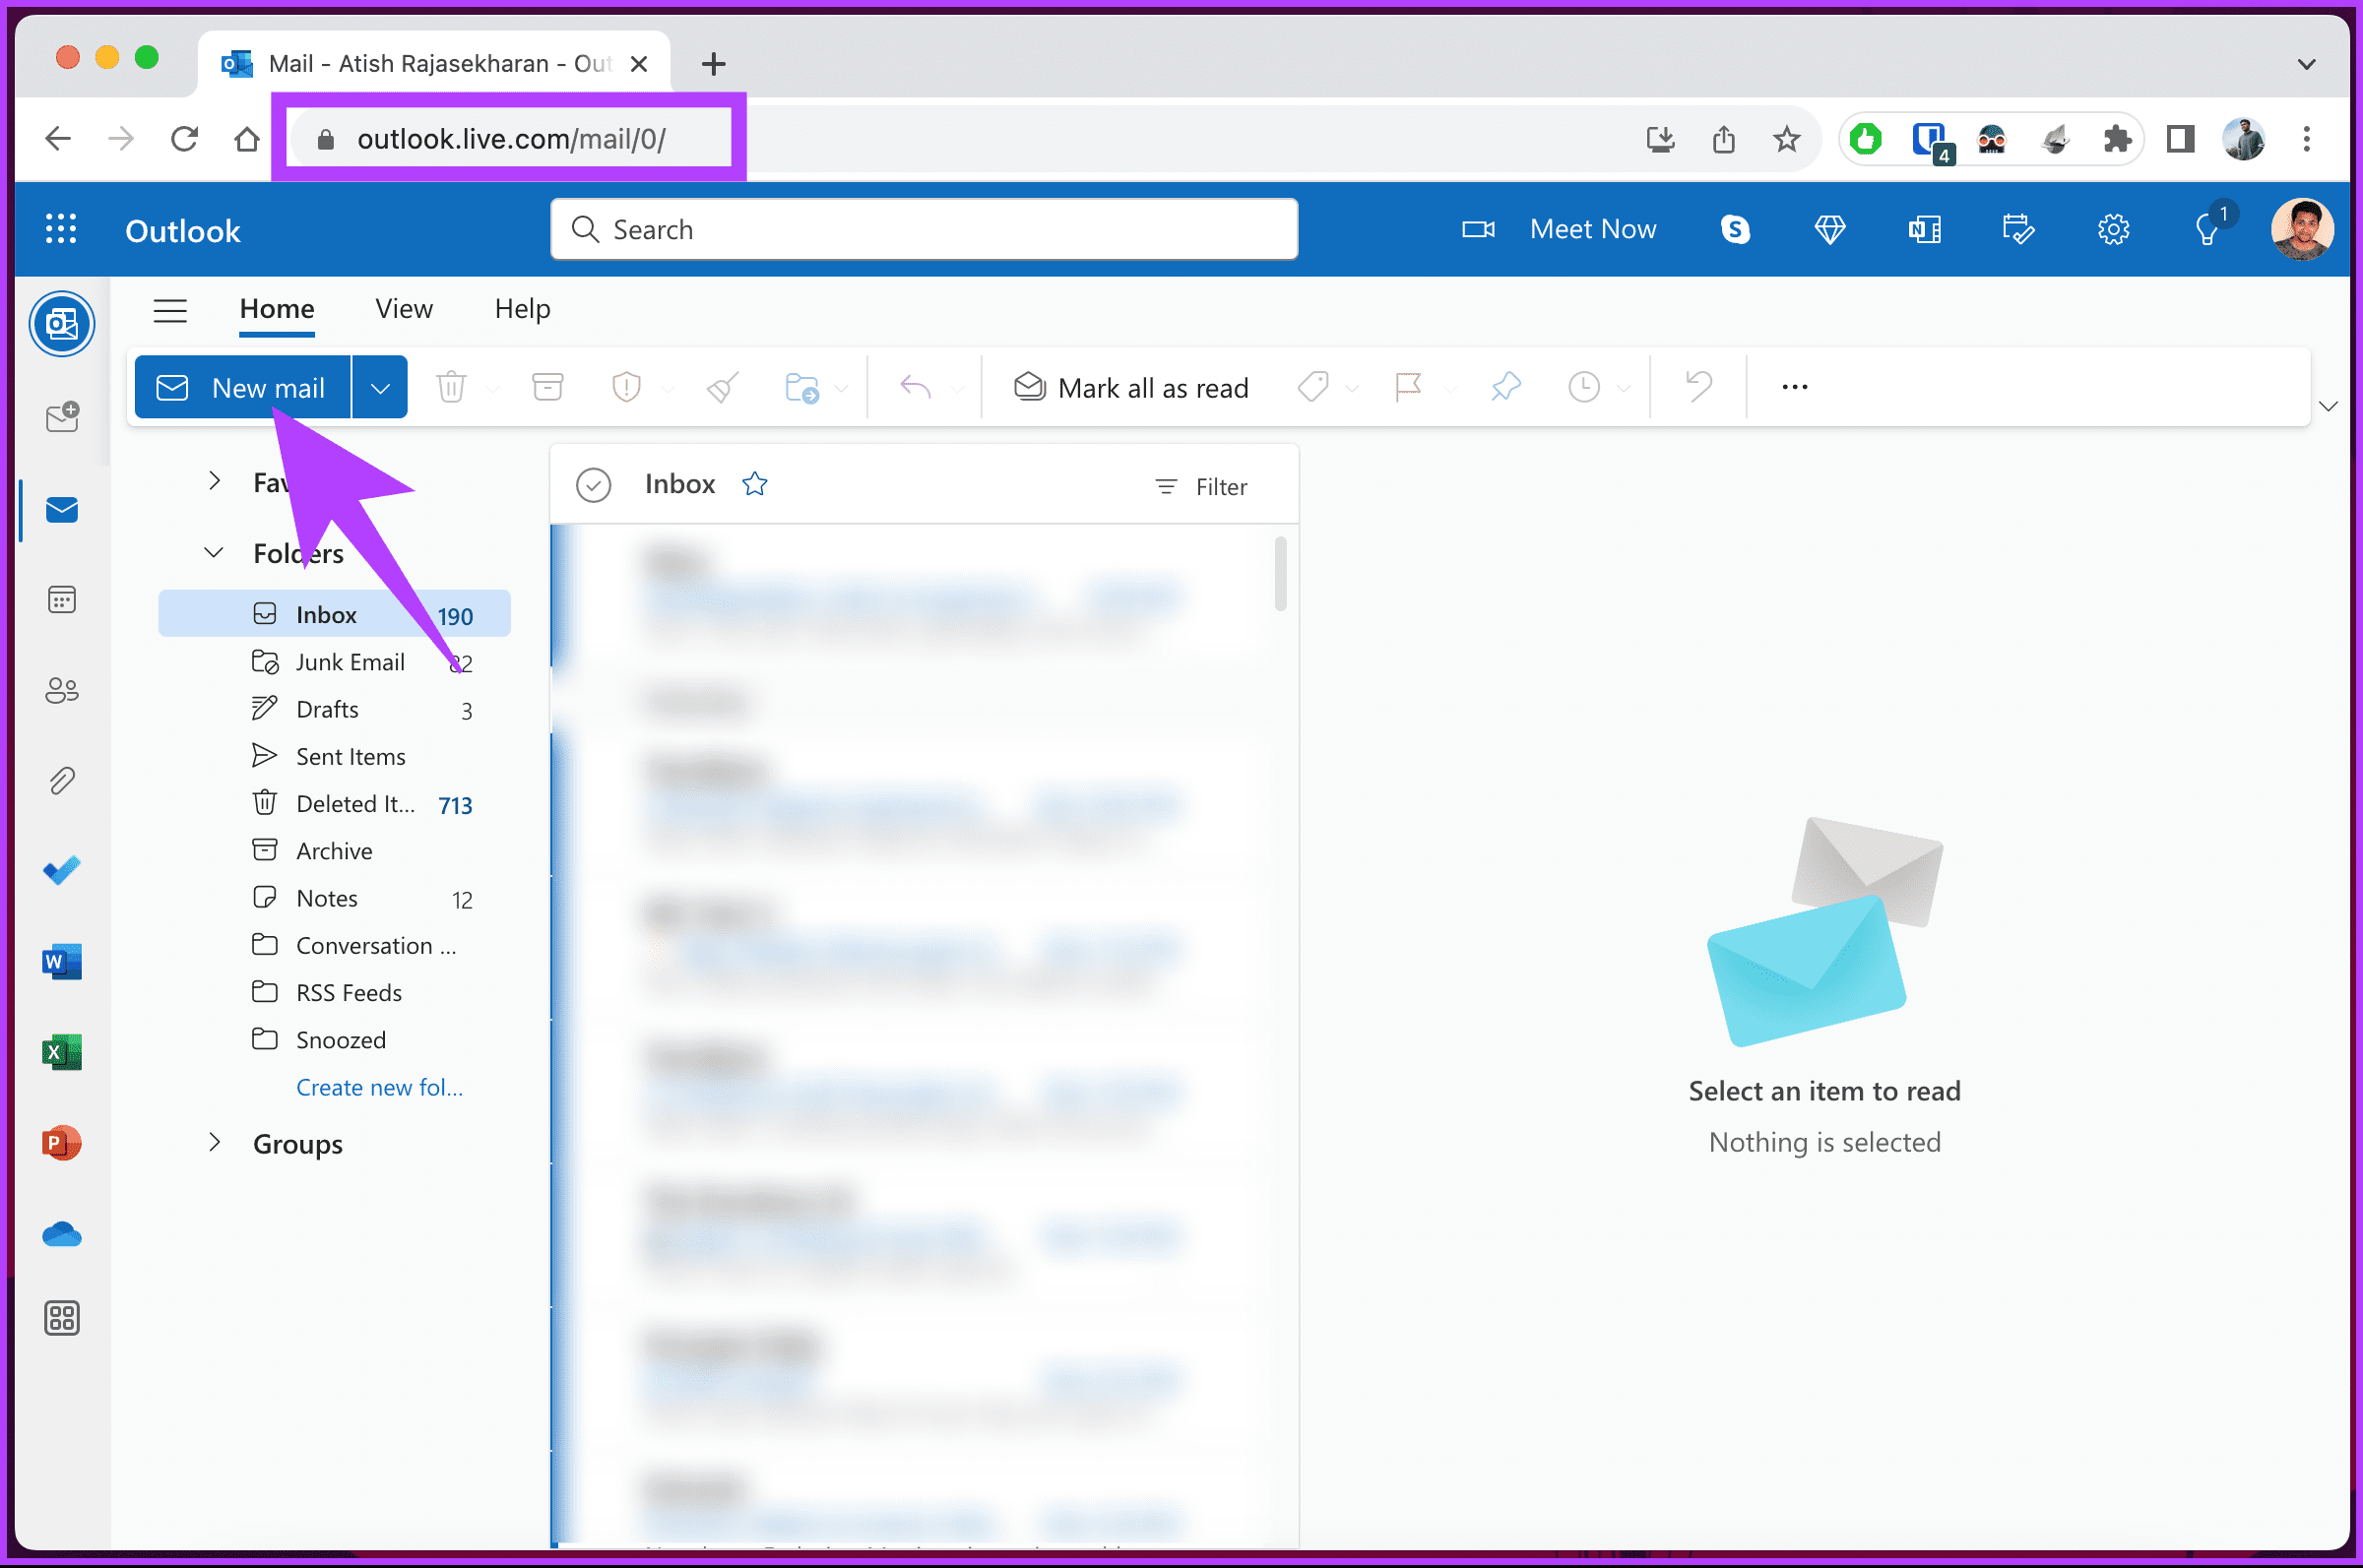
Step 2: Click on the New message button in the top left corner of the screen to compose a new email.
Note: If it’s an email thread you want to schedule mail to, you can click the Reply button and continue with the steps below.
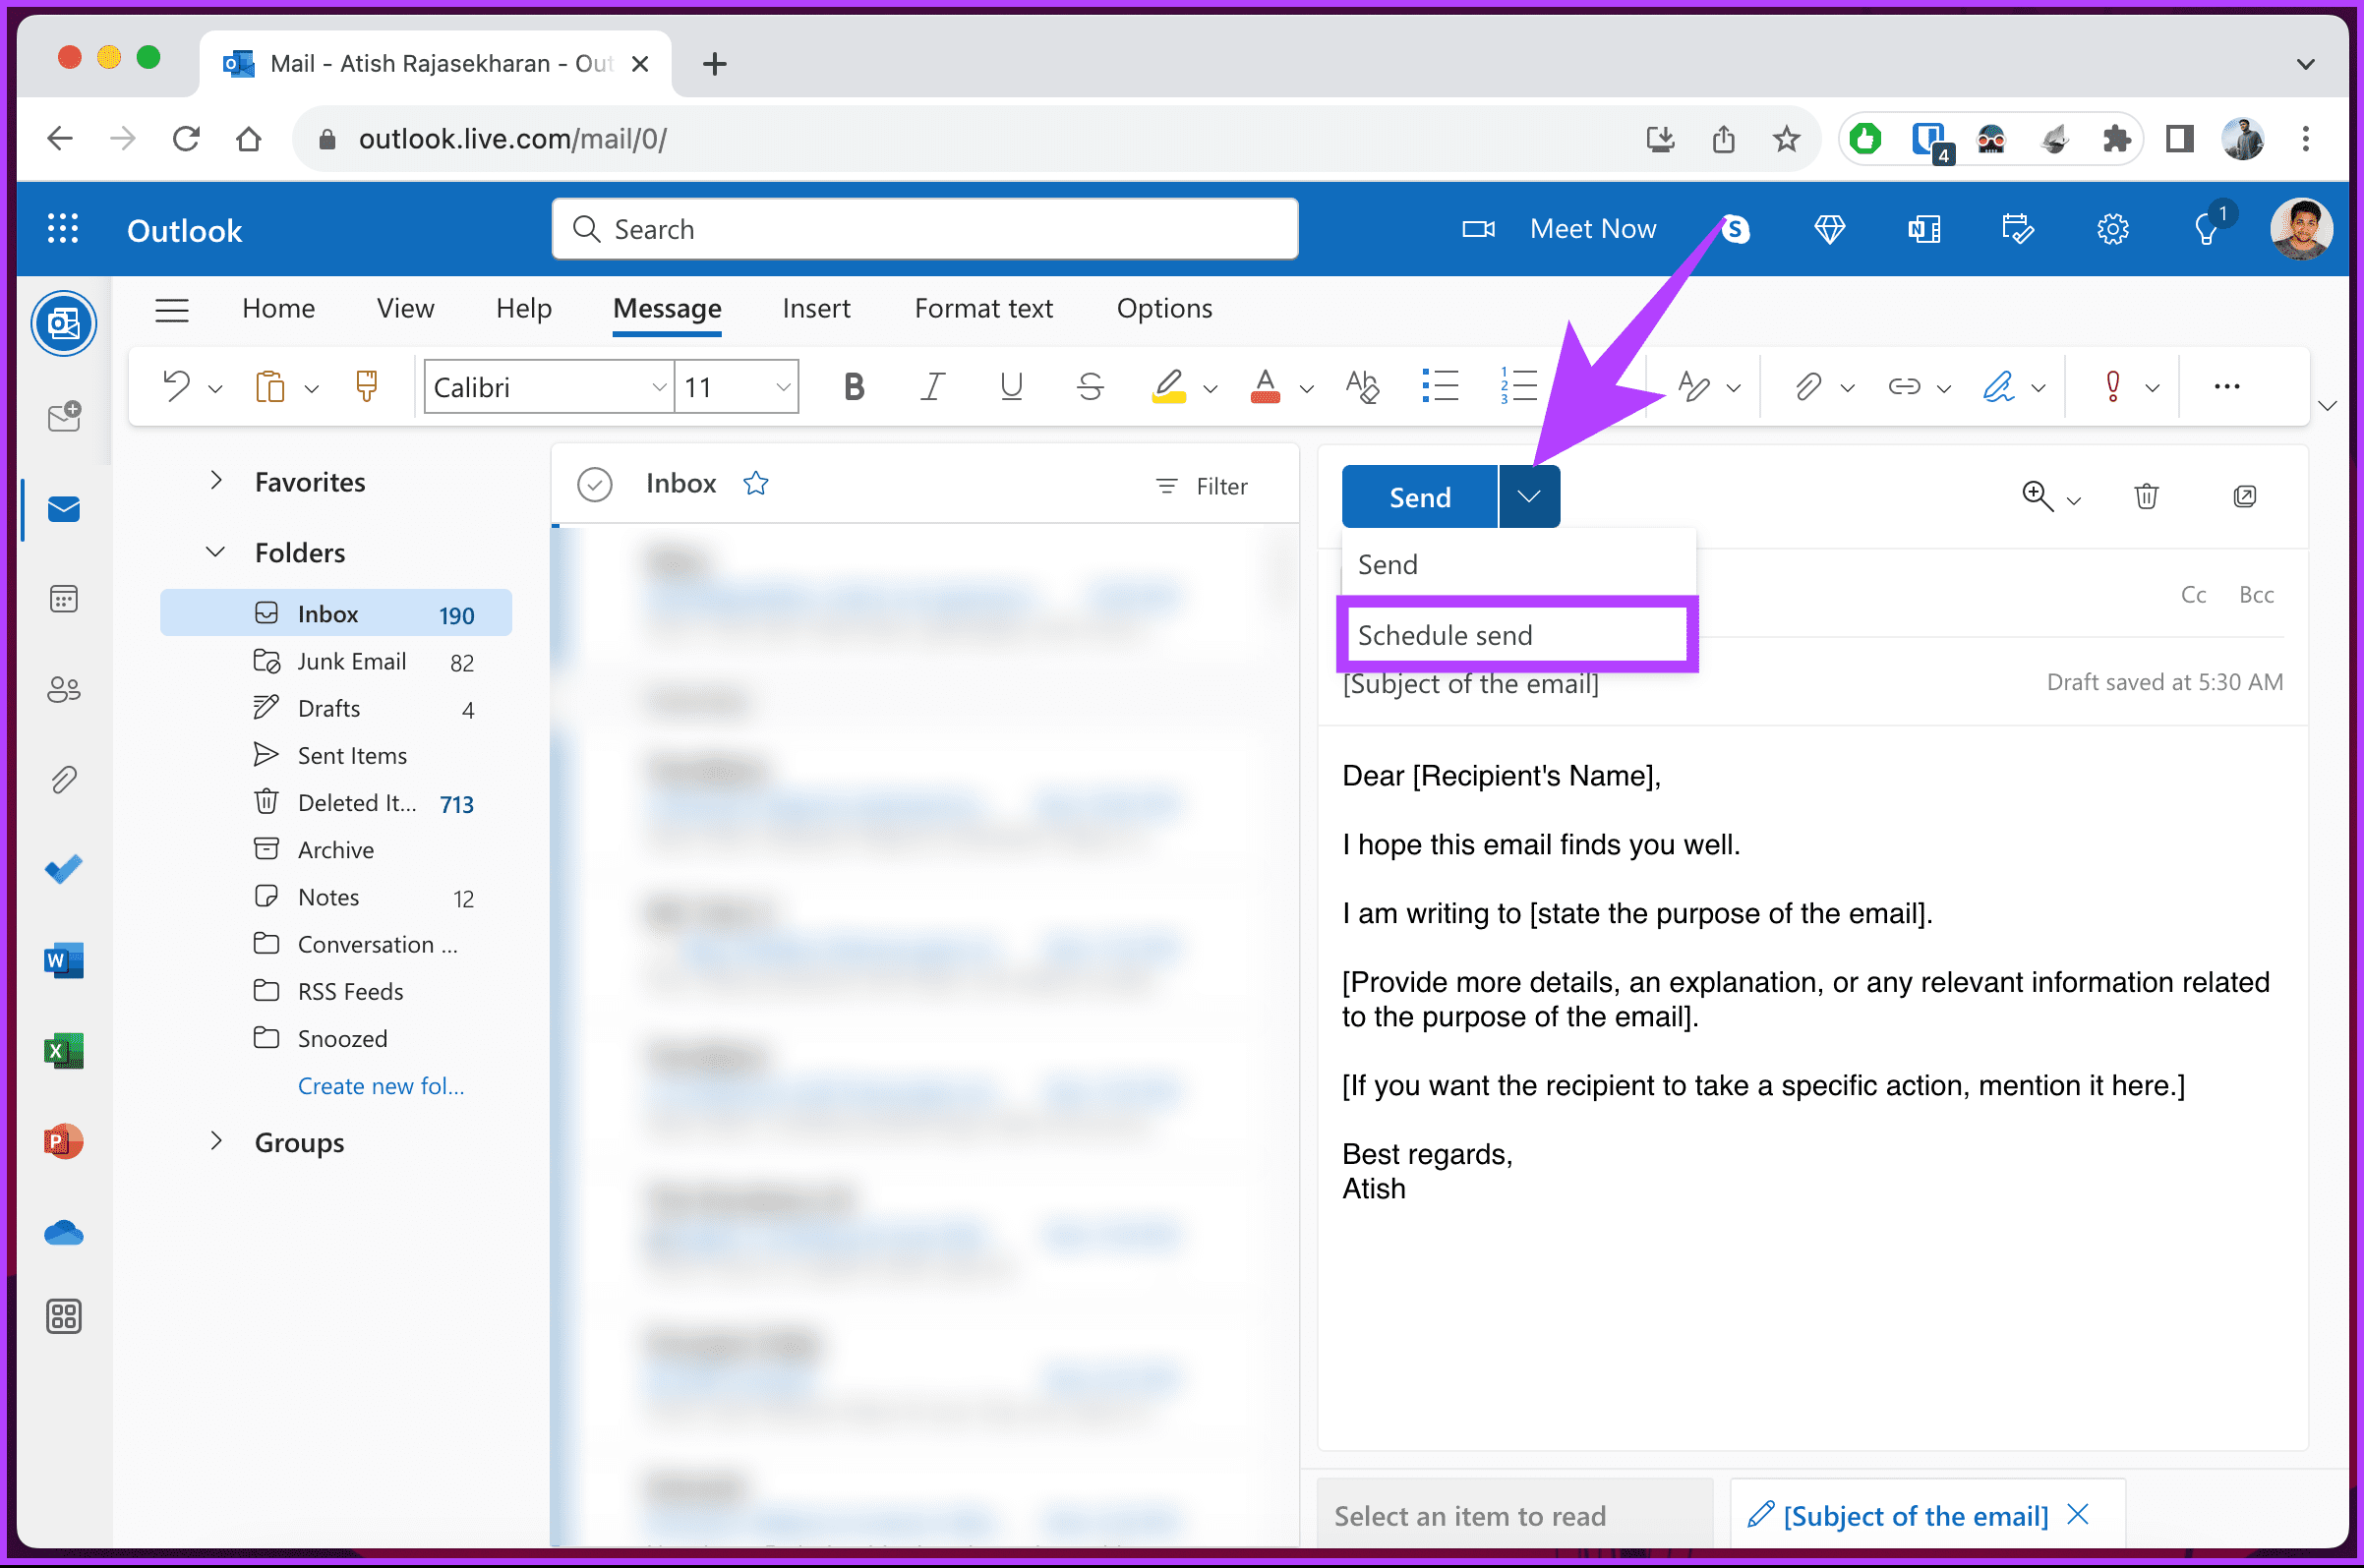
Step 3: Write an email as you would typically do. After completing the write-up and adding the documents, click on the chevron (arrow) icon next to the Send button to reveal the menu with the Send later option. Select it.
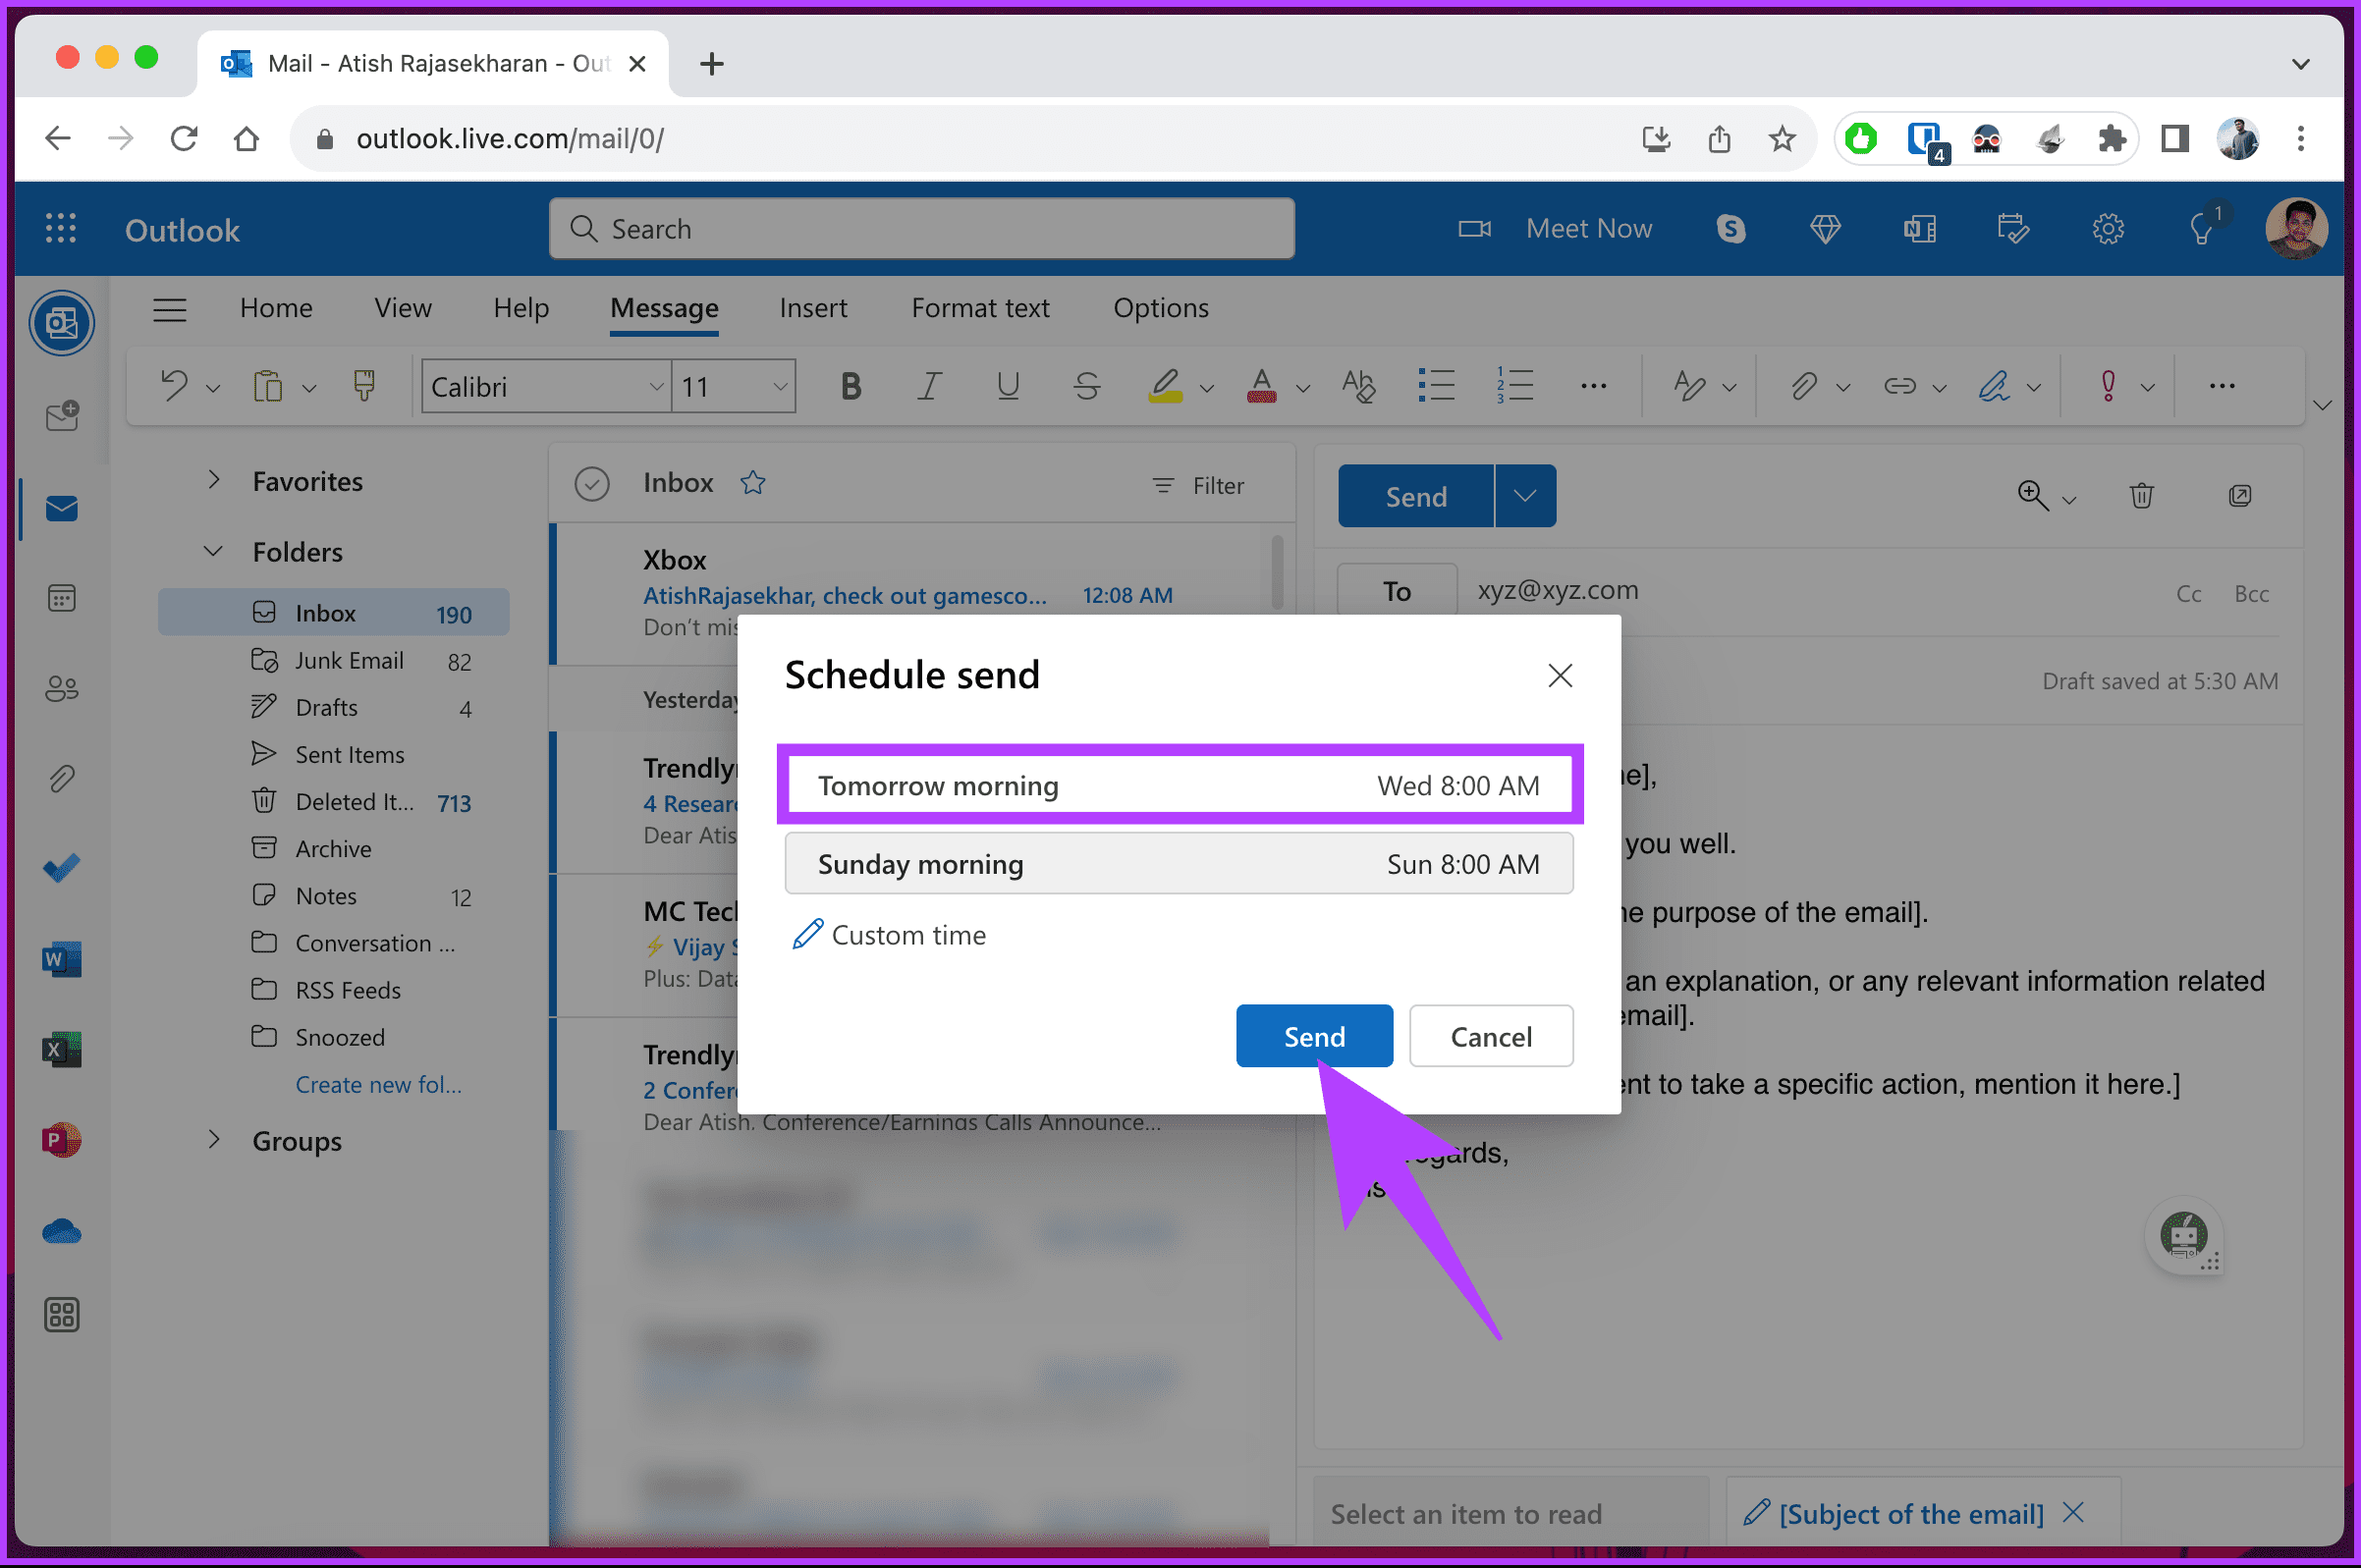
Step 4: In the ‘Set date and time’ pop-up, choose the date and time you want this email sent. Finally, click Send to save changes.
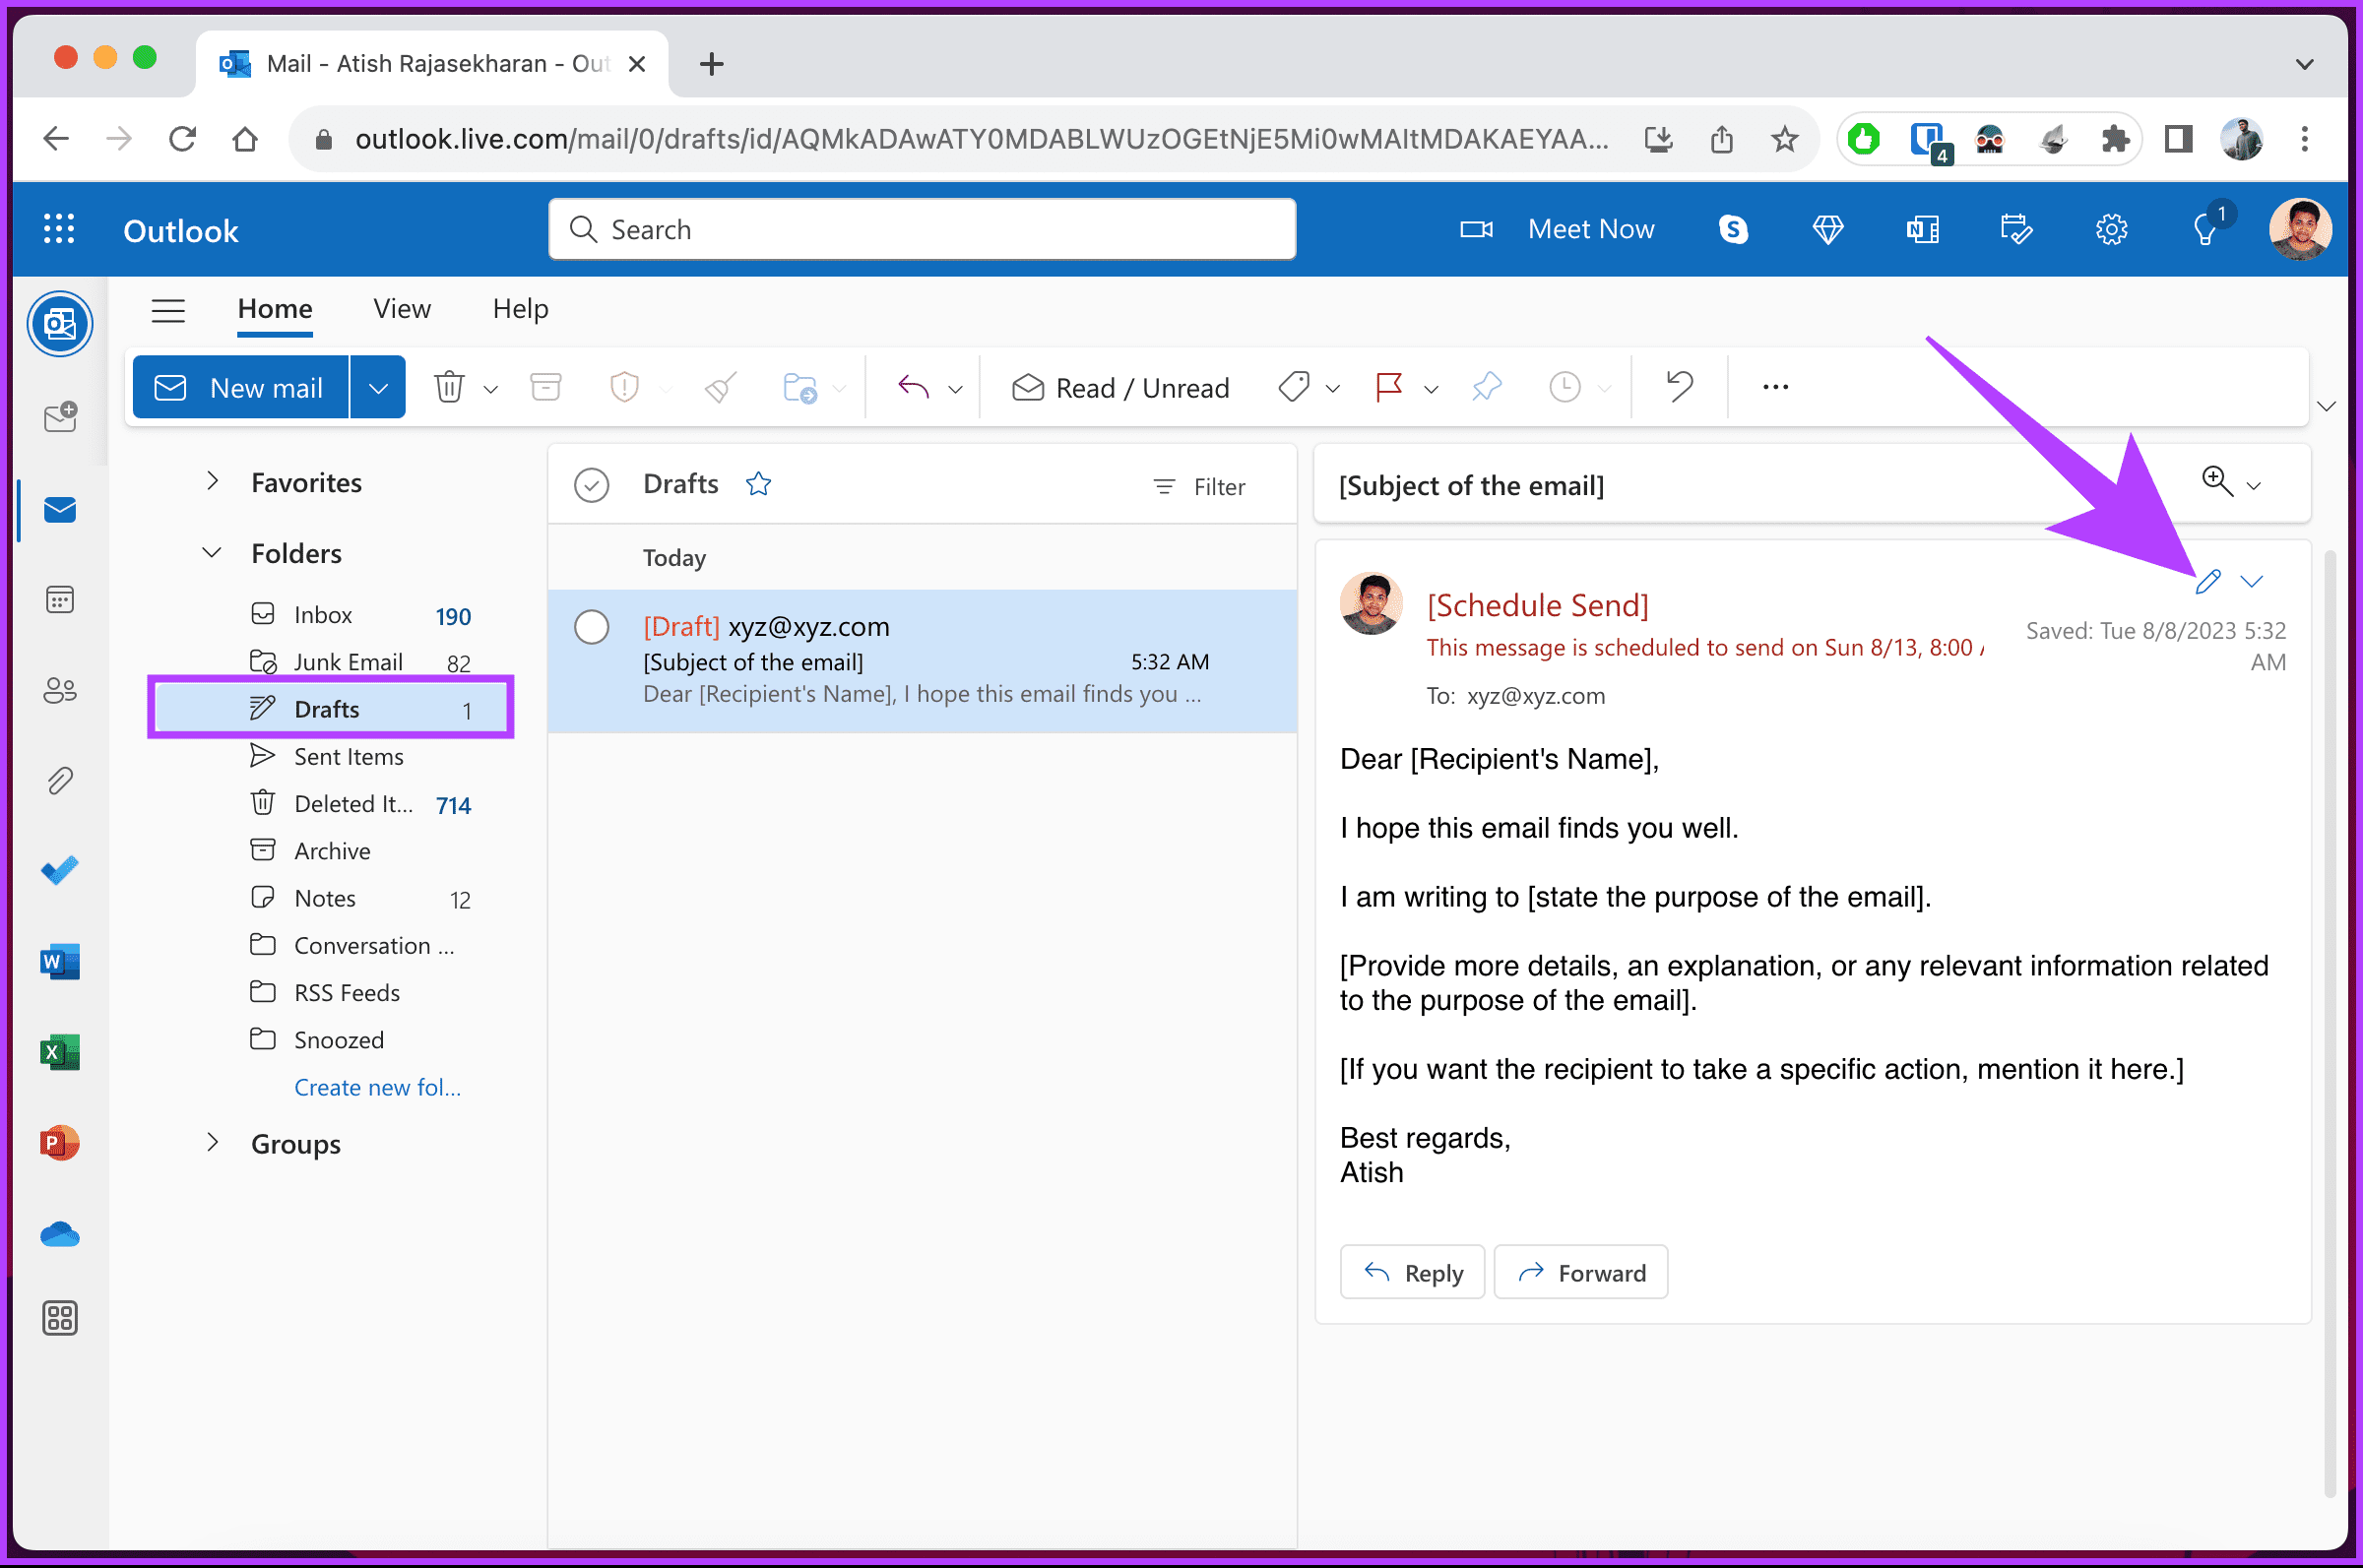
You have successfully scheduled your mail in Outlook. If you change your mind, want to edit the email, or change the scheduling time, continue with the steps below.
Step 5: Navigate to the Drafts folder in the left sidebar.
Step 6: Click the pencil icon to edit the email and reschedule or send it immediately.
Note: Alternatively, click the Cancel Send option to cancel the scheduled email in Outlook.
That’s it. You have learned to edit and schedule emails in Outlook. It is important to note that the steps are the same for Outlook web and new desktop apps (Windows or Mac). However, if you are on an older version of the Outlook desktop app or don’t want to ‘Try the new Outlook,’ the steps may slightly differ; continue reading.
Also Read: How to add images to Outlook email and email Body on mobile and desktop
How to Schedule Emails in Outlook Desktop App
If you are on the older version of the Outlook desktop app, you need to know that Microsoft calls the Send later feature as Delay Delivery. Follow the instructions below.
Tip: If you operate Outlook on multiple devices, trying the new Outlook on one device doesn’t sync up with the other. You will need to change it individually.
Step 1: Open the Outlook desktop app on your Windows or Mac computer.
Step 2: Click on the New Email button in the top left corner of the toolbar.
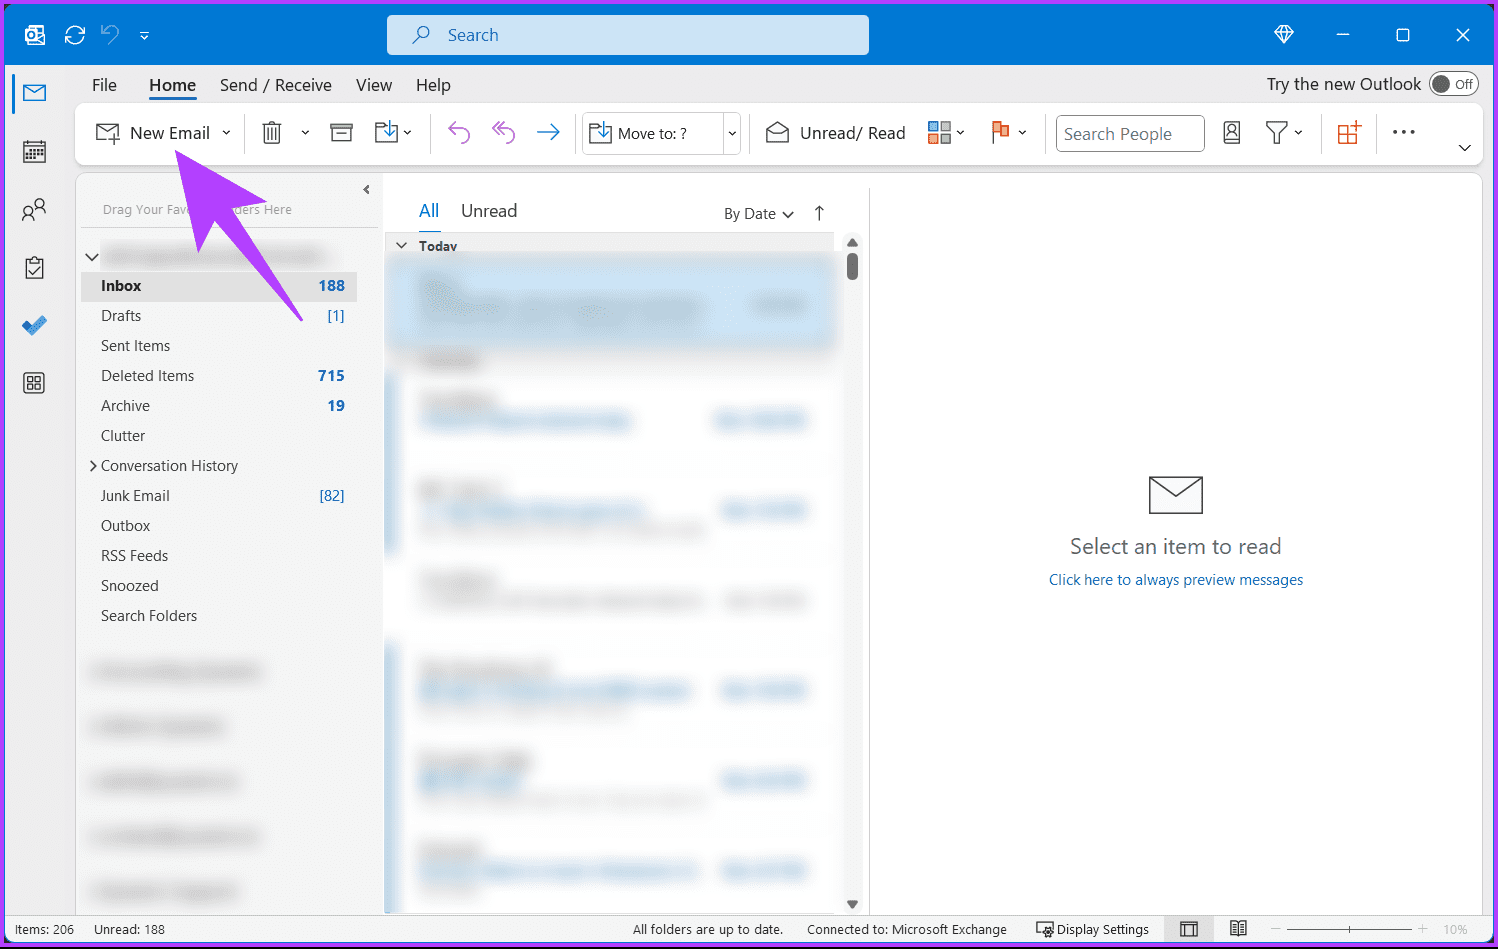
Step 3: Compose the email as you desire. Once completed, click the Options menu in the toolbar.

Step 4: Click the three-dot menu and select the Delay Delivery option from the drop-down menu.
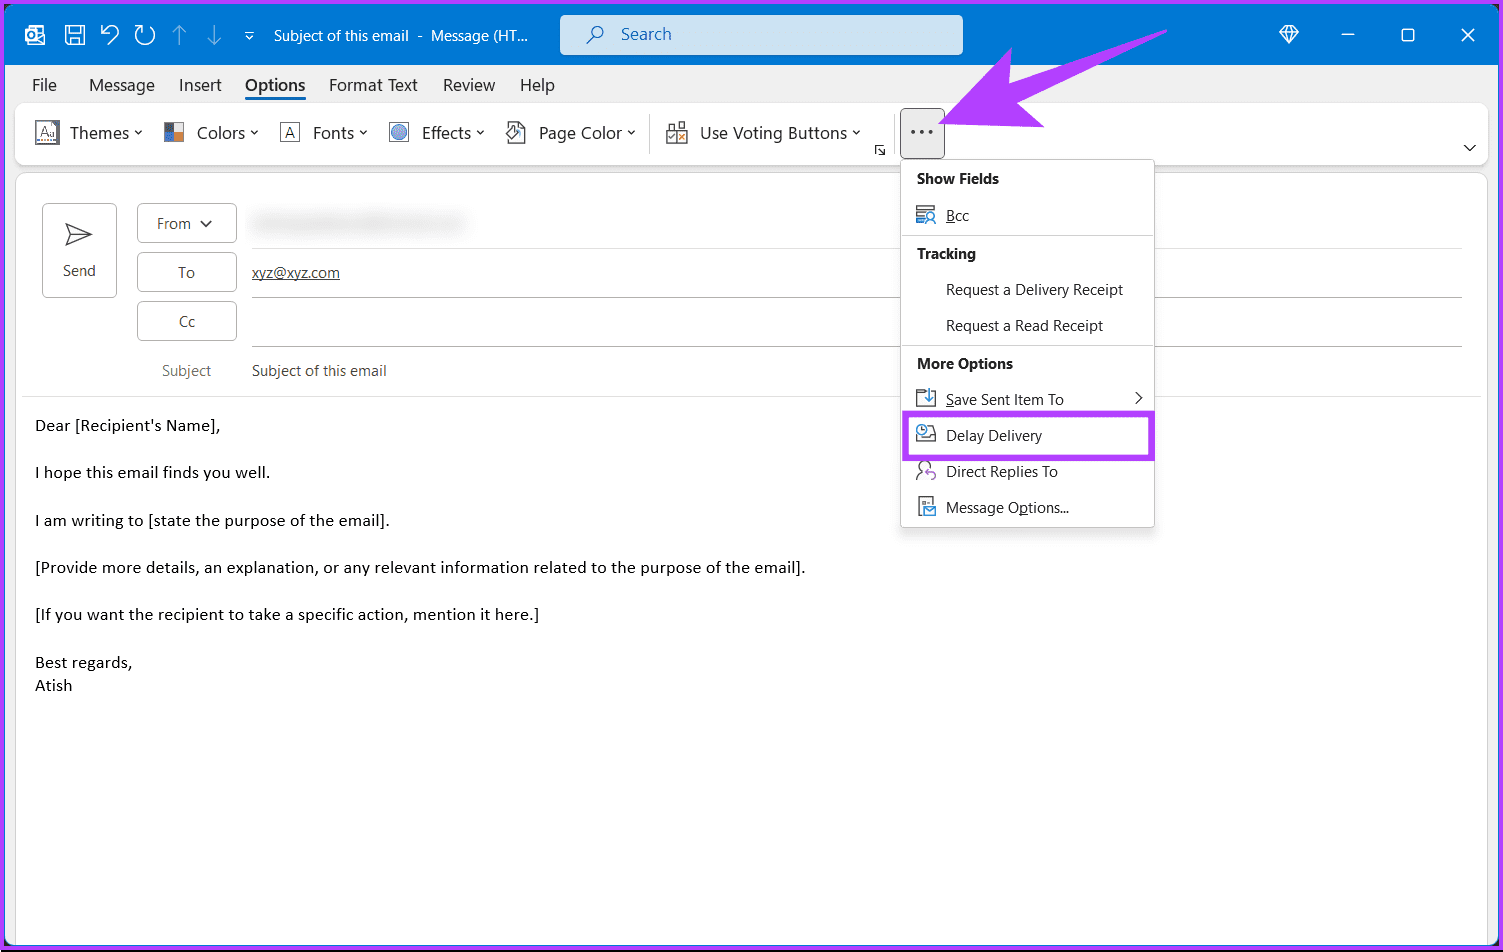
Step 4: In the Properties window, validate if ‘Do not deliver before’ is checked. Now, choose a date and time for scheduling the delivery and click Close.

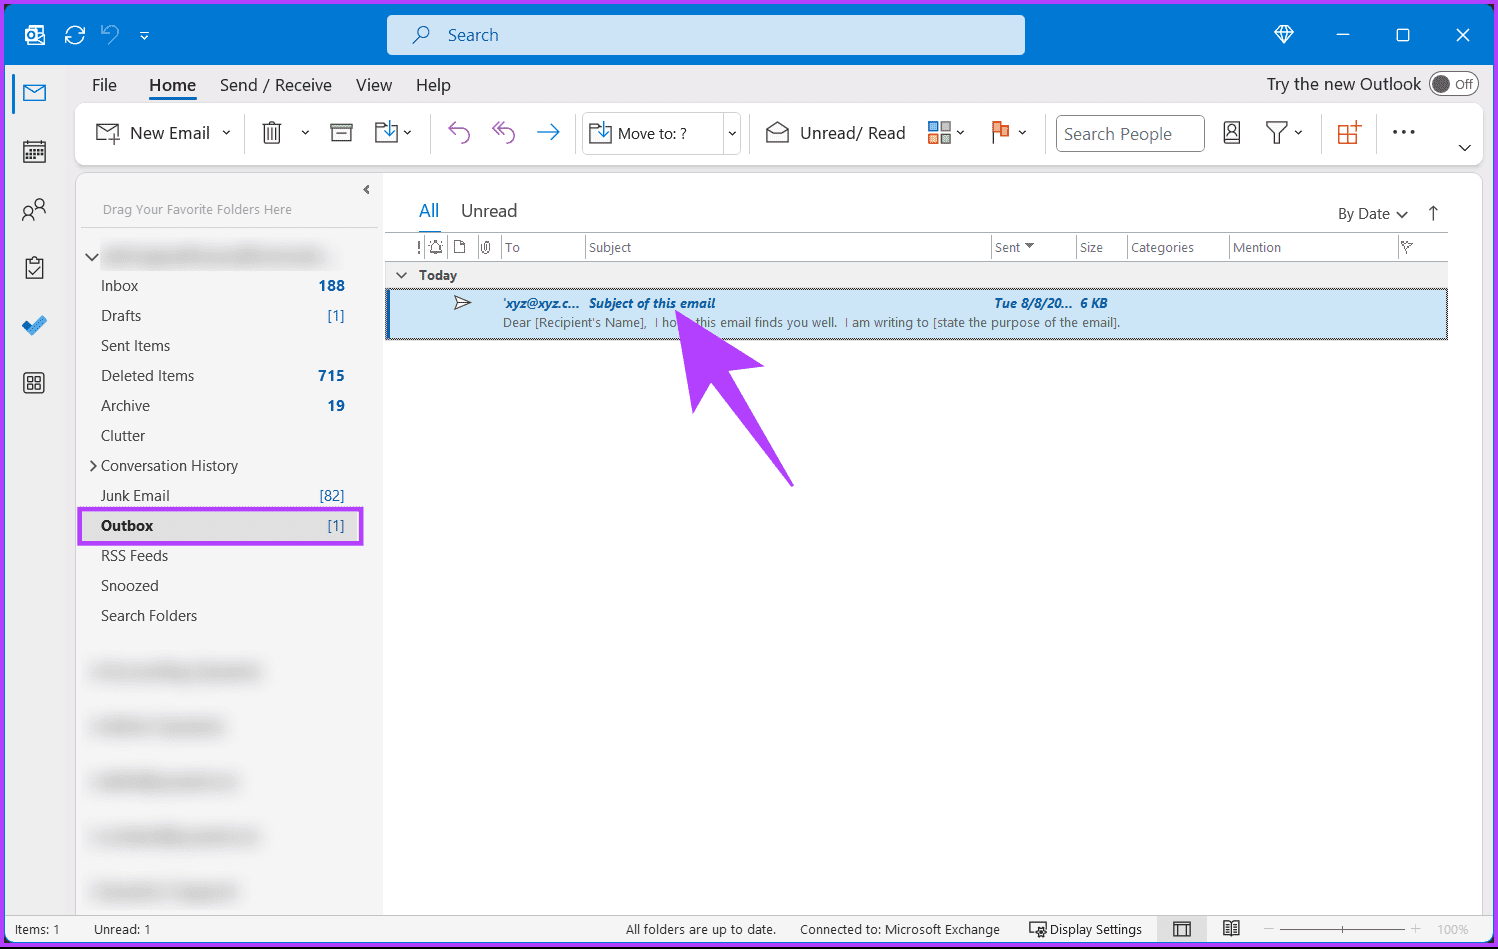
Now, you can click the Send button as you normally do. You can find all the emails you have scheduled in the Outbox folder. Much like on the web, you can open the email you have scheduled to edit the content or reschedule.
Repeat the same steps if you want to send the mail immediately instead of scheduling. However, uncheck the ‘Do not deliver before’ option, close the Properties window, and click Send from the compose screen.
Further, if you are not a desktop user or don’t have access to the web and want to do the same on mobile, continue reading.
Also Read: How to delete multiple emails in Outlook on mobile and web
How to Schedule Emails in Outlook on Mobile
The steps are the same for Android or iOS. However, for demonstration, we are going with Android. If you are on iOS, follow along.
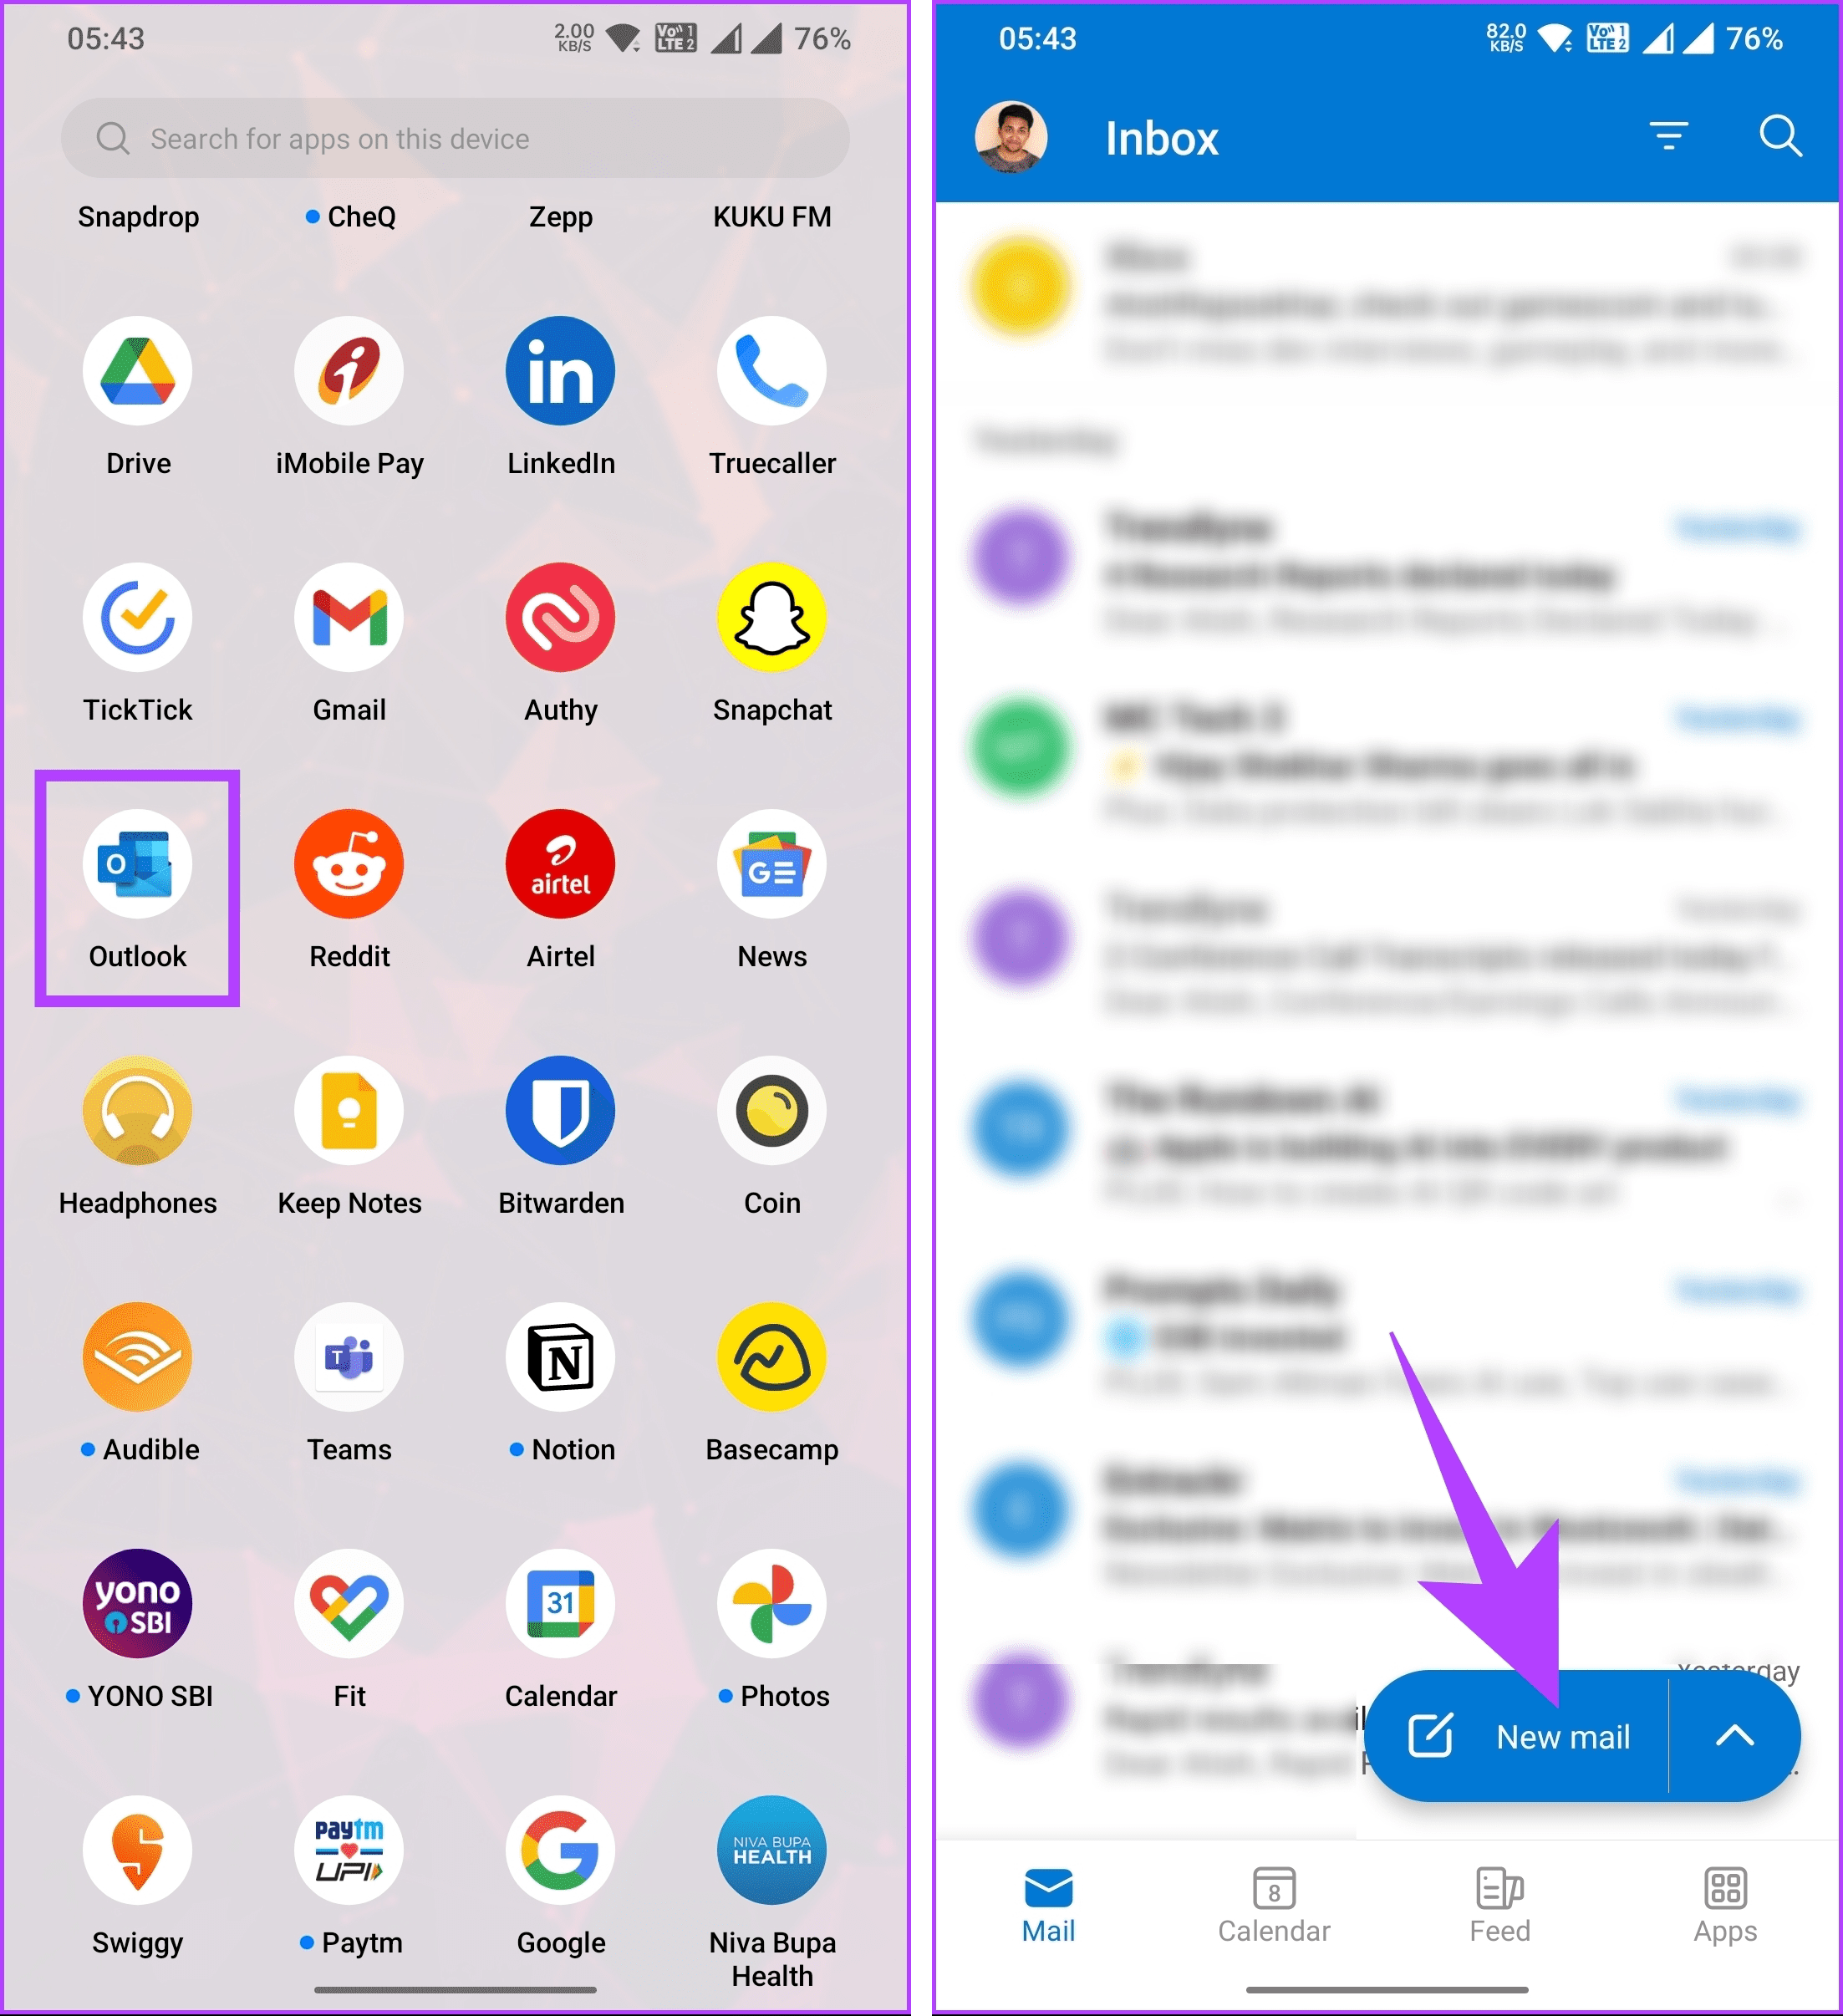
Step 1: Firstly, launch the Outlook app on your Android or iOS device. Tap on the New mail floating button in the bottom right corner.
Step 2: Compose the mail as you would normally do. After you finish, tap the three-dot icon before tapping the Send icon.
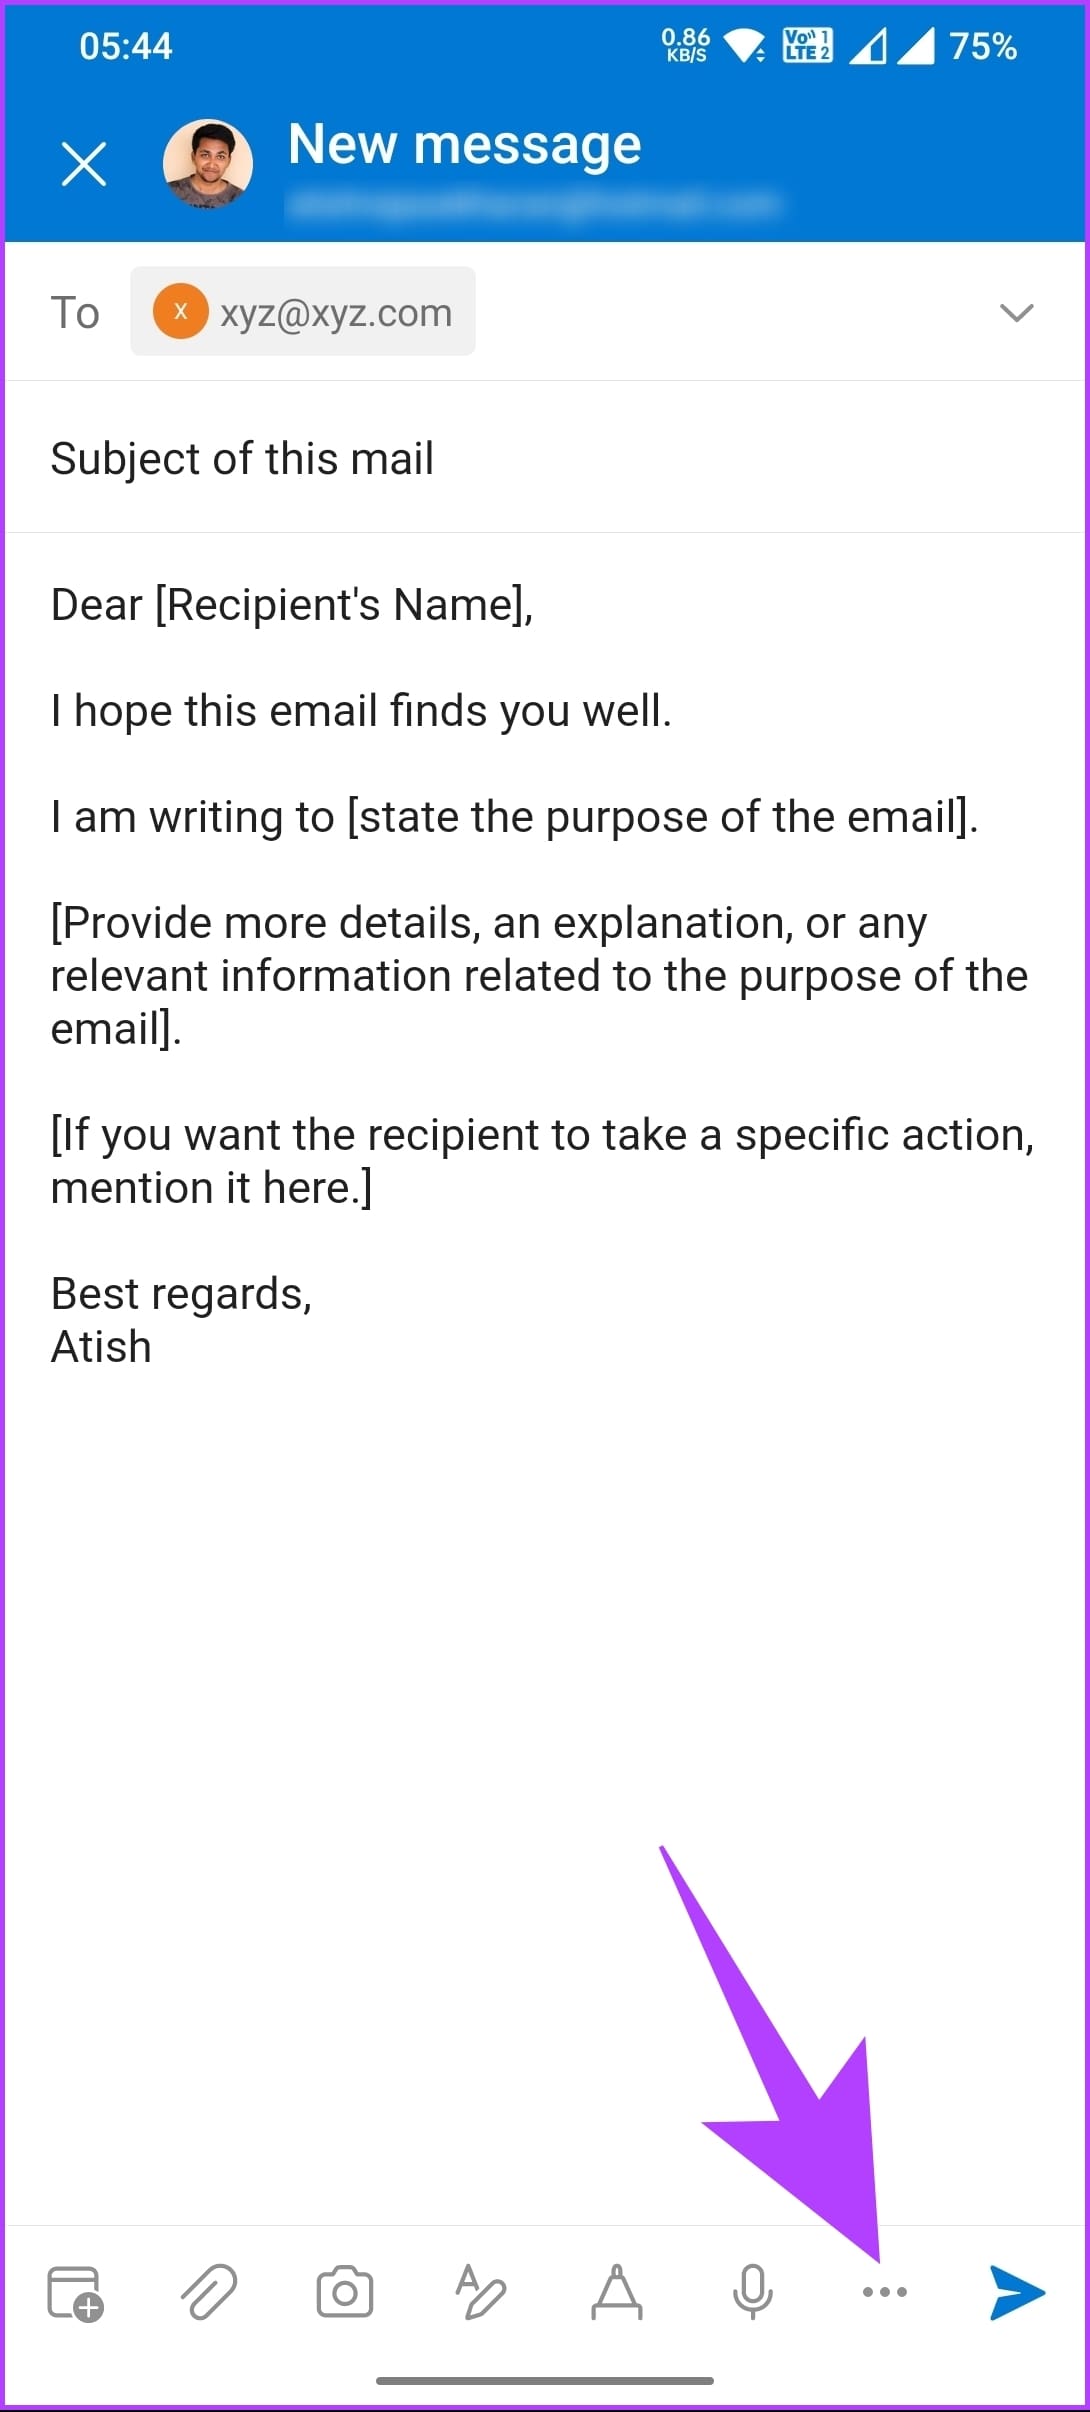
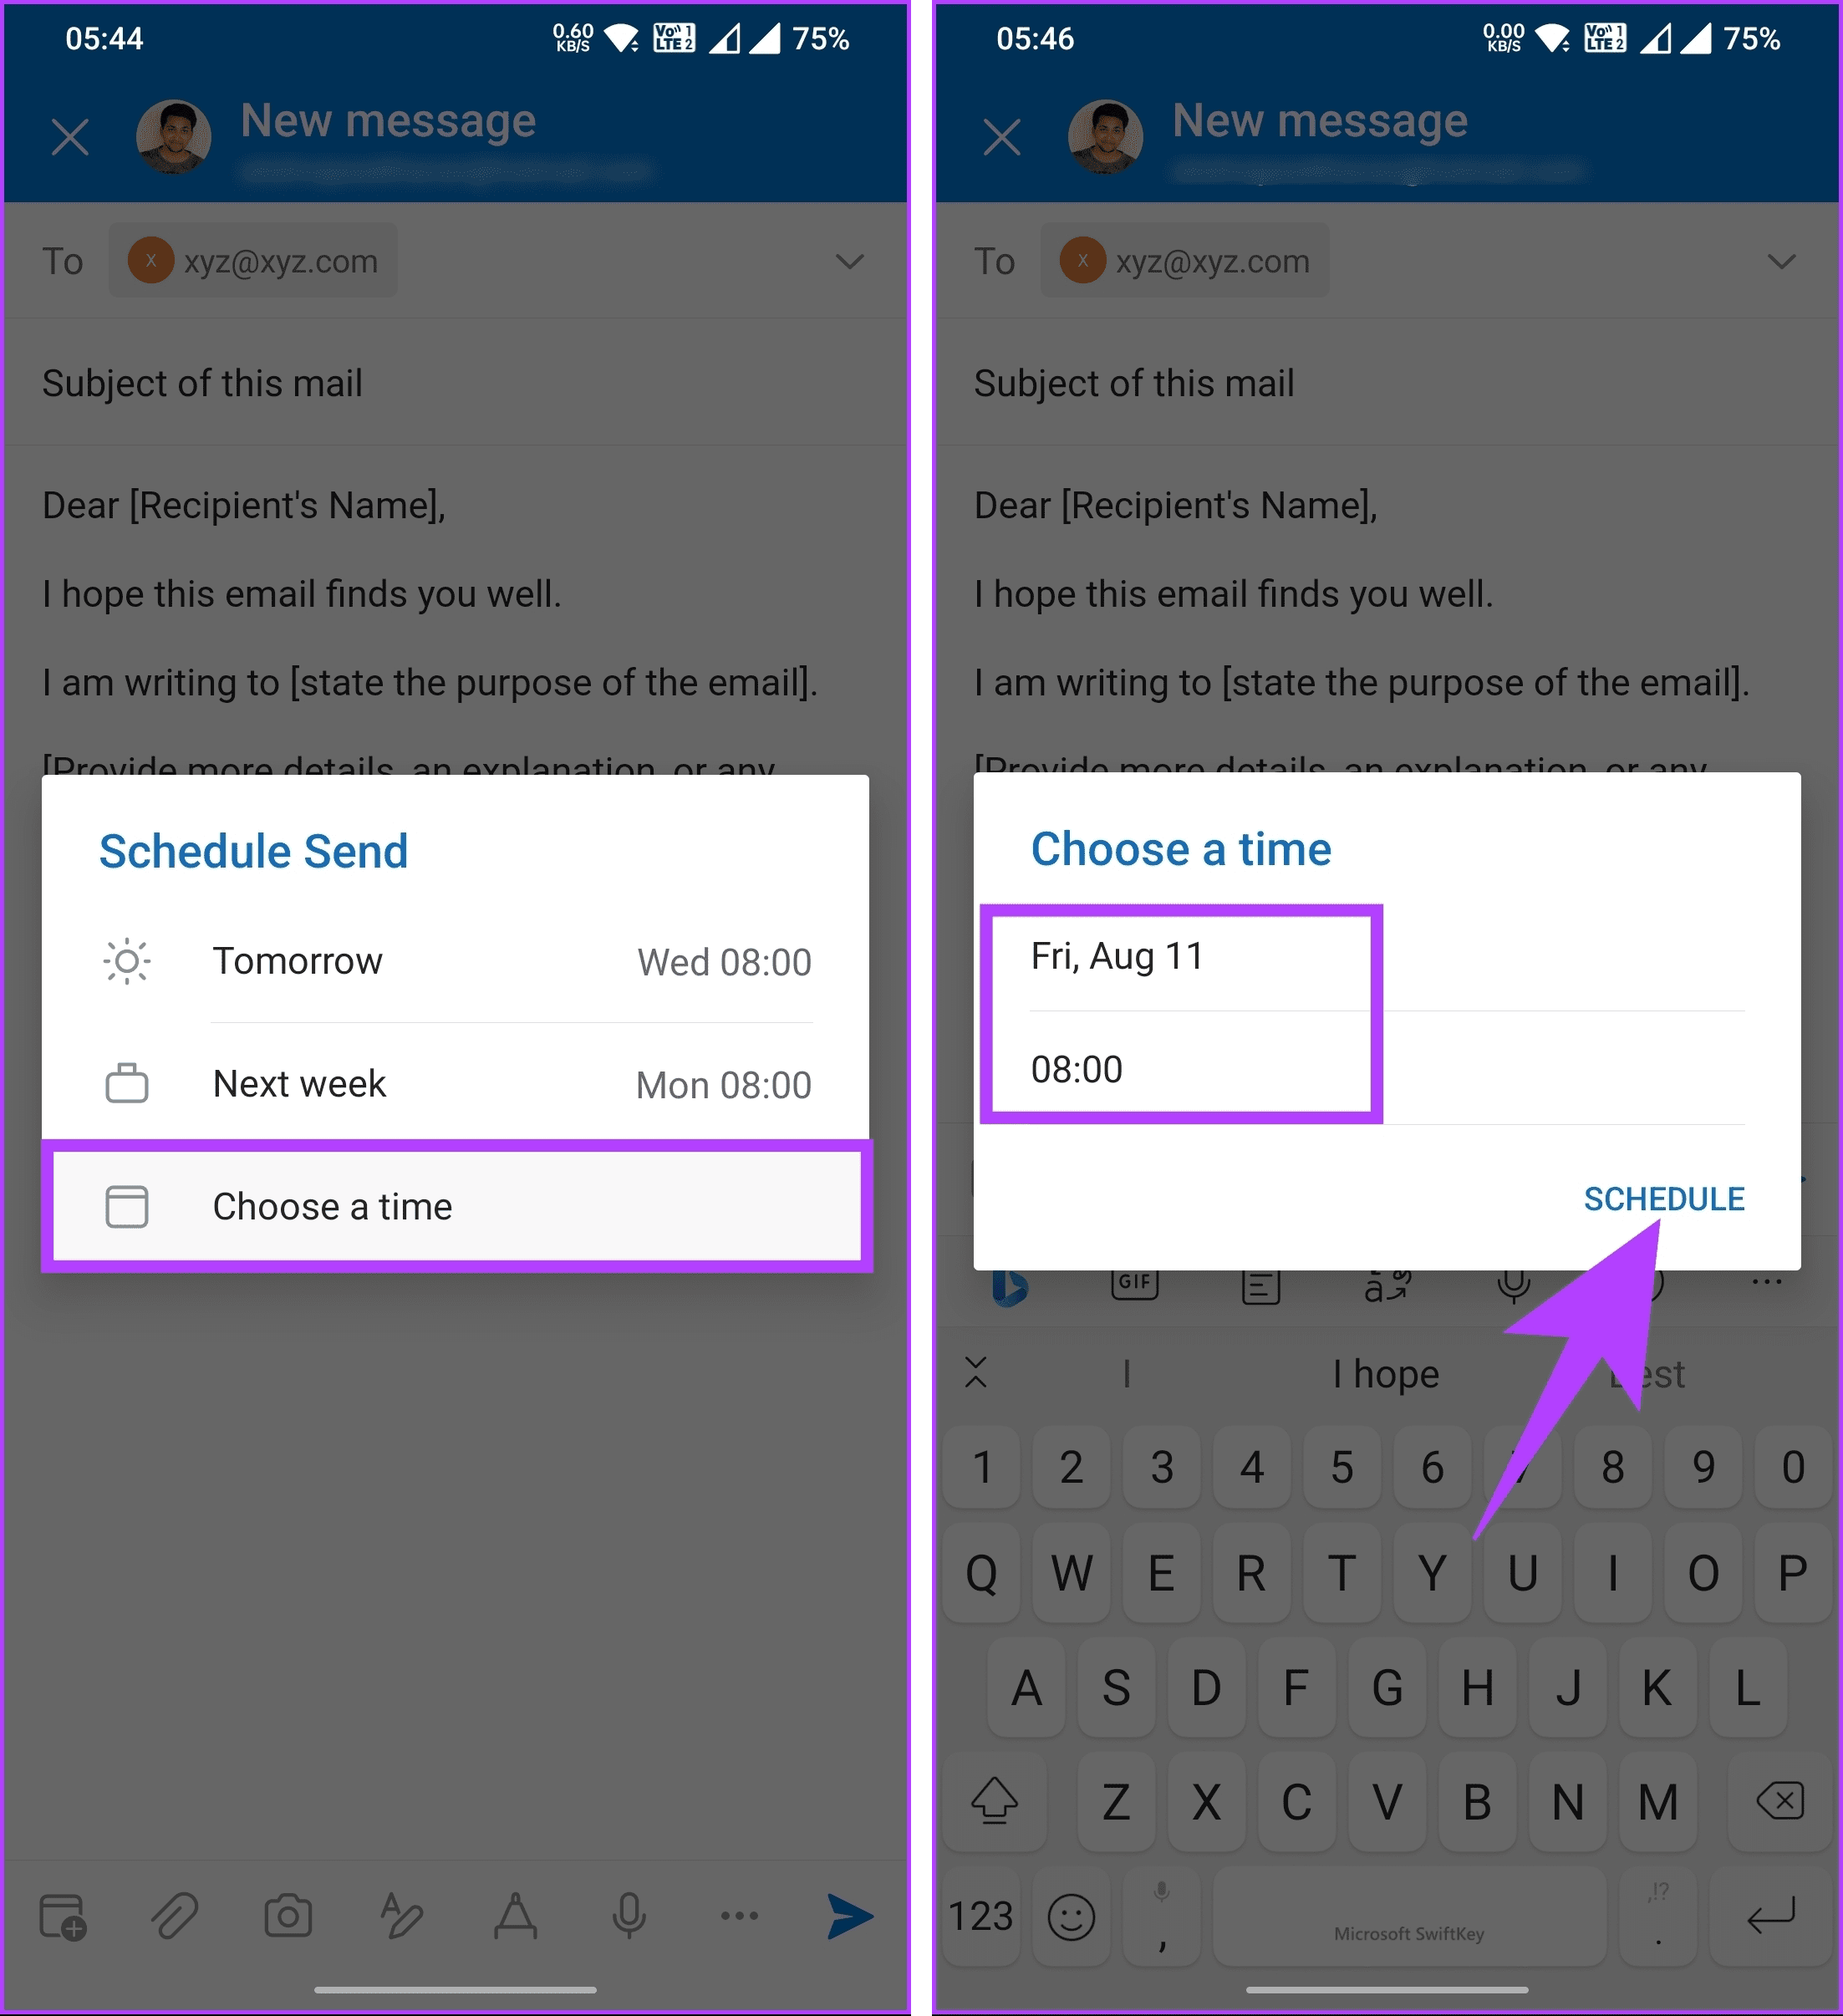
Step 3: From the bottom sheet, choose the Schedule Send option. In the Schedule Send modal, select the default option.

If you want to schedule the email based on your time preferences, continue with the below steps.
Step 4: Instead of choosing the default option in the Schedule Send pop-up, select ‘Choose a time, select the date and time of your preference, and finally, tap Schedule.
There you go. You have scheduled your email on the Outlook mobile app. You will find all scheduled emails in the Drafts folder, which you can access by tapping on your profile in the top left corner, and from the sidebar, choosing the Drafts folder.
If you have any queries, check out the FAQ section below.
FAQs On Scheduling Emails in Outlook
Outlook does not have a built-in feature to schedule recurring emails natively. The standard version of Outlook allows you to schedule an individual email to be sent at a specific time and date, but it does not offer the ability to automatically send recurring emails on a set schedule.
No, you do not need to keep Outlook open for scheduled emails to be sent. Once you schedule an email to be sent at a specific time, the email will be added to the Outbox and queued for sending. Outlook will take care of sending the email even if the application is closed or your computer is turned off.
Typically, the cloud stores scheduled emails. When you schedule to send an email later, the email service provider preserves the details of the scheduled email on their servers. This guarantees that the email will be sent at the specified time, even if your device is turned off or you are not connected to the internet when the scheduled time arrives.
Schedule your Emails
Now that you know how to schedule mail in Outlook, you can compose messages when convenient and have them automatically delivered later. You may also want to read how to remove Microsoft Teams meeting from Outlook invite.
Was this helpful?
Last updated on 08 August, 2023
Read Next
 How to Schedule Google Meet in Microsoft Outlook
Even though Microsoft is pushing Teams left and right, Google Meet remains the preferred choice for the majority out there.
How to Schedule Google Meet in Microsoft Outlook
Even though Microsoft is pushing Teams left and right, Google Meet remains the preferred choice for the majority out there.
 How to Schedule Out of Office Mail in Outlook
Everyone deserves a vacation or a small break from work life.
How to Schedule Out of Office Mail in Outlook
Everyone deserves a vacation or a small break from work life.
 How to Mark Emails as Read in Outlook on Web, Desktop, or Mobile App
Outlook is a widely used email client for personal and professional purposes.
How to Mark Emails as Read in Outlook on Web, Desktop, or Mobile App
Outlook is a widely used email client for personal and professional purposes.
 How to Download Emails From Outlook on Web, Desktop, and Mobile
Are you tired of constantly sifting through your Outlook emails to find that one crucial message?
How to Download Emails From Outlook on Web, Desktop, and Mobile
Are you tired of constantly sifting through your Outlook emails to find that one crucial message?
 Top 7 Ways to Fix Microsoft Outlook Not Sending Emails on Android and iPhone
Microsoft Outlook may be a feature-rich email app, but it is not known for its reliability, especially on Android and iPhone.
Top 7 Ways to Fix Microsoft Outlook Not Sending Emails on Android and iPhone
Microsoft Outlook may be a feature-rich email app, but it is not known for its reliability, especially on Android and iPhone.
 How to Encrypt Emails in Microsoft Outlook
Microsoft Outlook is a reliable email client for managing your personal and professional accounts.
How to Encrypt Emails in Microsoft Outlook
Microsoft Outlook is a reliable email client for managing your personal and professional accounts.
 How to Translate Emails in Microsoft Outlook
Whether you're conducting international business, collaborating with colleagues from diverse backgrounds, or simply communicating with friends and family who speak different languages, Microsoft Outlook's ability to translate emails can significantly
How to Translate Emails in Microsoft Outlook
Whether you're conducting international business, collaborating with colleagues from diverse backgrounds, or simply communicating with friends and family who speak different languages, Microsoft Outlook's ability to translate emails can significantly
 Why Am I Getting Spam Emails on Gmail and Outlook
Gmail and Outlook have a spam filter to safeguard your main inbox from irrelevant emails.
Why Am I Getting Spam Emails on Gmail and Outlook
Gmail and Outlook have a spam filter to safeguard your main inbox from irrelevant emails.
The article above may contain affiliate links which help support Guiding Tech. The content remains unbiased and authentic and will never affect our editorial integrity.