The era of sharing content through hard drives or pen drives is already over. Now, people use cloud services for such needs. And why not? It’s convenient, easily accessible, secure, and getting affordable. Microsoft OneDrive and Google Drive are two prime examples.

The most common way to send the files and media through a cloud service is by generating a shareable link. All the major cloud storage providers offer mobile apps with that feature built-in and easily usable unless you want to share something confidential. That’s where OneDrive scores against its rivals.
Last year, Microsoft announced new additions to protect sharable links before sending them out to others. After all, you wouldn’t want to become a victim if the other person is not careful with the link that gives access to confidential files or media. In this post, we will talk about how to secure shareable links and use them on mobile and web apps.
1. Add Password Protection
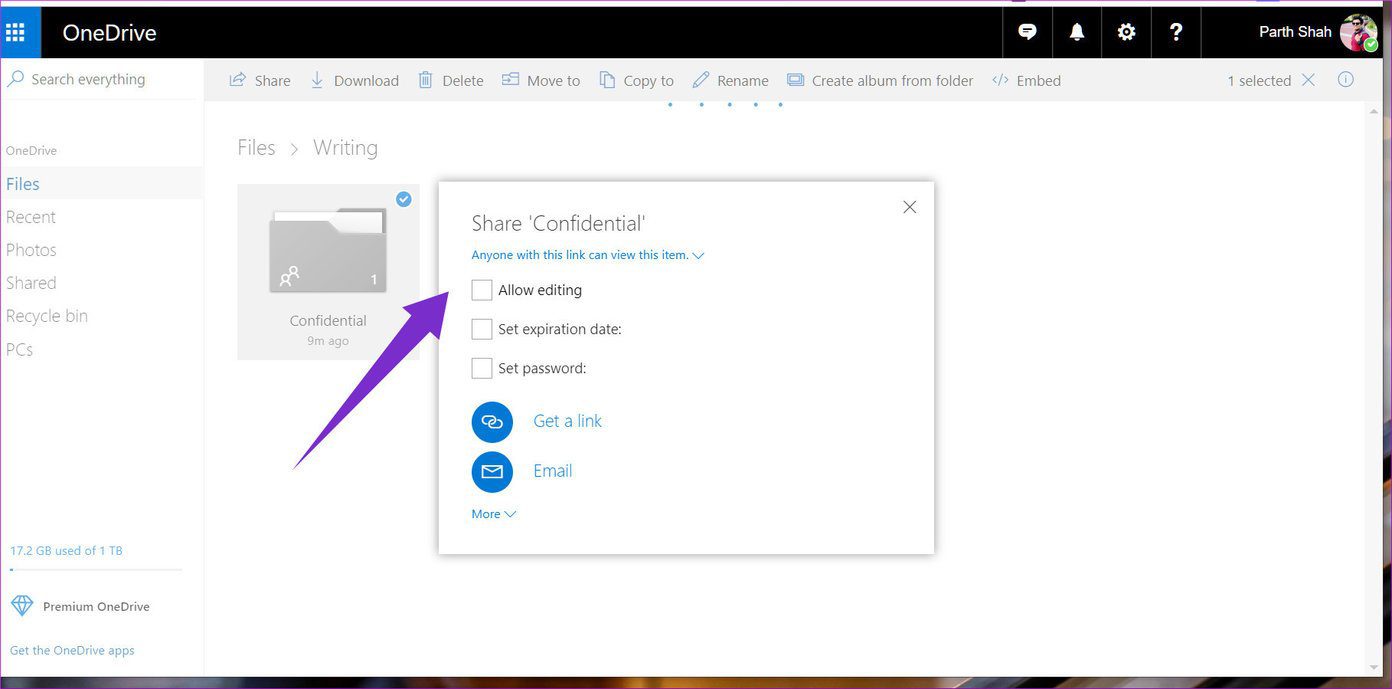
One of the most requested OneDrive features was finally added by Microsoft. You can now add a password to a OneDrive link before sharing it with others. The recipient will have to use the exact password before accessing the files in the OneDrive link.
You don’t have to worry about any third-party accessing OneDrive files without access. Follow the below steps to access it using OneDrive web.
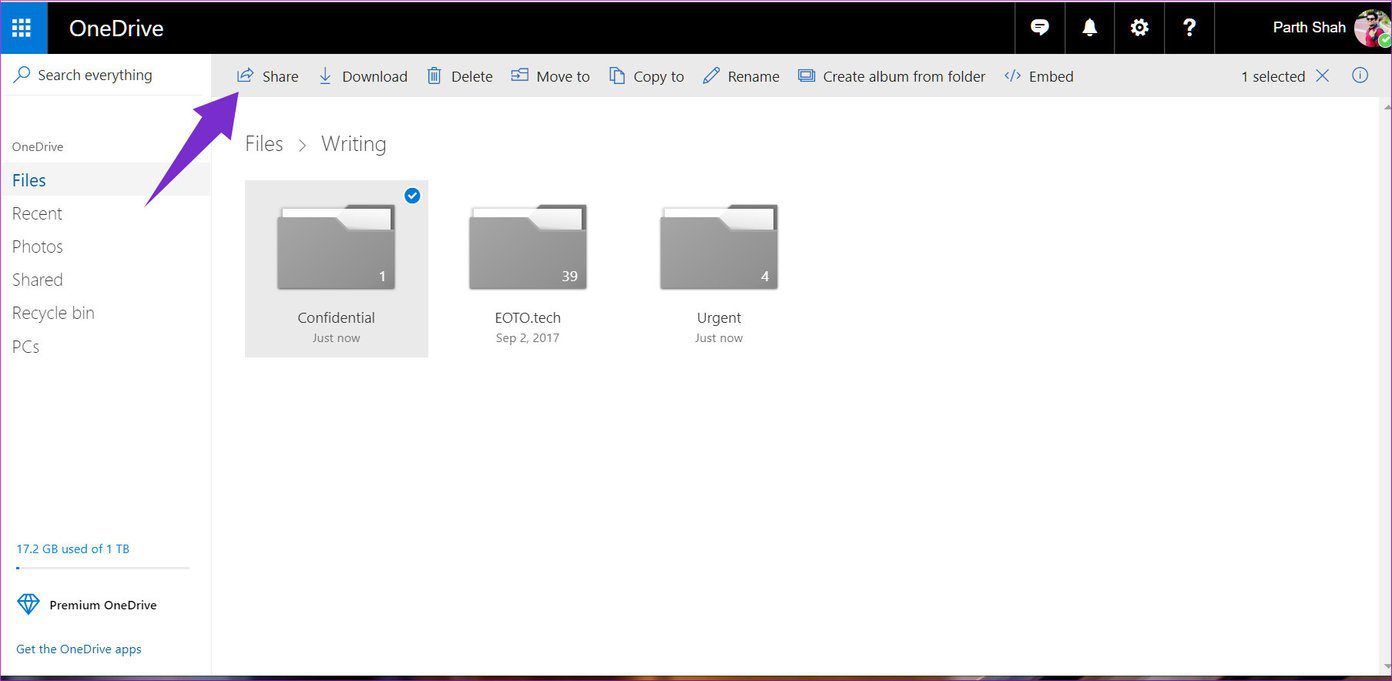
Step 1: Go to your OneDrive page and log in using Microsoft credentials.
Step 2: Choose the files or a folder that you want to share.
Step 3: Select the folder and tap on the ‘Share’ button at the upper left corner.
Step 4: In the share dialog box, select the set password option.
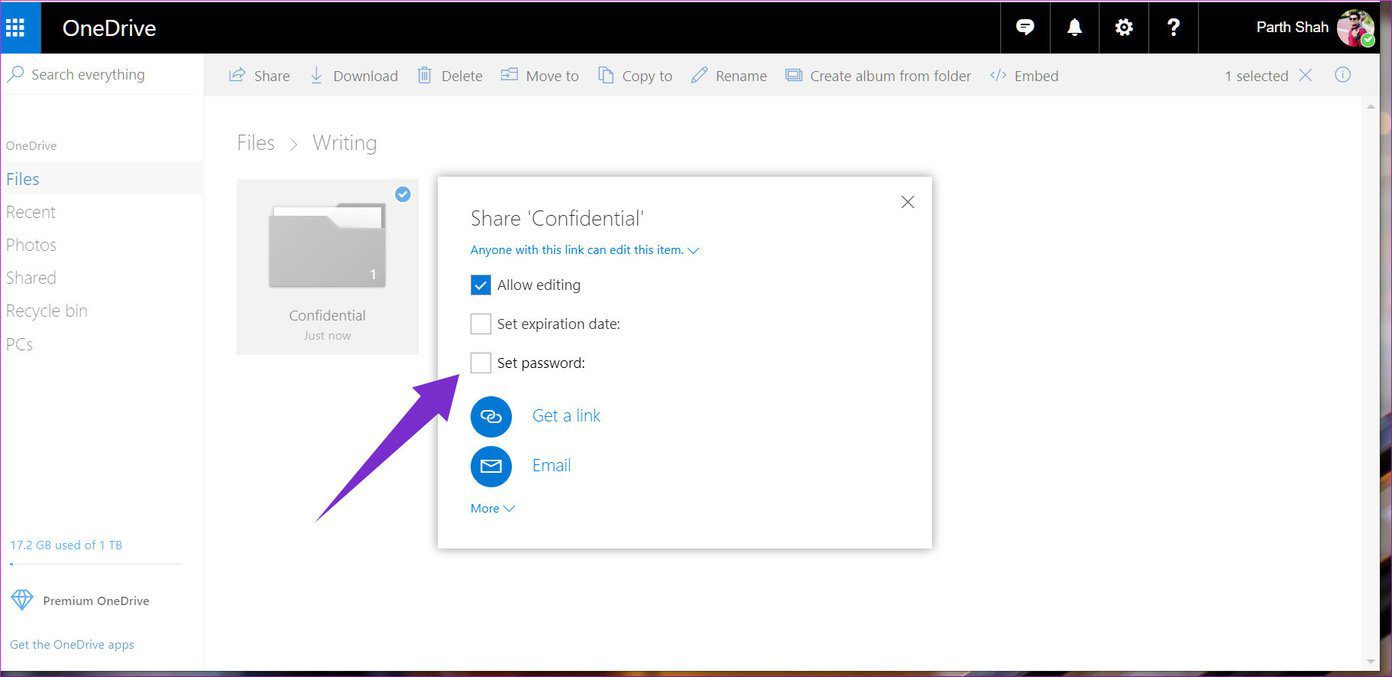
Step 5: Add a password to the link and select ‘Get a link’ option.
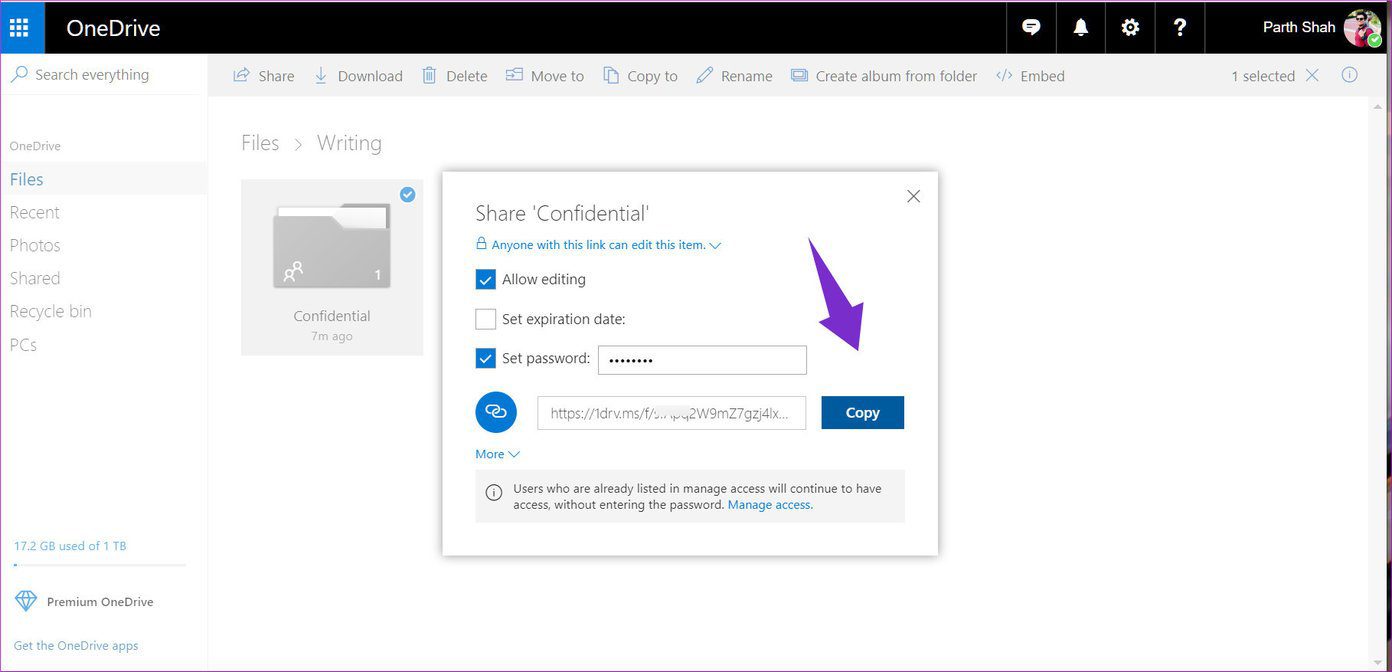
Step 6: Copy the link and share it with others (you will need to share the password with receiving person so that he can access the files in the link).
Unfortunately, the functionality is only available on OneDrive Web and not on any mobile apps or Windows 10 native app. Here is hoping Microsoft adds the option to mobile apps soon for better convenience.
2. Add a Timer to Links
Adding an expiry time to a OneDrive link is another handy way to make sure that it doesn’t get misused. After a particular time, the link will turn dead, and there won’t be any action when you tap on it. Here is how to use it.

For OneDrive Web, you can use the above steps till the share dialog box pops up. Now instead of selecting the password option, tap on the expiry link bracket and add a timer to it. The generated link will expire after some time.
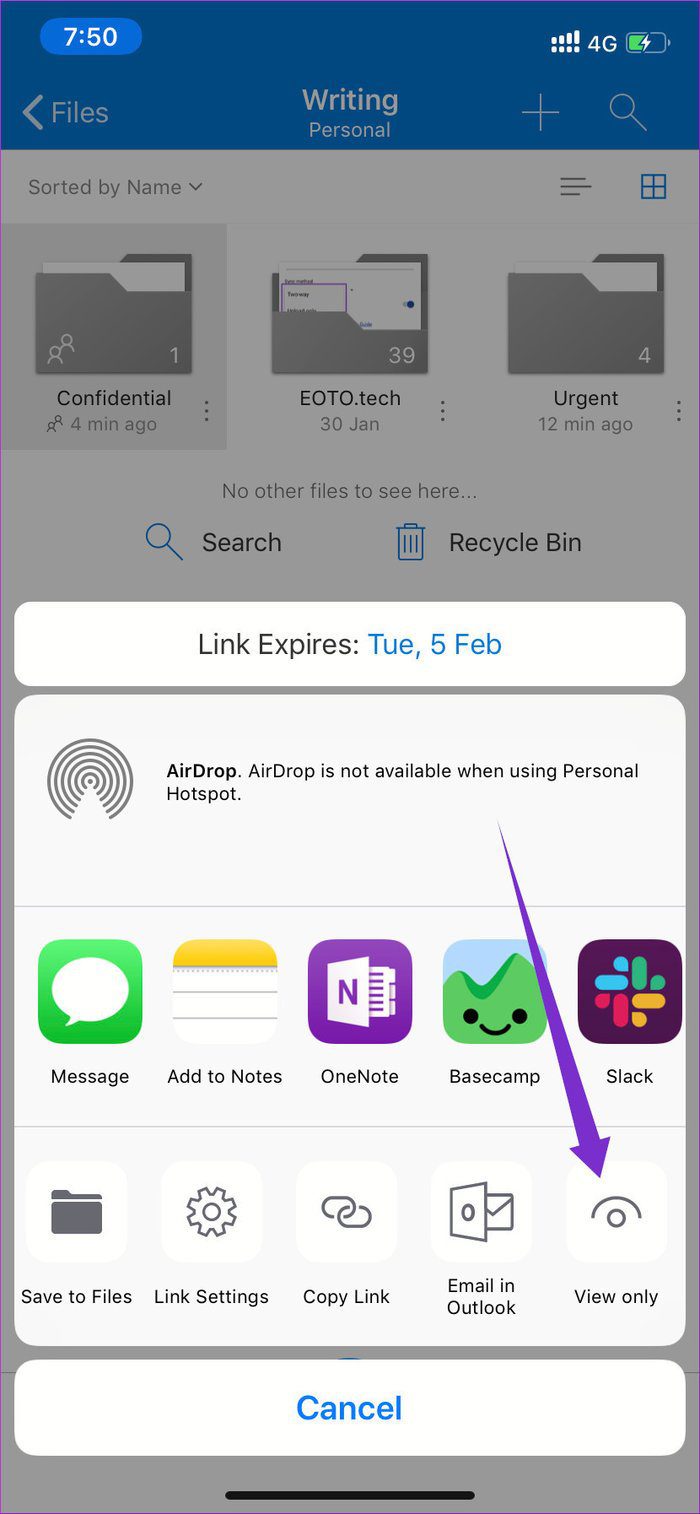
Now for mobile apps, use these steps to add a timer.
Step 1: Download OneDrive and log in using the relevant details.
Step 2: Navigate to the folder, tap on the three-dots icons to select the share button.

Step 3: Select the Link Settings option.

Step 4: Turn on the Add Expiry Date option.
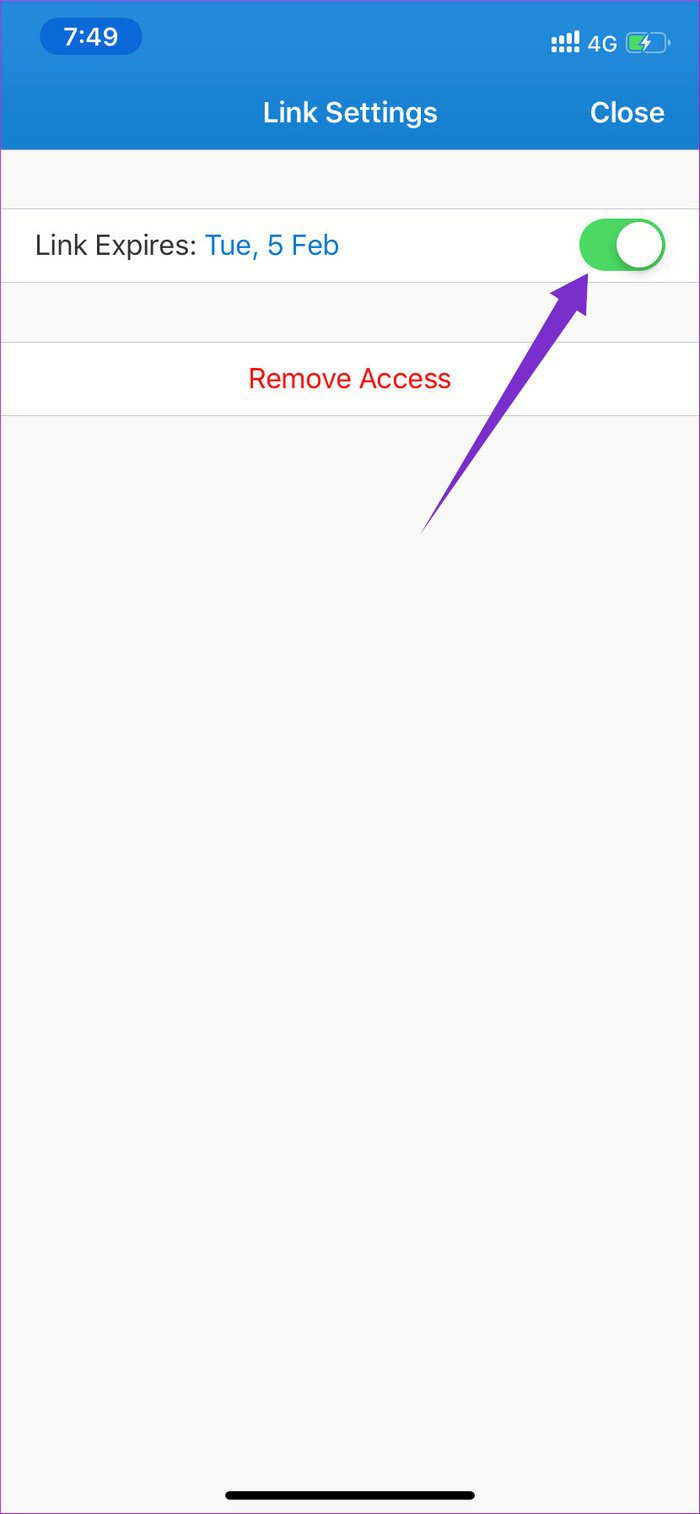
Step 5: Add a timer to link and copy it from the above menu.
From the above example, the link was set to expire on Tuesday, 5 Feb. I use this feature more frequently as its available on every platform and not just on the web.
For maximum security, you can use both add password and expiry date option from the OneDrive Web. That way the link will be password protected and will expire after a while.
Note:
3. Use ‘View Only’ Permission
Many people get confused between ‘view only’ and ‘edit’ options while sharing the link. By default, OneDrive allows editing options in a generated link, and that can be troublesome if someone messes with it.
My advice would be to use ‘View only’ option and if needed then only allow for editing option. Here is how to use it.
For OneDrive Web, disable the ‘Allow editing’ option from the share dialog. That way the service will generate a ‘View only’ link by default.
To use it on mobile apps, tap on the three-dot menu, select share, and choose View only option from the sidebar menu.
Remember, the app will automatically generate an editable link. So you will have to select view only options every time you share the OneDrive files and media.
4. Use Biometrics
This one is the most basic security feature everyone should be using. Microsoft supports every default biometric authentication on Android (Fingerprint), iOS (Face ID), and Windows 10 (Windows Hello).

Head to Settings > Security and turn on the relevant option. By default, you must set a 4-digit password just in case you are unable to use a biometric option.


Note:
Be Worry-Free
Many believe uploading files and media to the cloud platforms is more reliable and easily accessible than storing them on hard drives. Also, sharing is highly customizable with enough safety measures. Using the options mentioned above, you can share the uploaded content responsibly and tighten the security at the same time.
Microsoft has upped its security for the shareable links, and it’s a welcome change. I’m surprised how Google is yet to pay any heed to Drive.
Next up: Do you know you can duplicate Android folders to OneDrive folders automatically. Read the post below on how to use it using OneSync app for Android.
Was this helpful?
Last updated on 07 February, 2022
Read Next
 3 Easy Ways to Password Protect a ZIP File on Windows
Have you ever wanted to keep your sensitive files and documents safe and secure?
3 Easy Ways to Password Protect a ZIP File on Windows
Have you ever wanted to keep your sensitive files and documents safe and secure?
 How to Password Protect a Folder on Windows 11
By password protecting a folder on Windows 11, you can essentially create a barrier between the data and anyone who tries to access it without permission.
How to Password Protect a Folder on Windows 11
By password protecting a folder on Windows 11, you can essentially create a barrier between the data and anyone who tries to access it without permission.
 How to Encrypt or Password Protect Files on Android
We have seen how you can hide your photos and videos on Android.
How to Encrypt or Password Protect Files on Android
We have seen how you can hide your photos and videos on Android.
 Top 3 Ways to Save Tabs Before Closing Chrome and How to Restore Lost Tabs
The best thing about the mobile version of Chrome is that you can keep tabs open in it for several days without worrying about them getting deleted — unless you
Top 3 Ways to Save Tabs Before Closing Chrome and How to Restore Lost Tabs
The best thing about the mobile version of Chrome is that you can keep tabs open in it for several days without worrying about them getting deleted — unless you
 Top 7 Things to Do Before Selling or Giving Away Your PC
Computers often contain a lot of personal information, including photos, videos, music, and email communications.
Top 7 Things to Do Before Selling or Giving Away Your PC
Computers often contain a lot of personal information, including photos, videos, music, and email communications.
 How to Estimate Laptop Battery Life Before Buying
We all know how much manufacturers lie about battery life.
How to Estimate Laptop Battery Life Before Buying
We all know how much manufacturers lie about battery life.
 Top 3 Ways to Share Webpage Links From Google Chrome
When browsing the web, you often come across a webpage or a website that you found interesting and want to share.
Top 3 Ways to Share Webpage Links From Google Chrome
When browsing the web, you often come across a webpage or a website that you found interesting and want to share.
 Top 6 Ways to Fix Links Not Opening in Google Chrome
Google Chrome can occasionally encounter problems that make it unusable.
Top 6 Ways to Fix Links Not Opening in Google Chrome
Google Chrome can occasionally encounter problems that make it unusable.
The article above may contain affiliate links which help support Guiding Tech. The content remains unbiased and authentic and will never affect our editorial integrity.
