Picture this — you want to insert several images in your Word document. Initially, the pictures are of different sizes, but you want them to be of the same size in your document. While one can take the help of proper photo-editing tools, sometimes, one doesn’t have access to them. In such situations, you can use Microsoft Word itself to resize all the pictures.
There’s no denying the fact that Microsoft Word is amazing when it comes to text. But if you dive deep into it, you will unearth its hidden features related to other things too such as photo editing. For instance, did you know you can give your image a perfectly round shape directly in Word?
Similarly, you can make pictures of the same size in Word. Let’s see how to do that by using the two methods mentioned below.
Method 1: Using Macros
Sometimes, we wish we had a single button where pressing it would perform a difficult task automatically. That’s what macros do in Word.
Macros automate a certain task that otherwise would require you to perform it repeatedly. You can create a macro by either recording the steps that you want to perform or write a set of instructions.
Since we need to resize all the pictures in MS Word, we would be taking the help of Macros. We would create it by writing the code to resize photos. Don’t get confused. Here are the steps in detail:
Step 1: Open the Word file where you want to make all the pictures of the same size.
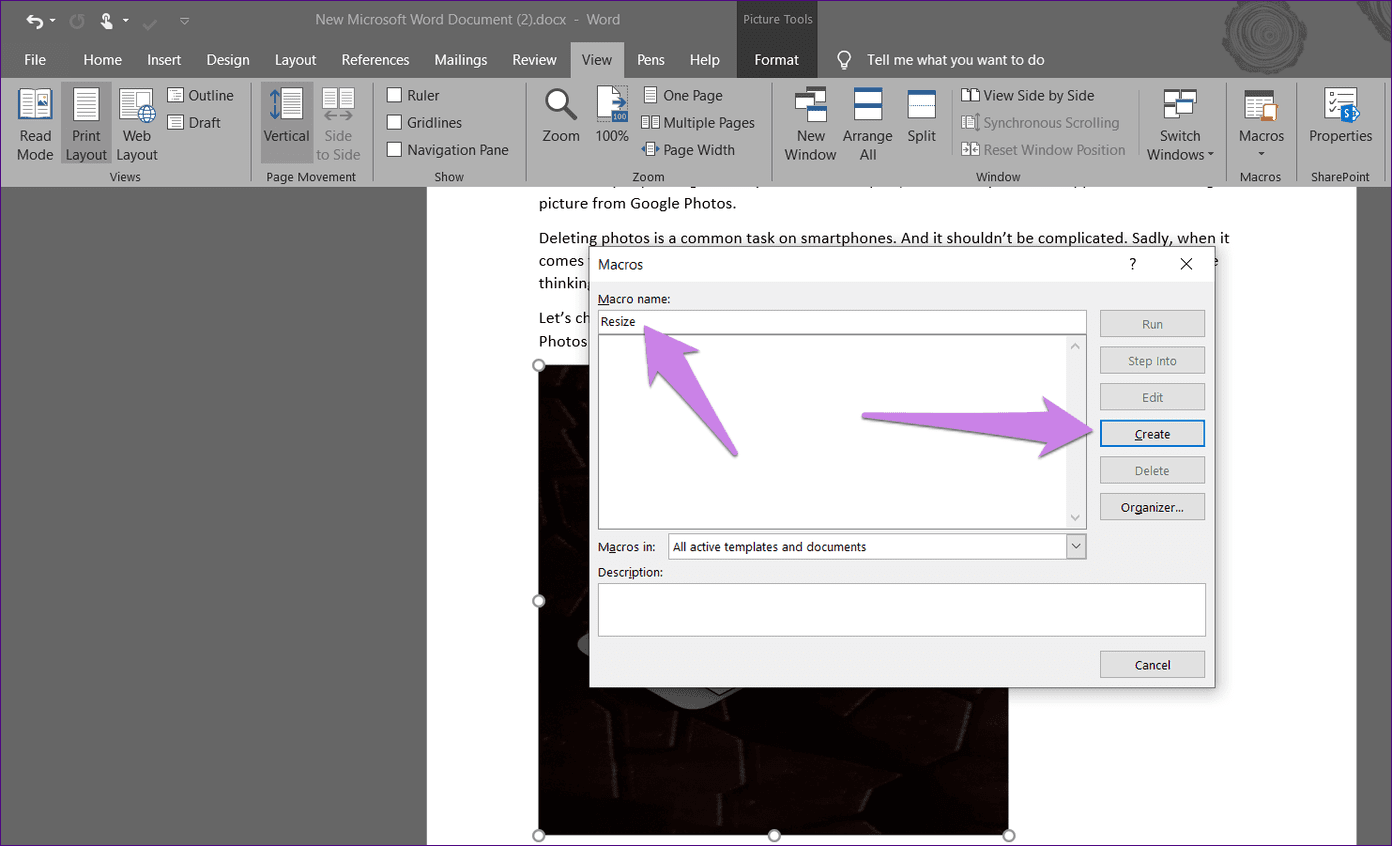
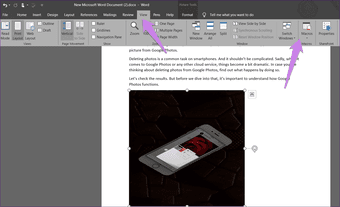
Step 2: Click on the first photo in the file to select it. Then, click on the View tab at the top.

Step 3: Click on Macros.

Step 4: A pop-up window will open. Type a name in the box under the Macro name. You can name it anything. For the sake of understanding, we would be calling it Resize.
Then, click on Create.
Step 5: A new Microsoft Visual Basic for Applications window will open. Select the existing code and delete it.

Step 6: Then, copy and paste one of the following codes into the window.
Type A: Use the following code if you want to change the height and width in terms of pixels. Replace 500 and 600 by your own values.
Sub resize() Dim i As Long With ActiveDocument For i = 1 To .InlineShapes.Count With .InlineShapes(i) .Height = 500 .Width = 600 End With Next i End With End Sub
Type B: Use this if you want to change the size by inches. Replace 2 by your value.
Sub resize() Dim i As Long With ActiveDocument For i = 1 To .InlineShapes.Count With .InlineShapes(i) .Height = InchesToPoints(2) .Width = InchesToPoints(2) End With Next i End With End Sub
Type C: If you want to scale the images, the following code will help you. Replace 30 and 40 by your preferred values.
Sub resize() Dim i As Long With ActiveDocument For i = 1 To .InlineShapes.Count With .InlineShapes(i) .ScaleHeight = 30 .ScaleWidth = 40 End With Next i End With End Sub
Step 7: Once copied, close the Microsoft Visual Basic for Applications window by clicking on the cross icon.

Step 8: With the image selected, click on Macros under the View tab again.
Step 9: The Macros window will open. Click on Run with your macro selected.
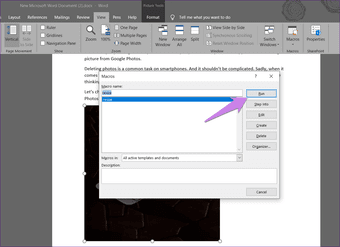
As soon as you press the Run button, you will notice the size will change for all images.
Method 2: Using the Magical Key
Did you know you could repeat your last performed action on Microsoft Office apps by just clicking a button on your keyboard? That key is the F4 on Windows and Y key on Mac.
Tip:
Here are the steps for this method:
Step 1: Open the Word document that contains your images.
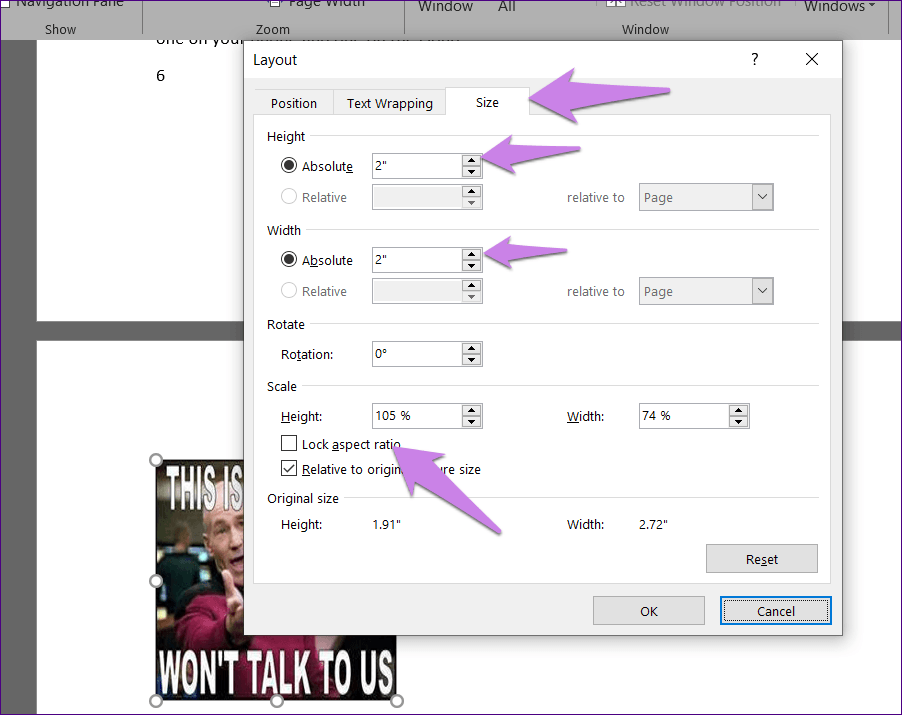
Step 2: Right-click on the first image and select Size and Position.

Step 3: In the Layout box that opens, click on the Size tab. Then, uncheck the box next to Lock aspect ratio. Enter the required values for the height and width of images in the given boxes. Click on Ok.
Step 4: You will notice the size will be changed for the selected image. Now, click on other images one by one and hit the F4 (or fn + F4 on Windows) or Y key (on macOS) for each of them. Doing that will repeat the action done in step 3 — change the height and width of the picture.
Note
Size Is Important
A well organized document with images of proper size looks better than an unorganized one. While the above methods will let you perform your intended task of resizing all images, we wish there was an easy way. Till we get that, you will have to rely on the two methods mentioned above. If you know of another way, we are always listening in the comments below.
Next up: Want to change the theme for Microsoft Office products? Find out how to change the theme and disable dark mode on Word, Excel, and PowerPoint from the given link.
Was this helpful?
Last updated on 07 February, 2022
Read Next
 Apple Pages vs Microsoft Word: Which Word Processing Software Is Better
Every major tech company out there is offering their version of the productivity suite.
Apple Pages vs Microsoft Word: Which Word Processing Software Is Better
Every major tech company out there is offering their version of the productivity suite.
 Google Docs vs. Microsoft Word Online: Which Word Processor Is Better
Google Docs goes toe-to-toe with Microsoft Word, especially with the Microsoft 365 subscription.
Google Docs vs. Microsoft Word Online: Which Word Processor Is Better
Google Docs goes toe-to-toe with Microsoft Word, especially with the Microsoft 365 subscription.
 Top 8 Fixes for PowerPoint Not Displaying Pictures on Windows
Microsoft PowerPoint can be frustrating when it fails to display pictures in your presentation on your Windows 10 or 11 PC.
Top 8 Fixes for PowerPoint Not Displaying Pictures on Windows
Microsoft PowerPoint can be frustrating when it fails to display pictures in your presentation on your Windows 10 or 11 PC.
 Top 7 Ways to Fix Microsoft Word Not Responding on Windows 10 and Windows 11
Even though the market is filled with Microsoft Word rivals, Word remains the top choice among consumers and businesses.
Top 7 Ways to Fix Microsoft Word Not Responding on Windows 10 and Windows 11
Even though the market is filled with Microsoft Word rivals, Word remains the top choice among consumers and businesses.
 Top 3 Ways to Convert Your Microsoft Word Document Into a PowerPoint Presentation
What if you want to make a Presentation out of a Microsoft Word document?
Top 3 Ways to Convert Your Microsoft Word Document Into a PowerPoint Presentation
What if you want to make a Presentation out of a Microsoft Word document?
 How to Lock an Image in Microsoft Word
Images added to Microsoft Word automatically move around as you add or remove text.
How to Lock an Image in Microsoft Word
Images added to Microsoft Word automatically move around as you add or remove text.
 5 Fixes When Read Aloud Is Not Working in Microsoft Word for Windows
Fix 1: Add the Read Aloud Option Is the Read Aloud option missing from Microsoft Word?
5 Fixes When Read Aloud Is Not Working in Microsoft Word for Windows
Fix 1: Add the Read Aloud Option Is the Read Aloud option missing from Microsoft Word?
The article above may contain affiliate links which help support Guiding Tech. The content remains unbiased and authentic and will never affect our editorial integrity.