Digital fillable forms are as important as their physical counterparts. Whether it’s for a simple book request from the library or for requesting office stationaries, electronic forms are useful in many scenarios.

The best part is that handling them is simple and straightforward. All you need to do is fill up the details, attach the form, and send it over in an email. No headache of rotating a paper around.
Creating a fillable form is not rocket science. If you have a word processor like Microsoft Word, you can create them quite easily. From adding checkboxes to neat text boxes, MS Word gives a lot of elements to play with.
However, these options are a bit hidden and not readily available. You have to enable the Developer options (yep, MS Word has this mode), and then design the form.
So, let’s take a look at how to make a fillable form in Microsoft Word.
Create a Fillable Form in Microsoft Word
Step 1: Enable the Developer Tab
Head off to the File tab and click on Options. That will open the Word options window.
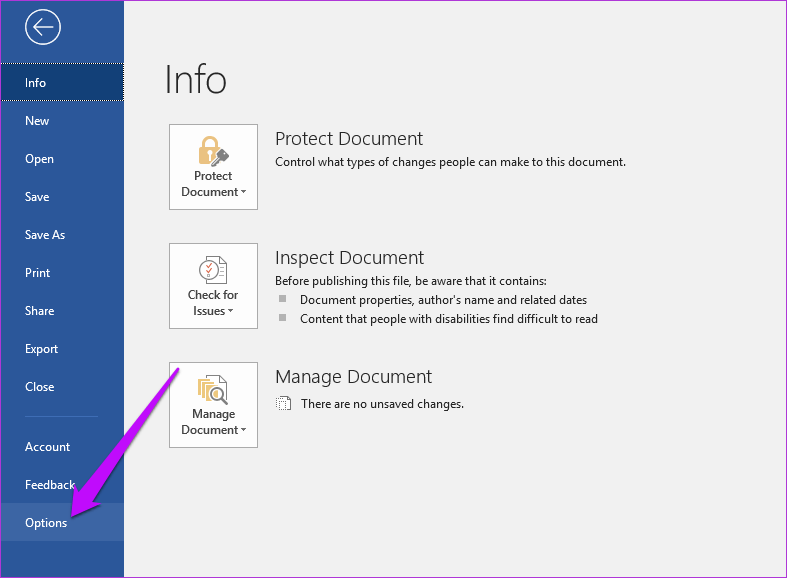
Now, select Customize Ribbon and click on the first drop-down.
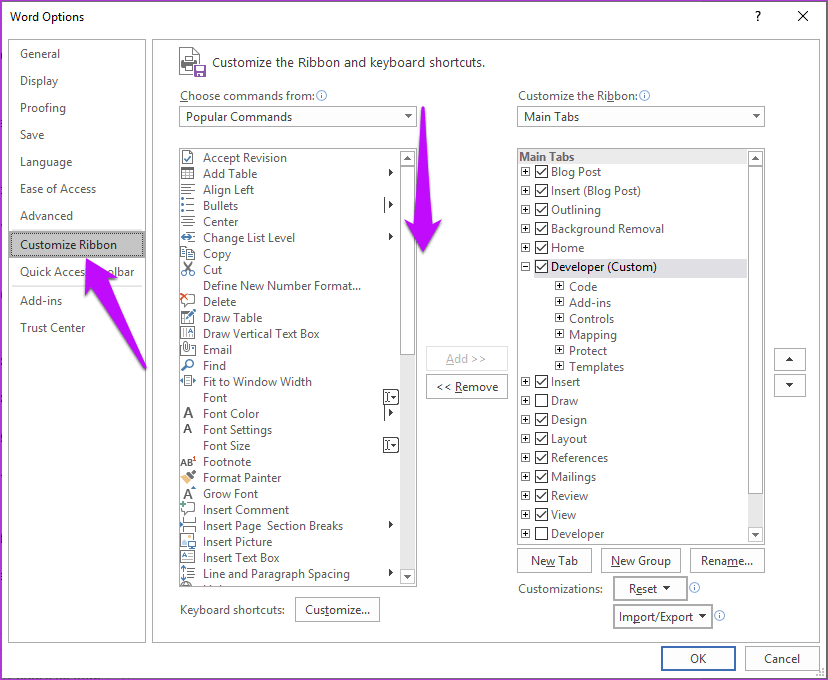
From the scrollable list in the first column, select Main Tabs, and you’ll see a Developer (Custom) option in the window below. Select it, and send it over to the right side.
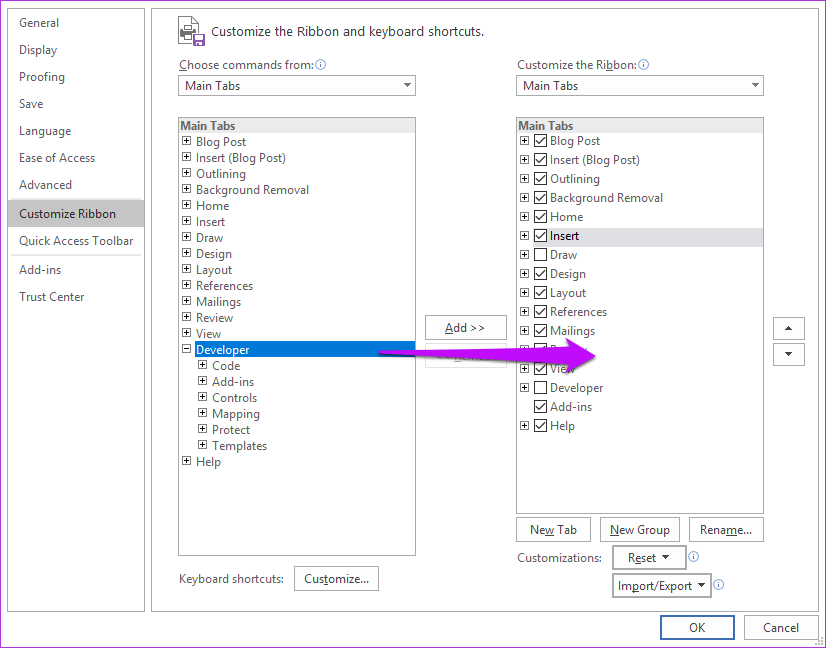
Once done, select Ok to save the changes. Here, you’ll see a new tab named Developer besides the Home tab.

All the control elements such as text boxes, drop downs, text boxes will be seen in the block beside the Add-in block, marked Controls.
Step 2: Add the Elements
Now, all you need to do is add the Content Control Elements. If it is a simple form with text boxes, you may want to add a table while designing the form. While the normal control panel lets you experiment with new elements, you can also play around with legacy controls.
Start by clicking on the Design Mode. Now, position your cursor at the place where you want to add the elements, and then select one of the many control elements.
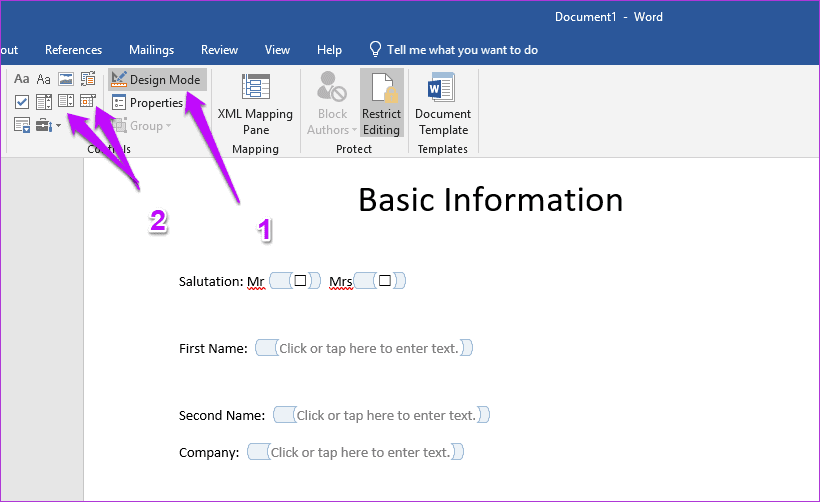
Note that the default style doesn’t have any formatting options. You won’t be able to see any borders, which can be problematic for first-time users. To see all the content control elements of a page, simply tap on Design Mode, which will highlight all the placeholders.
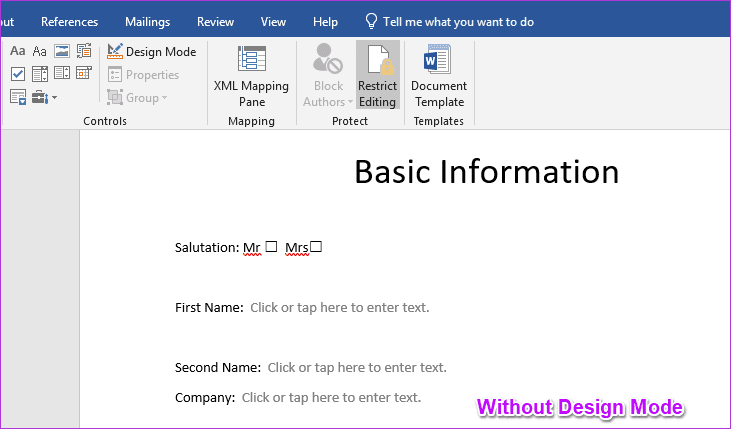
At the same time, if you want to access the legacy controls, click on the little briefcase-shaped icon shaped as shown in the screenshot below.

Step 3: Customize the Elements
Other than that, Microsoft Word also lets you edit and customize the properties of the elements. From simple things like changing the placeholder color to adding the element title and adding locking mechanisms, you can do plenty with this simple control.
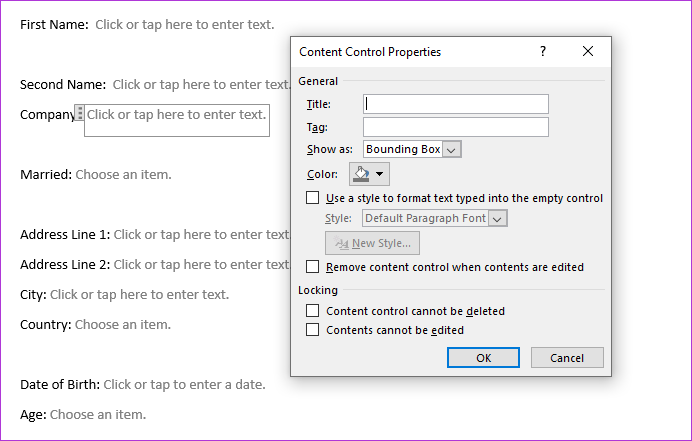
To open the Properties box, select an element and click on Properties from the top ribbon. Next, double click on the content control element to change the instructional text.
Step 4: Restrict Editing
It’s quite easy to edit a form in Word. All you need is a person who knows their way around MS Word’s fillable forms features to completely change the structure of a form. However, at the same time, you would want users to be able to fill the form easily.
Thankfully, this can be averted by simply locking the form. To do that, select all the form elements with the Ctrl+A keyboard shortcut, then click on the Restrict Editing button at the top ribbon.

Next, select the modes of restriction. Tap on Editing restrictions (option #2) and select the ‘Allow only this …’ checkbox, and then select the ‘Filling in forms’ option from the drop-down. Enter a password if you want to, and then hit the Ok button
Congratulations! You just created your first form. Open the test the form and you should be able to fill it like any other forms.
Content Control Elements And their Meaning
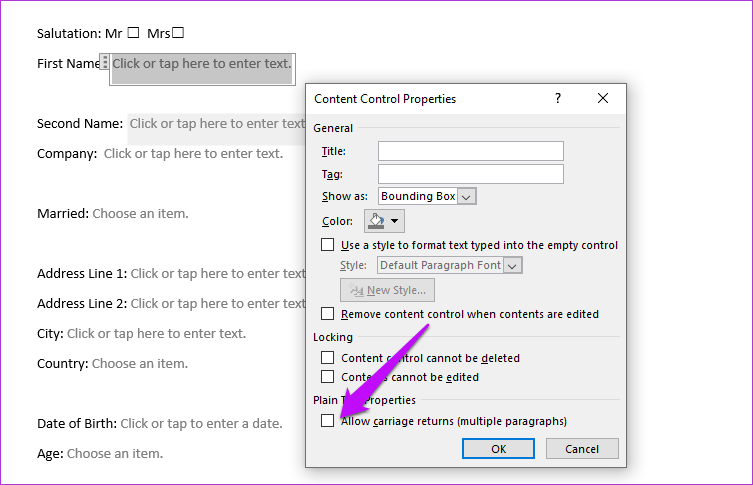
Quite naturally, the first two options, Plain Text Content Control and Rich Text Content Control are for adding text elements to the form. Though users can add text in various formats, users won’t be able to add multiple lines by default.
Thankfully, it is easily rectifiable. Click on properties and check the Allow Carriage returns checkbox.
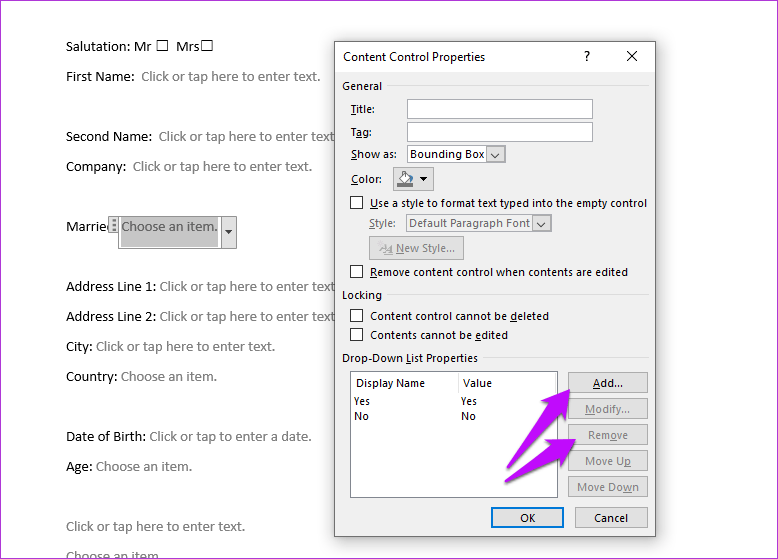
However, it’s not as simple as that for the other elements like the drop-down list, date picker, where you’d need to add the values beforehand when you submit the form.
For drop-downs, select the element and click on Properties. Next, tap on Add and add the name and the value. Do this for the rest of your options. You can even move the values up and down on the list.
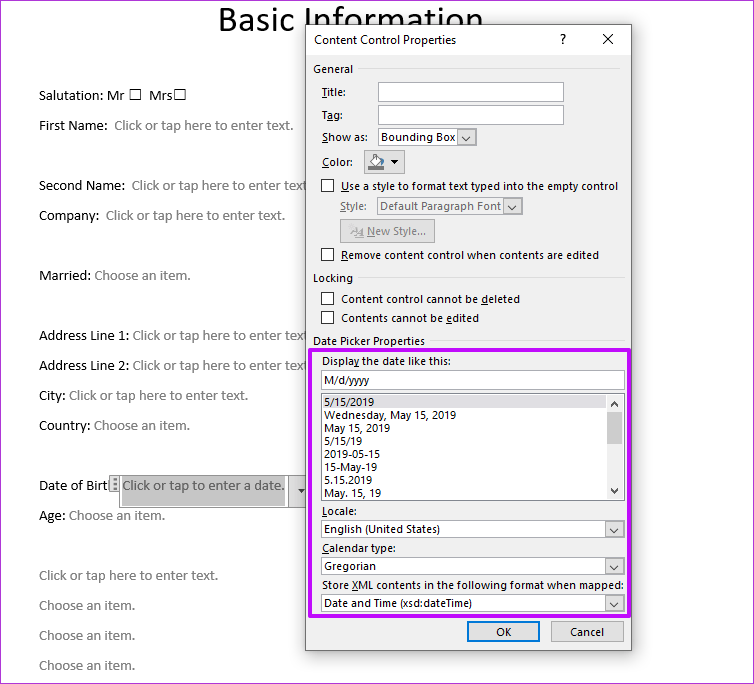
Similarly, for dates, you can choose the date format, calendar type, and the likes. Like the above one, open the Properties controls for the calendar and make your changes. Hit Ok when done.
However, the best tool is the Repeating Section tool. This one lets you repeat any form element on your form. That is a container for other content tools that you want to repeat in the different parts of the form.
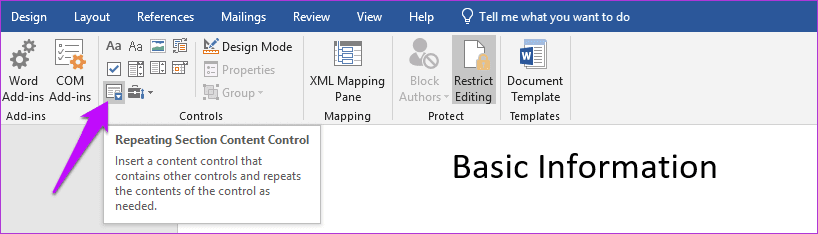
To use it, tap on the icon and add the tools which you want inside it. Once done, click on the Add icon. There, all the elements will be repeated neatly.
Fill Away
Whether it’s crafting a writing a simple essay or creating an official document, MS Word provides an endless set of features. And with the option to create fillable forms, the scope just widens.
What are your favorite Word features?
Next up: Did you know you can do a bit of image-editing on Word? If not, check out the post below.
Was this helpful?
Last updated on 07 February, 2022
Read Next
 How to Create a Fillable Form in Google Docs
Method 1: The Native Way Using Tables and Other Form Elements One of the best methods to create a form in Google Docs is to use Tables.
How to Create a Fillable Form in Google Docs
Method 1: The Native Way Using Tables and Other Form Elements One of the best methods to create a form in Google Docs is to use Tables.
 How to Create a Custom Form in Microsoft Outlook
Microsoft Outlook leats you create a Form.
How to Create a Custom Form in Microsoft Outlook
Microsoft Outlook leats you create a Form.
 Apple Pages vs Microsoft Word: Which Word Processing Software Is Better
Every major tech company out there is offering their version of the productivity suite.
Apple Pages vs Microsoft Word: Which Word Processing Software Is Better
Every major tech company out there is offering their version of the productivity suite.
 Google Docs vs. Microsoft Word Online: Which Word Processor Is Better
Google Docs goes toe-to-toe with Microsoft Word, especially with the Microsoft 365 subscription.
Google Docs vs. Microsoft Word Online: Which Word Processor Is Better
Google Docs goes toe-to-toe with Microsoft Word, especially with the Microsoft 365 subscription.
 How to Create an RSVP Form Using Google Forms
Here's how to create an RSVP invite on Google Forms, share it with your guests, and collect their responses in a few steps.
How to Create an RSVP Form Using Google Forms
Here's how to create an RSVP invite on Google Forms, share it with your guests, and collect their responses in a few steps.
 How to Save Google Form Responses to Different Sheets Easily
Google Forms is perhaps one of the most popular services for collecting surveys, and it's easy to see why.
How to Save Google Form Responses to Different Sheets Easily
Google Forms is perhaps one of the most popular services for collecting surveys, and it's easy to see why.
 4 Ways to Share Google Form Responses With Others
Want to give access to Google Form responses to someone else?
4 Ways to Share Google Form Responses With Others
Want to give access to Google Form responses to someone else?
 How to Create a Custom Color Set and Theme in Microsoft Word
To personalize your document, you are not limited to the default color sets and themes in Microsoft Word.
How to Create a Custom Color Set and Theme in Microsoft Word
To personalize your document, you are not limited to the default color sets and themes in Microsoft Word.
The article above may contain affiliate links which help support Guiding Tech. The content remains unbiased and authentic and will never affect our editorial integrity.