When Apple first launched the HomePod, the smart speaker’s integration was limited to Apple Music. Over the years, Apple allowed third-party music streaming apps to integrate with HomePod. While services like Deezer and Pandora added HomePod support, YouTube Music was late to the party. If you are on team YouTube and are subscribed to the Premium services, here’s how to play YouTube Music on HomePod.

Streaming your favorite music service on HomePod isn’t straightforward. Unlike Amazon Alexa speakers or Google Nest devices, Apple doesn’t include Bluetooth functionality on HomePod. You can’t simply connect your iPhone or Android to a HomePod and listen to a playlist. You must use an AirPlay-compatible device like an iPhone, iPad, or Mac to connect it to the HomePod.
Play YouTube Music on HomePod
Apple HomePod supports the likes of iHeartRadio, TuneIn Radio, Deezer, Pandora, Apple Music, YouTube Music, and Apple Podcasts. That means you can easily play tunes from any of those services. However, big names like Spotify and Amazon Music haven’t added direct support for HomePod. To use these services, you’ll need to rely on AirPlay from a specific app or change the volume output from the notification center to play YouTube Music on HomePod.
By default, HomePod uses Apple Music to play your favorite tracks. Manufacturers like Google, Apple, and Amazon keep their music streaming services by default for obvious reasons. You need to dig through settings to change your preferred streaming service.
As for YouTube Music on Apple HomePod, you need to connect it to your HomePod and change the default streaming service from the Home app settings. Let’s check it in action.
Add YouTube Music to HomePod
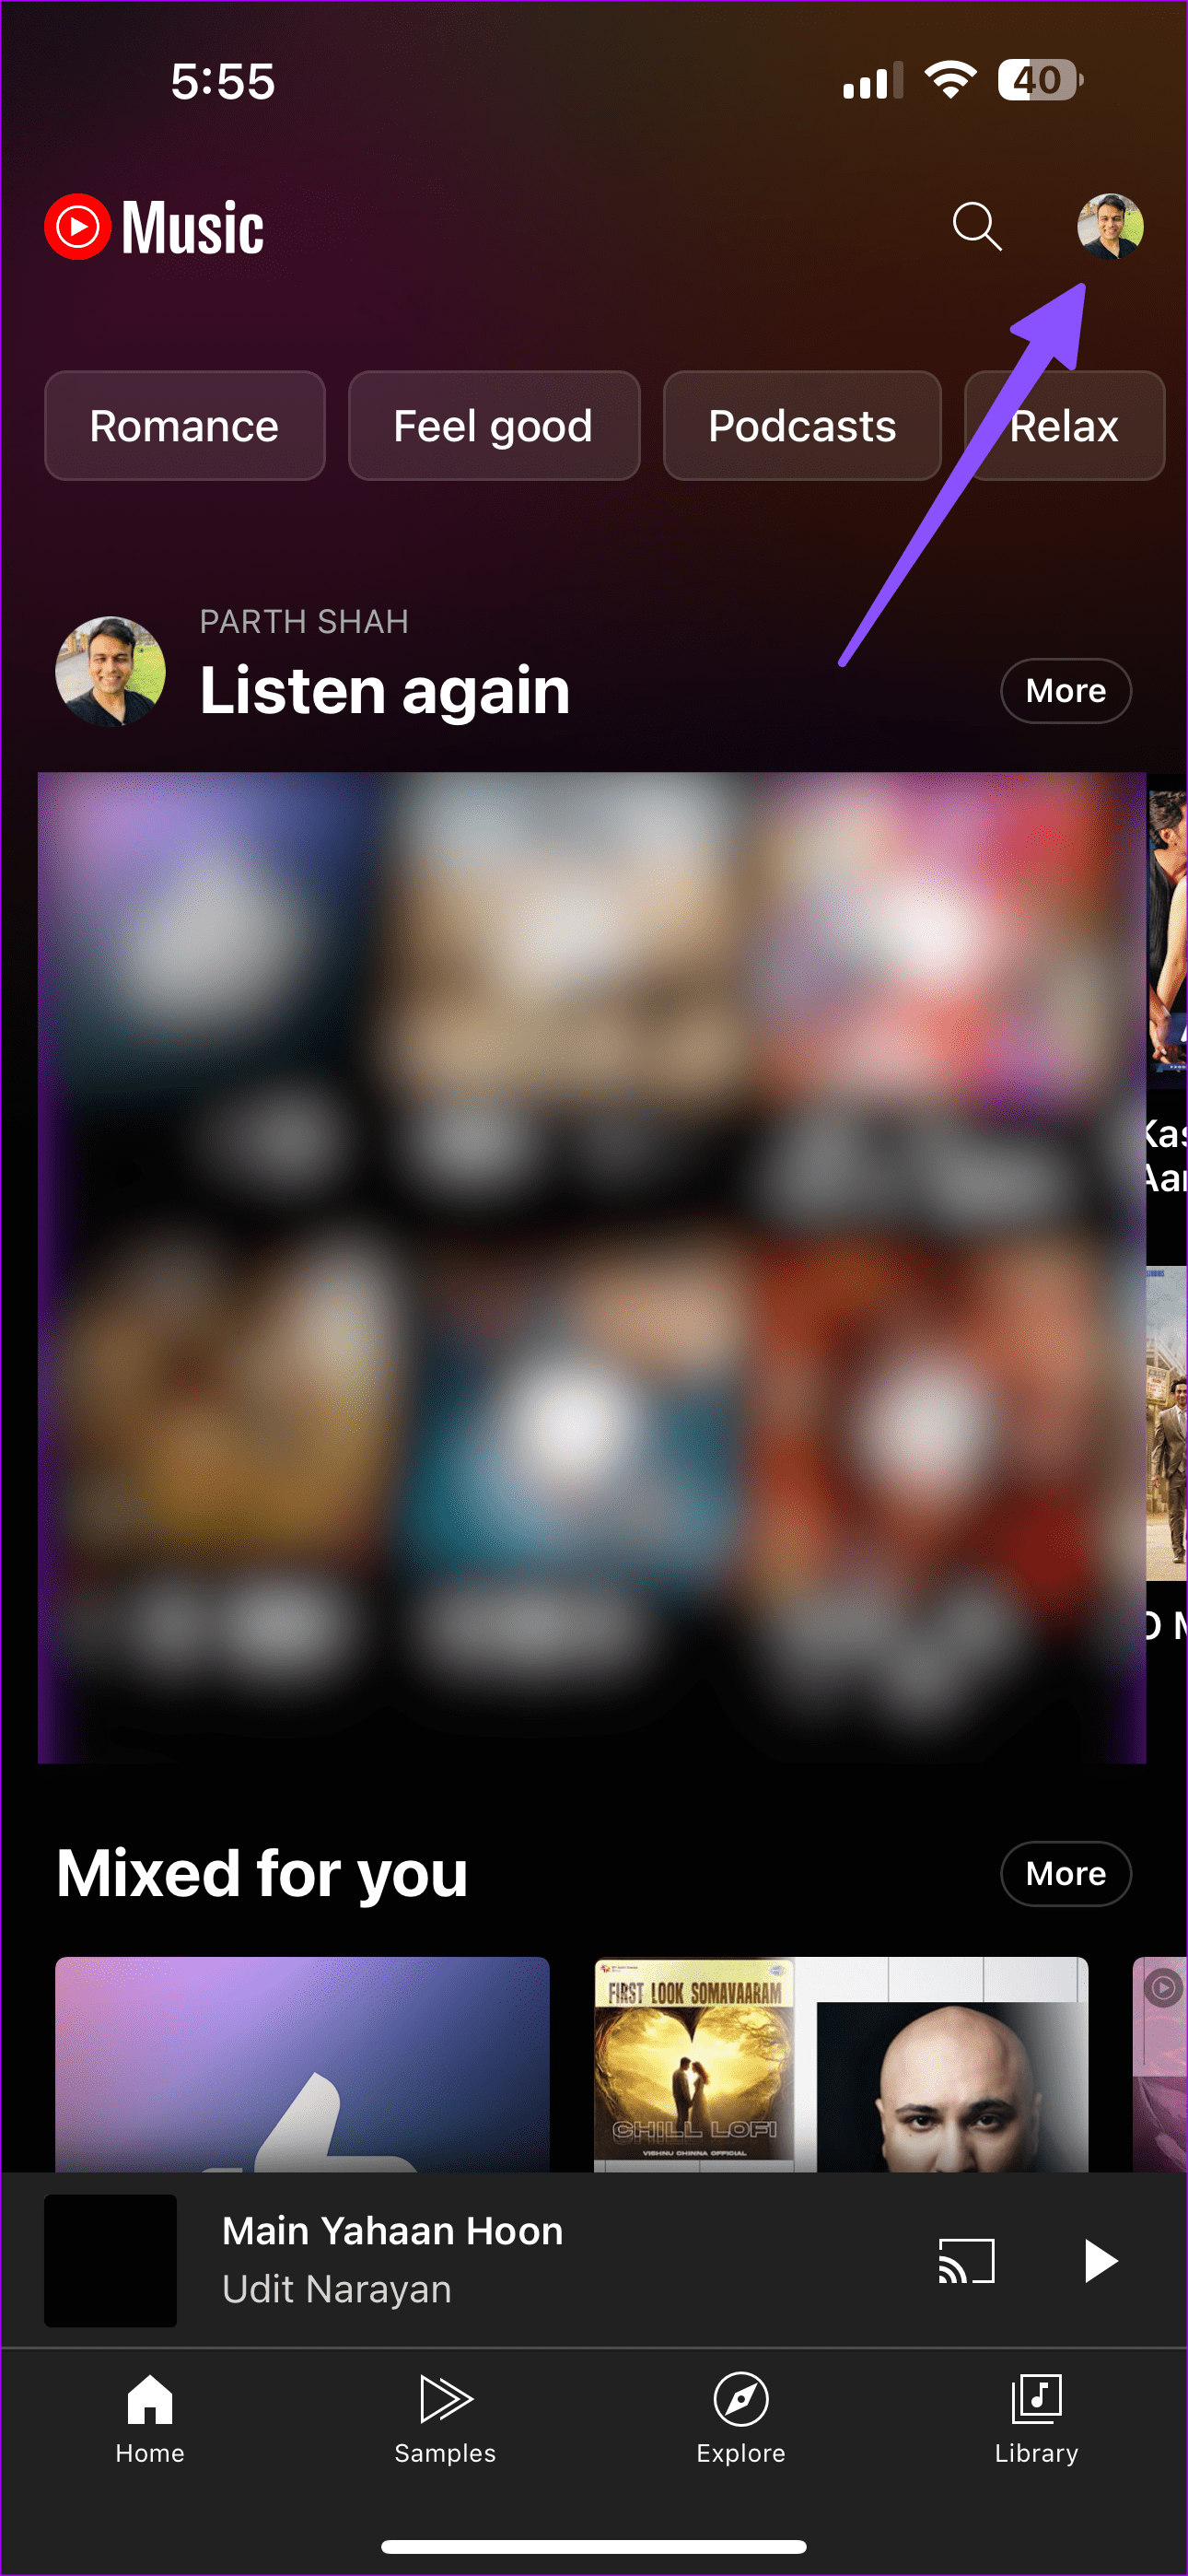
Step 1: Open the YouTube Music app on your iPhone or iPad.
Step 2: Tap the profile picture in the top-right corner. Open Settings.
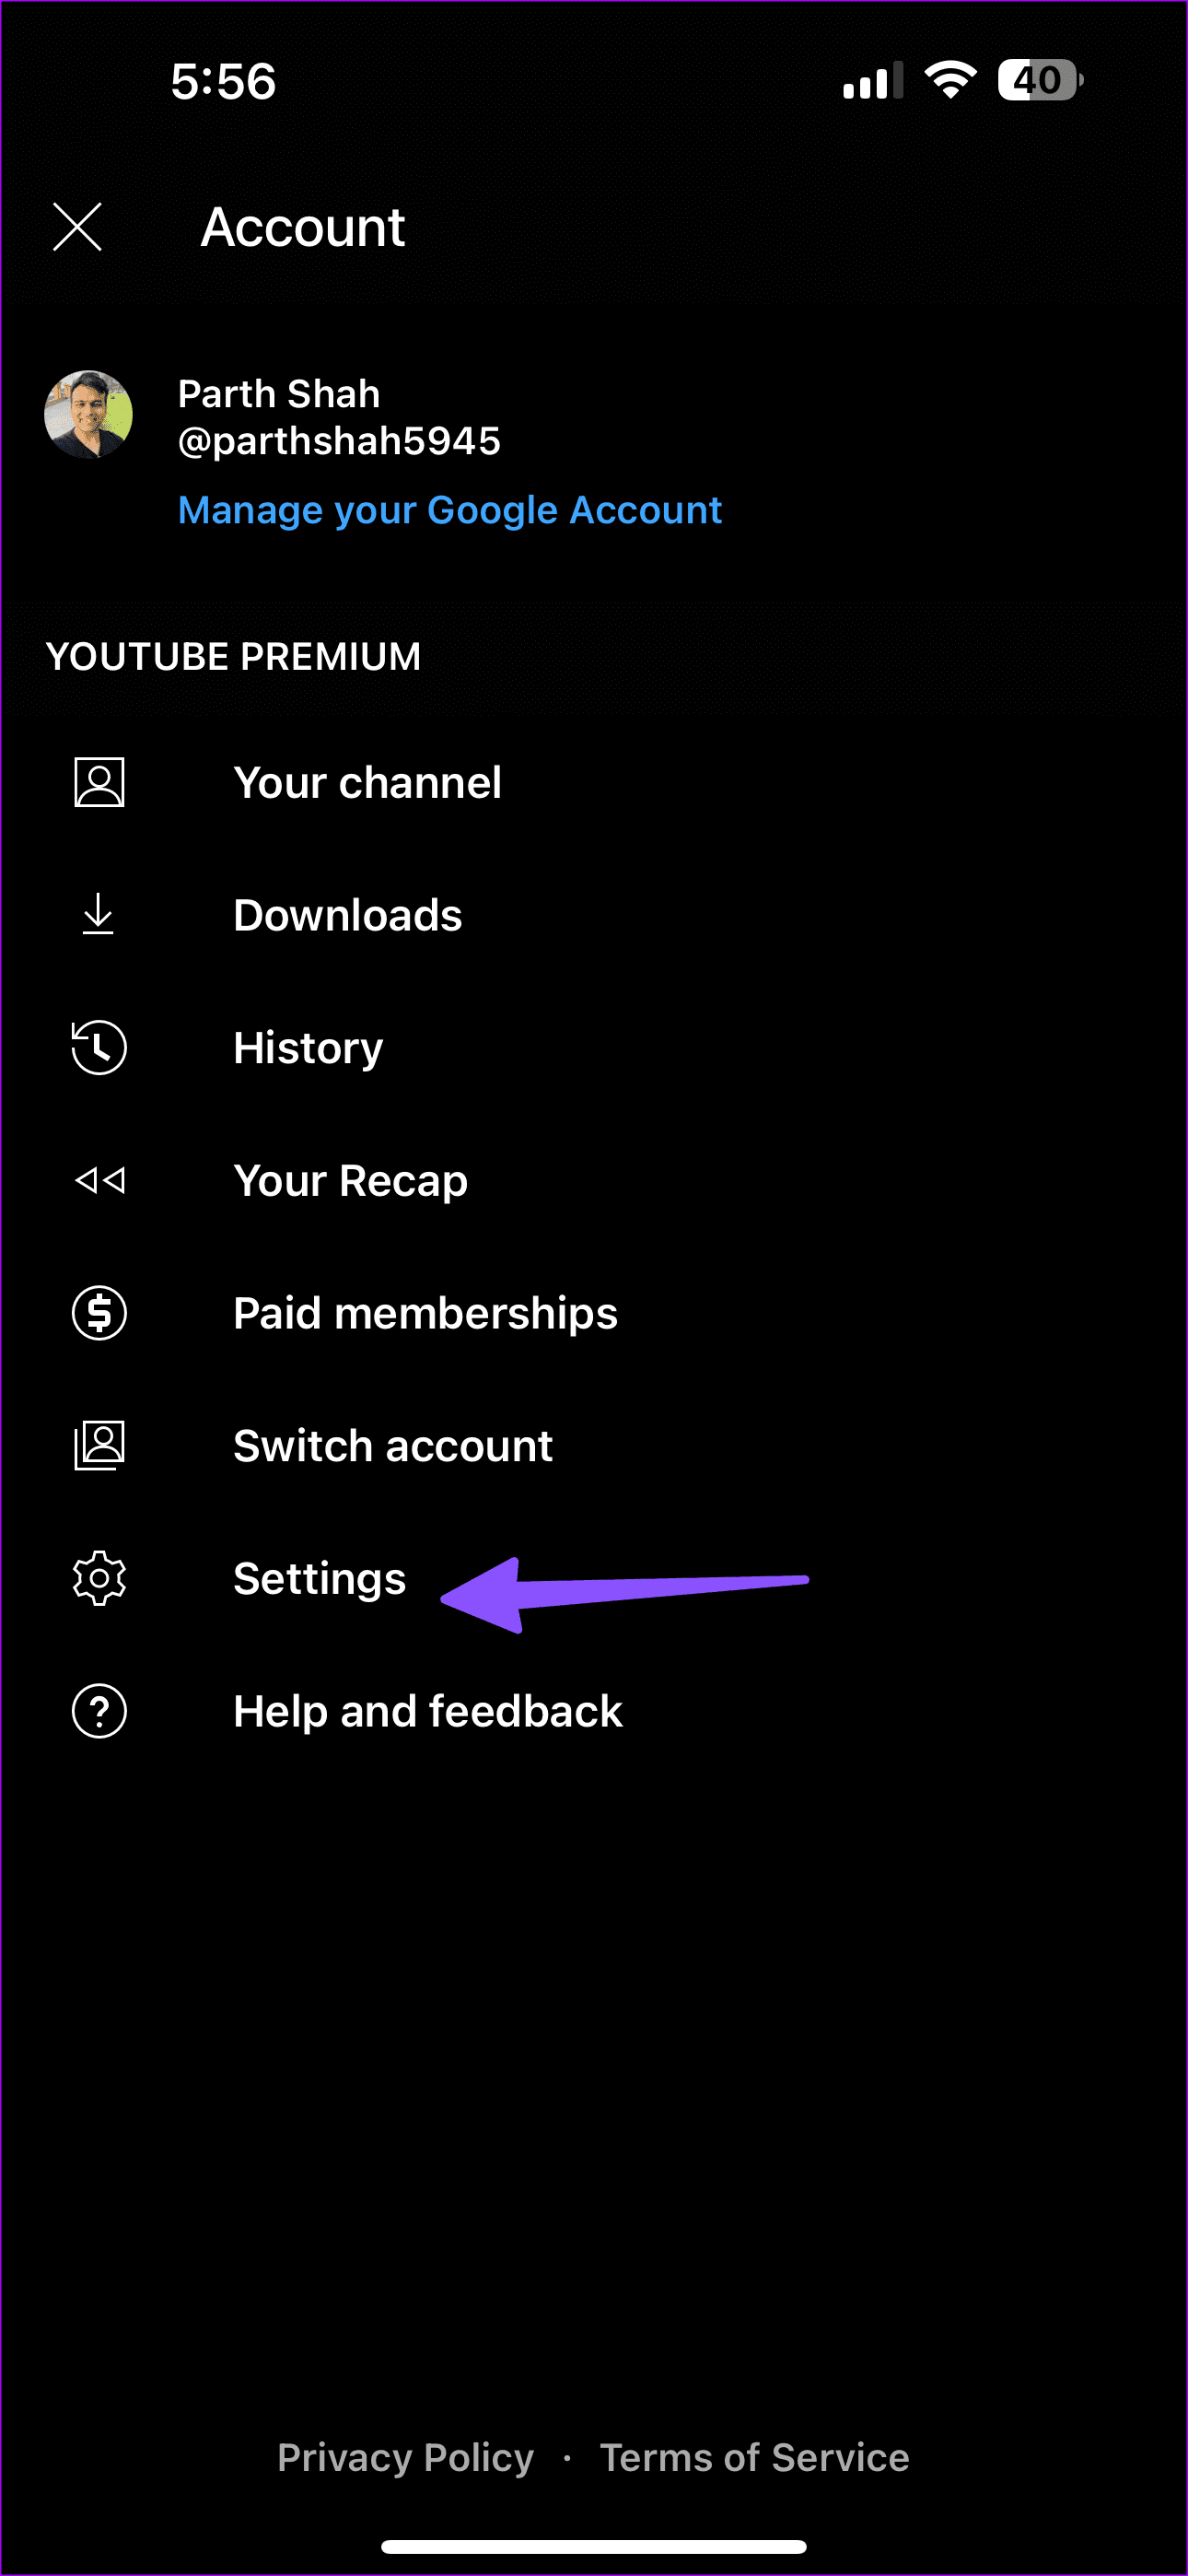
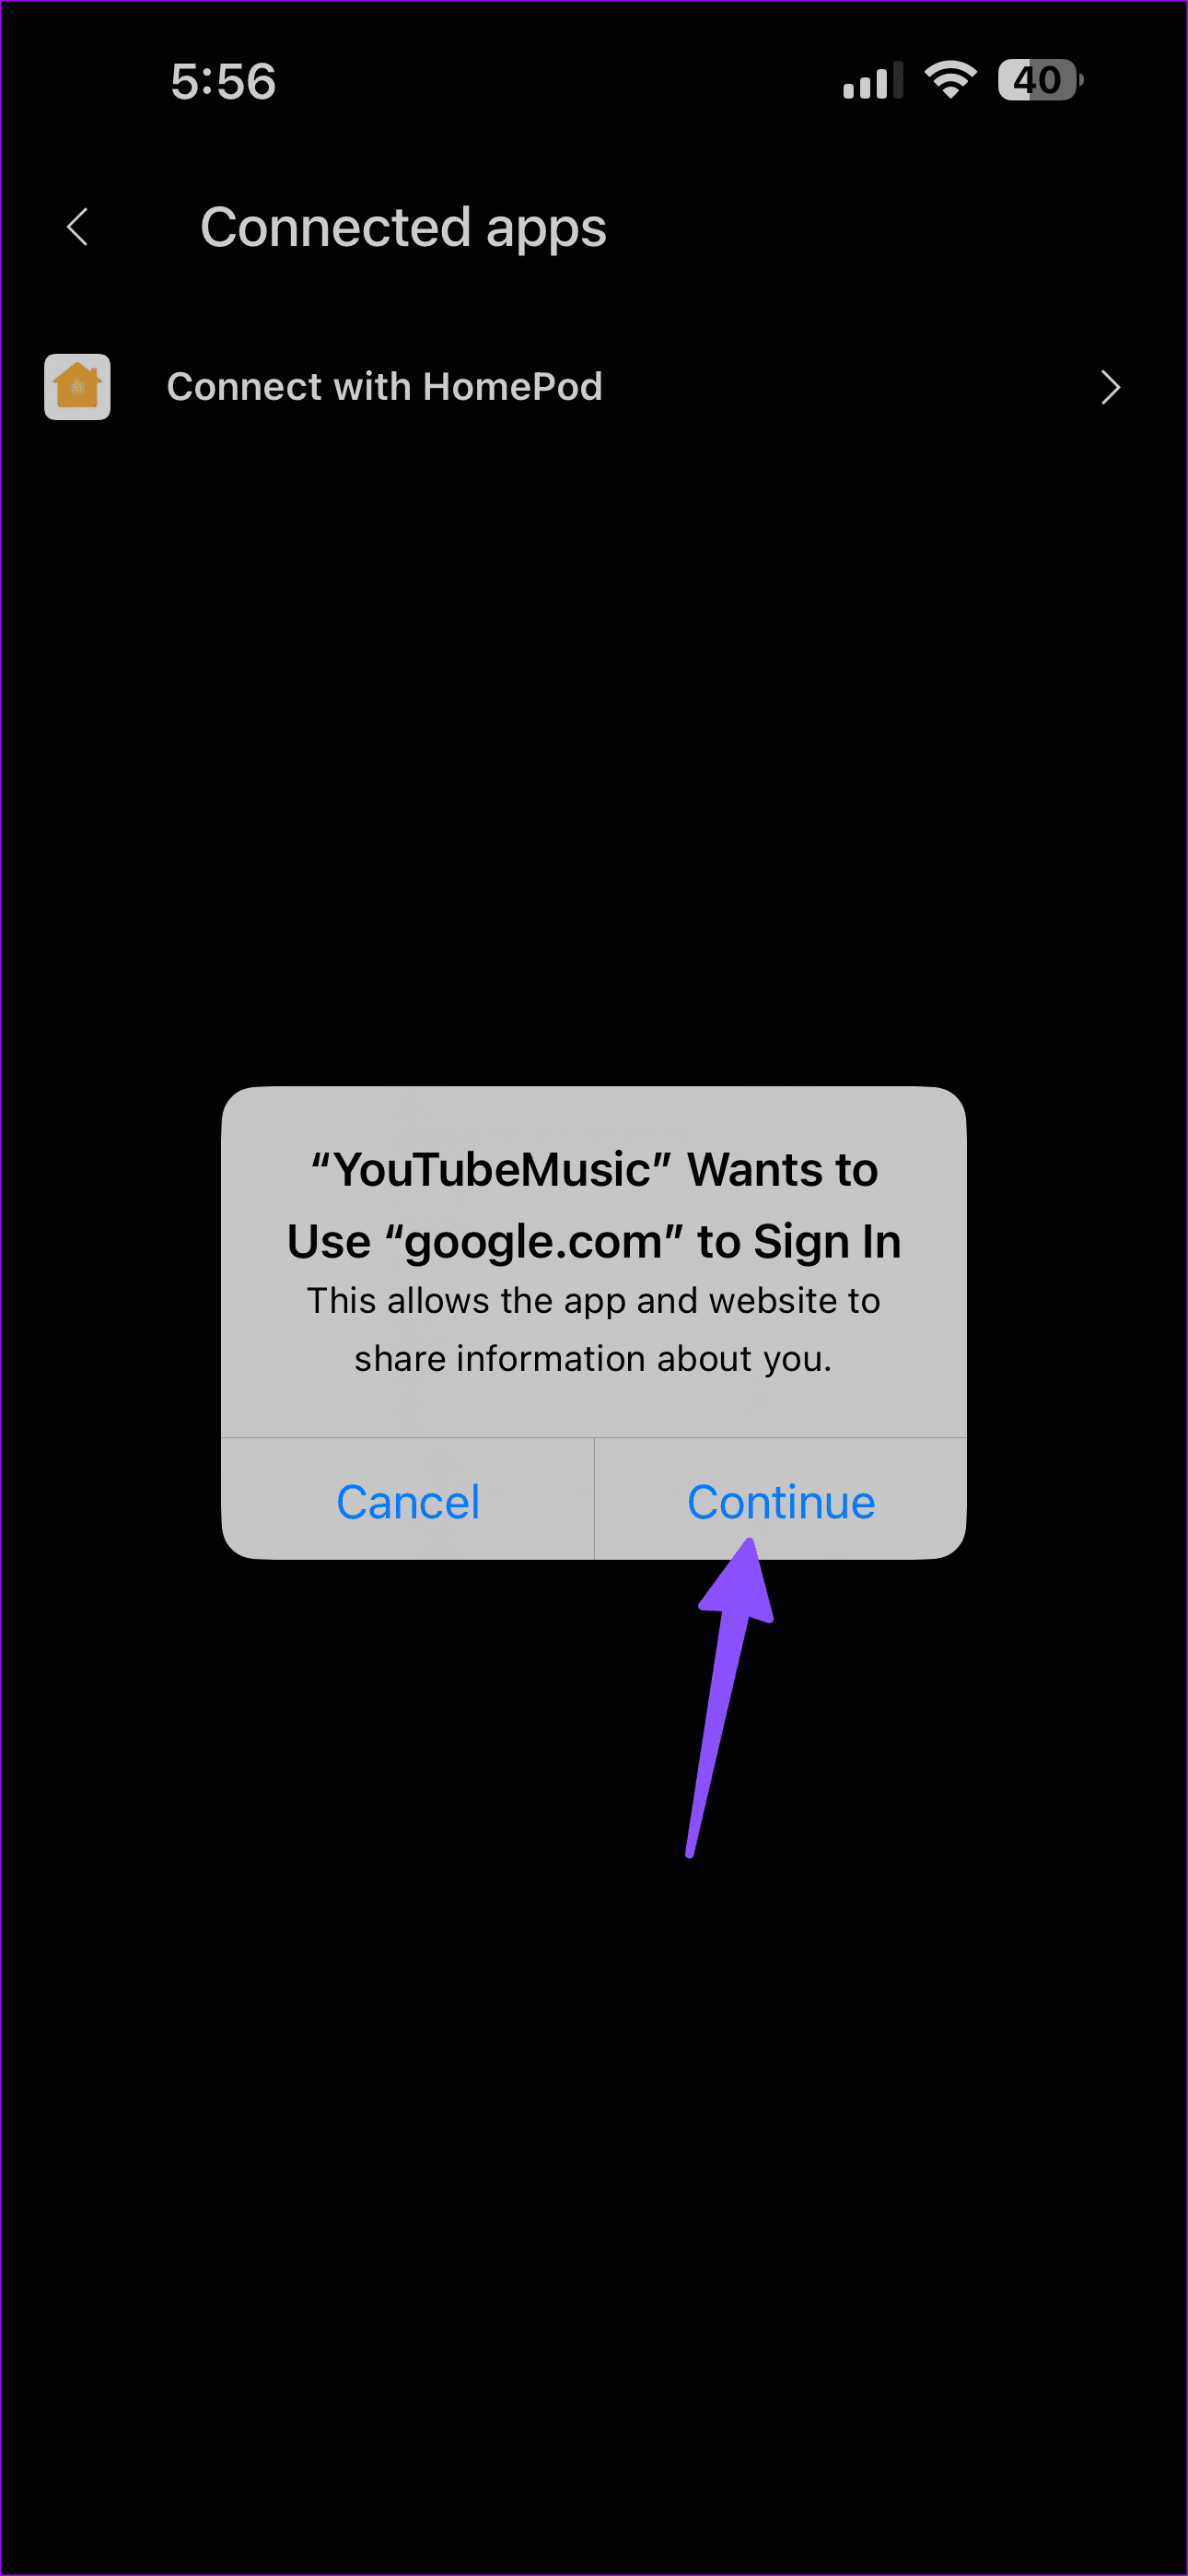
Step 3: Select Connected Apps.
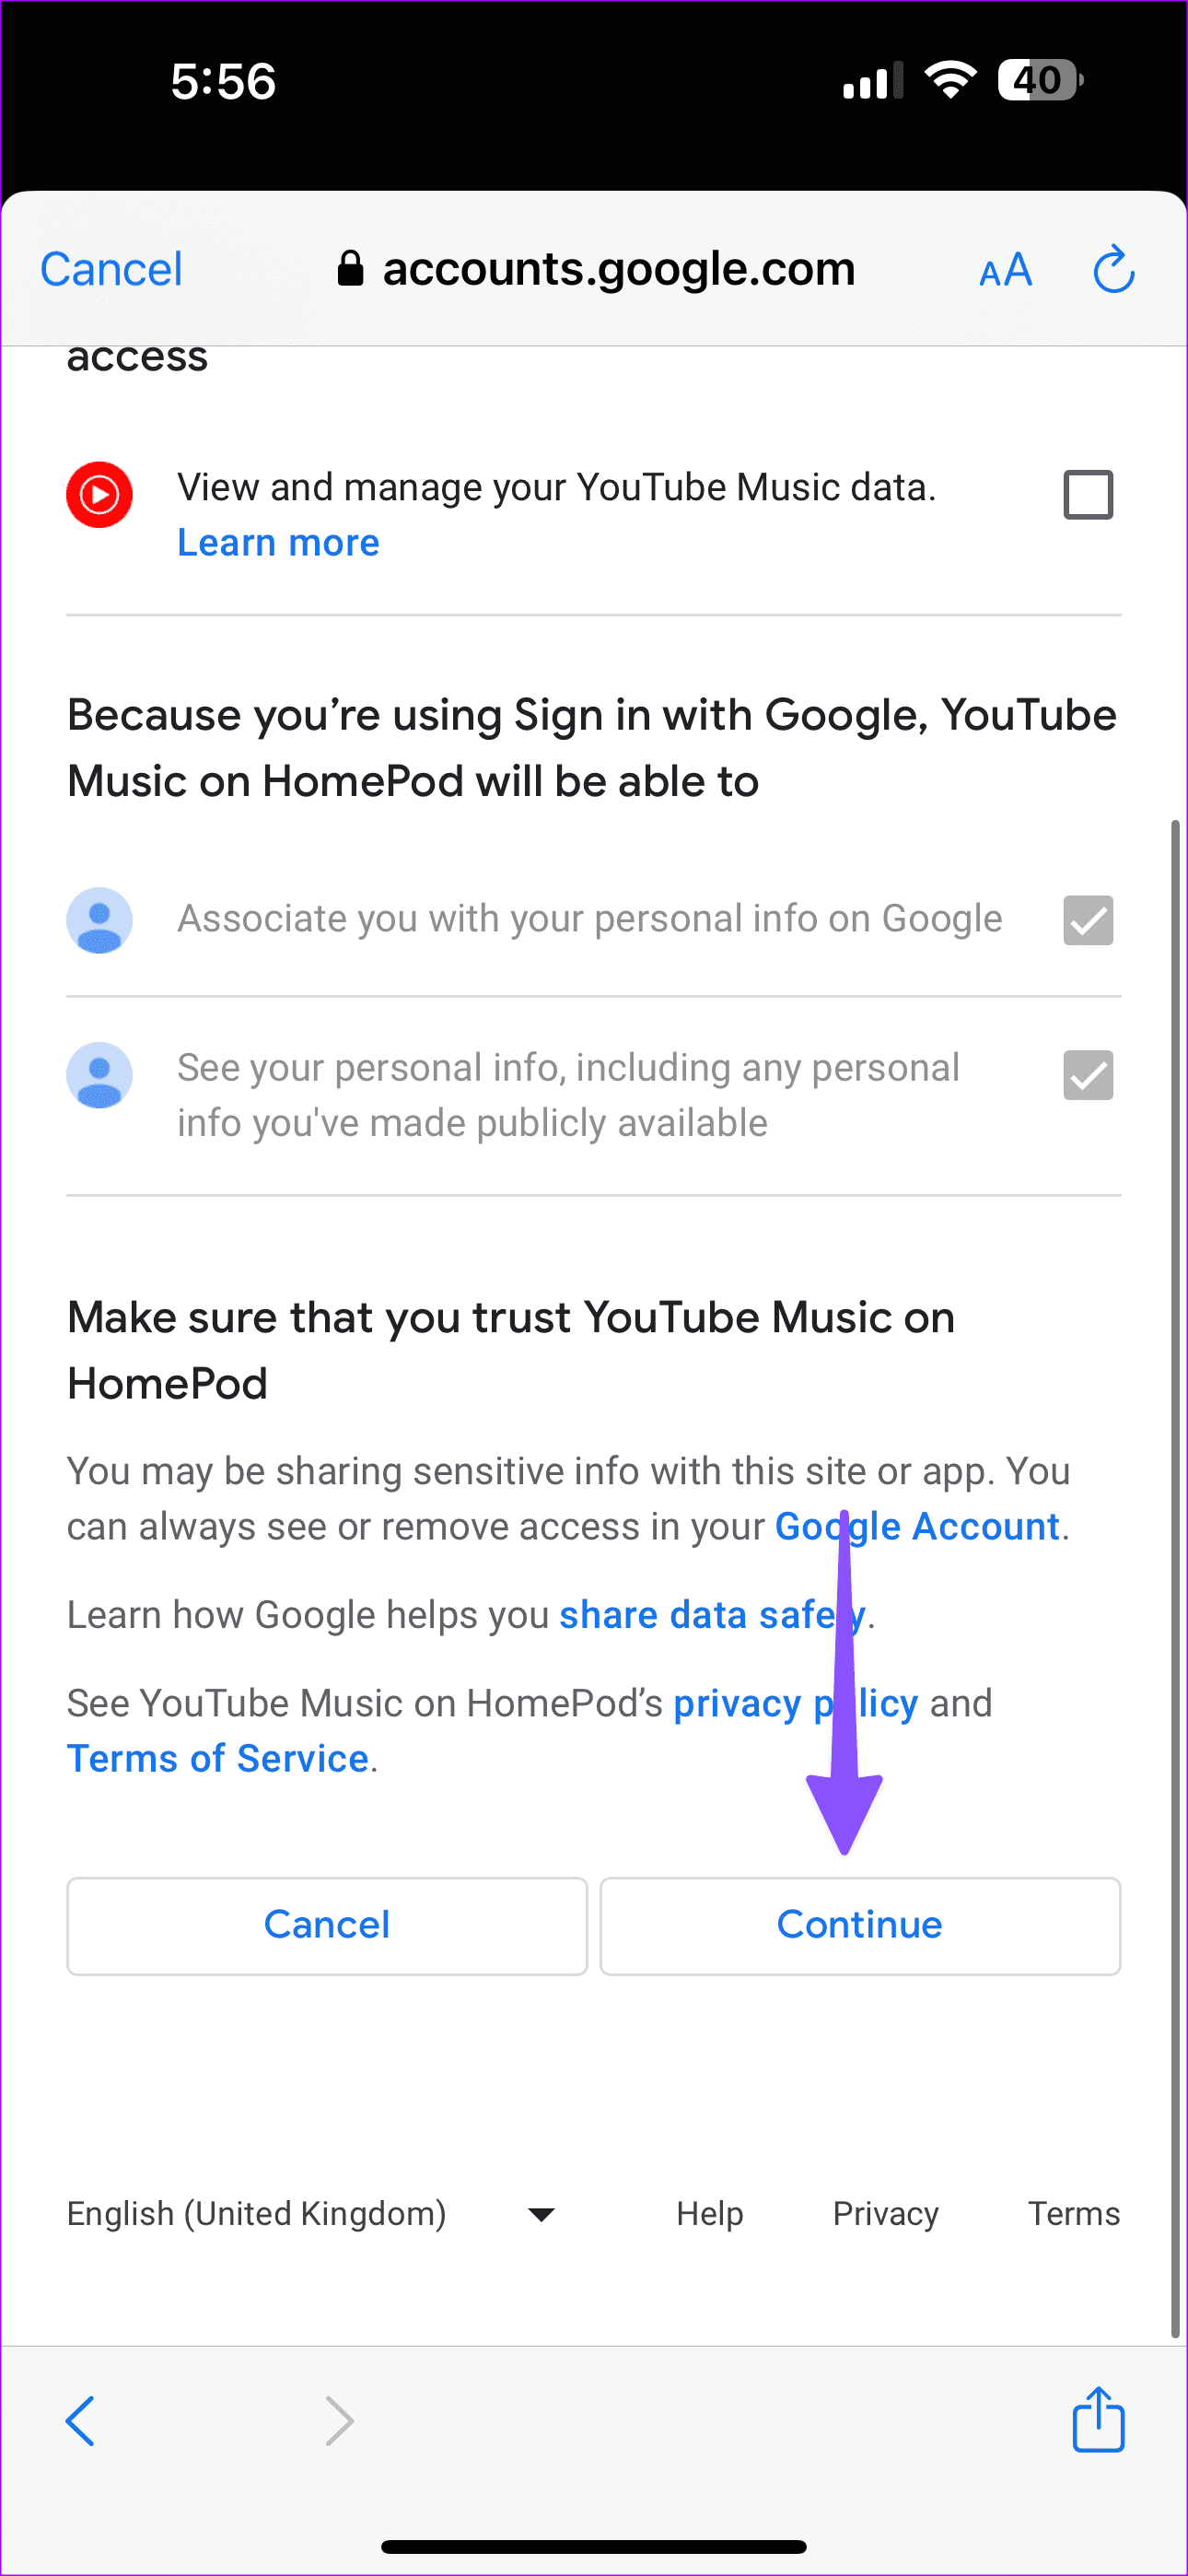
Step 4: Tap ‘Connect with HomePod’ from the following menu. Follow the on-screen instructions to complete the YouTube Music setup on HomePod.

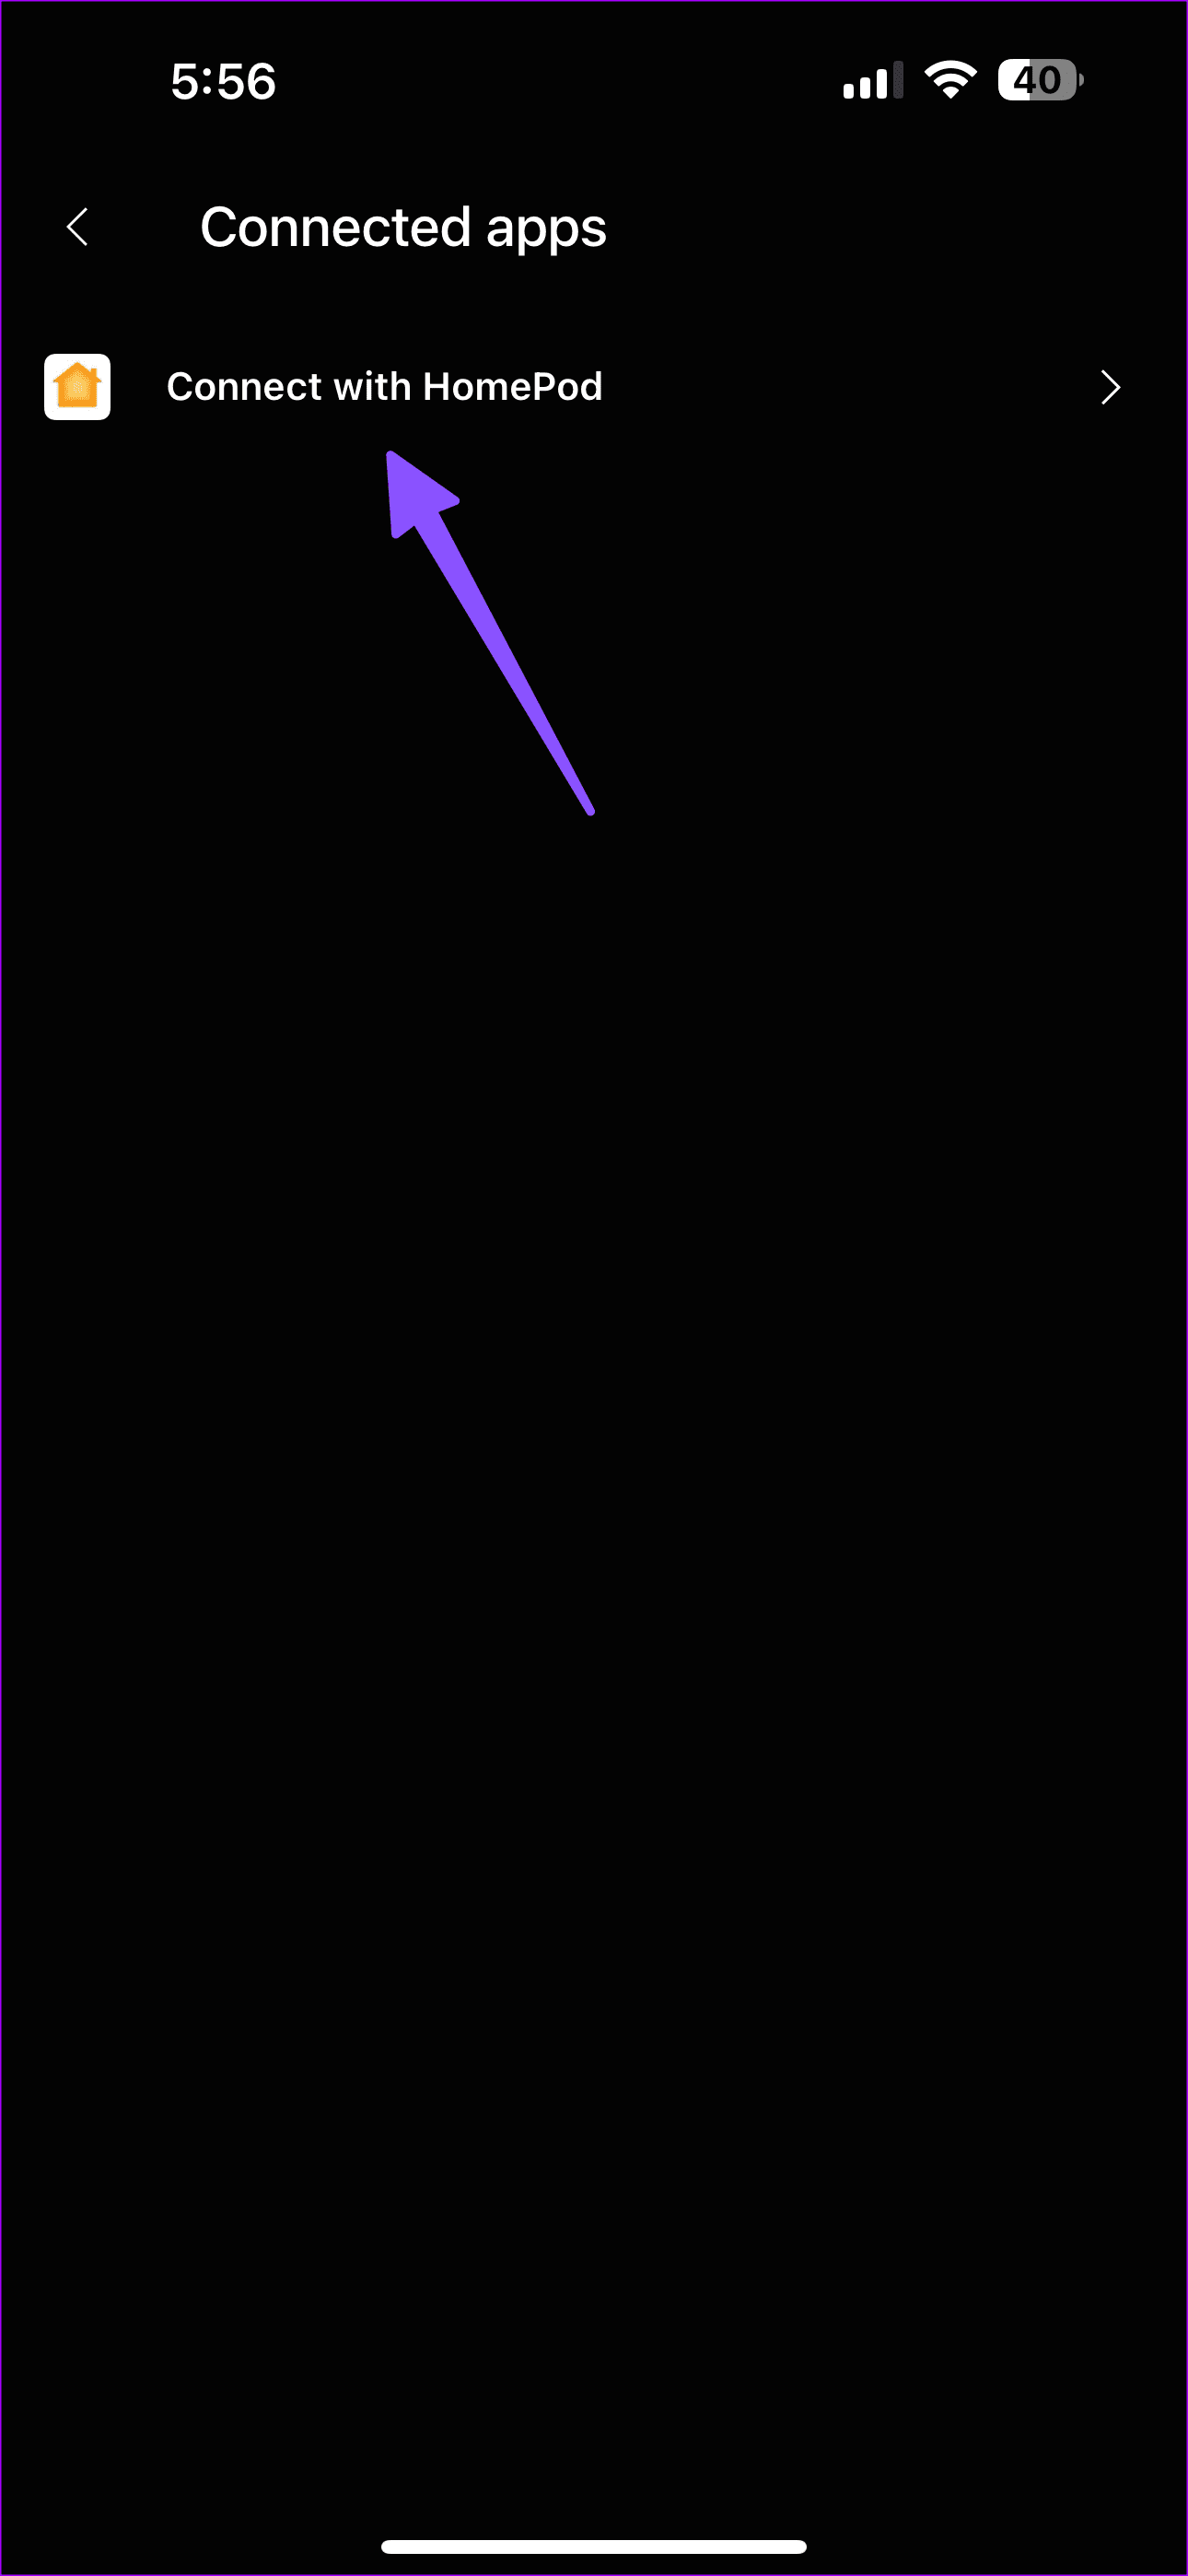
You shall give the required permission to let HomePod connect to your YouTube Music account.
Make YouTube Music Default Music Player on HomePod
Once you connect YouTube Music to HomePod, make it as the default music service for HomePod.
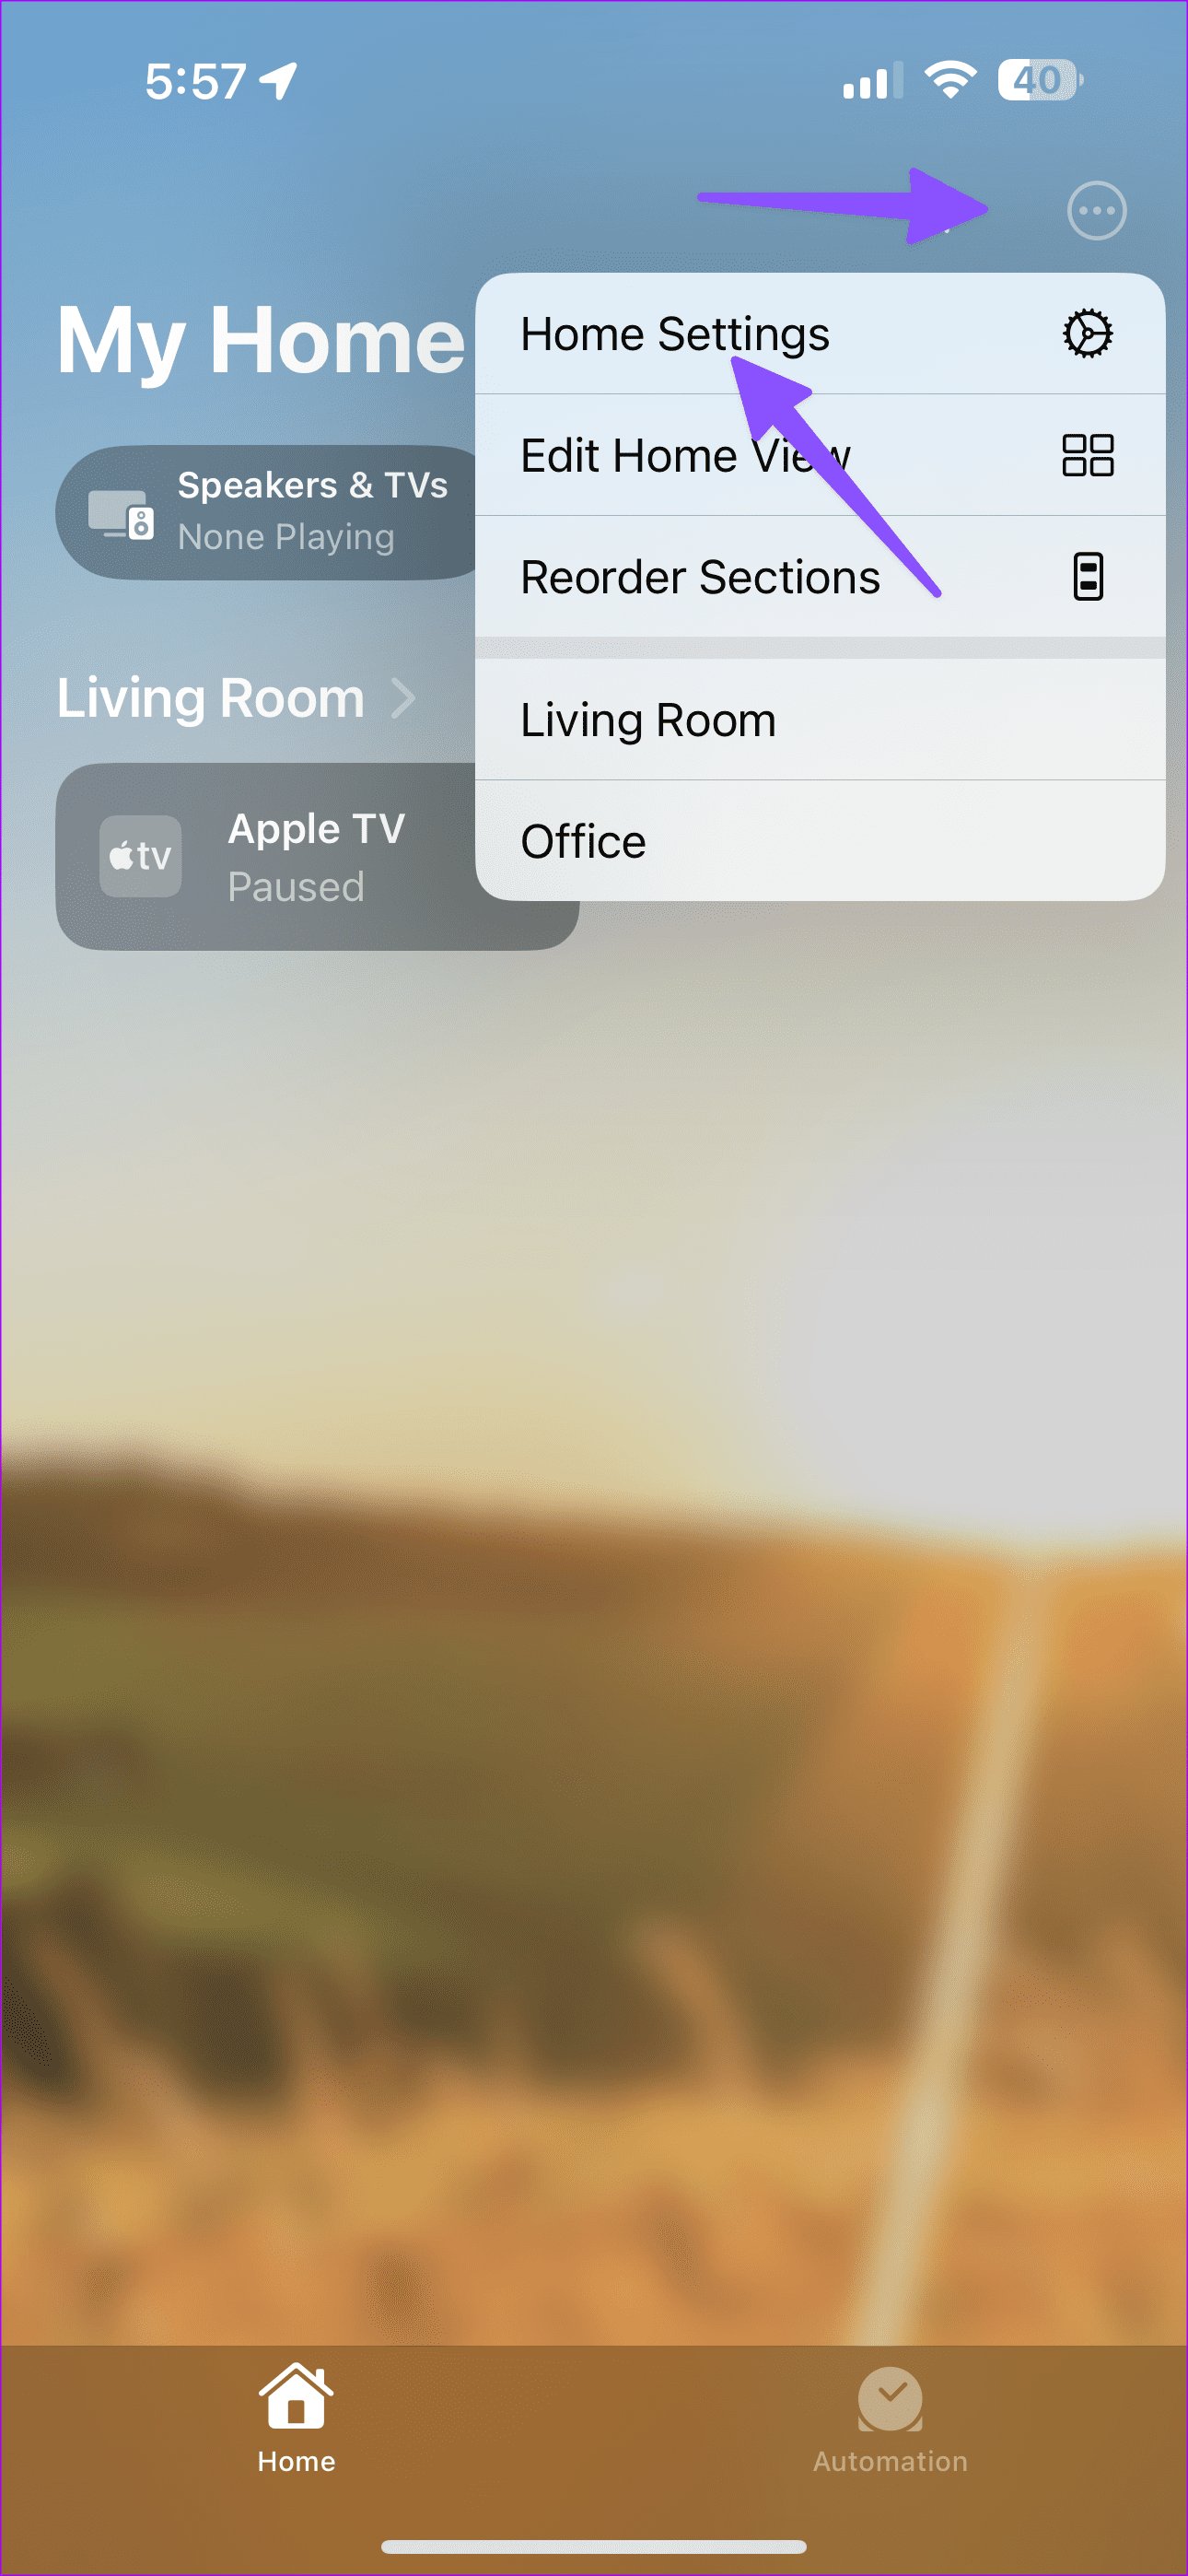
Step 1: Launch the Home app on your iPhone. Tap the three-dot menu at the top and select Settings.
Step 2: Select your profile under the People menu.
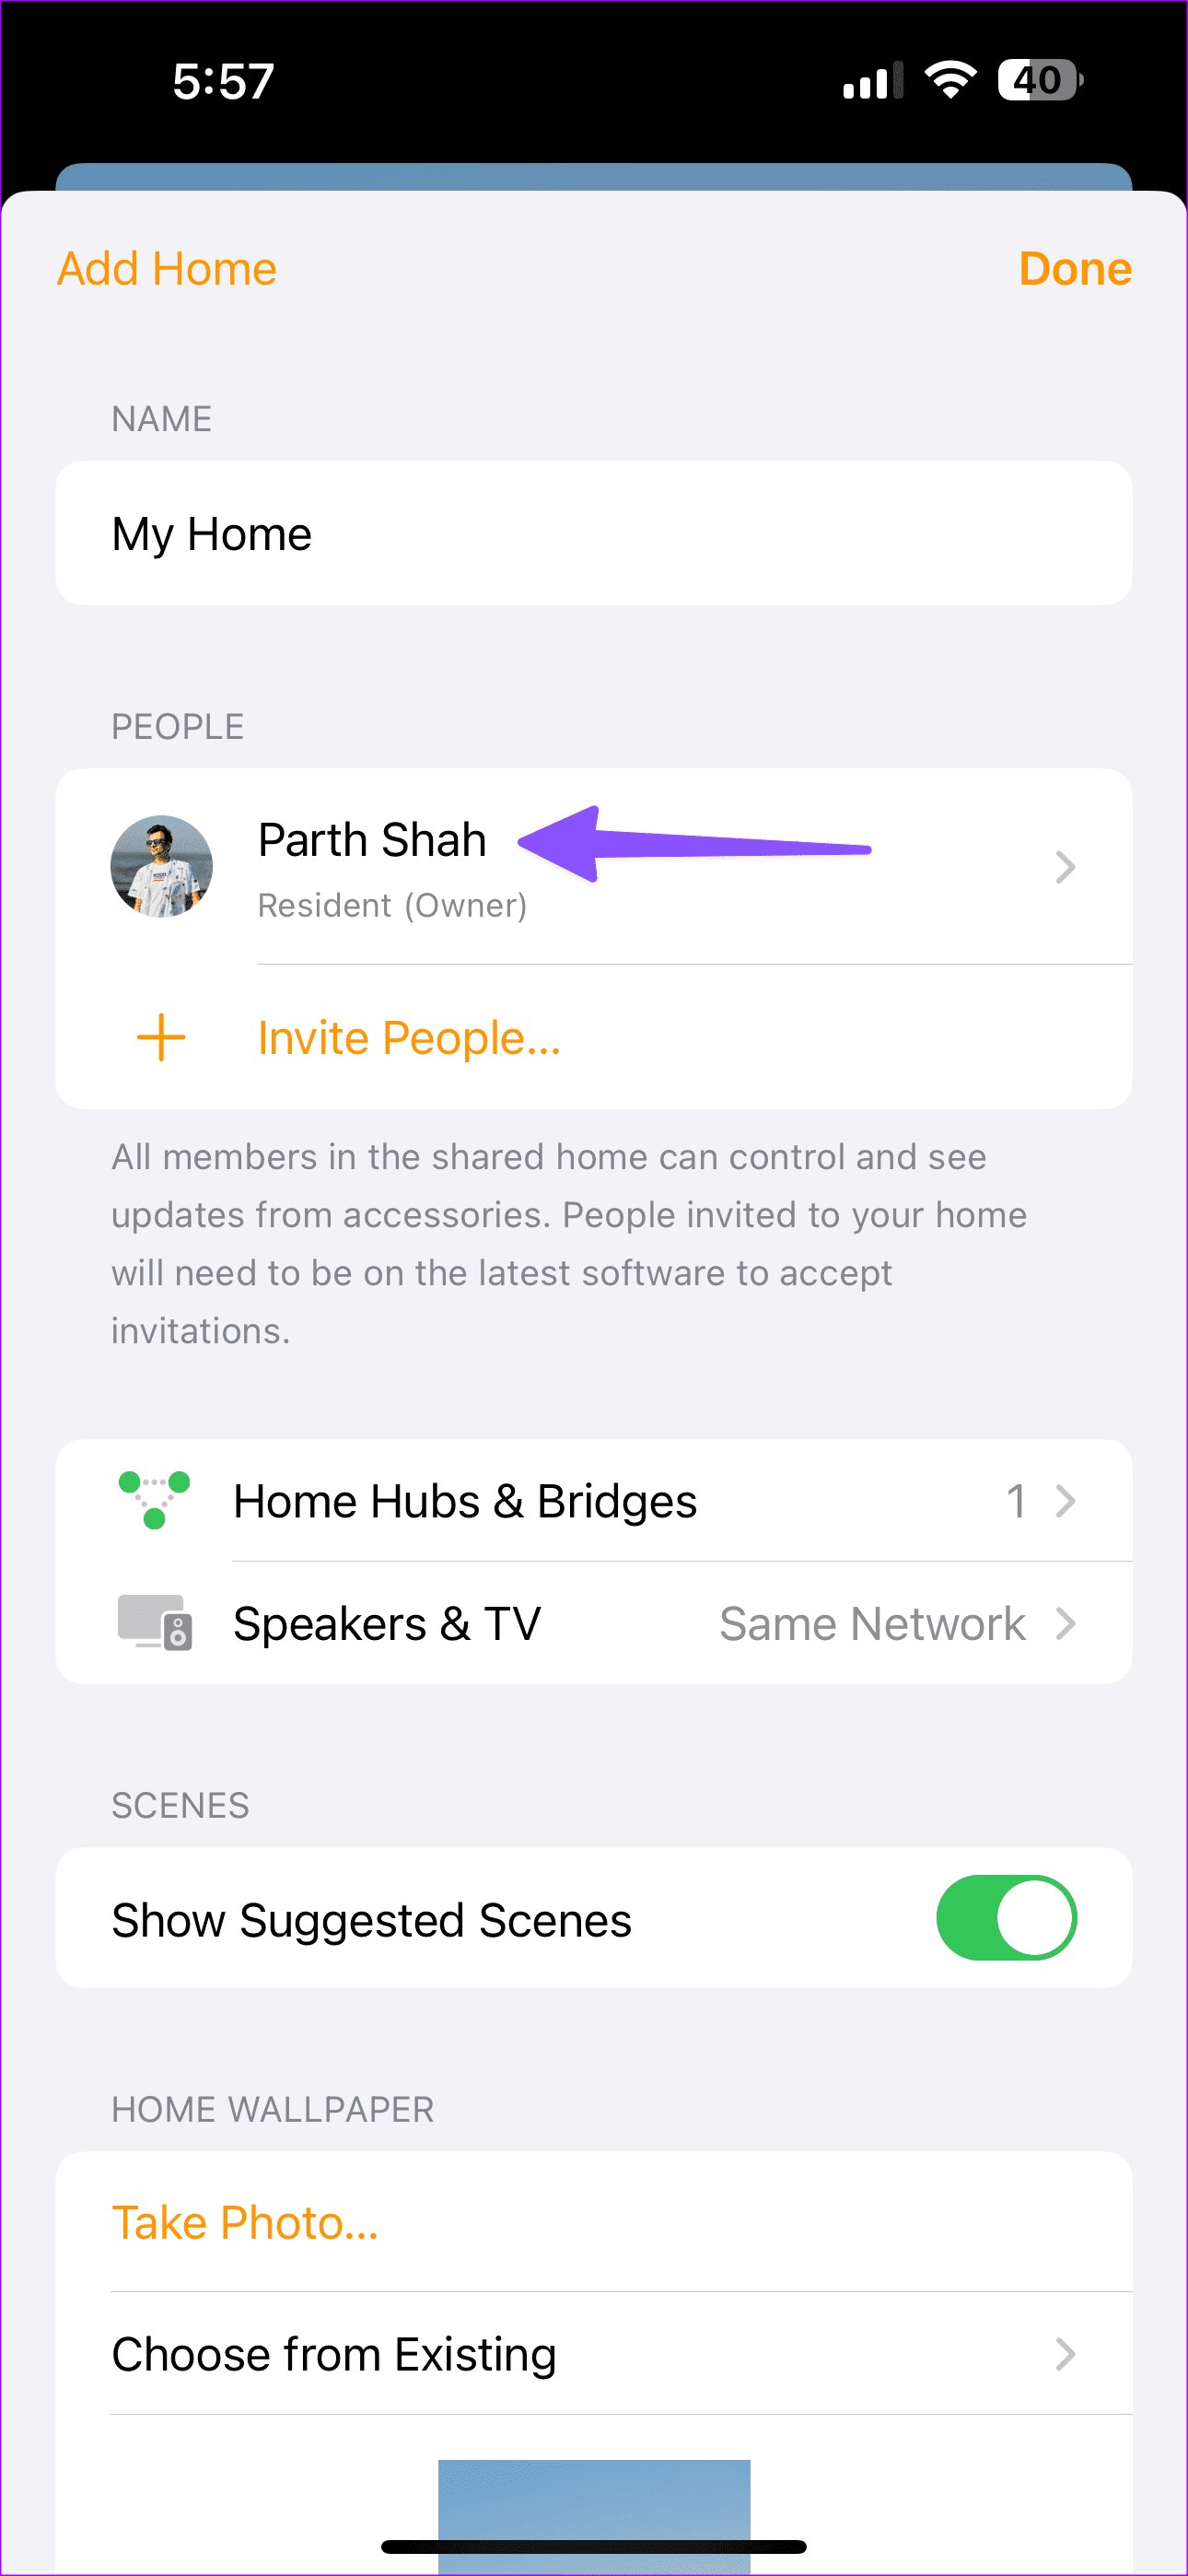
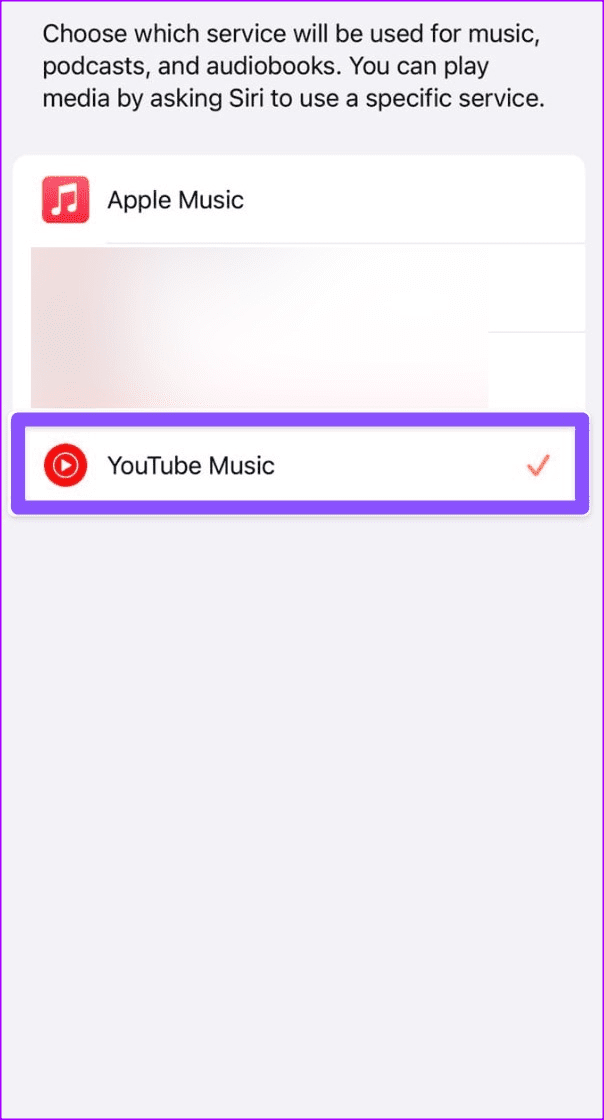
Step 3: Tap Default Music Service from the following menu and select YouTube Music.
Now that you have added YouTube Music to HomePad and set it as default, you don’t need to say ‘YouTube Music’ in every voice command. You can simply say, ‘Hey Siri, play music’ and it starts playing audio tracks from YouTube Music. Here are other benefits of exploring YouTube Music integration on HomePod.
- Use Siri commands or physical touch controls on the Apple HomePod to play music.
- Seamless playback between Apple HomePod and iPhone thanks to Handoff.
- Playback control in the Apple Home app.
YouTube Music Support on HomePod via AirPlay
If you are not able to connect and set YouTube Music as the default service on HomePod, use the steps below to play your favorite songs via AirPlay. It can be a handy trick when you are at your friend’s place or party and want to stream music from your iPhone or iPad quickly. You don’t need to go through the lengthy setup. Simply follow a couple of steps below to set the party mood.
On iPhone
Step 1: Open YouTube Music and sign in with your account details.
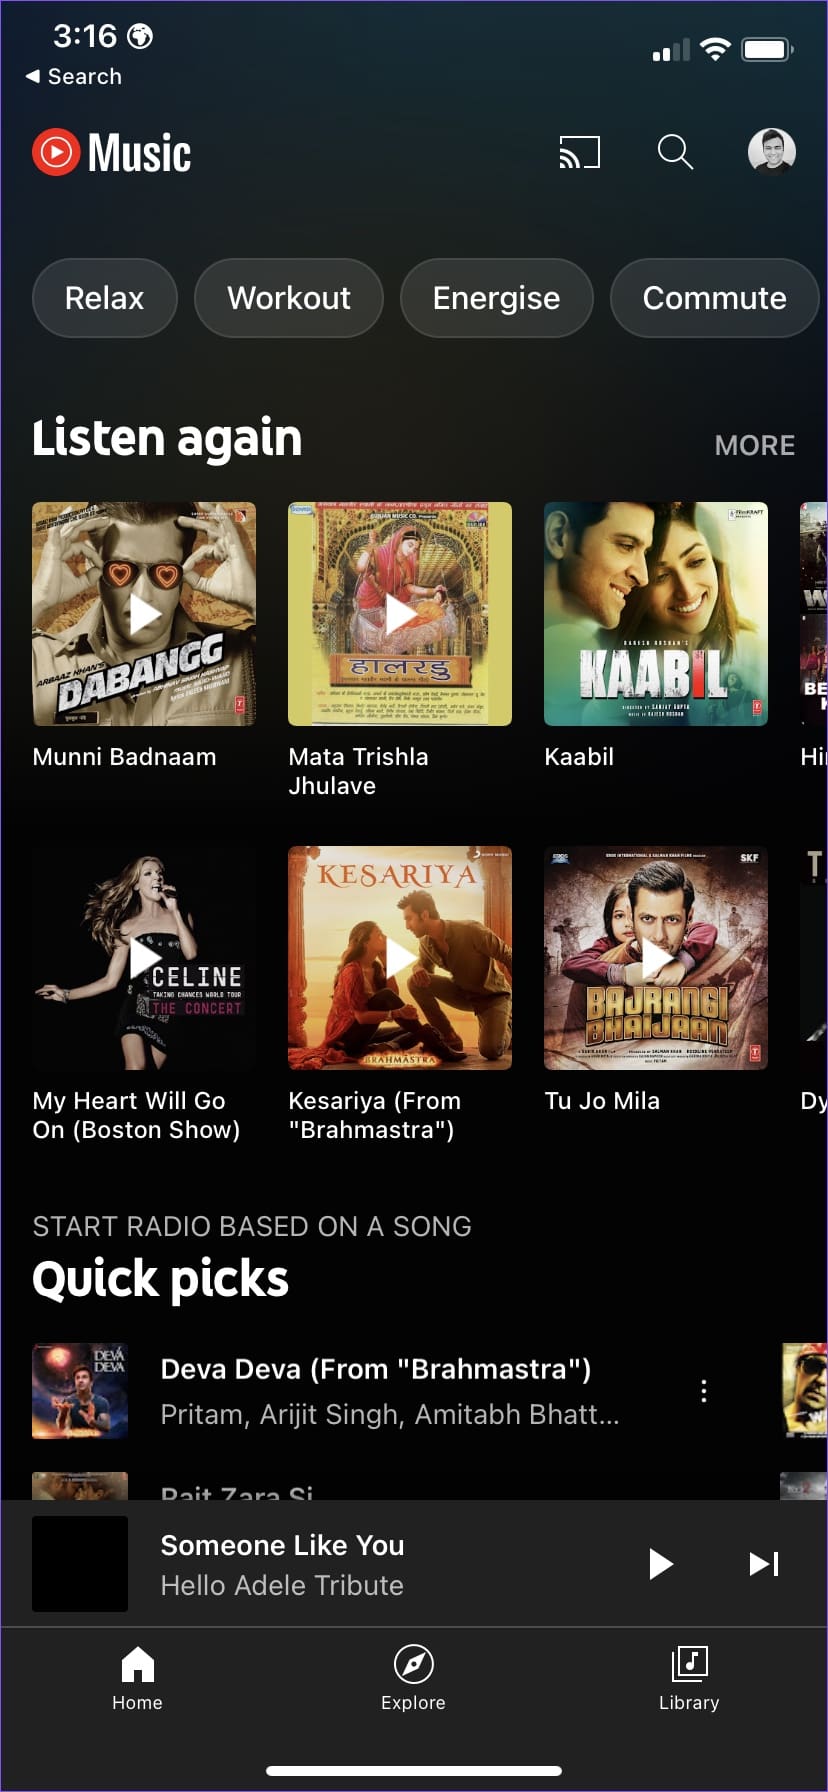
Step 2: You can play your favorite tunes from the home screen or head to the Library tab to pick a song.
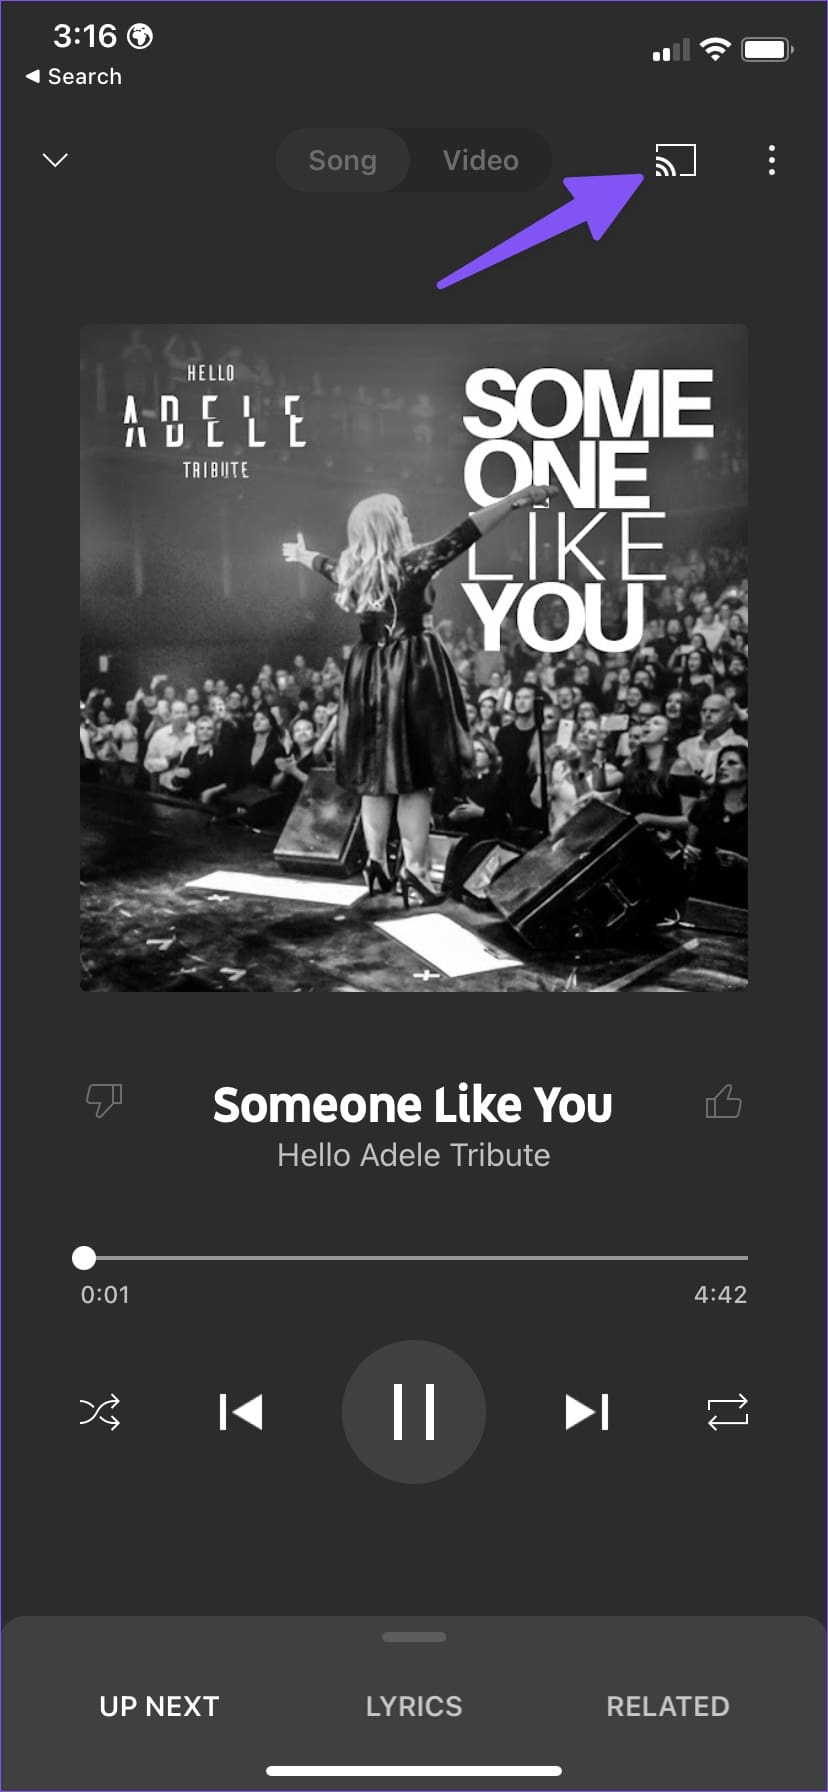
Step 3: When you stream a song, hit the cast button in the top right corner.
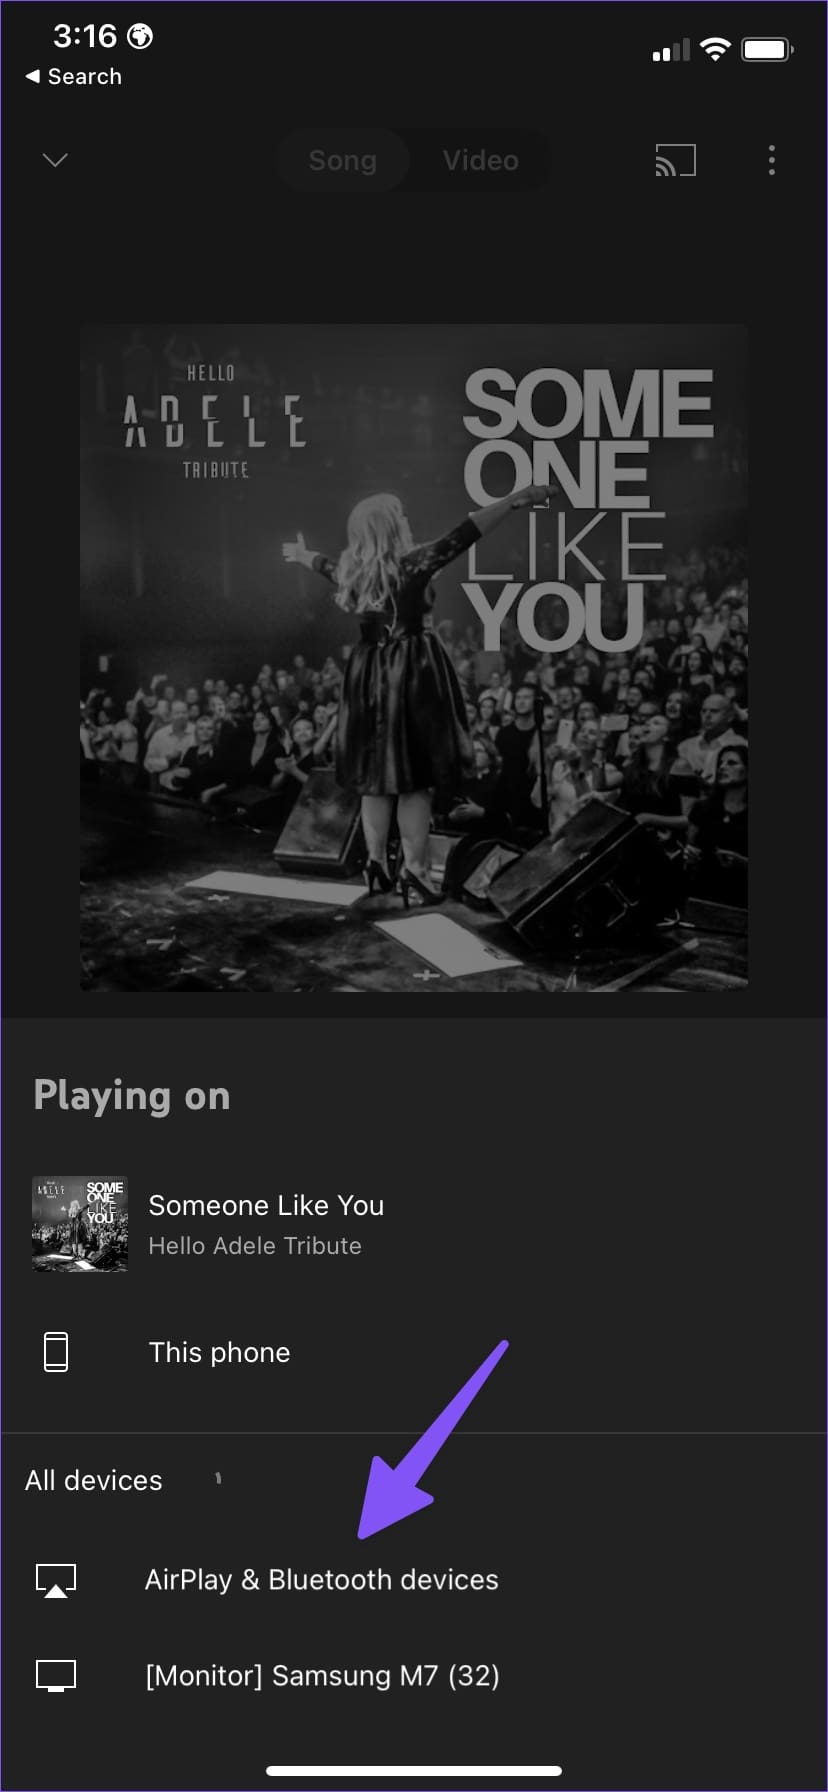
Step 4: Select AirPlay & Bluetooth devices.
Step 5: The app will open the AirPlay menu. Select your HomePod under the ‘Speakers & TVs’ menu.
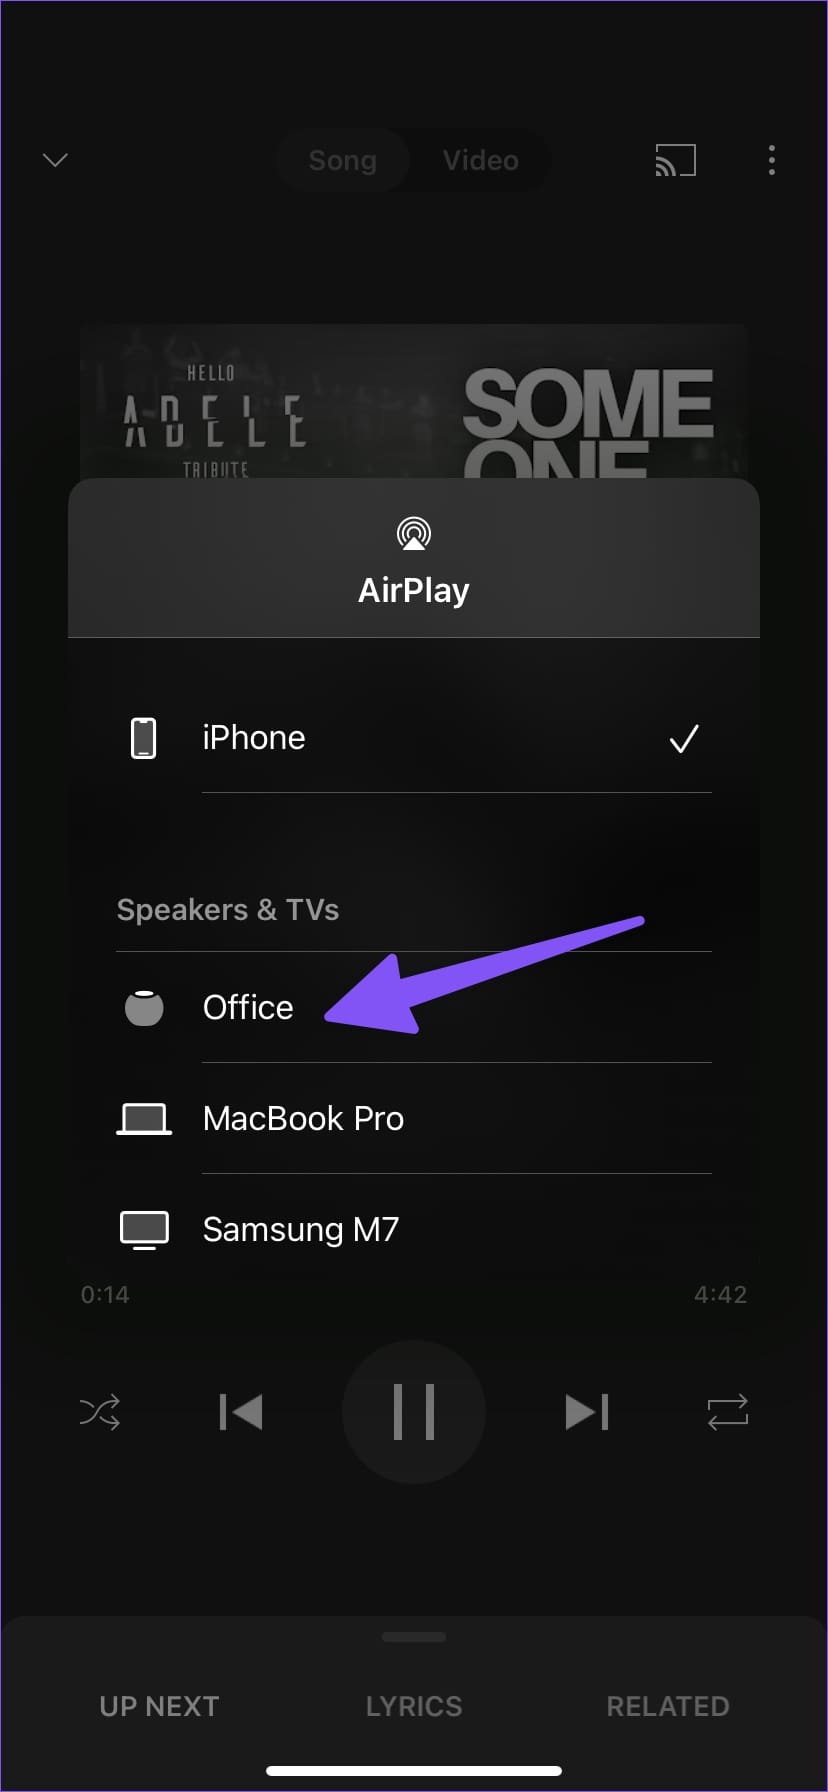
Within a few seconds, your favorite tracks will start playing on a connected HomePod. iPhone will move to HomePod for music output.
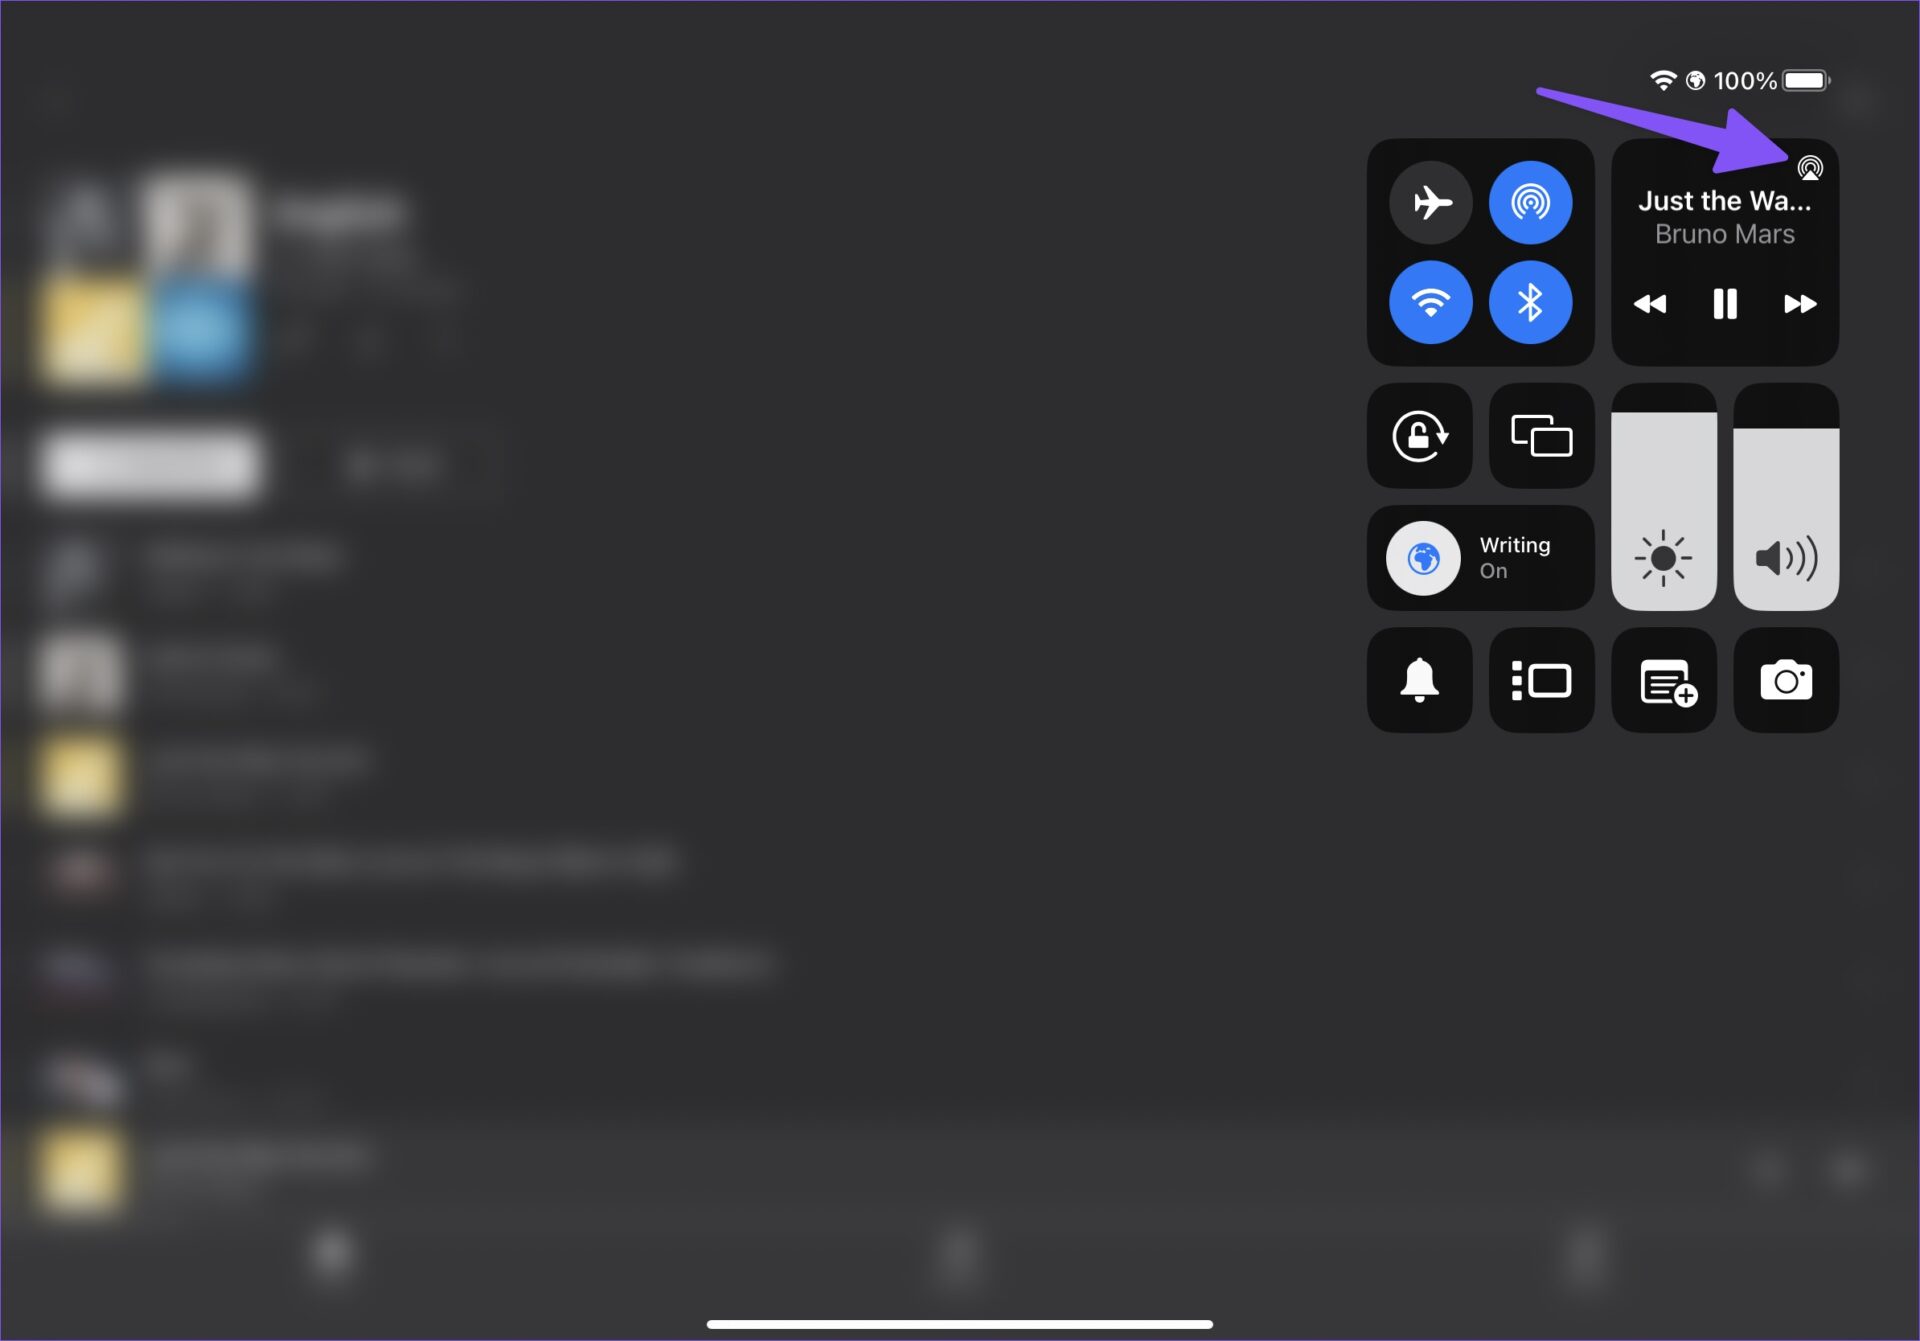
AirPlay connectivity is built into the iOS. You can access the same from the iPhone lock screen as well. Using the steps below, you don’t need to open the YouTube Music app whenever you want to change the sound output.
Step 1: Open the iPhone lock screen.
Step 2: Tap on the AirPlay icon in a music playback widget.
Step 3: Select your HomePod from the list and enjoy YouTube Music on a HomePod.


On iPad
YouTube Music has a native app for iPad too. If you only have an iPad, you can follow the steps below to play music from the streaming service on HomePod.
Step 1: Download and install YouTube Music on your iPad, if you haven’t.
Step 2: Open YouTube Music on your iPad and check your tracks from the library or the Explore page.

Step 3: Play any song. Swipe from the top-right corner of your iPad to open the Control Center menu.
Step 4: Long-press on the music widget and select the AirPlay icon in its top-right corner.
Step 6: Check your HomePod speaker from the list and enjoy your YouTube Music playlist with a better sound output.

You can change the volume levels from the iPad notification center too. Swipe down from the top, select the AirPlay icon, and adjust the volume.
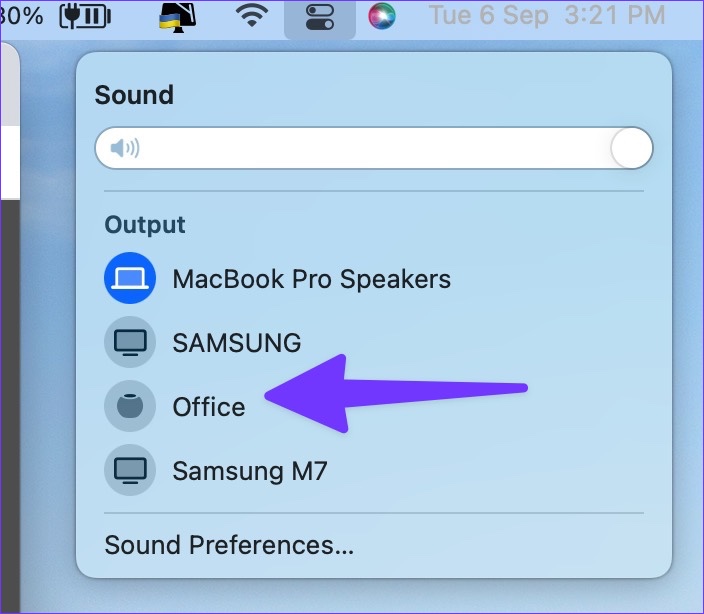
On Mac
YouTube Music is available as a PWA (Progressive Web App) on Mac. You can access the same from YouTube Music web too. Mac users can go through the steps below to play YouTube Music on HomePod.
Step 1: Open your preferred browser on Mac and visit YouTube Music on the web.
Step 2: Log in with your account details and play any song.
Step 3: Select the Control Center icon in the Mac menu bar.
Step 4: Click the AirPlay icon in the Sound menu.
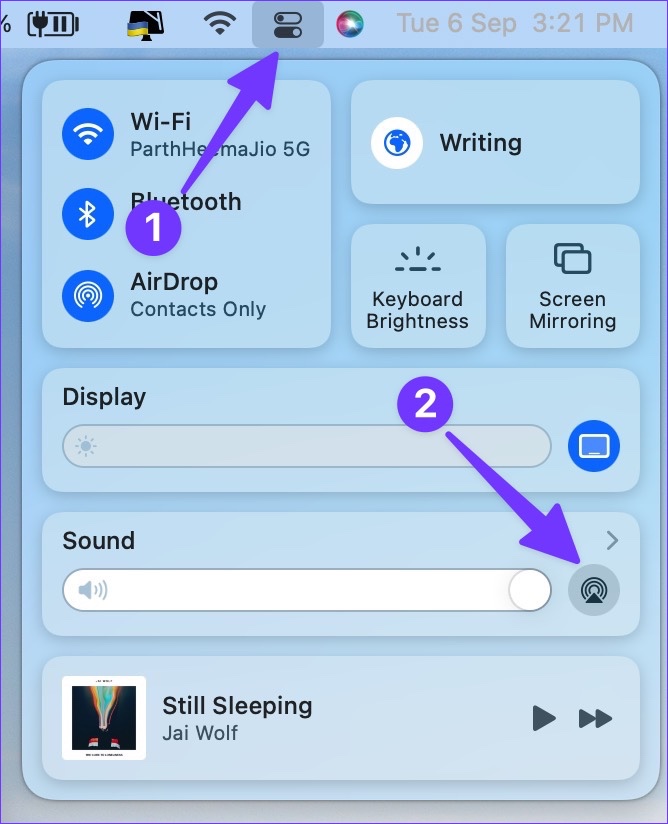
Step 5: Select your HomePod from the Output menu, and you are good to go.
Enjoy YouTube Music on HomePod
Now that Google has utilized Homekit to add Siri support for YouTube Music on HomePod, you no longer need to rely on AirPlay to play your favorite tracks on HomePod. You can explore Siri commands, use Handoff, and seamless integration in the Home app to run YouTube Music playlists.
Was this helpful?
Last updated on 01 February, 2024
Read Next
 How to Play Amazon Music on Apple HomePod
Unlike other smart speakers like Google Nest, Amazon Echo, Sonos, offerings from JBL, and others, Apple HomePod doesn’t come with Bluetooth functionality.
How to Play Amazon Music on Apple HomePod
Unlike other smart speakers like Google Nest, Amazon Echo, Sonos, offerings from JBL, and others, Apple HomePod doesn’t come with Bluetooth functionality.
 Top 9 Ways to Fix HomePod Not Showing Up in the Home App
The Home app on iPhone or iPad is necessary to manage HomePod, HomePod Mini, Apple TV, and other smart devices.
Top 9 Ways to Fix HomePod Not Showing Up in the Home App
The Home app on iPhone or iPad is necessary to manage HomePod, HomePod Mini, Apple TV, and other smart devices.
 How to Play YouTube Music on Amazon Echo
Amazon has one of the best smart speaker lineups with Echo devices.
How to Play YouTube Music on Amazon Echo
Amazon has one of the best smart speaker lineups with Echo devices.
 10 Fixes for Android Auto Not Playing Music From Spotify or YouTube Music
It’s 9.30 PM.
10 Fixes for Android Auto Not Playing Music From Spotify or YouTube Music
It’s 9.30 PM.
 3 Free Ways to Transfer Playlists From YouTube Music to Apple Music
So, you have carefully curated playlists for every mood, occasion, and trip.
3 Free Ways to Transfer Playlists From YouTube Music to Apple Music
So, you have carefully curated playlists for every mood, occasion, and trip.
 How to Turn Off Smart Downloads on YouTube and YouTube Music
We're quite disciplined when it comes to clearing junk files on our phones.
How to Turn Off Smart Downloads on YouTube and YouTube Music
We're quite disciplined when it comes to clearing junk files on our phones.
 How to Play Waiting Music on Zoom from PC and Mobile
Online meetings have skyrocketed ever since the onset of the pandemic.
How to Play Waiting Music on Zoom from PC and Mobile
Online meetings have skyrocketed ever since the onset of the pandemic.
 How to Play Music on Twitch Without Infringing Copyright
Apart from streaming games, you can also play music on Twitch or do both together.
How to Play Music on Twitch Without Infringing Copyright
Apart from streaming games, you can also play music on Twitch or do both together.
The article above may contain affiliate links which help support Guiding Tech. The content remains unbiased and authentic and will never affect our editorial integrity.