Using Microsoft Excel’s Power Query feature, you can import data presented in tabular form on a website into a worksheet. Power Query is only available on Excel for Microsoft 365, Excel 2021, Excel 2019, Excel 2016, Excel 2013, and Excel 2010.
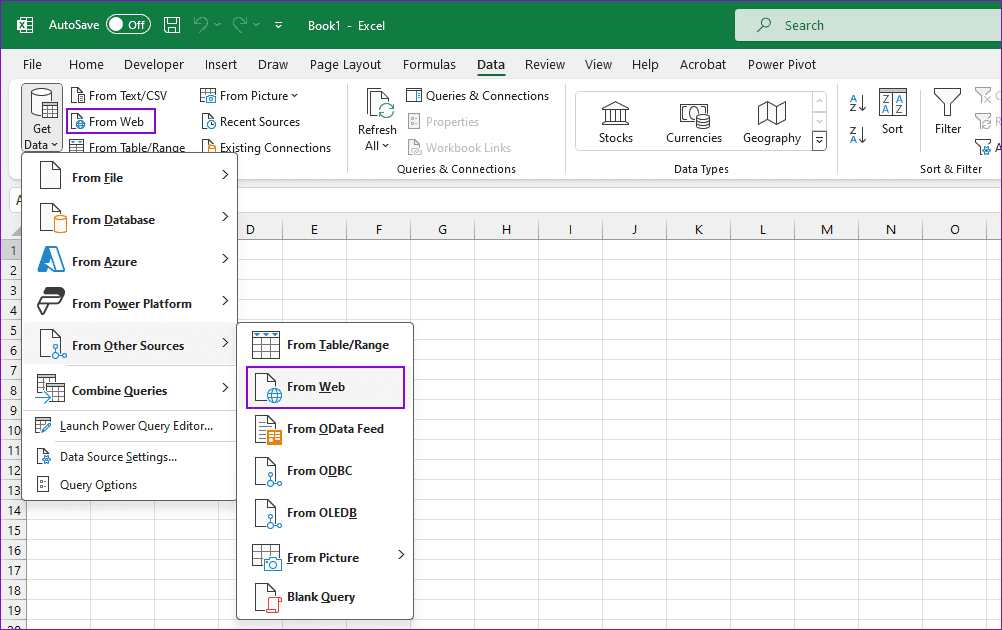
Step 1: Open Excel, and then click on the Data tab on the Ribbon menu.
Step 2: Click the From Web menu under the Get & Transform Data group.
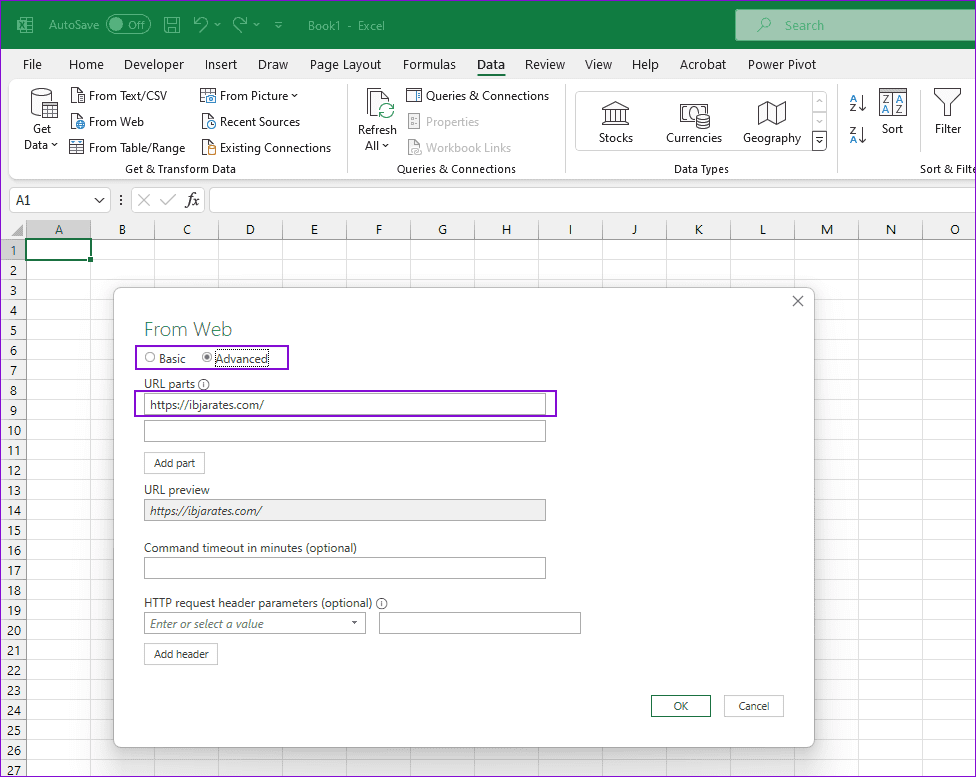
Step 3: In the popup window labeled From Web, input the webpage address into the URL textbox. After pasting the link, click OK to load the webpage into the browser.
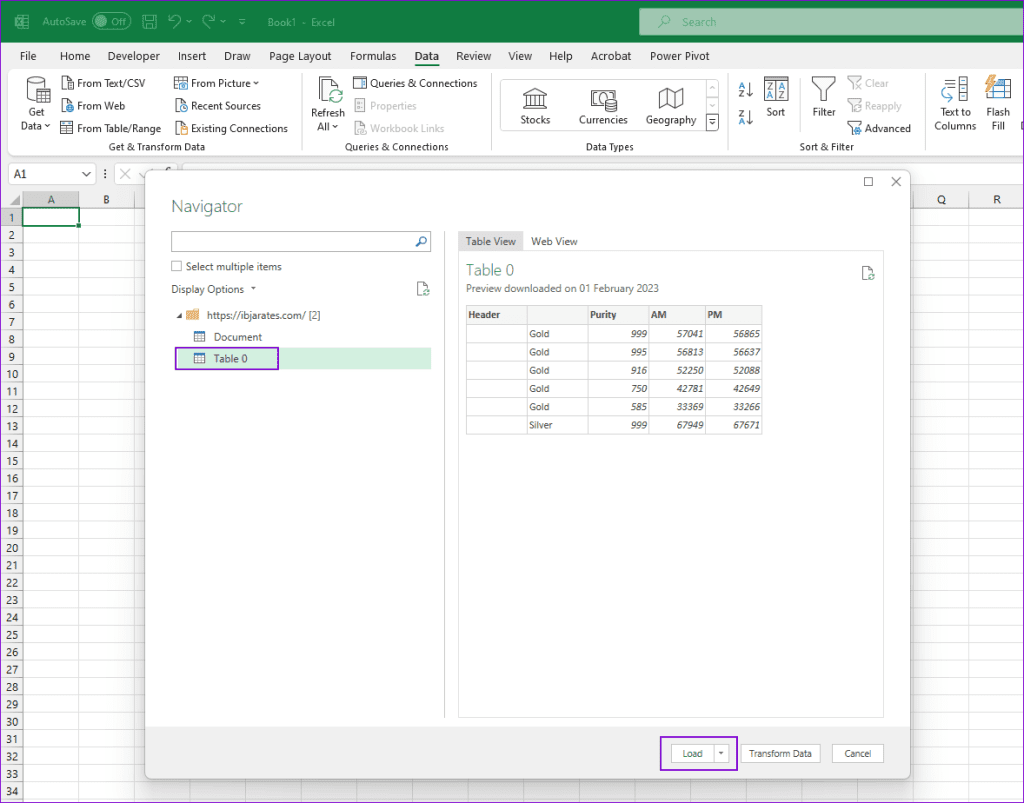
Step 4: Once Microsoft Excel has loaded the data, you should see a Navigator window. Select the required table to check if you want to import that.

Step 6: if the preview looks good, click the Load button to import it on the sheet.
How to Refresh Web Data on Microsoft Excel
It is interesting to note that data loaded from a website in Excel can be refreshed. This is handy if you constantly use a website’s value in your calculations. You can also choose how often you want to refresh the content.
Step 1: Select the Table connected with the website in your Excel file. Then click on the Table Design menu that appears in the menu. If you want to remove the theme of the table design, follow the guide.
Step 2: Click the Refresh drop-down within the External Table Data group.
Step 3: From the Refresh drop-down, you have three options: Refresh, Refresh All, and Connection Properties. To set your preferences, click on Connection Properties.

Step 6: In the Query Properties dialogue box, click on the Usage tab to set your refresh preferences, which include:
- Enable background refresh: This option is ticked by default and ensures your content is constantly refreshed.
- Refresh every: This option ensures Excel only refreshes the data within specific periods. When selecting this, you must input the minute intervals where you want this to occur.
- Refresh data when opening the file: The data in the Excel file is only refreshed when you launch it.
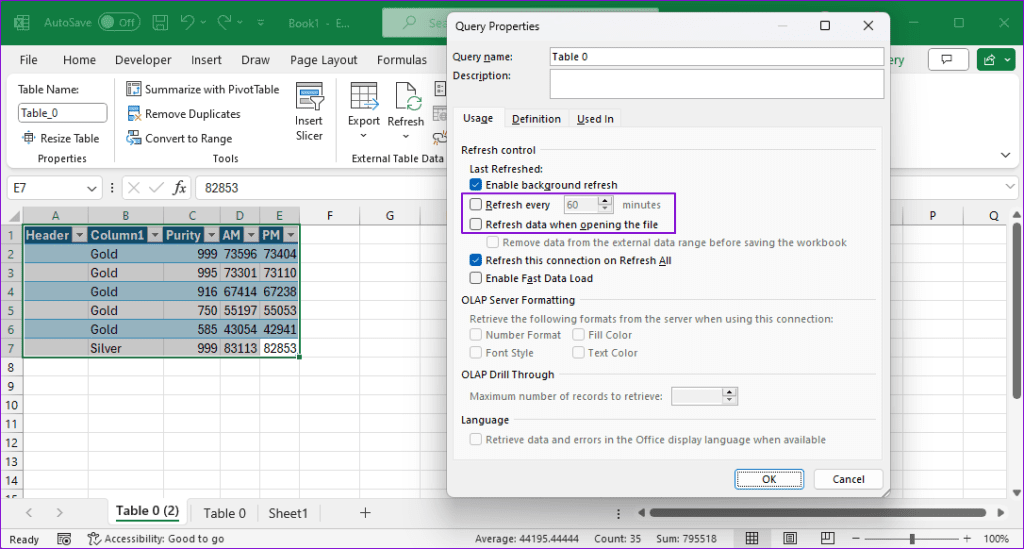
Step 7: Select OK to save your refresh preference.
Was this helpful?
Last updated on 20 April, 2024
Read Next
 10 Essential Microsoft Excel Functions for Data Analysis
Microsoft Excel offers users hundreds of different functions and formulas for a variety of purposes.
10 Essential Microsoft Excel Functions for Data Analysis
Microsoft Excel offers users hundreds of different functions and formulas for a variety of purposes.
 How to Use the Filter and Sort Data Function in Microsoft Excel
Microsoft Excel is one of the most popular data visualization and analysis tools.
How to Use the Filter and Sort Data Function in Microsoft Excel
Microsoft Excel is one of the most popular data visualization and analysis tools.
 How to Fix Registry Editor Cannot Import File Error in Windows 10
Windows Registry is a critical database that stores information about the apps, services, and hardware used to run Windows.
How to Fix Registry Editor Cannot Import File Error in Windows 10
Windows Registry is a critical database that stores information about the apps, services, and hardware used to run Windows.
 Top 7 Ways to Fix Microsoft Excel Not Responding on Windows 11
Microsoft Excel is powerful spreadsheet software that remains the top choice among students, professionals, and businesses.
Top 7 Ways to Fix Microsoft Excel Not Responding on Windows 11
Microsoft Excel is powerful spreadsheet software that remains the top choice among students, professionals, and businesses.
 5 Ways to Fix Unable to Print From Microsoft Excel on Windows 11
Fix 1: Save Your Excel File in XPS Format and Try Again If Excel can't respond to print requests, save your file in the XPS format and try again.
5 Ways to Fix Unable to Print From Microsoft Excel on Windows 11
Fix 1: Save Your Excel File in XPS Format and Try Again If Excel can't respond to print requests, save your file in the XPS format and try again.
 Top 8 Ways to Fix Microsoft Excel Stuck at Starting on Windows 11 and Windows 10
While Microsoft’s spreadsheet app is feature-rich, it feels bloated and overwhelming at times.
Top 8 Ways to Fix Microsoft Excel Stuck at Starting on Windows 11 and Windows 10
While Microsoft’s spreadsheet app is feature-rich, it feels bloated and overwhelming at times.
 Top 11 Ways to Fix Microsoft Excel Not Saving Changes on Windows
Microsoft Excel offers real-time collaboration to Microsoft 365 subscribers.
Top 11 Ways to Fix Microsoft Excel Not Saving Changes on Windows
Microsoft Excel offers real-time collaboration to Microsoft 365 subscribers.
 How to Create a Print to PDF Button in Microsoft Excel on Windows 11
While you may Microsoft Excel to create spreadsheets, but not everyone would have the same Office version installed.
How to Create a Print to PDF Button in Microsoft Excel on Windows 11
While you may Microsoft Excel to create spreadsheets, but not everyone would have the same Office version installed.
The article above may contain affiliate links which help support Guiding Tech. The content remains unbiased and authentic and will never affect our editorial integrity.