When working on a big project on Google Chrome, you may find that you eventually have far too many tabs open on your screen. When this happens, you run the risk of getting overwhelmed, and that your productivity takes a dip.

Fortunately, you no longer need to worry about having too many tabs open on your browser. Google has made it easy to group tabs based on however you want to categorize them.
In this article, you’ll find out the two best ways to group Google Chrome tabs on both Windows and Mac.
Color-Coding While Using Google Chrome
If you find that you’ve got too many tabs open while in the middle of a Google Chrome session, you can group them and minimize the ones you aren’t using.
Grouping Google Chrome tabs with different colors is easy. If you’re on a Mac, all you need to do is follow the steps below.
Step 1: Hold Ctrl and click the trackpad at the same time on a tab.
Step 2: Click Add tab to new group.

Step 3: Give your group a name.
Step 4: Choose the color you want to give this group.

You’ll then need to add the tabs you want to be included in the group. To do this, the steps below are for you.
Step 1: Hold Ctrl and click the trackpad on the tab you want to move.
Step 2: Hover over Add tab to new group, and choose the new tab.

Repeat the above two processes for every group you want to create. Alternatively, you can drag them over.
If you’re on a Windows computer, you can instead follow the steps listed below.
Step 1: For the first step in each of the above walkthroughs, right-click on the tab you want to add to a group instead of using Ctrl + trackpad.

Step 2: The remaining processes are identical to those listed above.
2. Segmenting Bookmarked Tabs by Folders
If you color-code your tabs on Google Chrome, they won’t reappear when you close and reopen the app.
For longer-term projects, you can instead choose to divide important tabs by creating different folders.
Sorting your bookmarked Google Chrome tabs is a straightforward process. Below are the steps you need to take when on a Mac.
Step 1: Click Ctrl + trackpad on the bookmarks bar in the web browser.
Step 2: Scroll down to Add Folder… and select this option.

Step 3: On the New Folder page, type in the name you want to call your new folder.
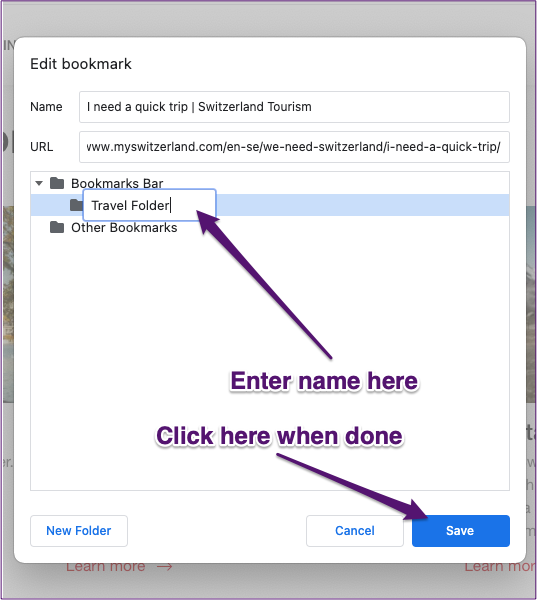
Step 4: Click Save.
Once you’ve created a new folder, follow the steps below to add all of your tabs into this if you’re on a Mac.
Step 1: Click on the tab you want to add to your newly-created folder by using Ctrl + trackpad.
Step 2: Choose the Edit option.
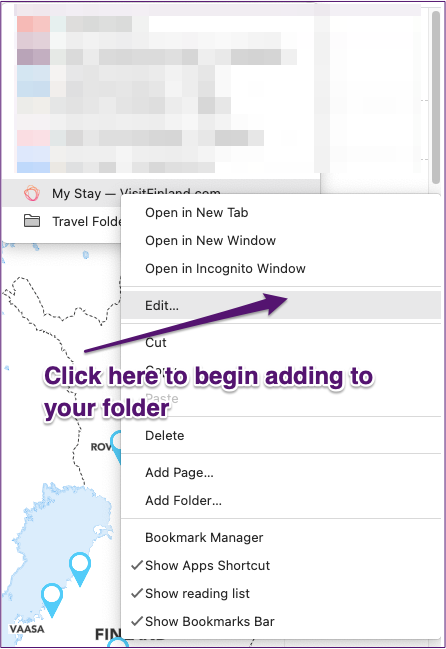
Step 3: On the next page, you’ll see a list of all the folders you’ve created. Pick the one you just made and press Save.

Step 4: Your bookmark will now feature in this folder. To access it, click on the titled folder that features in the bookmarked tabs section.
Step 5: Repeat this process for every tab you want to add to the folder.
If you want to complete the above steps on a Windows computer, the only difference is for the first step in both of them. Instead of using Ctrl + trackpad for both of these, you’ll need to right-click.
How to Delete a Bookmark Group
When you no longer need the tabs that you bookmarked, getting rid of them is simple. All you need to do is follow the steps outlined below.
Step 1: Click on the folder with Ctrl + trackpad on a Mac or by right-clicking on your Windows computer.

Step 2: Select Delete. Google will instantly remove both the folder and any saved tabs.
Group Your Tabs on Google Chrome and Manage Your Projects With More Ease
Having too many tabs open on Google Chrome is a source of stress for many users. Luckily, though, organizing them so that they’re more manageable isn’t too tricky.
If you’re working on something where you won’t need the tabs afterward, color-coding is the best option. Once you close the app, you no longer need to think about them.
But for longer-term assignments and everyday essentials (such as your emails), grouping them in a bookmarked folder is the smarter alternative.
Was this helpful?
Last updated on 07 February, 2022
Read Next
 Top 3 Ways to Save Tabs Before Closing Chrome and How to Restore Lost Tabs
The best thing about the mobile version of Chrome is that you can keep tabs open in it for several days without worrying about them getting deleted — unless you
Top 3 Ways to Save Tabs Before Closing Chrome and How to Restore Lost Tabs
The best thing about the mobile version of Chrome is that you can keep tabs open in it for several days without worrying about them getting deleted — unless you
 How to Enable Sleeping Tabs in Google Chrome
Google Chrome is notorious for its memory management issues.
How to Enable Sleeping Tabs in Google Chrome
Google Chrome is notorious for its memory management issues.
 6 Best Fixes for Google Chrome Tabs Are Not Showing Page or Website Names
When Tabs in the Google Chrome show the website or page name, it can be quite helpful while switching between tabs.
6 Best Fixes for Google Chrome Tabs Are Not Showing Page or Website Names
When Tabs in the Google Chrome show the website or page name, it can be quite helpful while switching between tabs.
 4 Fixes for Google Chrome Not Opening New Tabs on Windows
Common Fixes Before you delve into complex troubleshooting methods, try these basic fixes and see if they help restore normalcy to Google Chrome: Restart Google Chrome - Restarting the browser
4 Fixes for Google Chrome Not Opening New Tabs on Windows
Common Fixes Before you delve into complex troubleshooting methods, try these basic fixes and see if they help restore normalcy to Google Chrome: Restart Google Chrome - Restarting the browser
 How to Restore Tabs & Save Tab Groups In Google Chrome
Usually when Google Chrome crashes, it gives you a restore tabs option when you open the chrome browser again.
How to Restore Tabs & Save Tab Groups In Google Chrome
Usually when Google Chrome crashes, it gives you a restore tabs option when you open the chrome browser again.
 A Complete Guide to Grouping Tabs in Google Chrome on Mobile
Rarely, you receive a feature on your phone that wows you.
A Complete Guide to Grouping Tabs in Google Chrome on Mobile
Rarely, you receive a feature on your phone that wows you.
 How to Restore Google Chrome Tabs After Restart
Imagine that you're working on an important assignment and have a ton of Chrome tabs open.
How to Restore Google Chrome Tabs After Restart
Imagine that you're working on an important assignment and have a ton of Chrome tabs open.
 How to Stop Chrome From Opening Old Tabs at Startup
When you open Chrome, you expect a new tab or a homepage to greet you.
How to Stop Chrome From Opening Old Tabs at Startup
When you open Chrome, you expect a new tab or a homepage to greet you.
The article above may contain affiliate links which help support Guiding Tech. The content remains unbiased and authentic and will never affect our editorial integrity.