The trackpad on MacBooks is widely regarded as the best on any laptop. While it’s mainly to do with how smooth it is, the trackpad gestures are also a contributing factor. You can swipe around to switch windows, desktops, and even minimize apps. However, all of this works only when using the trackpad. Or Apple’s expensive Magic Mouse. So you may be wondering — can I use Mac gestures with a regular mouse?

Thankfully, there is a workaround that lets you do exactly that. All you need is a small third-party software to modify some files and you’re good to go. You don’t have to spend a bomb on getting the Magic Mouse. Here’s how to use Mac gestures with any mouse of your choice.
How to Use Gestures on Mac With Any Mouse
Once you have your Mac and a mouse of your choice handy, follow the steps below to enable gestures. Then, swipe around with your mouse to open Mission Control or switch between multiple desktops!
Installing xGestures
Step 1: Connect your mouse to your Mac. You can either connect it via the wired route or wirelessly via a dongle or Bluetooth.
Step 2: Download the xGestures DMG file from their website using the link below. This app lets you customize the click functions of your mouse.
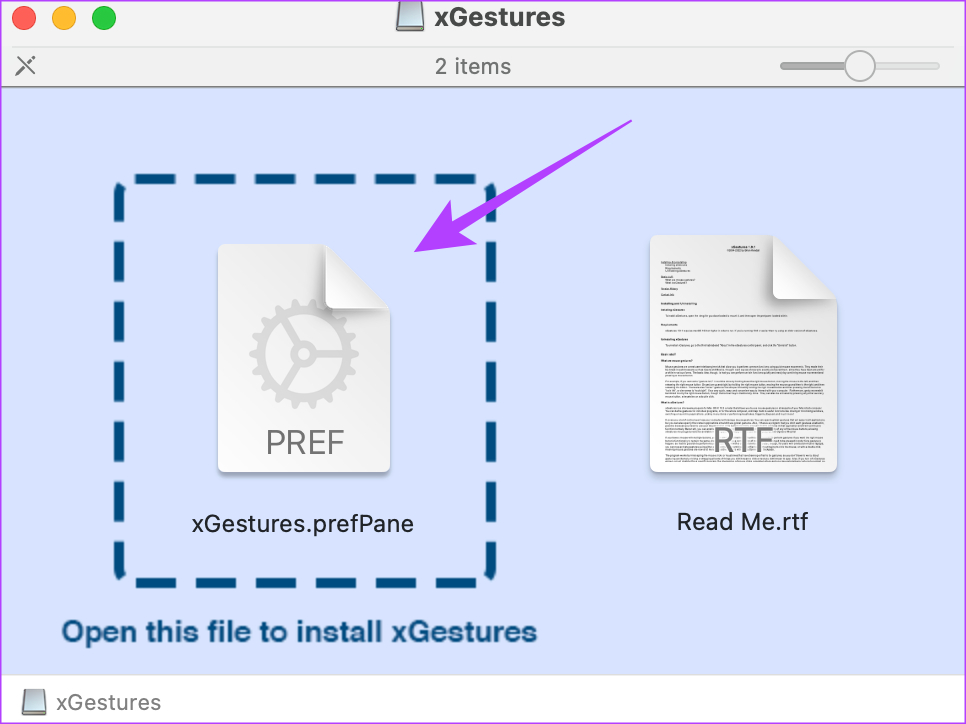
Step 3: Double-click on the DMG file to open it.
Step 4: Now, double-click on the xGestures.prefPane file. This will start the installation of the app on your Mac.
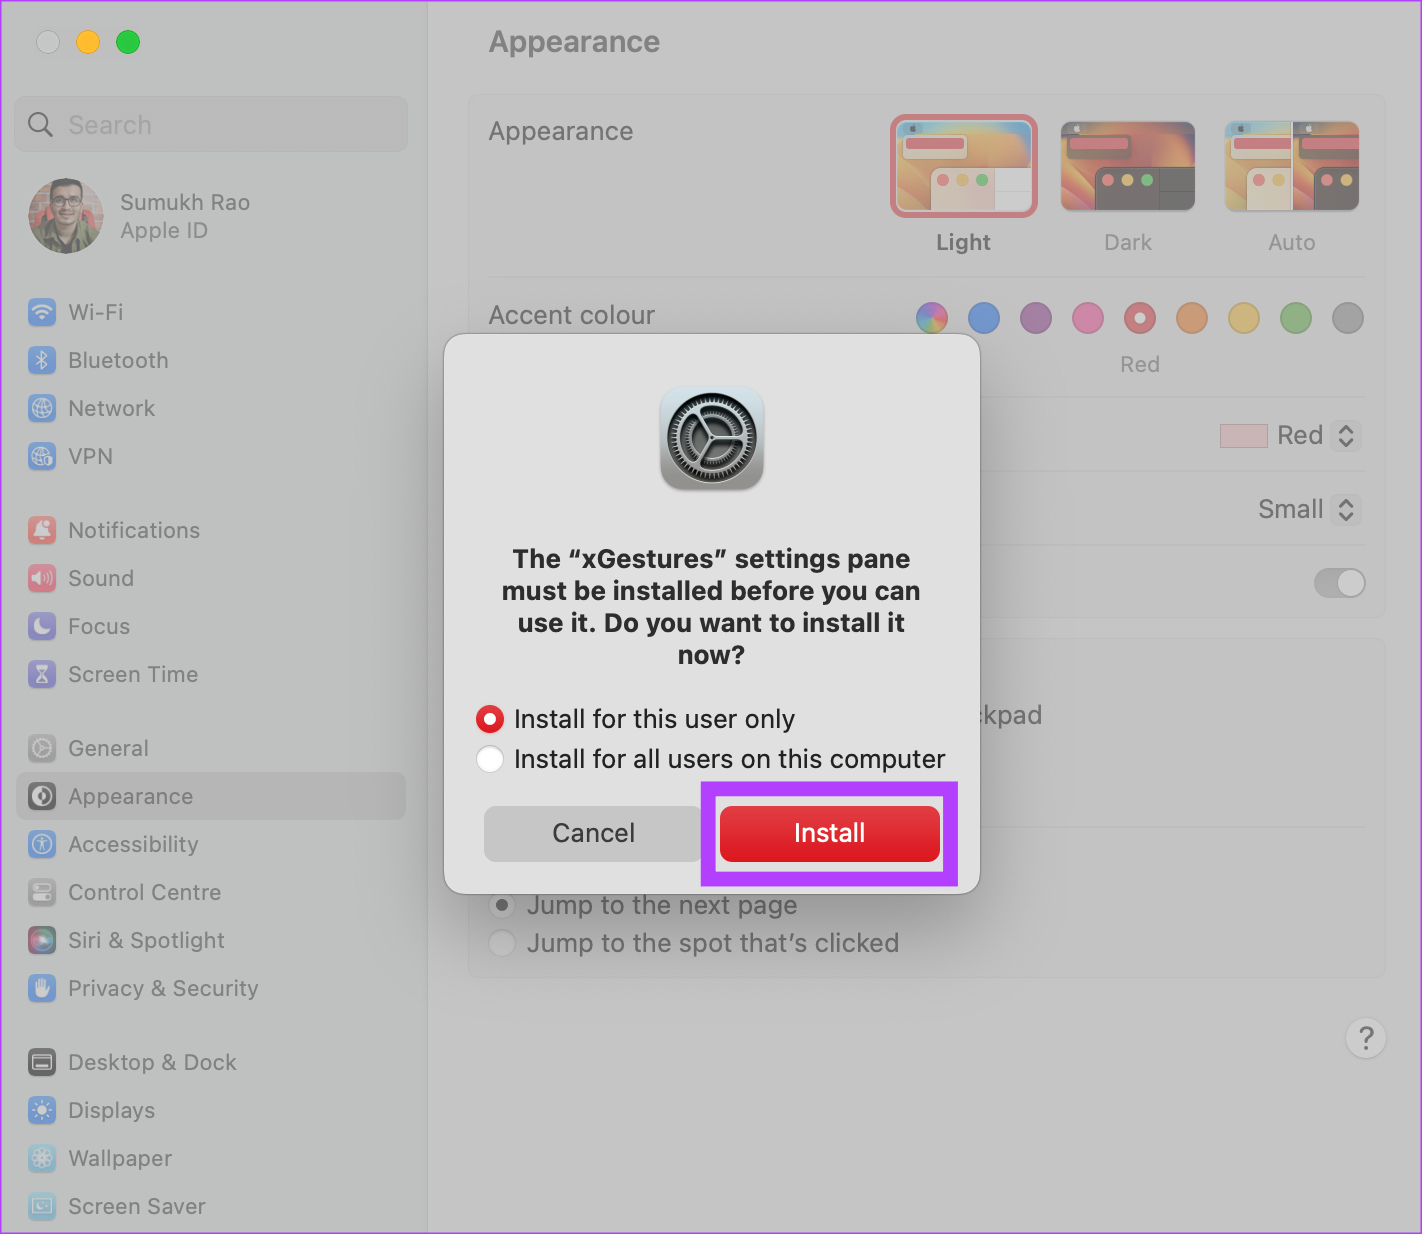
Step 5: Click on the Install button when prompted. xGestures will now be installed.
Downloading Scripts
Step 6: You now have to download three additional files to assign gestures. These are scripts that need to be loaded into xGestures. Download them using the link below. Save them in any folder of your choice.
Step 7: Open the Settings app on your Mac. Scroll to the bottom in the left pane. You will see a new tab called xGestures. Click on it.

Setting Up and Configuring xGestures
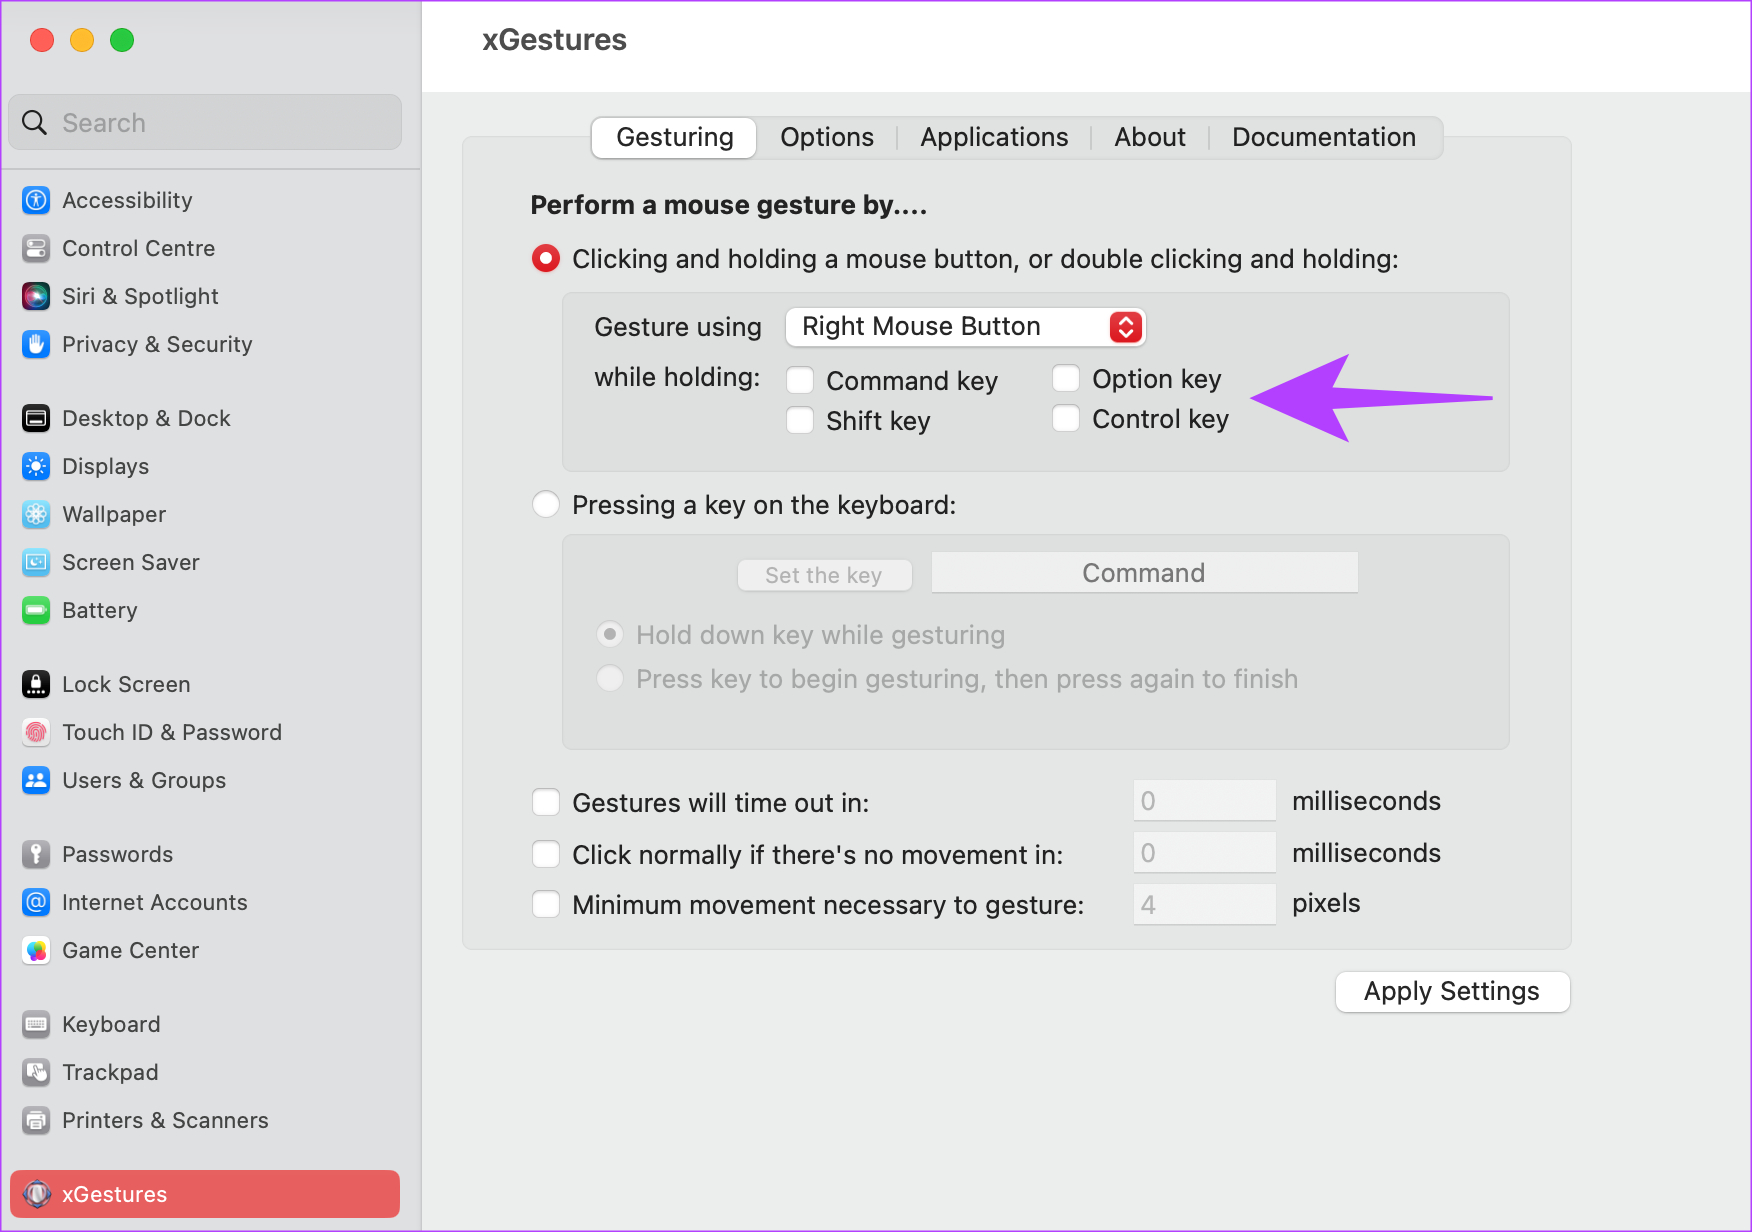
Step 8: In the Gesturing tab, click on the drop-down menu next to Gesture using. Select which button you want to press on your mouse while performing the gestures. This is the button you will be holding down on your mouse to perform a set gesture.

You can also select a key from the while holding section. This way, you will have to press and hold on to a key to perform a gesture.
Step 9: Now, switch to the Applications tab at the top.

Step 10: Click on New Gesture. You will now be asked to select the gesture to perform.

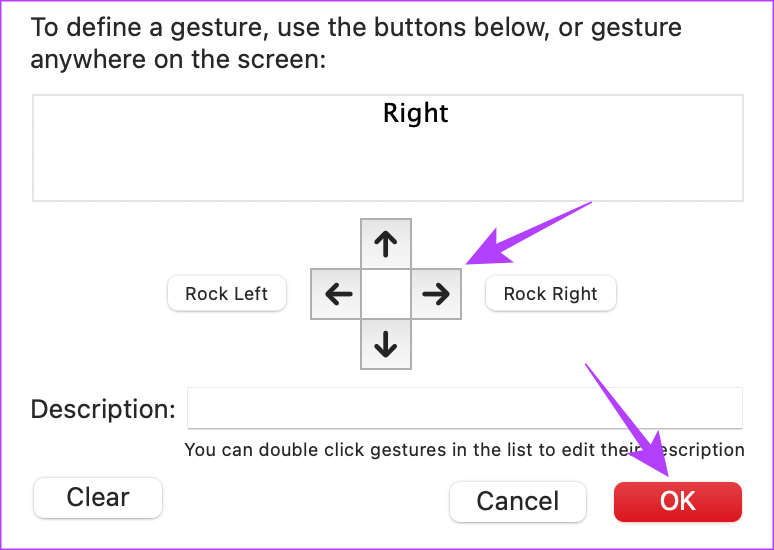
Step 11: Choose the Right arrow key to indicate the Right gesture. Then, click on OK.
Step 12: Select the drop-down menu next to the Gesture action text. Click on Run AppleScript.

Step 13: Click on the Choose File button next to the Script file option.
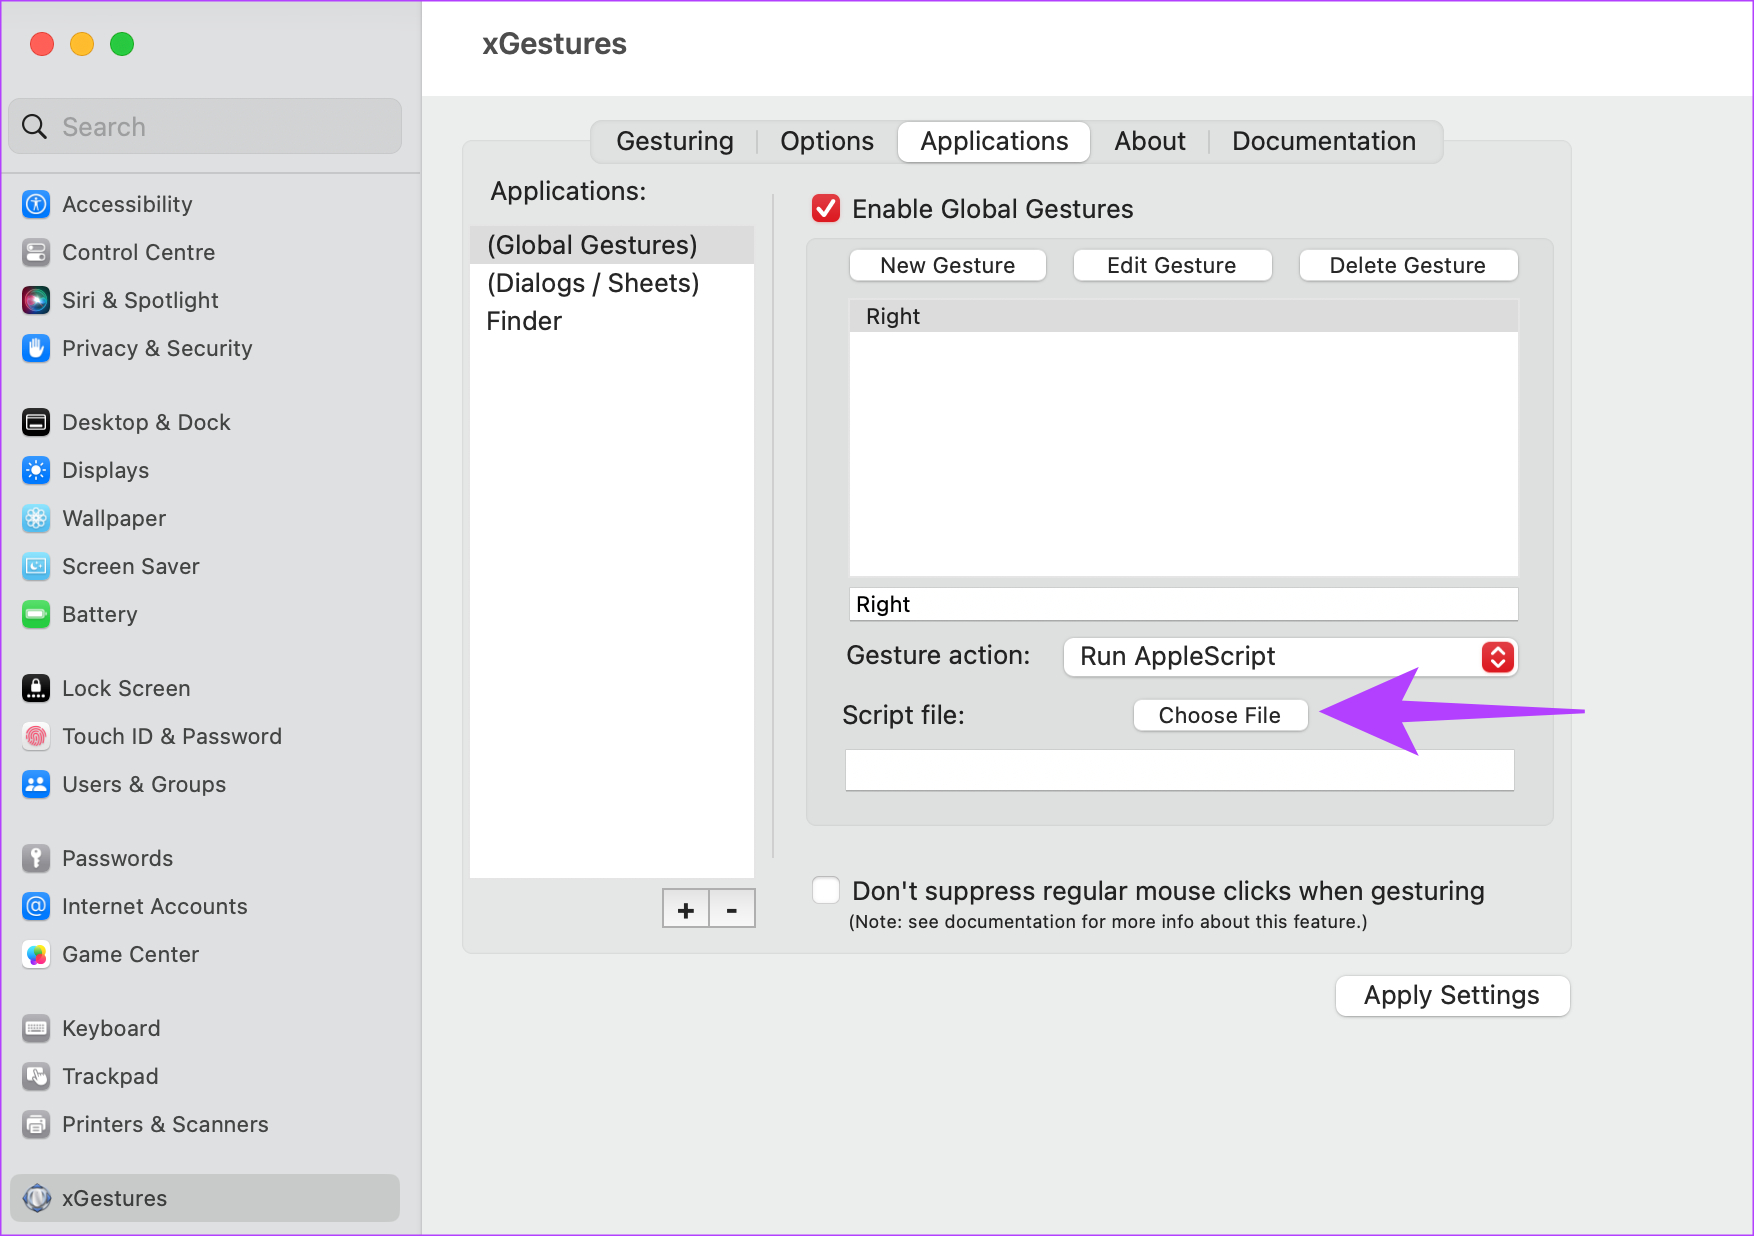
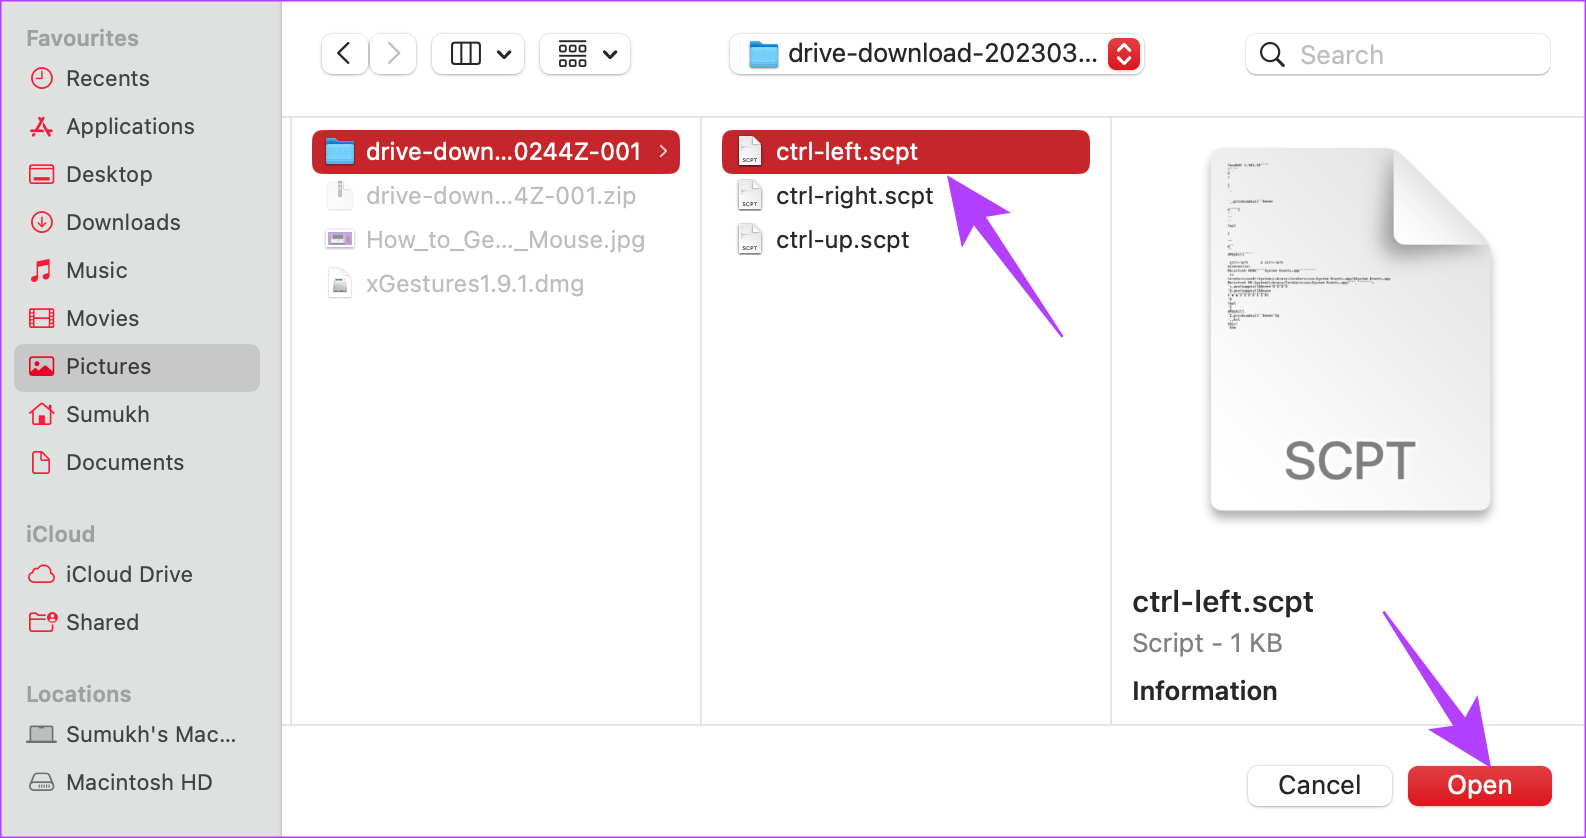
Step 14: Navigate to the folder where you saved the downloaded scripts. Select the ctrl-left.scpt file. Then, click on Open.
Step 15: Finally, hit the Apply Settings button to save the gesture.

Step 16: Perform the same steps from Step 9 onwards for the Left and Up gestures. Just make sure you select the correct scripts for the corresponding gestures.
Step 17: Switch to the Options tab at the top.

Step 18: Enable the checkbox next to ‘Start xGestures when logging in’. Click on Apply Settings once again.
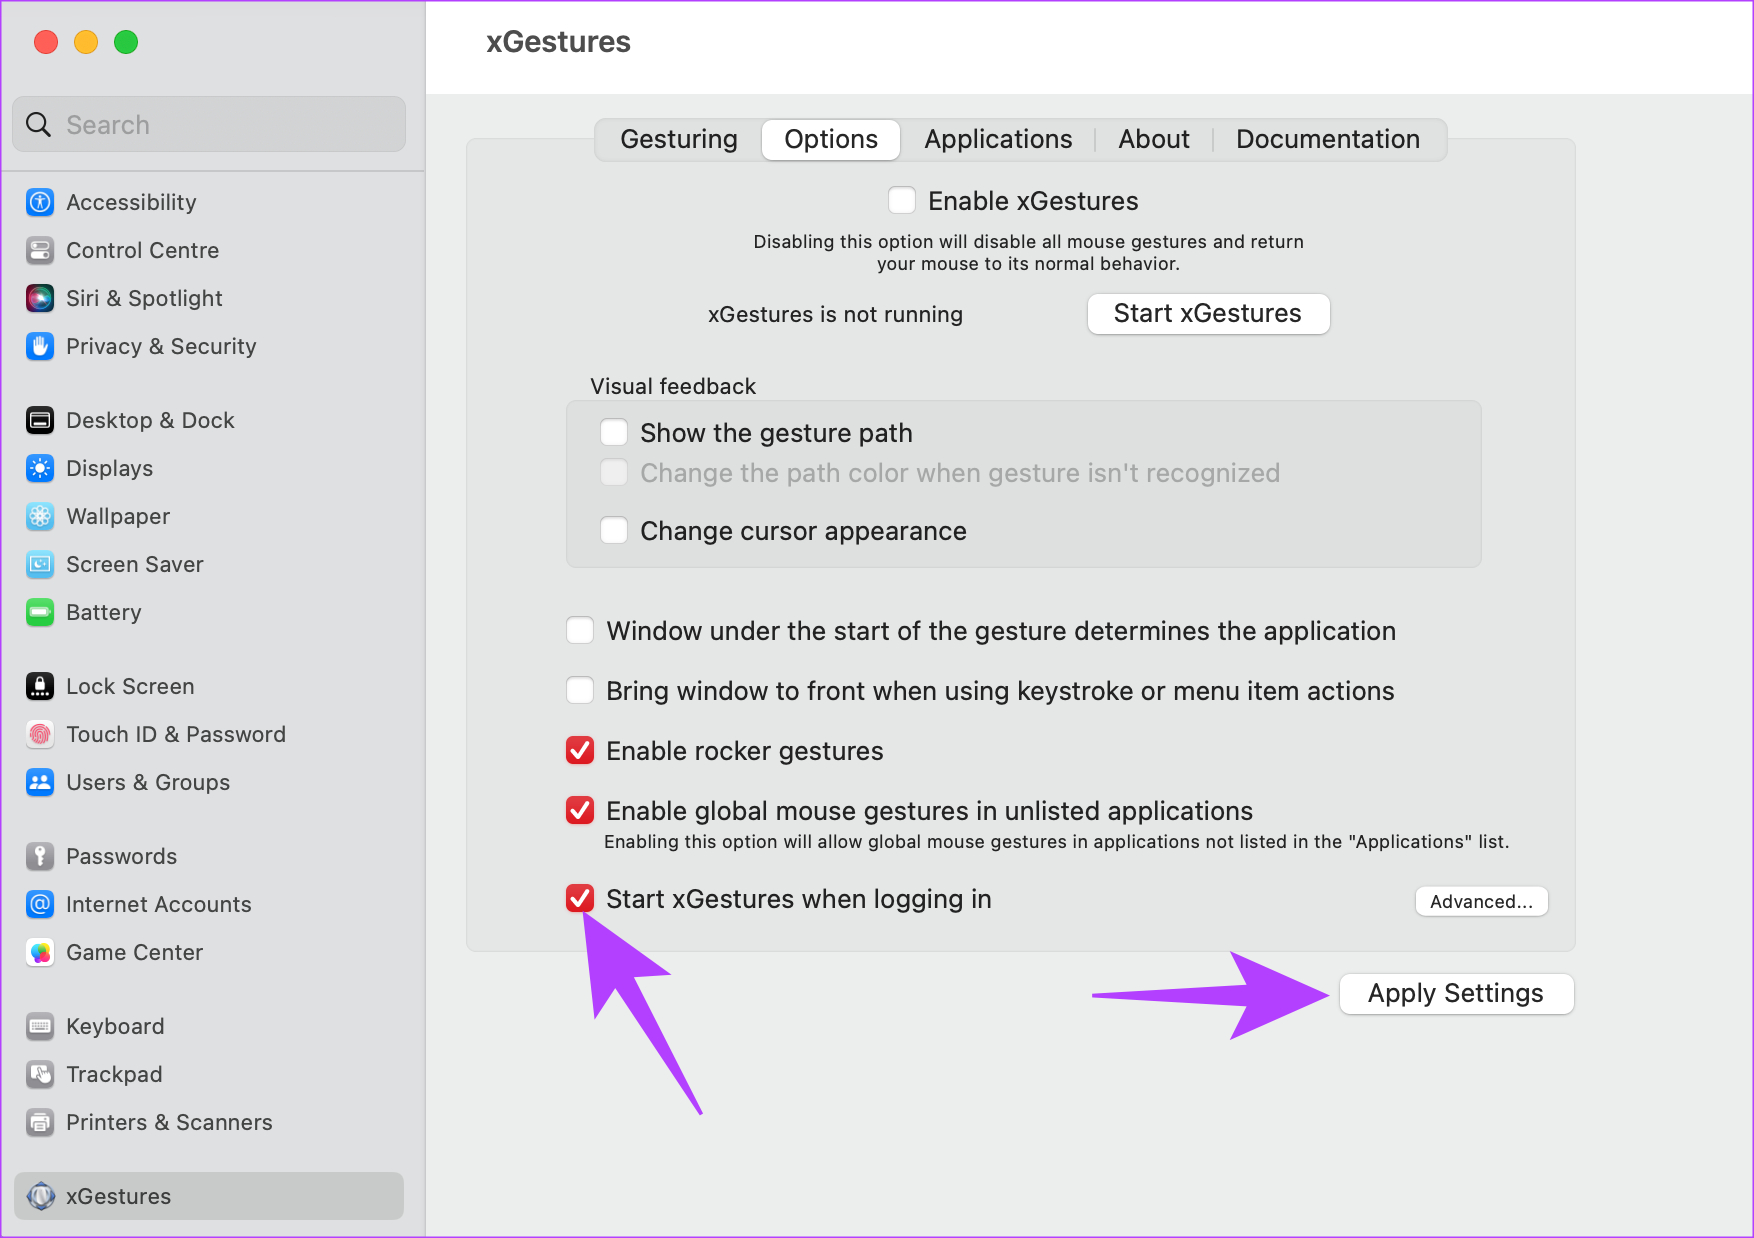
This will ensure your custom gestures are enabled by default when you start your Mac every single time.
Using xGestures
Voila! You now have a mouse compatible with Mac gestures. Now that the custom gestures are set and enabled, all you have to do is hold down the button you selected and swipe your mouse in the direction you want. The set gesture will be triggered each time you do this.
For example, holding the trigger button and swiping your mouse to the left or right will switch applications in that order. Cool, isn’t it?
What to Do if Mac Gestures Are Not Working With a Mouse
If your gestures suddenly stop working, it could be that the xGestures process has stopped. Here’s what you need to do to resume the process on your Mac.
Step 1: Open the Settings app on your Mac. Scroll to the bottom in the left pane. Select the xGestures option.
Step 2: Navigate to the Options tab at the top of the window.
Step 3: Click on Start xGestures. This will restart the process. Also, while you’re at it, ensure the checkbox next to Enable xGestures is selected.

Improve Your Workflow With Gestures
Using Mac gestures with a regular mouse will surely help you improve your workflow by a considerable margin. You no longer have to learn and perform keyboard shortcuts or alternate between the trackpad and the mouse when using your Mac. Just swipe your mouse in any direction and enjoy seamless Mac gestures on your mouse. You may also want to know how to add special characters in Mac and other tricks.
Was this helpful?
Last updated on 06 March, 2023
1 Comment
Leave a Reply
Read Next
 How to Customize Gestures for Apple’s Trackpad or Magic Mouse on a Mac
One of the iPhone’s greatest innovations was the ability to zoom with a pinch.
How to Customize Gestures for Apple’s Trackpad or Magic Mouse on a Mac
One of the iPhone’s greatest innovations was the ability to zoom with a pinch.
 Top 3 Touch Mouse Alternatives to Apple’s Magic Mouse
The Magic Mouse is useful for plenty of people, but some can get annoyed by its poor ergonomics.
Top 3 Touch Mouse Alternatives to Apple’s Magic Mouse
The Magic Mouse is useful for plenty of people, but some can get annoyed by its poor ergonomics.
 10 Best Ways to Fix Trackpad Gestures Not Working on Mac
MacBooks are widely regarded to have the best trackpads on any computer.
10 Best Ways to Fix Trackpad Gestures Not Working on Mac
MacBooks are widely regarded to have the best trackpads on any computer.
 Top 9 Ways to Fix Touchpad Gestures Not Working in Windows 10
Windows 10 supports various touchpad (trackpad) gestures.
Top 9 Ways to Fix Touchpad Gestures Not Working in Windows 10
Windows 10 supports various touchpad (trackpad) gestures.
 Top 6 Ways to Fix Touchpad Gestures Not Working on Windows 11
Although a traditional computer mouse provides precision and ease of use, many still prefer the convenience of touchpad gestures.
Top 6 Ways to Fix Touchpad Gestures Not Working on Windows 11
Although a traditional computer mouse provides precision and ease of use, many still prefer the convenience of touchpad gestures.
 4 Ways to Fix Gestures Not Working on Android
Try Basic Fixes Remove the screen protector and case: Using a low-quality screen protector from an unknown brand may affect the touchscreen's functionality.
4 Ways to Fix Gestures Not Working on Android
Try Basic Fixes Remove the screen protector and case: Using a low-quality screen protector from an unknown brand may affect the touchscreen's functionality.
 9 Fixes for FaceTime Reactions (Gestures) Not Working on iOS 17 and iPadOS 17
iOS 17 and iPadOS 17 introduced reaction effects for FaceTime and other video conferencing apps.
9 Fixes for FaceTime Reactions (Gestures) Not Working on iOS 17 and iPadOS 17
iOS 17 and iPadOS 17 introduced reaction effects for FaceTime and other video conferencing apps.
 7 Best Ways to Fix Mouse Cursor Stuck on Mac
A mouse or a trackpad is one of the most important input devices on any computer.
7 Best Ways to Fix Mouse Cursor Stuck on Mac
A mouse or a trackpad is one of the most important input devices on any computer.
The article above may contain affiliate links which help support Guiding Tech. The content remains unbiased and authentic and will never affect our editorial integrity.


Very simple and useful, thank you for your work, man.