Do you have black squares show up all of a sudden behind certain folders in Windows 10? They look downright hideous, right?
Fortunately, it’s just a visual bug, and nothing’s gonna happen to any files or subfolders within those affected folders. So, if you are going crazy with worry, calm down!
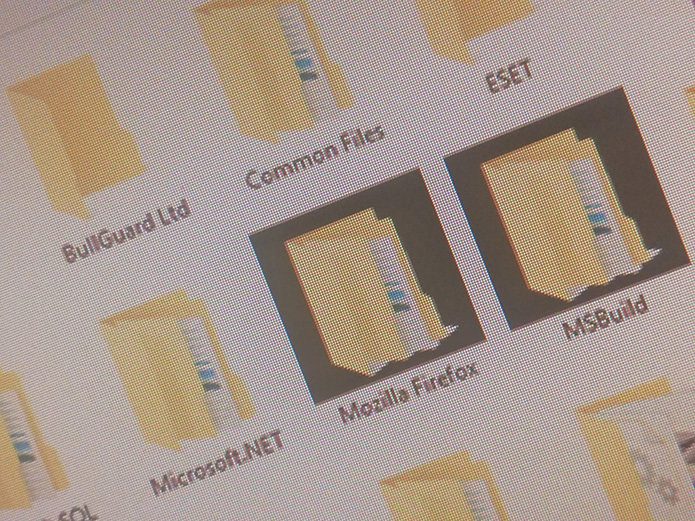
The black folder background issue can crop up for a number of reasons — outdated thumbnail caches, corrupted system files, etc. Luckily, it’s fixable!
Without wasting any more time, let’s get your folders looking crisp and clear ASAP!
Also Read: 5 Cool Windows 10 Features You Might Have MissedRestart Your Computer
This may sound weird in this day and age, but Windows operating systems are still prone to get things right after a good system restart. So, let’s get that out of the way first.
Open the Start menu, click the Power icon, and then click Restart.
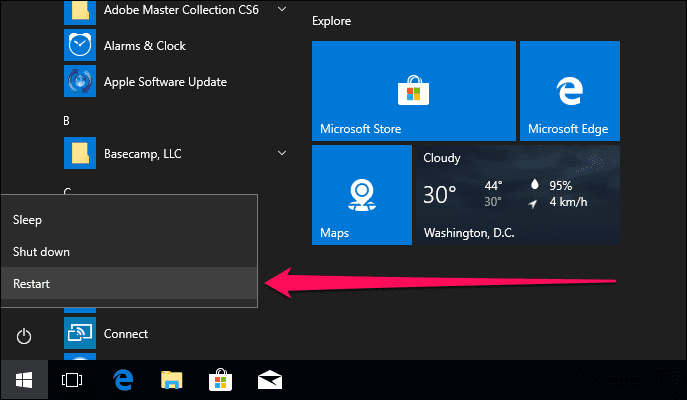
If the affected folders look normal after the restart, you are golden. If they don’t — or if the issue keeps coming back after a while — let’s move on.
Reset Thumbnail Cache
An outdated thumbnail cache is the prime reason for black squares to show up behind folders, so let’s try deleting it from your computer. Don’t worry. Folder thumbnails regenerate automatically over time.
Step 1: Open the Start menu, search for Disk Cleanup, and press Enter. You should now have the Disk Cleanup utility loaded.

Step 2: Select the drive with the Windows 10 installation. Usually, it’s drive C.
Now, click OK. Windows 10 should take a while to scan for deletable files within the drive.
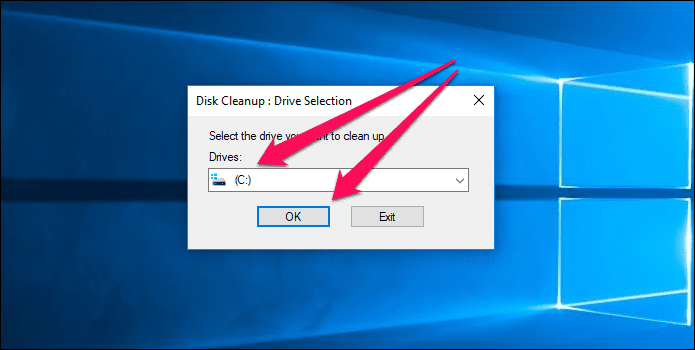
Step 3: Keep the box next to Thumbnails checked, and then click OK. You can also choose to delete any other unwanted file types — temporary files, for example — while you are at it.

Windows 10 should take a few seconds to delete your thumbnail cache, and it’s possible for those black folder backgrounds to disappear for good soon afterward.
If they don’t, let’s continue.
Tip:Update Display Driver
An outdated graphics driver is another main reason for visual glitches to occur in the first place. You can easily get your graphics drivers updated via the Device Manager console.
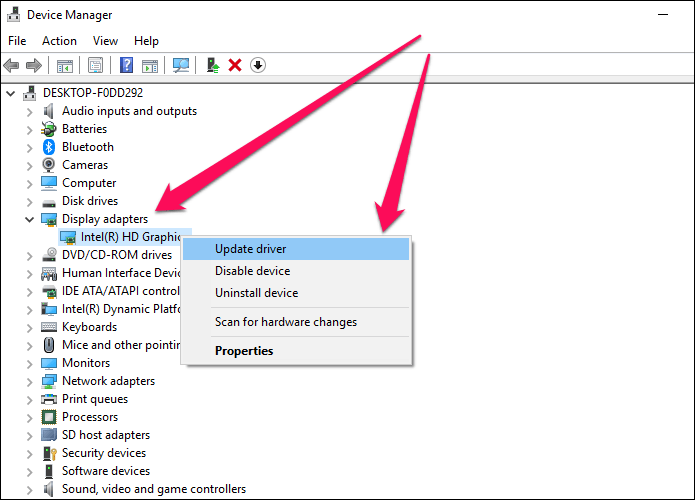
Step 1: Search for and open the Device Manager via the Start menu.

Step 2: Expand the section labeled Display Adapters, and then right-click your video card and select Update Driver Software.
Step 3: On the Update Drivers pop-up window, click Search Automatically for Updated Driver Software.

Device Manager should automatically download and install the latest updates over the Internet. If there are multiple items listed under Display Adapters, repeat the process for each of them.
Note:If the Device Manager can’t find the appropriate drivers automatically, you must manually download them from the manufacturer’s website. Here are some links to major manufacturers:
NVIDIA | AMD | Intel | HP | Dell | ASUS
Once you do that, use the Browse My Computer for Driver Software option on the Update Drivers window and select the downloaded files.
Also Read: How to Easily Backup and Restore Drivers in Windows 10 using Command LineRun SFC Scan
Corrupted system files can also cause certain visual glitches, with black folder backgrounds being one of them. Fortunately, there’s a way to automatically repair such files, and that involves running a command via the Command Prompt console.
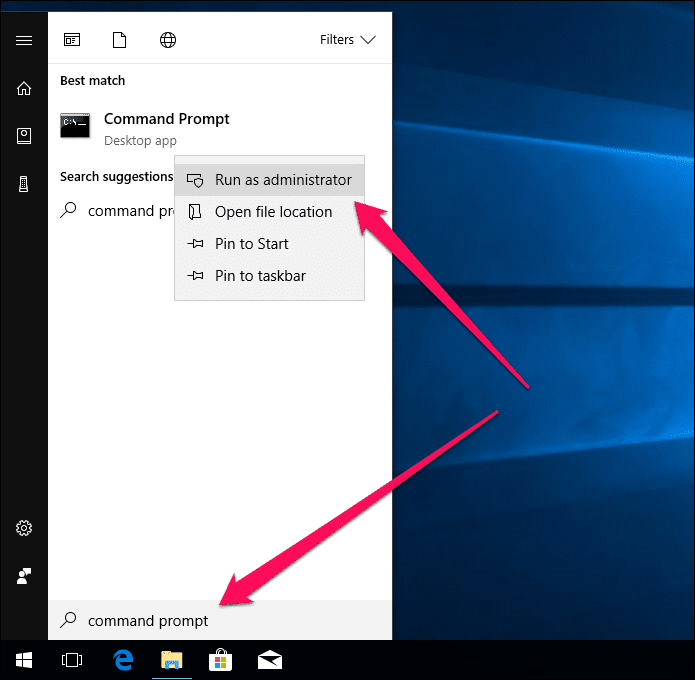
Step 1: Open the Command Prompt console in elevated mode. To do that, search for it in the Start menu, right-click the Command Prompt search result and then select Run as Administrator.
Step 2: Type sfc /scannow into the console and press Enter to initiate a system scan. Note that it may take a while to finish.
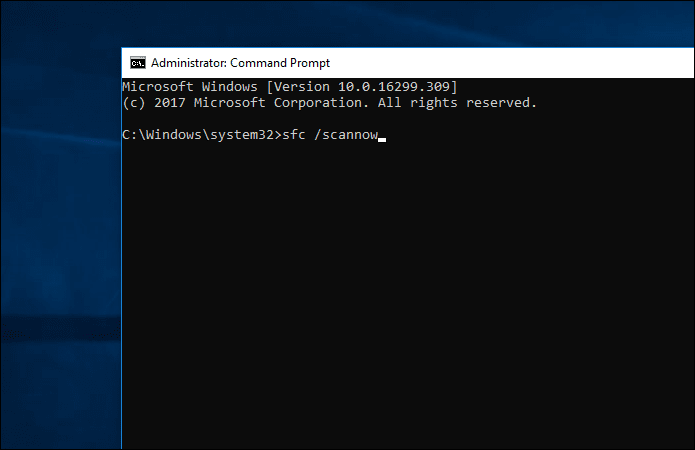
If corrupted system files were detected and fixed, you are prompted with a Windows Resource Protection found corrupt files and successfully repaired them message, which should hopefully resolve the black folder background issue.
If you see a Windows Resource Protection did not find any integrity violations or a Windows Resource Protection found corrupt files but was unable to fix some of them message instead, move on to the final fix.
Run DISM Command
A DISM (Deployment Image Servicing and Management) command fixes deep underlying issues in Windows 10, and quite useful when it comes to resolving our problem.
You can also complete the SFC scan normally if you got the Windows Resource Protection found corrupt files but was unable to fix some of them message earlier.
On a Command Prompt console with elevated rights, type DISM /Online /Cleanup-Image /RestoreHealth and press Enter.
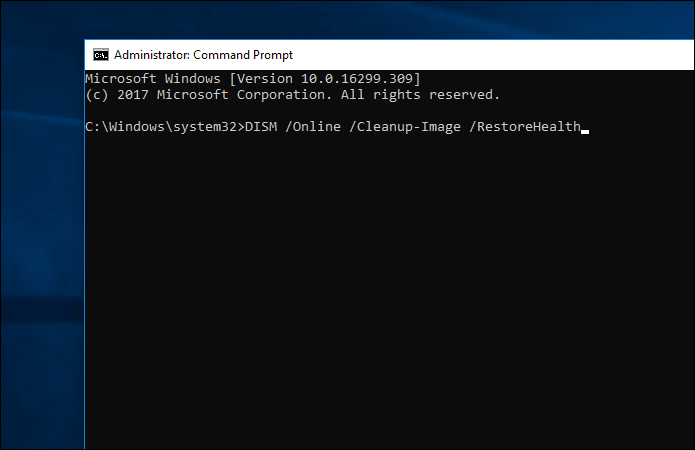
It should take a while for any issues to be found and fixed. The progress counter may hang at 20% for quite a while, but that’s usual.
Once you get to the end, perform the SFC scan again if you couldn’t finish it successfully before, and then exit the console and restart your computer. Hopefully, you should see those pesky black backgrounds gone.
Also Read: Top 11 Fixes for iTunes Not Working on Windows 10Enjoy Windows as Usual
Your folders should look good now. Usually, a thumbnail cache reset or a display driver update should fix things up and only rarely do you need to run an SFC or DISM scan.
And finally, make sure to keep your computer updated. Windows 10 may have a permanent fix in the works anytime soon, and you really don’t want to miss that.
So how did it go? The comments section is right below.
Was this helpful?
Last updated on 13 July, 2021
Read Next
 10 Ways to Fix Windows 11 Black Screen Issue
It can be terrifying if the screen of your Windows 11 computer goes black all of a sudden, especially when you're in the middle of an important task.
10 Ways to Fix Windows 11 Black Screen Issue
It can be terrifying if the screen of your Windows 11 computer goes black all of a sudden, especially when you're in the middle of an important task.
 Top 9 Ways to Fix the Black Screen Issue in Amazon Prime Video on Windows
Like any streaming service, Prime Video can run into some issues from time to time.
Top 9 Ways to Fix the Black Screen Issue in Amazon Prime Video on Windows
Like any streaming service, Prime Video can run into some issues from time to time.
 Fix: Background Intelligent Transfer Service (BITS) Keeps Stopping
Fix 1: Set Background Intelligent Transfer Service to Automatic (Delayed Start) If the Background Intelligent Transfer Service or its related services are misconfigured, you must reset them to their default
Fix: Background Intelligent Transfer Service (BITS) Keeps Stopping
Fix 1: Set Background Intelligent Transfer Service to Automatic (Delayed Start) If the Background Intelligent Transfer Service or its related services are misconfigured, you must reset them to their default
 Top 5 Ways to Fix Google Meet Background Blur Not Working Issue
Google Meet has been slightly late to the party of introducing background blur.
Top 5 Ways to Fix Google Meet Background Blur Not Working Issue
Google Meet has been slightly late to the party of introducing background blur.
 Top 8 Ways to Fix YouTube Black Screen Issue on Android TV
Watching YouTube videos is a favorite past-time for many people.
Top 8 Ways to Fix YouTube Black Screen Issue on Android TV
Watching YouTube videos is a favorite past-time for many people.
 Top 9 Ways to Fix Netflix Black Screen With Sound Issue on Mobile and Desktop
Imagine launching the Netflix app on your mobile or PC to catch up with the latest episode of the favorite show, but the app throws black screen.
Top 9 Ways to Fix Netflix Black Screen With Sound Issue on Mobile and Desktop
Imagine launching the Netflix app on your mobile or PC to catch up with the latest episode of the favorite show, but the app throws black screen.
The article above may contain affiliate links which help support Guiding Tech. The content remains unbiased and authentic and will never affect our editorial integrity.