Audio problems can be annoying while watching your favorite movie or during a video call. And that’s the last thing you want it can’t recognize your speaker or headphone. In such cases, a restart might help but not always. That’s why you need to take a closer look to troubleshoot the audio problems in your Windows 10 PC.
Whenever the audio stops working, there can be many factors behind it, right from an interfering third-party program to the audio drivers and services running on your PC. Luckily, the solutions are simple and quick to apply.
In this guide, we’ll start with the most basic solutions progressively moving on to slightly advanced ones to troubleshoot audio problems on Windows PC.
1. Check Volume
If there’s no sound at all, then you can start with your PC’s volume settings. Now I’m sure you’ve already done that by now. But it’s always nice to double-check.
To check volume, right-click on the speaker icon in the taskbar and select ‘Open Volume mixer.’ Then, in the Volume Mixer window, make sure that none of the volumes are on mute.
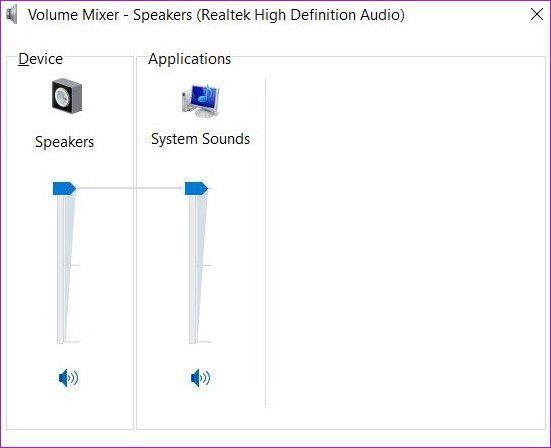
Also, if you’re using headphones or speakers that have their own volume controls, be sure to check them too.
2. Change Default Playback Device
If you use multiple audio devices such as headphones, external speakers, etc., with your PC, make sure that your preferred audio device is set as the default playback device.
To do that, right-click on the speaker icon in the taskbar and select Sounds. Now switch to the Playback tab and set the preferred audio device as the default playback device.
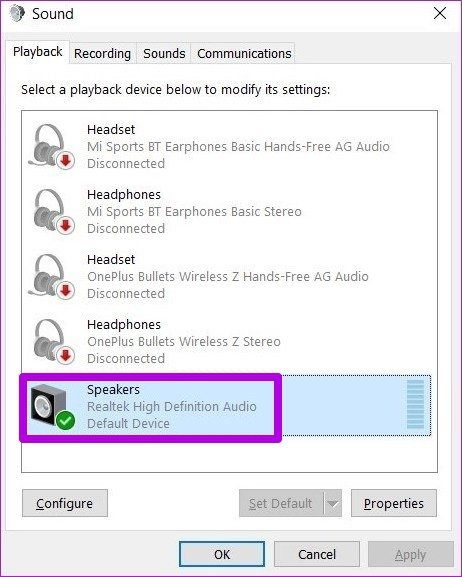
Now go ahead and see if the audio is working fine on your default playback device.
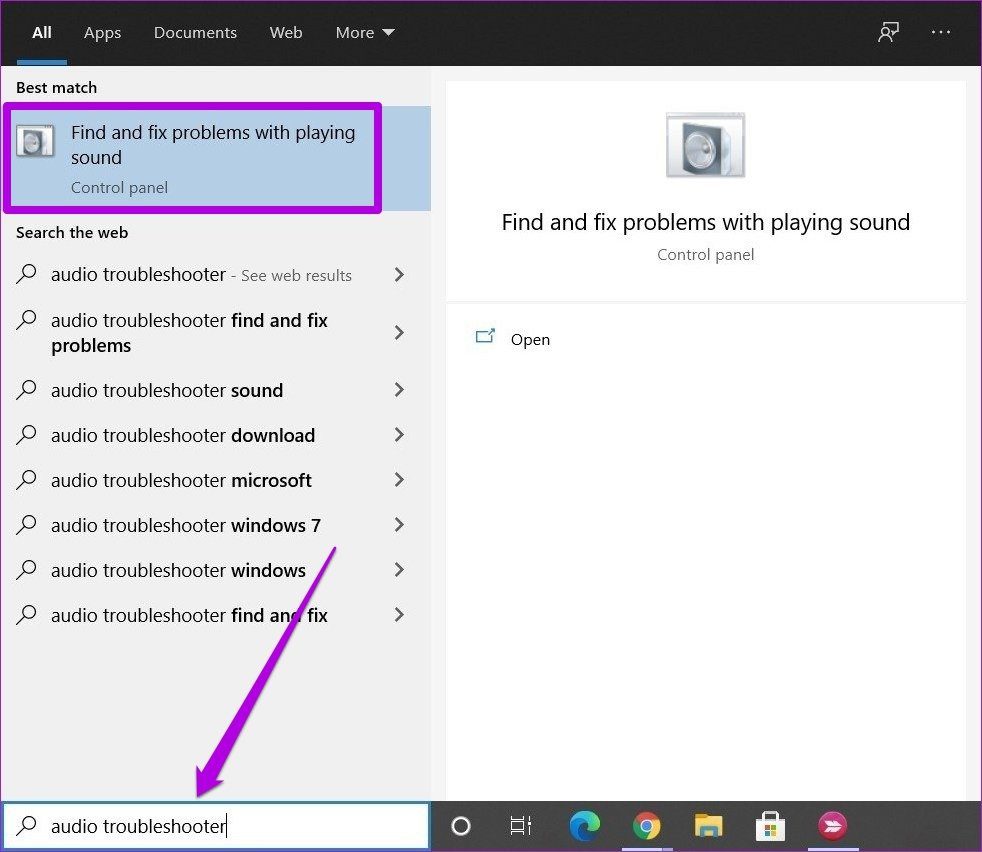
3. Audio Troubleshooter
If changing the playback device doesn’t help, then it’s time to dig a little deep and use the built-in Windows audio troubleshooter. It can efficiently diagnose audio problems on its own and fix them. Here’s how to use it.
Open the start menu and type in the audio troubleshooter. Then select ‘Find and fix audio playback problems’.
Now select the audio device for which you want to troubleshoot and follow the on-screen instructions to fix the issue.
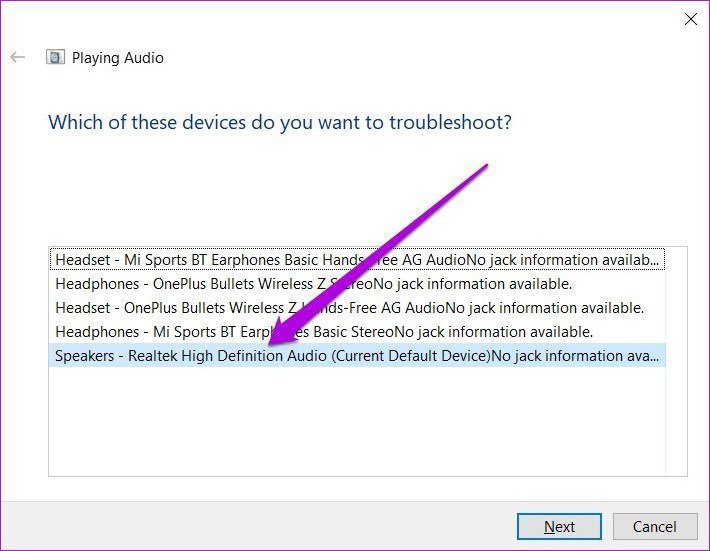
Once done, check to see if the audio problem is resolved. If not, you can move on to the next solution.
4. Update Audio Driver
In many instances, incompatible or corrupted audio drivers are found as the culprit of sound problems on Windows 10. In such cases, updating or reinstalling drivers should fix the issue. Here’s how you can do it.
Step 1: Press Windows key + X to open the quick link menu and select Device Manager from the list.

Step 2: In the Device Manager window, expand ‘Sound, video and game controllers’. Then right-click on the audio device, and select ‘Update driver’ from the list.

Step 3: Now select ‘Search automatically for drivers’ and follow the on-screen instructions to update drivers.
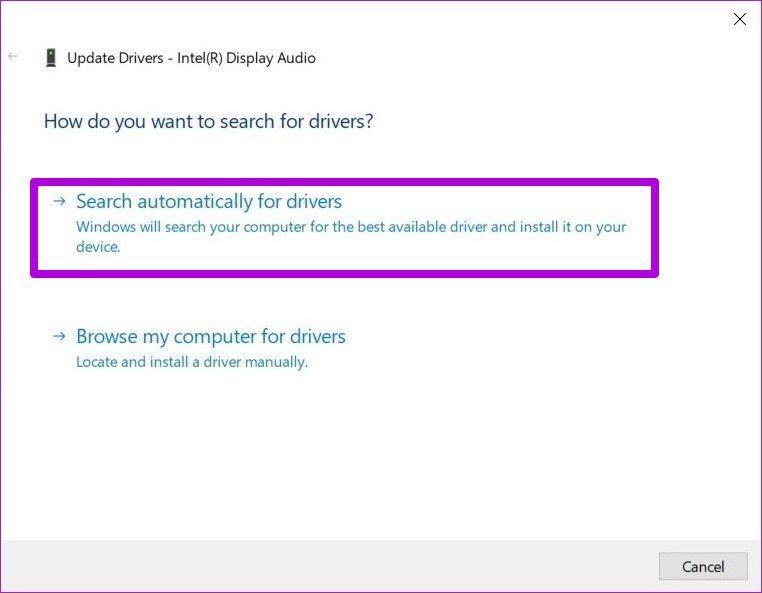
In the majority of cases, updating the driver should do the trick. If not, then you can also try reinstalling the audio drivers by uninstalling them and restarting your PC.
5. Restart Audio Services
Windows Services is a small program that starts running in the background every time your PC boots up. Sometimes, these services, which include the audio service, can act up due to an error of some sort. In such cases, you can try restarting the audio service to fix audio problems. Here’s how.
Open the Start menu, type in services, and press Enter. In the Services window, scroll all the way down to find Windows Audio. Right-click on Windows Audio and select Restart from the list.
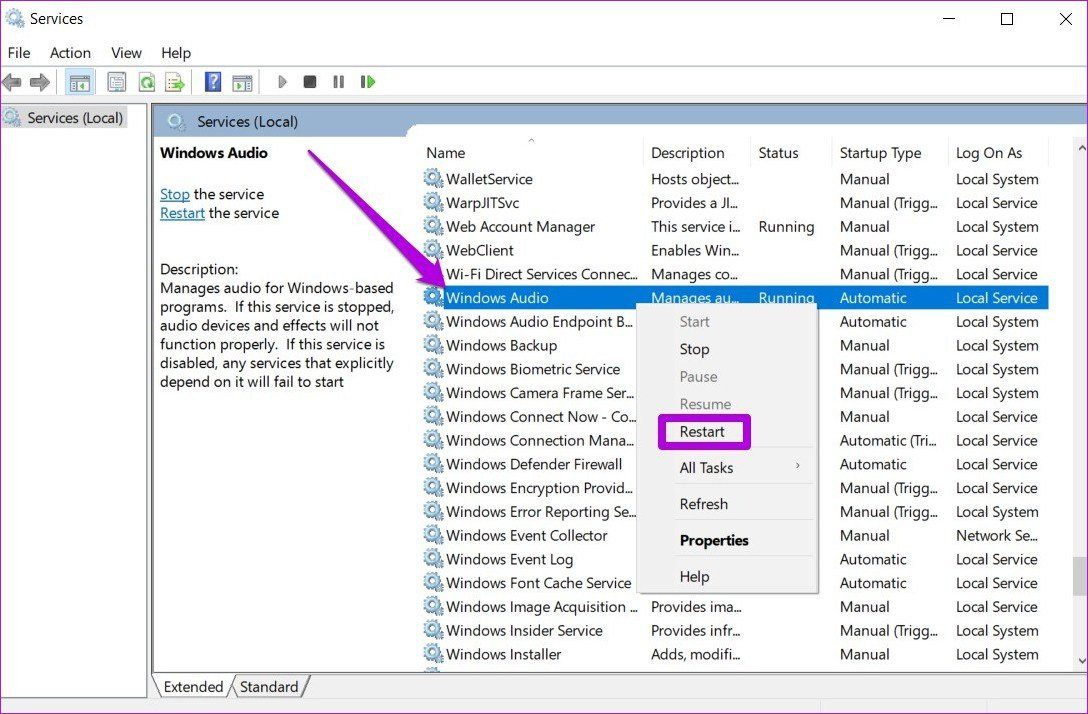
Repeat the above process to restart ‘Windows Audio Endpoint Builder’ and ‘Remote Procedure Call’ service as well. After that, restart your PC to see if the audio problem is fixed.
6. Update Windows
Microsoft regularly pushes out Windows updates to fix major or minor issues with your PC. These updates usually bring all sorts of driver updates and bug fixes with them. So, it’s always recommended you check regularly for updates and make sure to restart your PC for changes to take effect.
7. Use System Restore
If you’ve started facing audio problems only after tweaking the system settings or updating your PC, Windows has a handy system restore feature which can be helpful to undo the changes made. The system restore feature allows you to roll back to a certain point before major system changes were made without losing any of your data. You can use it to move back to a restore point before the audio problems started and see if it fixes the issue.
Sound Check
Sometimes, the external headphones or speakers connected to your PC can fail, leading you to believe there are audio problems with your PC. To find which one is to blame, you can try connecting your speakers or headphones to another device. Also, it’s good practice to perform a soundcheck with the microphone and speakers before jumping on a video call.
Hopefully, one of the fixes worked out for you alright. If not, there could be a hardware-related issue on your sound card or speaker. To fix that, you’ll have to visit your nearest service center or get a replacement.
Was this helpful?
Last updated on 07 February, 2022
Read Next
 10 Best Ways to Fix VLC Audio Not Working Error on Windows
VLC media player has long been a go-to alternative to Windows Media Player, thanks to its open-source nature and support for various file formats.
10 Best Ways to Fix VLC Audio Not Working Error on Windows
VLC media player has long been a go-to alternative to Windows Media Player, thanks to its open-source nature and support for various file formats.
 11 Easy Ways to Fix HDMI Audio Not Working in Windows 11
When watching a movie, series, show, etc., using HDMI audio seems to have become a staple.
11 Easy Ways to Fix HDMI Audio Not Working in Windows 11
When watching a movie, series, show, etc., using HDMI audio seems to have become a staple.
 4 Fixes for Audio Not Working in Microsoft Teams on Windows 11
Common Fixes Reboot Windows - Open the Start Menu, click Power in the bottom right, and select Restart.
4 Fixes for Audio Not Working in Microsoft Teams on Windows 11
Common Fixes Reboot Windows - Open the Start Menu, click Power in the bottom right, and select Restart.
 How to Fix Realtek HD Audio Manager Missing in Windows 10 and Windows 11
Realtek HD Audio Manager comes with Realtek's High-Definition (HD) Audio Driver on almost every Windows 10 and Windows 11 computer.
How to Fix Realtek HD Audio Manager Missing in Windows 10 and Windows 11
Realtek HD Audio Manager comes with Realtek's High-Definition (HD) Audio Driver on almost every Windows 10 and Windows 11 computer.
 Top 6 Ways to Fix Audio Distortion Issues While Streaming on Windows 11
There’re a few things more annoying than hearing audio that’s distorted.
Top 6 Ways to Fix Audio Distortion Issues While Streaming on Windows 11
There’re a few things more annoying than hearing audio that’s distorted.
 Top 6 Ways to Fix No Audio Device Is Installed Error on Windows 11
Are you getting the 'No audio device is installed' error when you play music or a video file on your Windows 11 computer?
Top 6 Ways to Fix No Audio Device Is Installed Error on Windows 11
Are you getting the 'No audio device is installed' error when you play music or a video file on your Windows 11 computer?
 Windows Audio Device Graph Isolation: Fix High CPU Usage
The productivity of your work can be easily influenced by how your Windows PC performs.
Windows Audio Device Graph Isolation: Fix High CPU Usage
The productivity of your work can be easily influenced by how your Windows PC performs.
 Top 7 Ways To Fix GeForce Experience Not Recording Game Audio in Windows 11
GeForce Experience is an NVIDIA utility that helps you install the latest drivers, tweak game settings, and even record and stream games.
Top 7 Ways To Fix GeForce Experience Not Recording Game Audio in Windows 11
GeForce Experience is an NVIDIA utility that helps you install the latest drivers, tweak game settings, and even record and stream games.
The article above may contain affiliate links which help support Guiding Tech. The content remains unbiased and authentic and will never affect our editorial integrity.