Have you ever found yourself waiting for your computer to start up, only to be greeted by Microsoft Teams? It might be frustrating, especially if you’re pressed for time and want to get your work done quickly. Fear not! This article will guide you on how to remove or disable Microsoft Teams in Windows 11 effectively and efficiently.

You may wonder what happens when you disable Teams on Windows 11. Well, nothing major; it will only prevent Teams from automatically launching when you turn on your computer, meaning your files and conversations will remain intact, and you can still access Teams manually whenever needed. With this understanding, let’s begin with the article.
Method 1: Disable Microsoft Teams From Its Settings
If you want to keep Teams installed on your PC but prefer to launch it manually when necessary, follow the steps below. But before we proceed, it’s important to note that disabling Teams will not uninstall it, so you can still access it later.
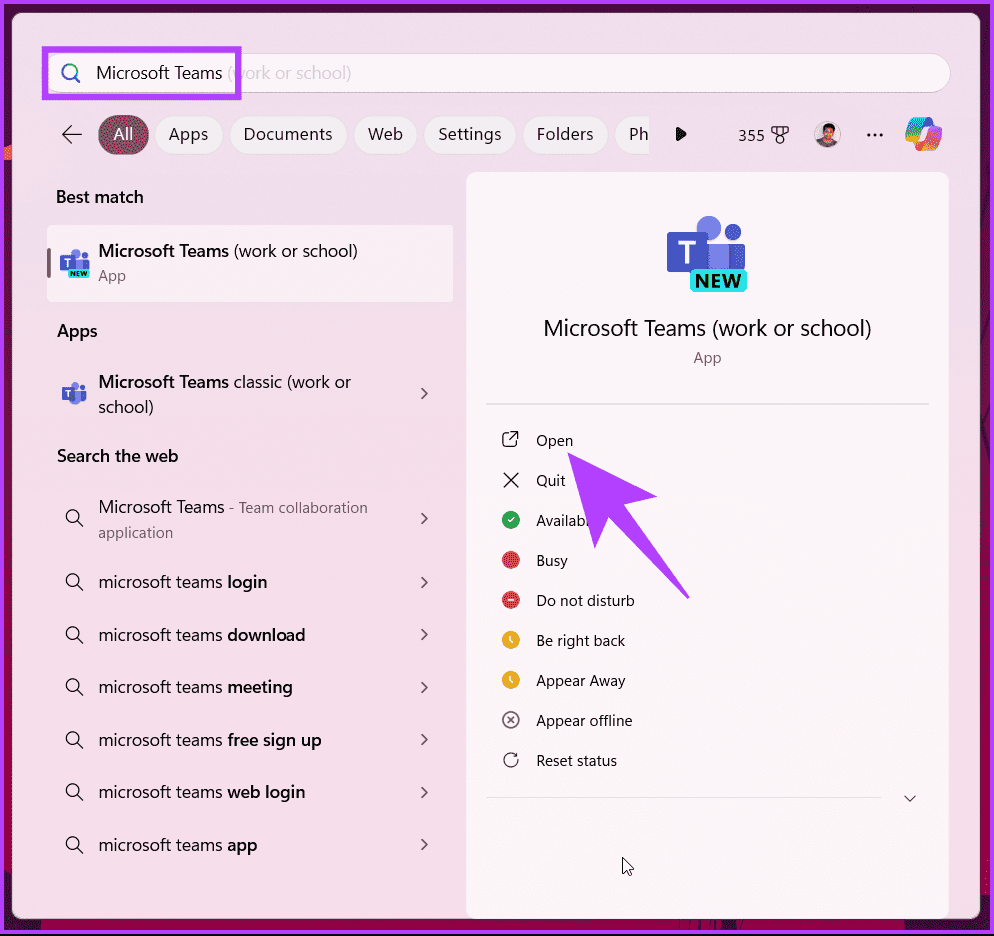
Step 1: Press the Windows key on your keyboard. Then, type Microsoft Teams and click Open.
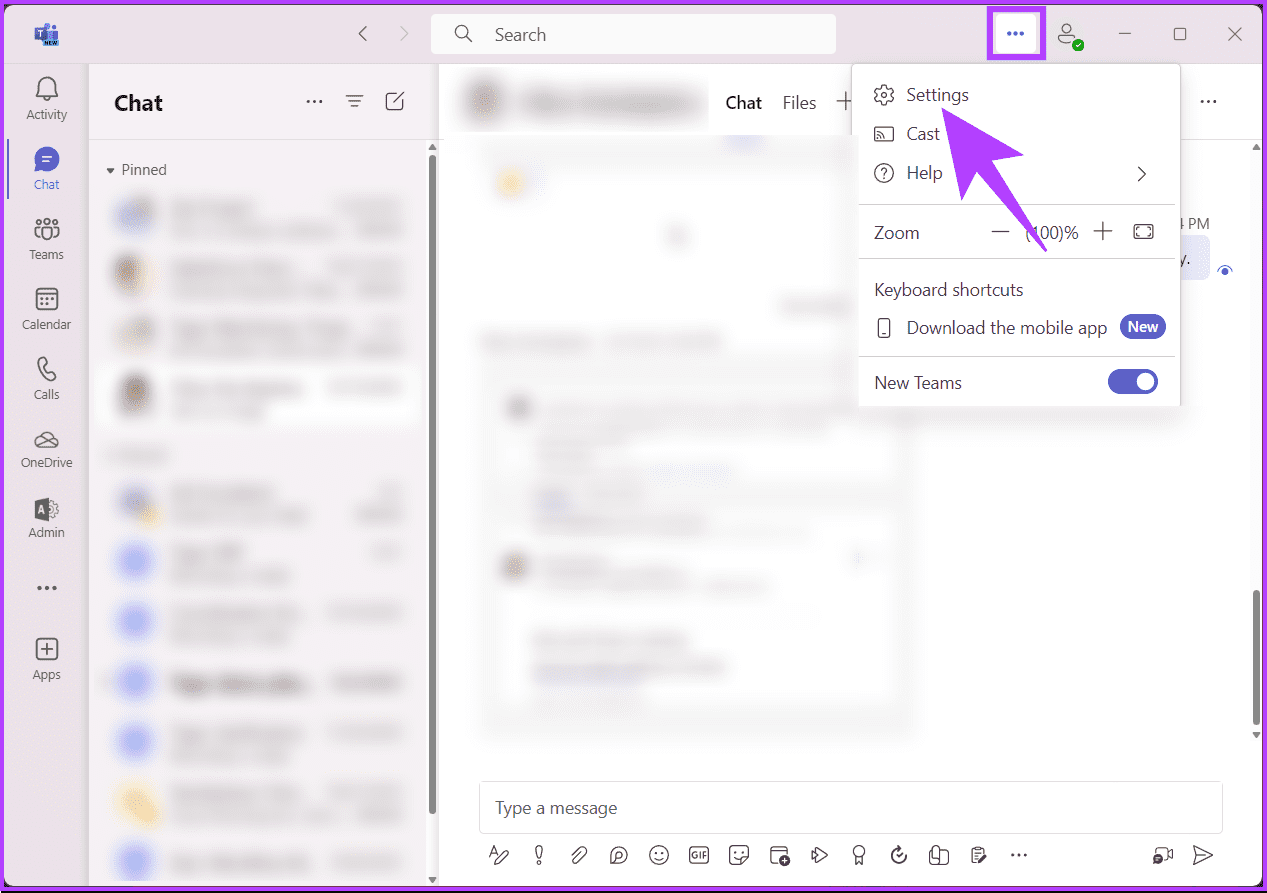
Step 2: Once launched, click on the three-dot icon on the top bar next to your profile icon. From the drop-down, choose Settings.
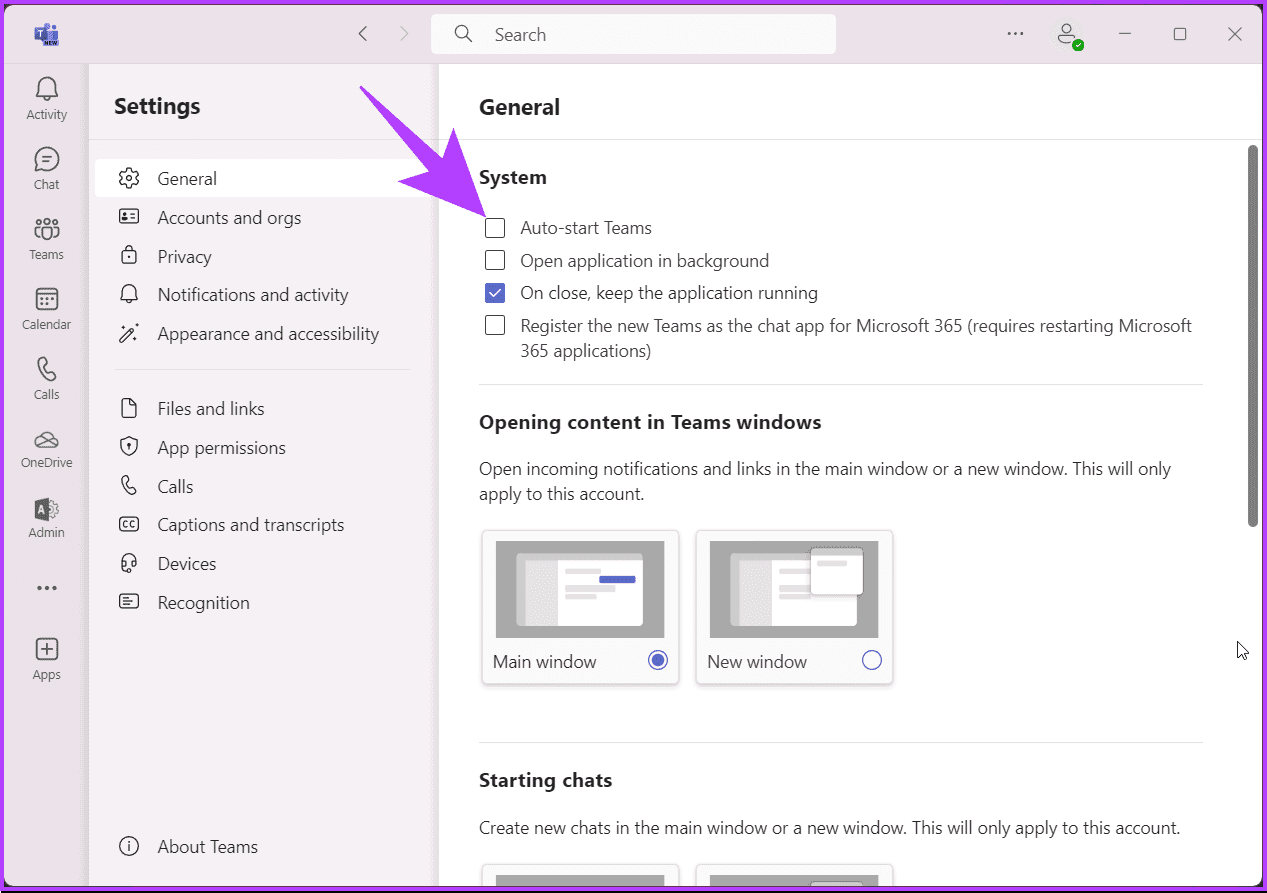
Step 3: In Settings, under System, uncheck the box next to the ‘Auto-start Teams’ option.
And that’s it. Microsoft Teams should no longer auto-start each time you turn on your PC. If you want to know another method to disable Microsoft Teams from opening on startup, move on to the next method.
Also Read: How to set status timeout in Microsoft Teams
Method 2: Stop Microsoft Teams From Opening on Startup Using Task Manager
Task Manager provides a simple interface to toggle the installed app’s startup status, making it ideal for users who prefer a more visual approach. If you only want to prevent Microsoft Teams from automatically launching when you boot up your Windows 11 PC but still want to keep the app installed, follow the instructions below.
Step 1: Press the Windows key on your keyboard, type Task Manager, and click ‘Run as administrator.’
Note: Alternatively, press ‘Windows key + Shift + Esc’ to open Task Manager.

Step 2: Go to Startup Apps from the side pane. Then, choose Microsoft Teams and click Disable on the top.

You can also use this method to stop any other app on your Windows computer from starting automatically. This will save and extend your Windows PC’s battery life by a great deal. You can make use of the Settings app on your Windows to disable Microsoft Teams from autostarting; continue reading.
Method 3: Use the Settings App to Disable Teams Autostart
Much like the methods above, disabling teams from autostarting is fairly straightforward. Moreover, once you prevent Teams from autostarting, you will no longer get any notifications from it unless you manually start the app. Follow the below steps.
Note: This method will only disable the Microsoft Teams app for the current user. If multiple people use the same computer, the changes will not apply to their accounts.
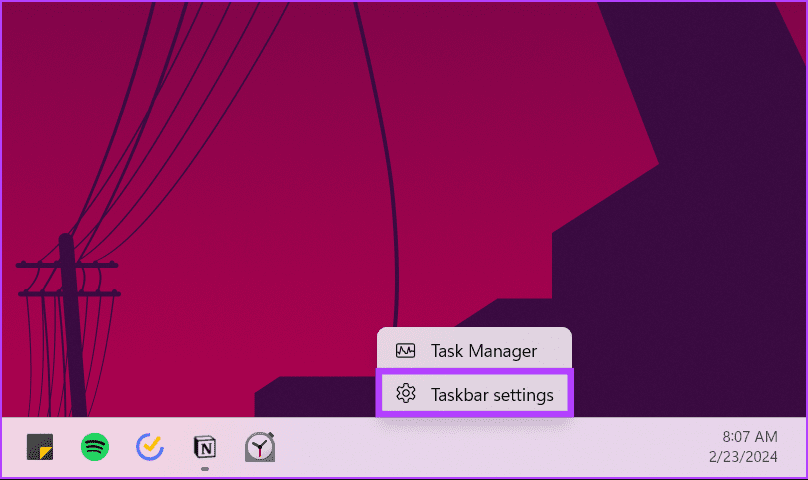
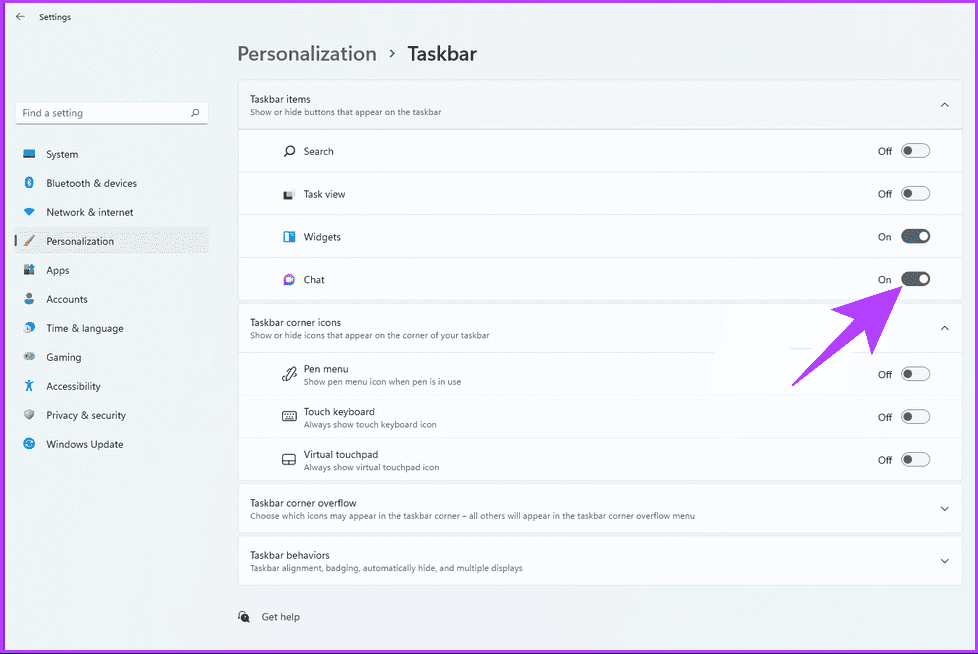
Step 1: Right-click on the Taskbar.
Step 2: Select Taskbar settings to open a configuration menu.
Step 3: Expand the Taskbar Items menu by clicking its corresponding downward arrow symbol. Then, toggle off the option for Chat to remove the Microsoft Teams shortcut from your taskbar.
Step 4: Open the Settings app by pressing the ‘Windows key + I’ simultaneously.
Step 5: Go to Apps from the left-hand side list. Then, select Startup from the right pane.
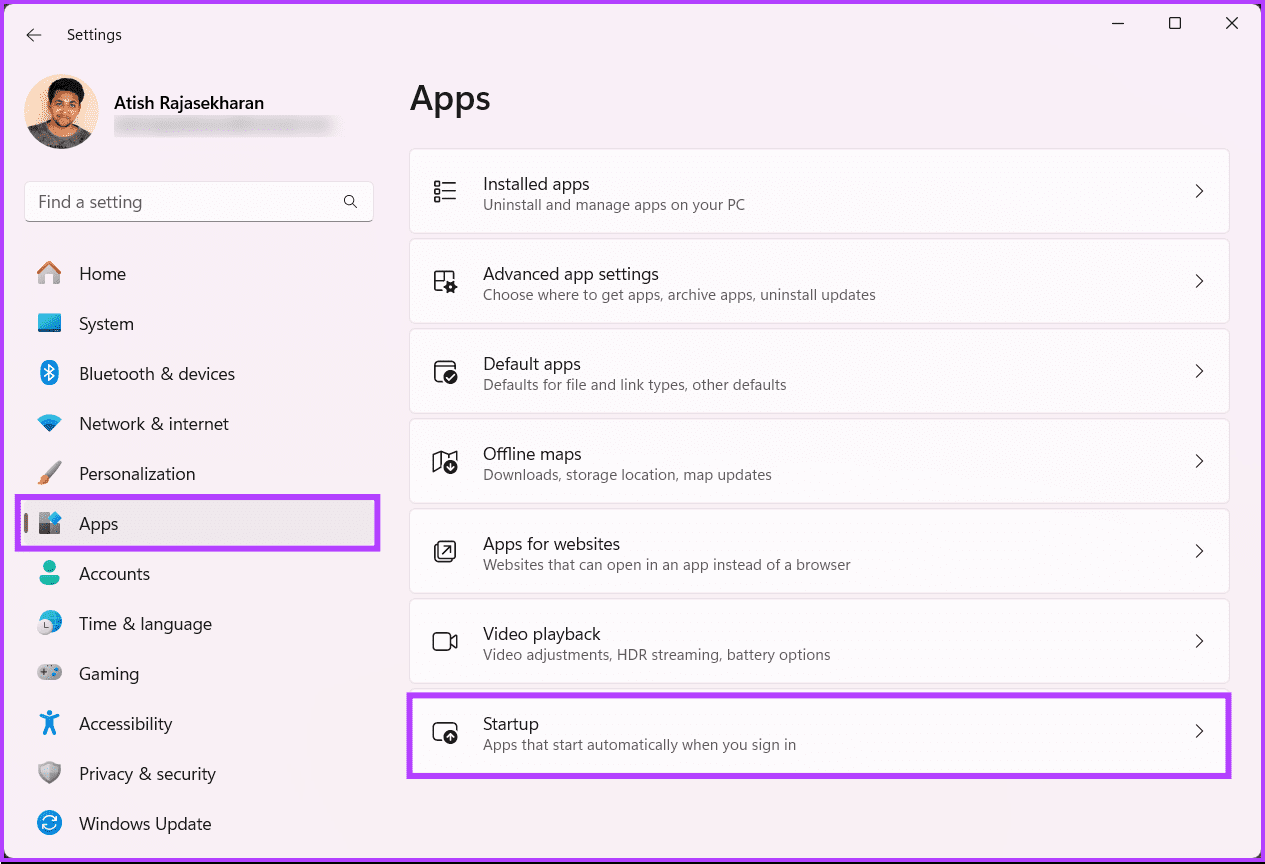
Step 6: Find Microsoft Teams in the list and toggle it off.

There you go. You have successfully disabled Microsoft Teams from launching automatically once your PC boots up. If you manually start the app, it will remain activated until you restart the computer, log off, or manually close it by right-clicking on its icon from the bottom-left corner of the taskbar and selecting Quit.
Also, you can reverse the changes by following the above steps and toggling on Microsoft Teams. There’s one more way to disable Teams on your PC. Continue reading.
Method 4: Disable Microsoft Teams Using Registry Editor
This method is more complex than the above one, but the steps are simple to follow. However, because we will use the Registry Editor, we recommend backing up the Windows Registry before proceeding with the steps below.
Step 1: Press the Windows key on your keyboard, type Registry Editor, and click ‘Run as administrator.’
Note: Alternatively, press the Windows + R key to open the Run dialog box, type regedit.exe, and click OK to open Registry Editor.

In the prompt, select Yes.
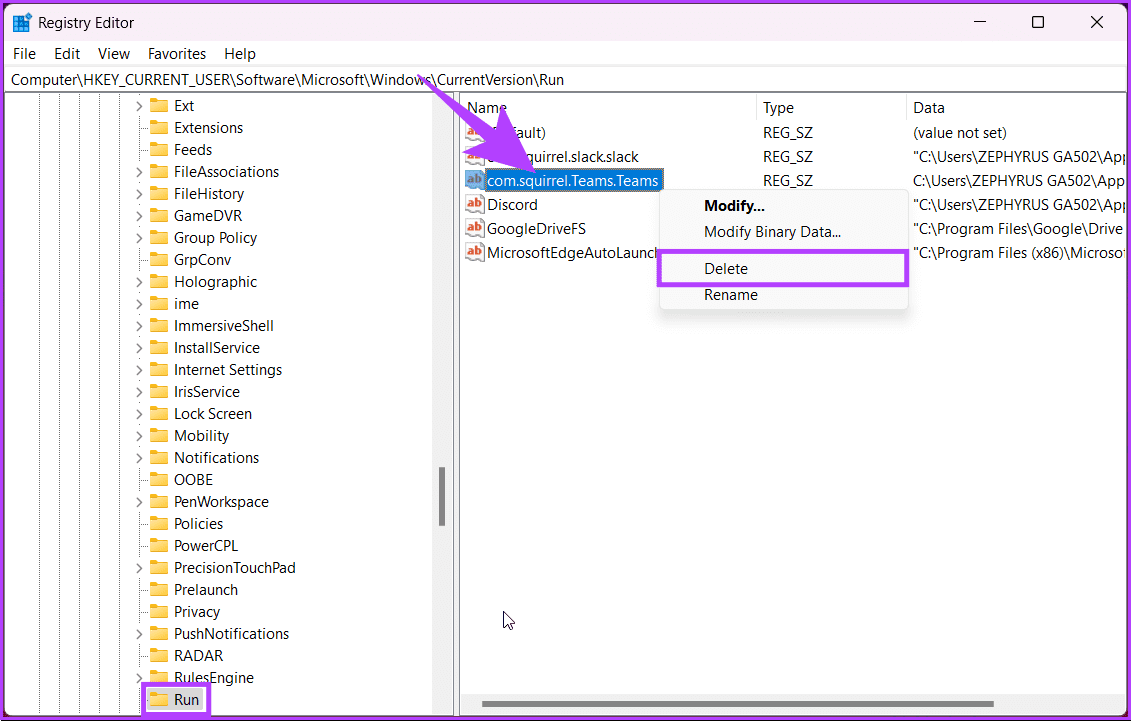
Step 2: In the top address bar, enter the following path:
HKEY_CURRENT_USER\Software\Microsoft\Windows\CurrentVersion\Run
Note: You can manually navigate to the section too.

Step 3: Find and right-click on the ‘com.squirrel.Teams.Teams’ key. Then, click Delete.
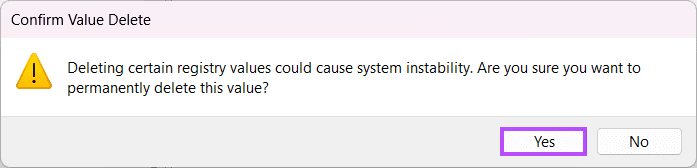
Step 4: In the confirmation window, click Yes.
Finally, reboot the system to implement the changes. And that’s it! After booting up your PC again, Microsoft Teams should no longer start automatically unless you launch it. If you don’t want to disable Teams but rather want to remove it altogether from your Windows PC, keep reading.
Also Read: How to schedule a meeting in Microsoft Teams
How to Uninstall Microsoft Teams
Uninstalling Teams removes the application entirely from your system, erasing all your Teams data, including chats, files, and meeting recordings. Once removed, you’ll have to reinstall it from the Microsoft Store if you wish to use it again. With that, let’s begin with the steps.
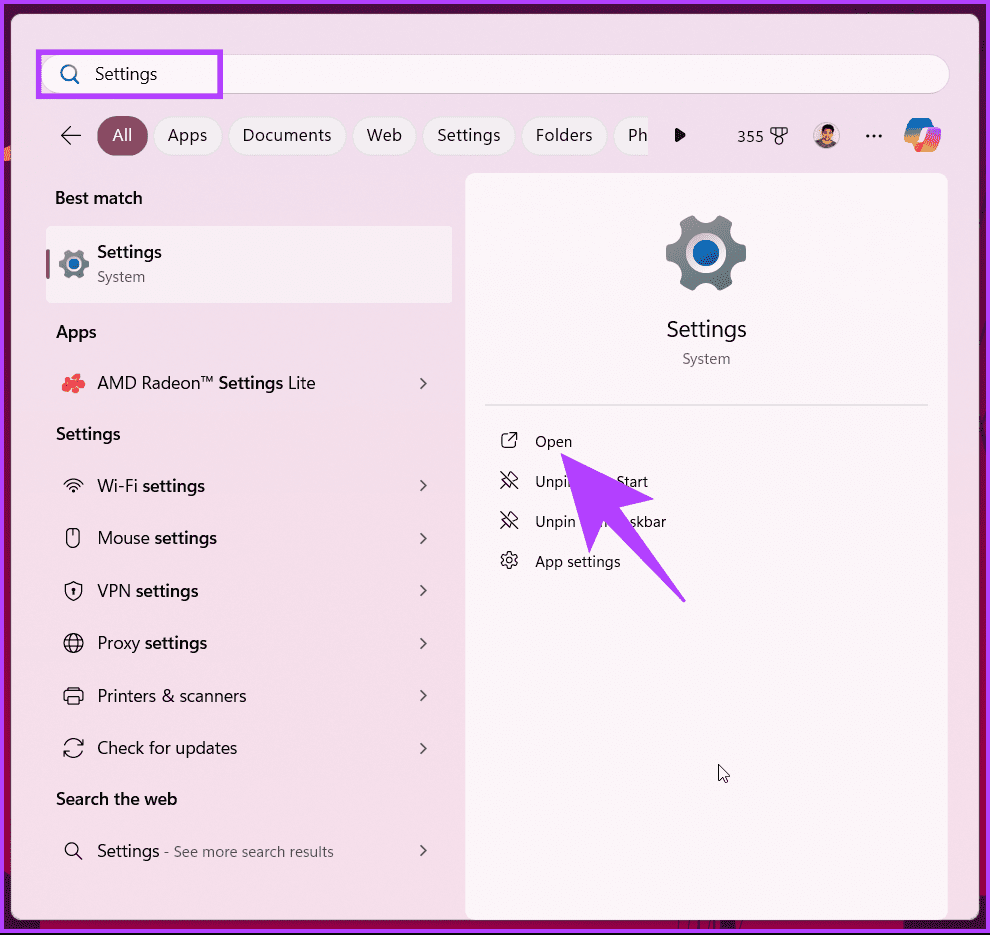
Step 1: Press the Windows key on your keyboard. Then, type Settings in the search bar and click Open.
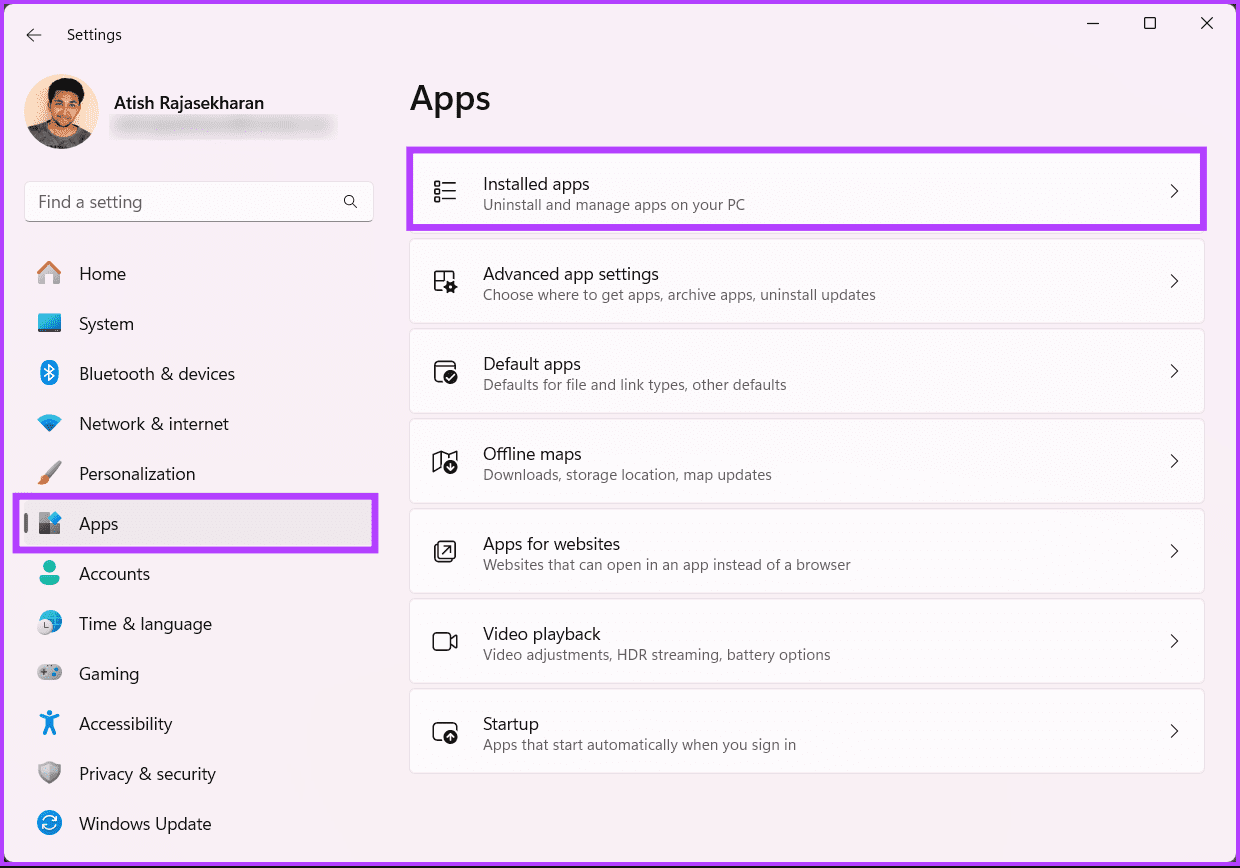
Step 2: Go to Apps from the left-hand side list. Then, select Installed apps from the right pane.
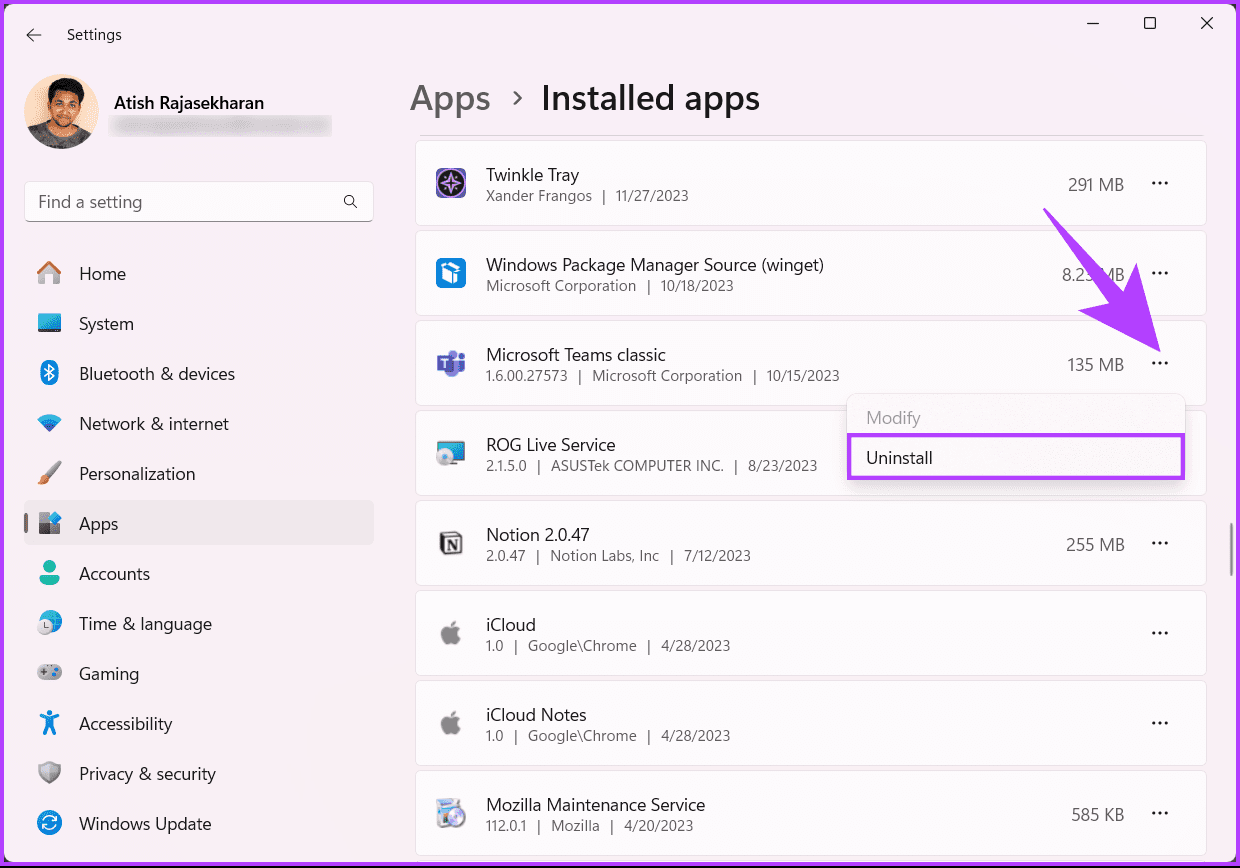
Step 3: Find Microsoft Teams in the apps list.
Step 4: Click on the three-dot icon corresponding to the app you want to delete. Then, choose the Uninstall option.
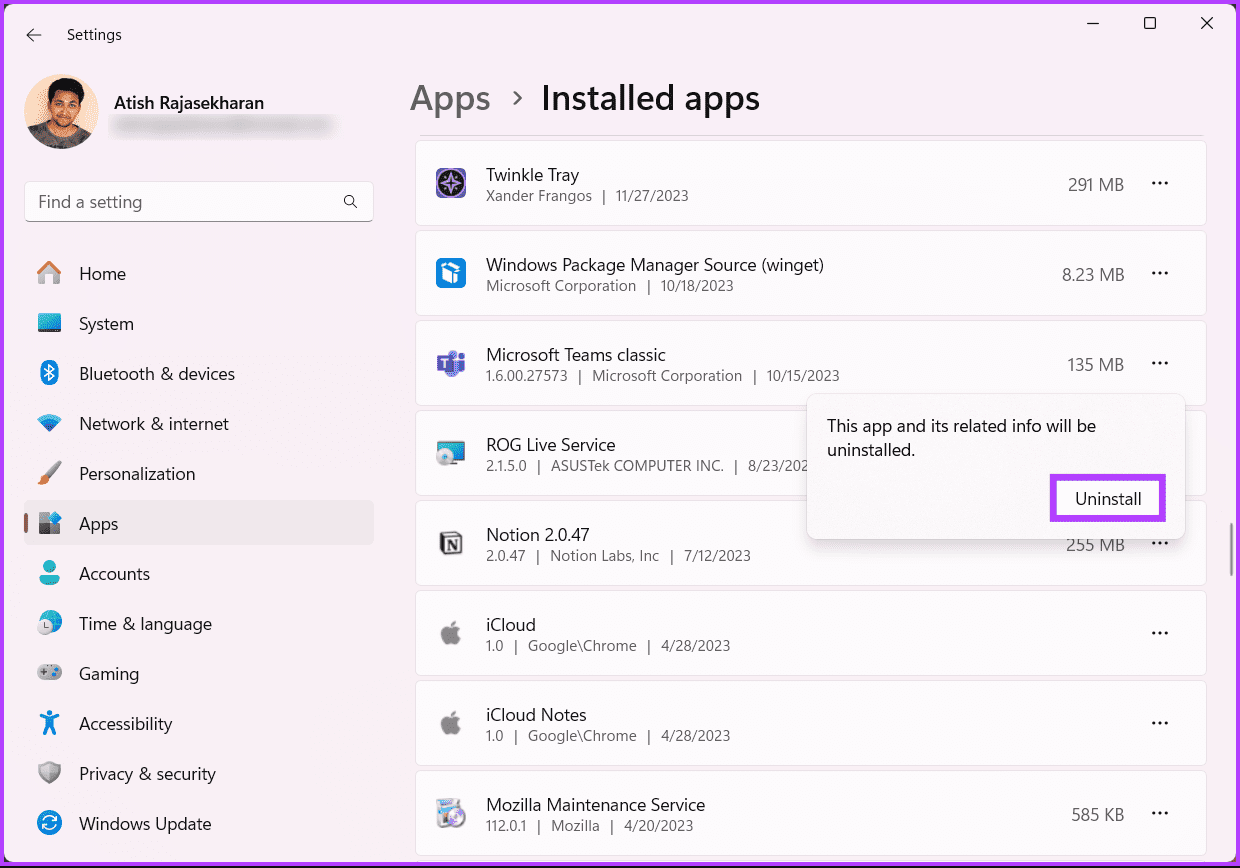
Step 5: Once the confirmation window is displayed, click on Uninstall, and the app will be removed from your computer.
Unlike disabling Microsoft Teams from your Windows PC, uninstalling Teams is a global action that will affect the entire system. As a result, it will remove Microsoft Teams from all current and future user accounts.
If you have any questions we missed addressing, check out the FAQ section below.
FAQs on Removing or Disabling Microsoft Teams in Windows 11
No, disabling Teams should not impact other Microsoft apps unless they directly integrate with Teams for functionalities.
Yes, disabling teams can minimize background processes and potentially improve system performance, especially on resource-constrained devices.
Switch Off Microsoft Teams
Now that you know how to remove or disable Microsoft Teams in Windows 11, you can effectively take control of your startup experience and streamline your PC’s routine. You may also want to read about how to test audio in Microsoft Teams.
Was this helpful?
Last updated on 23 February, 2024
1 Comment
Leave a Reply
Read Next
 5 Ways to Stop Apps From Opening at Startup in Windows 11
Having some apps run automatically when you start your Windows PC can be convenient, but it can also slow down Windows 11 and result in longer startup times, as your
5 Ways to Stop Apps From Opening at Startup in Windows 11
Having some apps run automatically when you start your Windows PC can be convenient, but it can also slow down Windows 11 and result in longer startup times, as your
 How to Stop Facebook Messenger From Opening at Startup on Windows
Method 1: Modify In-App Settings to Prevent Messenger From Opening Automatically Like most apps, Facebook Messenger lets you customize its startup behavior from its in-app settings menu.
How to Stop Facebook Messenger From Opening at Startup on Windows
Method 1: Modify In-App Settings to Prevent Messenger From Opening Automatically Like most apps, Facebook Messenger lets you customize its startup behavior from its in-app settings menu.
 How to Stop Chrome From Opening Old Tabs at Startup
When you open Chrome, you expect a new tab or a homepage to greet you.
How to Stop Chrome From Opening Old Tabs at Startup
When you open Chrome, you expect a new tab or a homepage to greet you.
 Top 3 Ways to Stop Google Chrome From Opening at Startup on Mac
Google Chrome has a lead over rival browsers for Mac and Windows.
Top 3 Ways to Stop Google Chrome From Opening at Startup on Mac
Google Chrome has a lead over rival browsers for Mac and Windows.
 4 Ways to Fix OneDrive Not Opening on Startup in Windows 11
Fix 1: Enable OneDrive as a Startup App Windows 11 provides several options for running apps at startup.
4 Ways to Fix OneDrive Not Opening on Startup in Windows 11
Fix 1: Enable OneDrive as a Startup App Windows 11 provides several options for running apps at startup.
 How to Uninstall Microsoft Teams on Windows 10 Correctly
Uninstalling apps from Windows PC is pretty easy and you can use more than one way to remove apps.
How to Uninstall Microsoft Teams on Windows 10 Correctly
Uninstalling apps from Windows PC is pretty easy and you can use more than one way to remove apps.
 How to Fix Microsoft Teams Not Loading or Opening Issue
Microsoft Teams completes the whole circle for those invested heavily in Microsoft's software-services ecosystem.
How to Fix Microsoft Teams Not Loading or Opening Issue
Microsoft Teams completes the whole circle for those invested heavily in Microsoft's software-services ecosystem.
 4 Ways to Stop Internet Explorer From Opening Edge
Windows 10 comes with two built-in web browsers: the classic Internet Explorer, which was discontinued in June 2022, and the newer Chromium-based Edge browser.
4 Ways to Stop Internet Explorer From Opening Edge
Windows 10 comes with two built-in web browsers: the classic Internet Explorer, which was discontinued in June 2022, and the newer Chromium-based Edge browser.
The article above may contain affiliate links which help support Guiding Tech. The content remains unbiased and authentic and will never affect our editorial integrity.

Your blog helped me a lot to improve the performance of my system