A ZIP file on your Mac lets you package and organize data without acquiring too much storage space. You can create a ZIP file on your Mac and extract it on your iPhone. You can add a password to your ZIP file to add a security layer to it and prevent unwanted access.
In this post, we will show you the steps to create and add a password to your ZIP file on Mac without installing any third-party applications or using any websites.
Create Password Protected ZIP File on Mac
Along with saving storage space, a ZIP file can also save you time while transferring large files from your Mac. The Terminal app on your Mac lets you create a password-protected ZIP file that can be shared across devices. Ensure you keep access to your password for the ZIP file.
Here are the steps.
Step 1: Press Command + Spacebar to open Spotlight Search, type Terminal, and press Return.

Step 2: Type the following command and press Return.

cd (File Location)
The File Location is the directory where your files that need to be zipped are saved on Mac. For example, we have selected the Downloads directory.
After you hit Return, your Command Prompt line and Directory will change.

Step 3: After you select the Directory, type the following command and press Return.

zip -er (ZIP file name) (original file name)
The ZIP file name stands for the name of your zipped file. The Original File Name stands for the exact name of the file that needs to be zipped. Do note that the zipped file’s name should match the original file name. Plus, don’t forget to enter the file extension as well as the original file name.
zip -er IMG_5909.zip IMG_5909.PNG
Step 4: Click Ok to let Terminal access your file location. In our case, it’s the Downloads folder.

Step 5: Type the password that you wish to use for the ZIP file and press Return.

The characters of the password will not appear on your Mac’s screen. But that’s not a problem.
Step 6: Type the password again to verify and press Return.

You will get confirmation that your selected file has been zipped and protected with your preferred password.

To confirm the same, double-click on your ZIP file and check if you are prompted to enter the password.

Unzip Password Protected File on Mac
If you wish to unzip your password-protected file on Mac, you can once again take the help of Terminal to do the same. Here are the steps.
Step 1: Press Command + Spacebar to open Spotlight Search, type Terminal, and press Return.
Step 2: Type unzip -d in the Terminal window. Don’t press Return.

Step 3: Select the ZIP file on your Mac. Then drag and drop it in the Terminal window.
This will add the exact file path in the Terminal window.
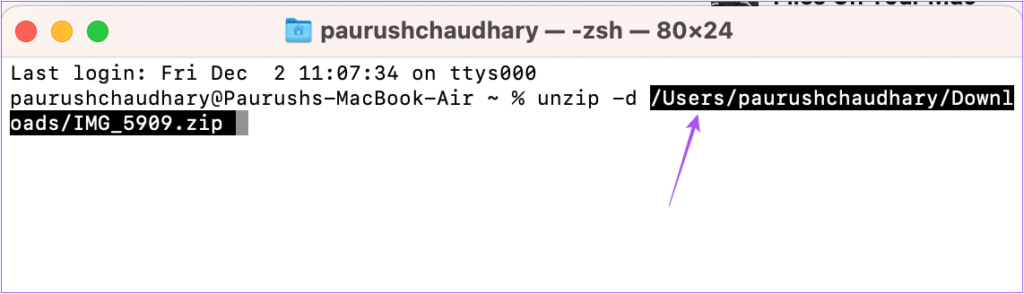
Step 4: Delete the file name from the Directory path. Then drag and drop the ZIP file again to the Terminal.
Step 5: Press Return.

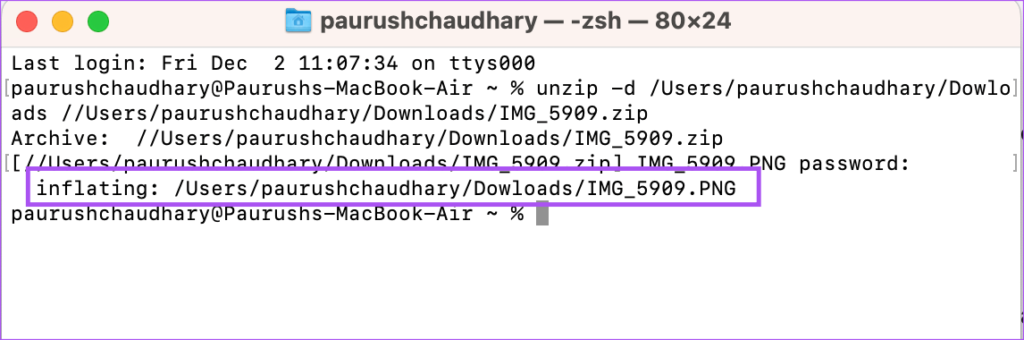
Step 6: Enter your ZIP file password. Then press Return.

Once again, your password will not be visible.
Your file will be unzipped and appear in the same location. In our case, the unzipped file appeared in the downloads folder.
Create ZIP File Without Adding Password on Mac
If you wish to create a ZIP file without adding a password on your Mac, here are the steps.
Step 1: Select the files or folder that you wish to add in a ZIP file.
Step 2: After selecting the items, right-click and choose Convert from the list of options.

If you compress a single file, it will be saved with the original file name and .ZIP extension. But if you select multiple items to compress, the ZIP file will be saved as Archive.zip. You can always go ahead and change its name.

Since the ZIP file won’t have a password, you can double-click on the file name to extract its contents.
Compress and Protect Your Data
These steps will help you to create and add a password to your ZIP files on Mac. If you have too many ZIP files on your Mac, you can use Tags in Finder to organize them. If you don’t wish to create a ZIP file but still ensure data security, you can read our post on how to add a password to files and folders on Mac.
Was this helpful?
Last updated on 02 December, 2022
Read Next
 3 Easy Ways to Password Protect a ZIP File on Windows
Have you ever wanted to keep your sensitive files and documents safe and secure?
3 Easy Ways to Password Protect a ZIP File on Windows
Have you ever wanted to keep your sensitive files and documents safe and secure?
 How To Automatically Extract ZIP Files After Downloading
ZIP files are necessary for combining multiple files together into one downloadable file.
How To Automatically Extract ZIP Files After Downloading
ZIP files are necessary for combining multiple files together into one downloadable file.
 4 Ways to ZIP Files on Android
Have you ever done a hard disk junk cleaning, and after a few hours of painstakingly removing files, your poor old hard disk is still running out of space?
4 Ways to ZIP Files on Android
Have you ever done a hard disk junk cleaning, and after a few hours of painstakingly removing files, your poor old hard disk is still running out of space?
 How to Add AirPlay Password to iPhone, iPad, Mac, and Apple TV
AirPlay allows you to cast the screen of your iPhone, iPad, or Mac on a different Apple device like Apple TV.
How to Add AirPlay Password to iPhone, iPad, Mac, and Apple TV
AirPlay allows you to cast the screen of your iPhone, iPad, or Mac on a different Apple device like Apple TV.
 Top 6 Fixes For ‘Path too Long’ Error When Extracting a ZIP File in Windows 10 and 11
Windows OS contains native support to extract ZIP files and is experimenting with adding support for other archive formats in Windows 11.
Top 6 Fixes For ‘Path too Long’ Error When Extracting a ZIP File in Windows 10 and 11
Windows OS contains native support to extract ZIP files and is experimenting with adding support for other archive formats in Windows 11.
 Top 7 Fixes for ‘Compress to ZIP File’ Option Not Working in Windows 11
Windows 11 has a handy file compression feature that makes it simple to free up storage space and send files over the internet.
Top 7 Fixes for ‘Compress to ZIP File’ Option Not Working in Windows 11
Windows 11 has a handy file compression feature that makes it simple to free up storage space and send files over the internet.
 How to Encrypt or Password Protect Files on Android
We have seen how you can hide your photos and videos on Android.
How to Encrypt or Password Protect Files on Android
We have seen how you can hide your photos and videos on Android.
 How to Unlock Notes When Password Is Forgotten on Mac and iPhone
Did you have a frustrating moment when you realized you'd forgotten the password to your Notes on your Mac and iPhone?
How to Unlock Notes When Password Is Forgotten on Mac and iPhone
Did you have a frustrating moment when you realized you'd forgotten the password to your Notes on your Mac and iPhone?
The article above may contain affiliate links which help support Guiding Tech. The content remains unbiased and authentic and will never affect our editorial integrity.