OneNote offers many ways to organize your notes. For instance, you can categorize notes in notebooks, sections, and pages. Tags are one of the ways to organize your notes in OneNote effectively and intelligently. If you stumbled upon tags in OneNote and wonder how to use tags in OneNote, this guide will be your savior.

This tutorial is based on OneNote for Windows 10 version, which is different from OneNote 2016. The mobile versions of OneNote only support the adding of the To-Do list tag. You can view other tags created from a computer, but they cannot be added on mobile apps. Similarly, mobile apps do not let you search for tags. However, the iPad version does offer many pre-defined tags, and the same can be found using the search.
Let’s get started on how to use and manage tags in Microsoft OneNote.
What Are Tags in Microsoft OneNote
Tags work inside pages. So consider them as tiny databases to collect similar information from different pages. Inside a page, you can tag a single line, an entire paragraph, or multiple paragraphs. Anything can be tagged. You can even add more than one tag to the same text.
Tags provide more structure to your notes. After adding data to your notes, you can label them with tags depending on the type of information and the action that needs to be taken. Tags make important things stand out from the rest of the notes. Unlike typical labels, tags are searchable and sometimes even dynamic such as the To-do list tags.

For instance, if you are learning new words while compiling notes in different sections and pages, you can tag the new words with the Definition tag. Later, when you want to revisit the new words, you don’t have to scroll through each page individually. Just search for the Definition tag, and all the tagged words will show up. Cool, right?
When to Use Tags
Tags come handy for creating to-do lists, remembering important information from a page, highlighting important lines, or marking definitions, etc. Use tags when you want to mark a similar type of data inside different notes. For instance, you can create a Phone number tag. So whenever you add a phone number to your notes, inserting the Phone number will make it easy to find when you need it.
You can, of course, find something using the search term as well. But for that, you will have to remember something related to data first. Take the case of a phone number. Say you added a phone number for some company. Now you don’t remember the name of the company. That’s where tags come to our rescue. Search for the Phone number tag, and it will show all the phone numbers. Tags offer an additional layer of organization while making it easier to find the right information quickly.
Pro Tip: Google Keep supports labels. Find out what are labels in Google Keep Notes and how to use them for organizing notes.
How to Add Tags to Notes
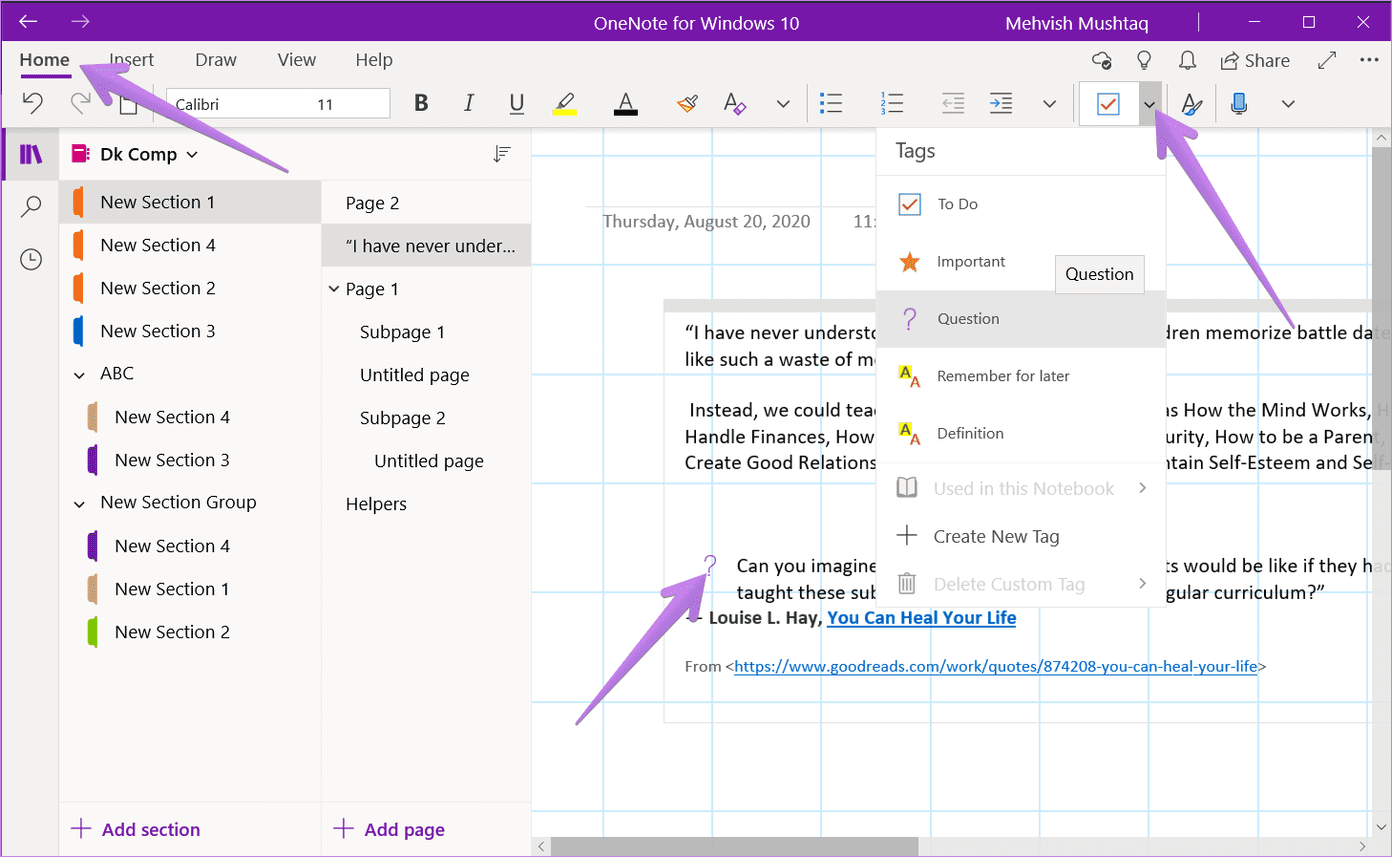
Adding tags or tagging your notes is quite easy. Place your cursor anywhere on the line or paragraph that you want to tag. Go to the Home tab, and you will find the tag drop-down box with a to-do list tag showing up first. Click on the To-do list tag if you want to add it to your note. Alternatively, click on the small down arrow and select the appropriate tag. You will find several pre-created tags such as Definitions, Remember for later, Important, and more. You can even create your custom tags, as shown below.
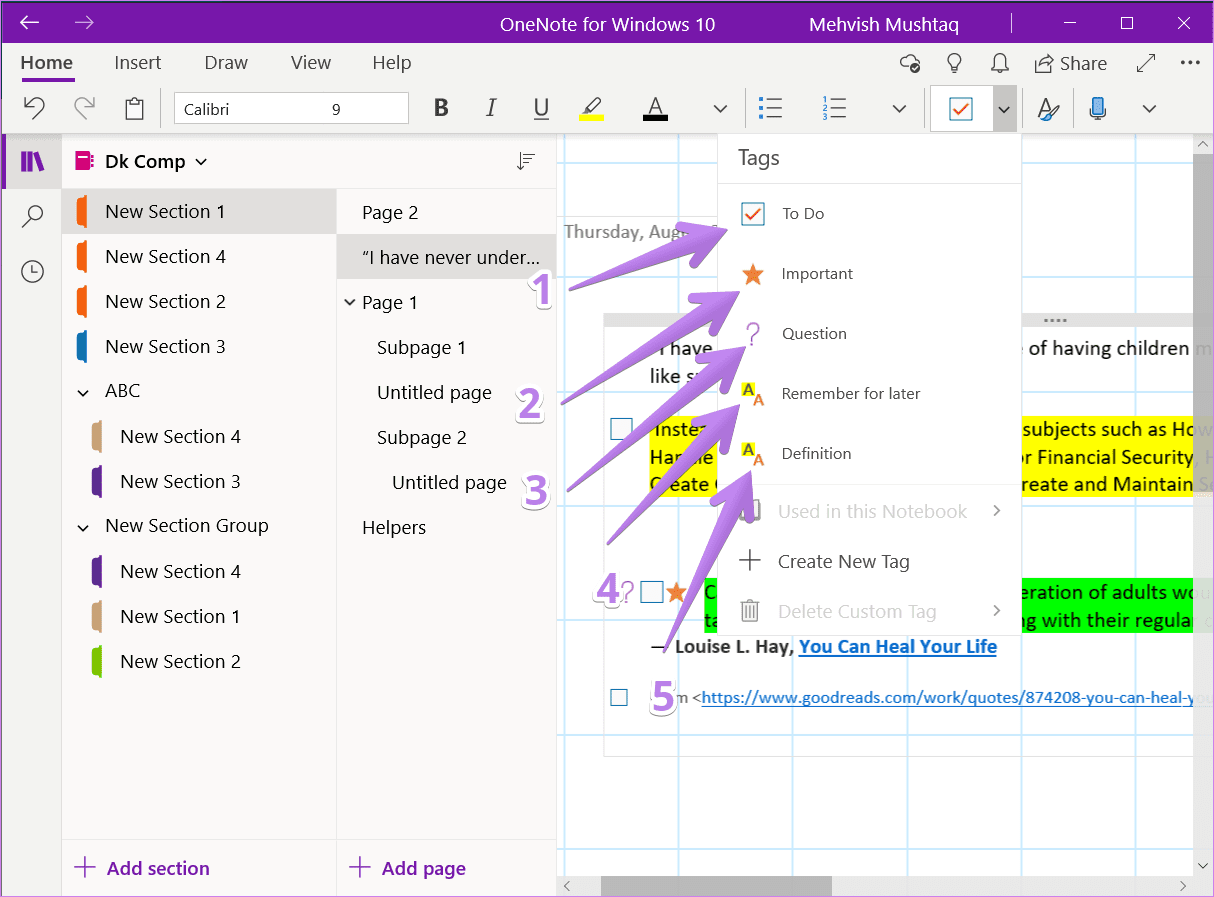
As mentioned before, you can add multiple tags to one line or paragraph. Most of the tags will show up at the beginning of the line, while some will highlight your text, such as the Definition tag.

You can even use keyboard shortcuts to add tags. Use Ctrl + 0 shortcut to add a To-do tag, and Ctrl + 1 shortcut to add Important tag. Similarly, use a combination of Ctrl and a number according to the tag’s position in the list.
How to Find Tags
To find tags, you need to use the search feature of OneNote. Click on the search icon in the left sidebar of OneNote. Alternatively, use Ctrl + F keyboard shortcut to open the search. When the search box appears, type the name of the tag. I repeat, you need to type the name of the tag. So for To-do lists, type to do and similarly, for Definition tag, type definition. Some tags will appear when you click on the search bar. Click on the tag if it’s available.

Once you press the Enter key to search for the tag, you will see the related searches. Do switch to the Tags tab if you are in pages. Also, OneNote might show search results for the current page. You can filter the data to search in the current section, current notebook, and all notebooks. For that, click on the second box under the search bar. Click on the various pages under the Tags section to view tagged notes. Your tagged data inside a particular note will be highlighted.

How to Remove Tags
You can keep the tags in your notes as long as you want. Once you are done with a tagged note and don’t want it to appear in the search results, you can remove the tag.
To remove a tag, place the cursor on the tagged text and go to the Home tab. Click on the tag drop-down box to reveal a list of tags. Click on the same tag that you want to remove. The process of removing a tag is similar to adding it. Alternatively, press Ctrl + 0 to remove any tag. Use the same shortcut if you want to remove multiple tags. In case you have added multiple tags but want to remove only one tag, use the keyboard combination that you used to add that particular tag, i.e., Ctrl + 1, Ctrl + 2, etc.
Tip: Check other keyboard shortcuts that work with Microsoft OneNote.
How to Create and Use Custom Tags
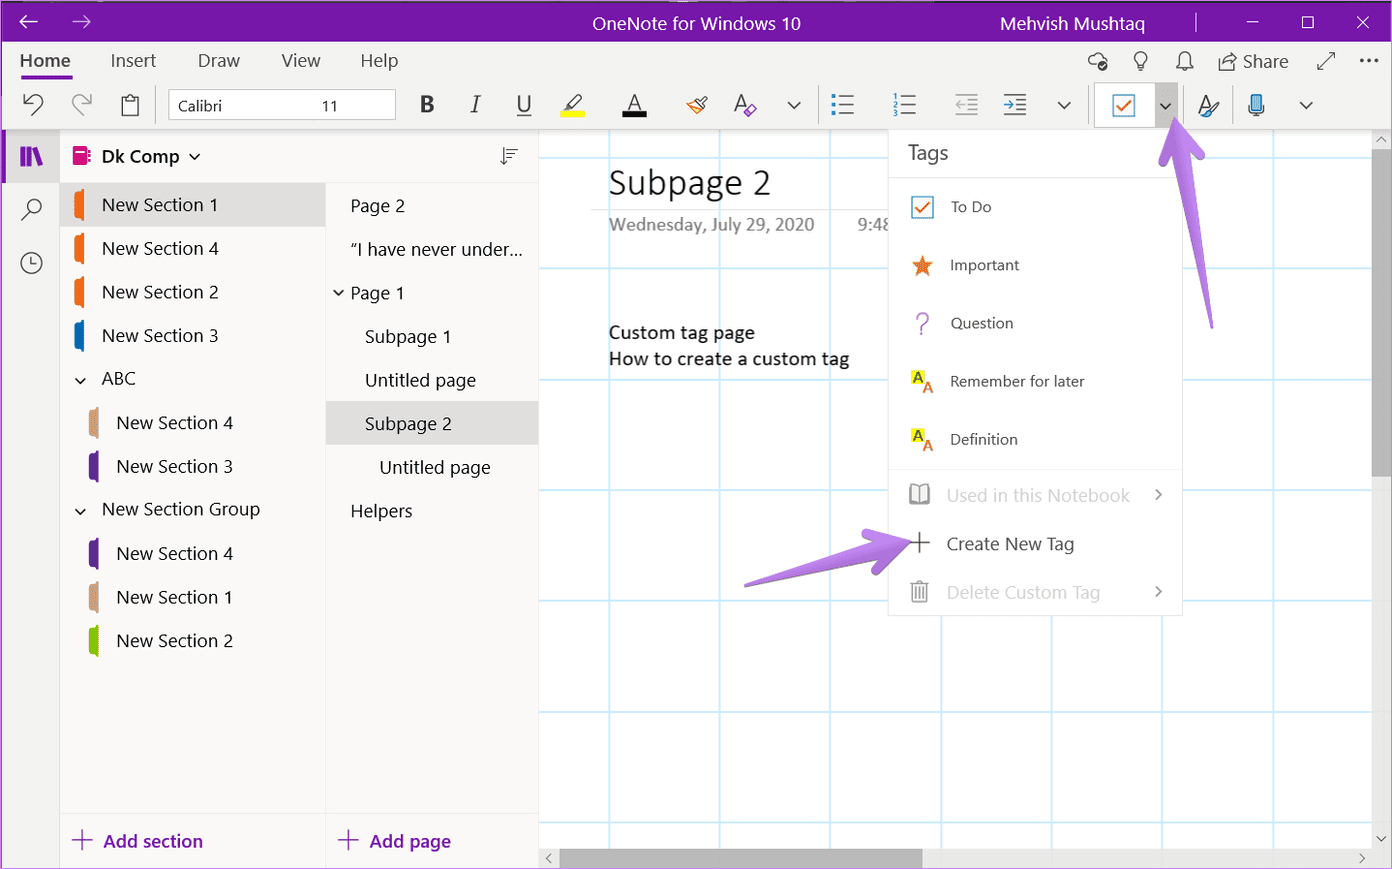
If you don’t like the tag offerings by OneNote, you can create your own depending on its purpose. To create a tag, click on the small down arrow in the tag box. Select Create new tag from the list.
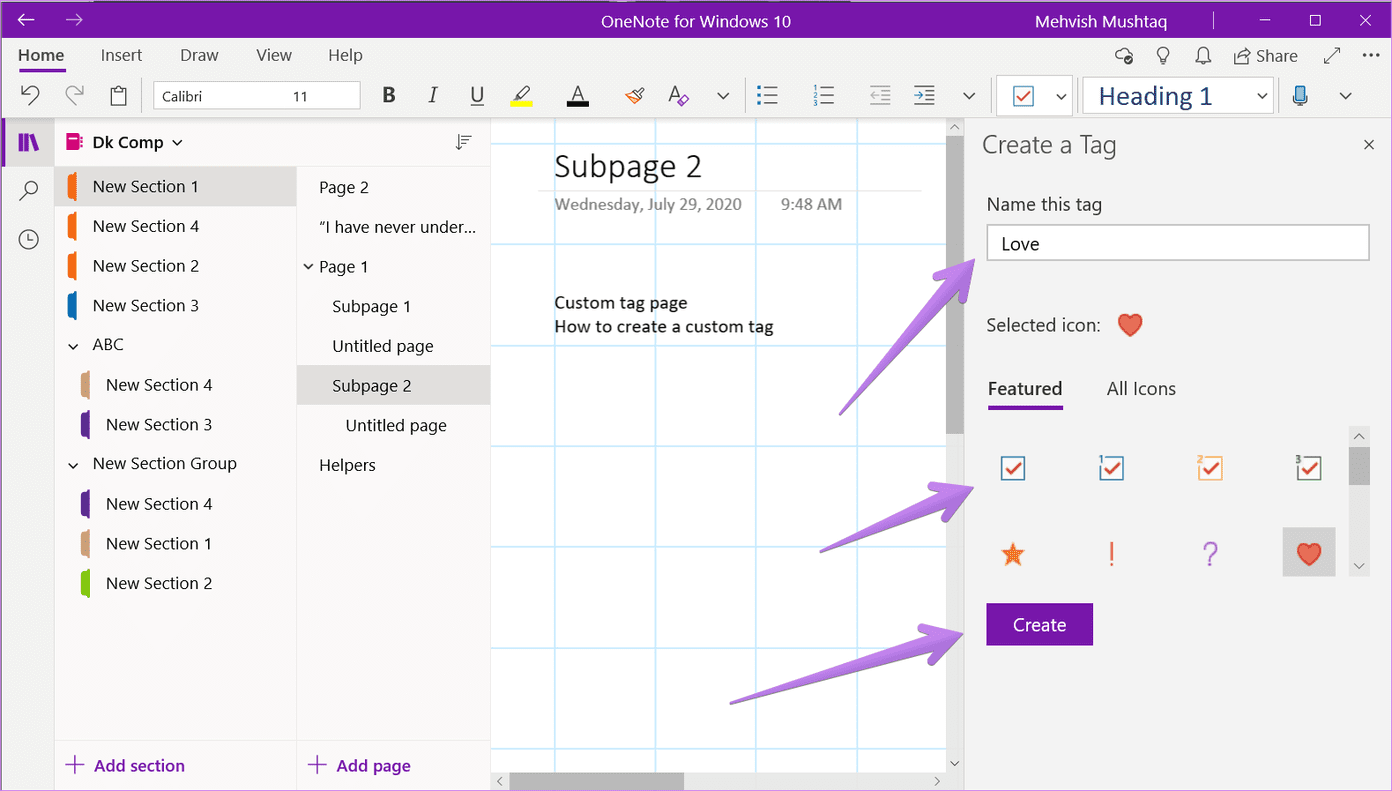
A new sidebar will open on the right side. Type a relevant name for your tag under the ‘Name this tag’ box. Select the appropriate icon from the list. Click on the Create button.
When the tag is created, it will show up in the list of the tags. Perform various actions such as adding, finding, and removing tags similar to the way, as shown above. The keyboard shortcut to add or remove a tag will work for custom tags as well.

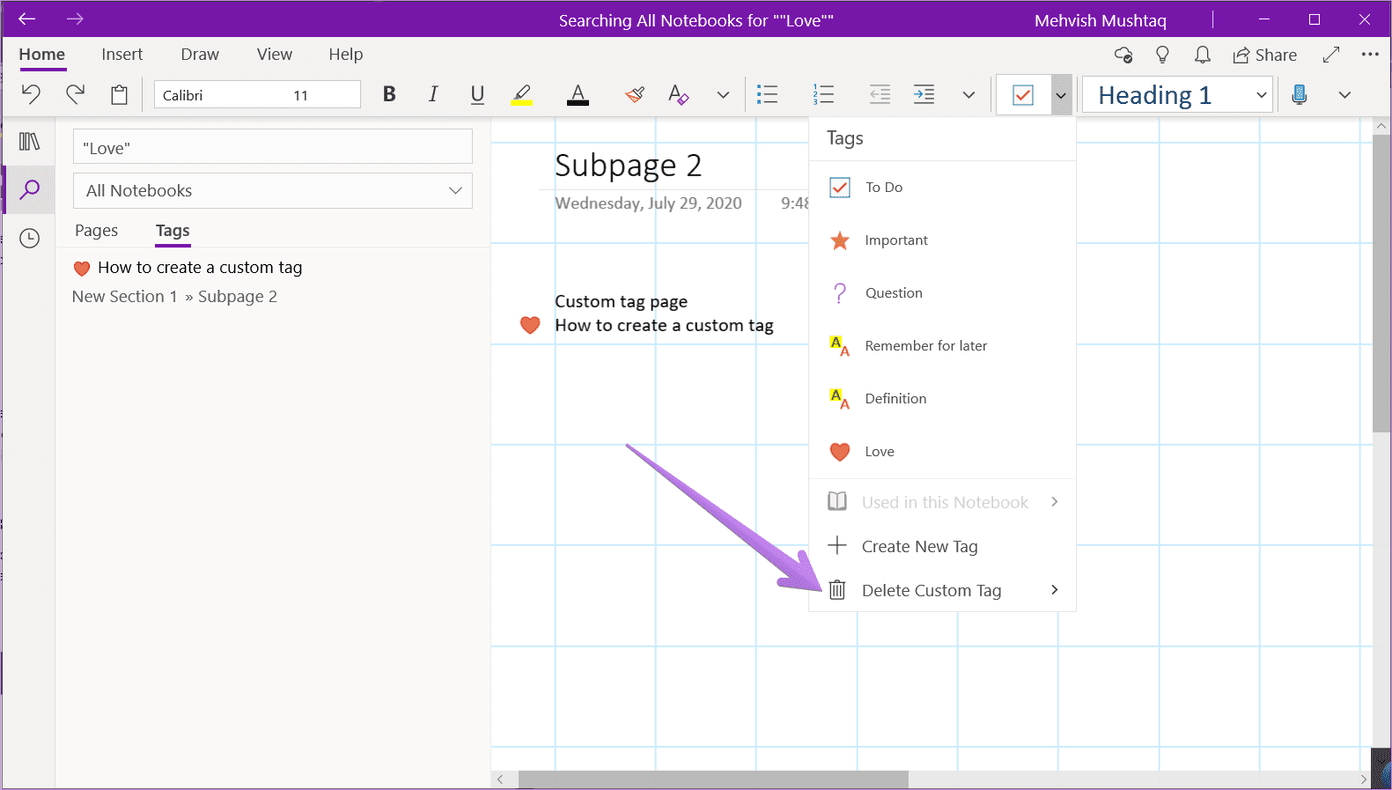
Delete Custom Tag
To delete any custom tag that you have created, open the tags list. You will see the Delete Custom tag option. Click on it and select the tag that you want to delete.
Get Them on Mobile
Tags are super handy once you get hold of them. Sadly, the functionality is limited to the OneNote desktop apps only. We hope Microsoft adds the functionality to add additional tags on the Android and iOS apps soon.
Next up: Want to explore other similar cool features of OneNote? Check out 11 best tips and tricks for OneNote from the next link.
Was this helpful?
Last updated on 07 February, 2022
Read Next
 A Guide to Creating and Managing Contact Groups on Samsung Phones
We organize our notes, documents, files, and similar things on our phones.
A Guide to Creating and Managing Contact Groups on Samsung Phones
We organize our notes, documents, files, and similar things on our phones.
 Google Contacts vs Samsung Contacts: Which App Is Best for Saving and Managing Contacts
Apart from phones running Stock Android, all other Android phones have their own set of basic apps.
Google Contacts vs Samsung Contacts: Which App Is Best for Saving and Managing Contacts
Apart from phones running Stock Android, all other Android phones have their own set of basic apps.
 3 Best Ways to Add Tags in Microsoft Word
Have you ever searched for a file using a particular keyword in your Windows File Explorer?
3 Best Ways to Add Tags in Microsoft Word
Have you ever searched for a file using a particular keyword in your Windows File Explorer?
 A Complete Guide to OneDrive Storage and Avoiding Disk Full Error
Microsoft OneDrive, previously known as SkyDrive, is a complete cloud storage solution for Windows users.
A Complete Guide to OneDrive Storage and Avoiding Disk Full Error
Microsoft OneDrive, previously known as SkyDrive, is a complete cloud storage solution for Windows users.
 A Complete Guide to Adding and Editing Text in Paint 3D
Adding text to your image is one of the basic functionalities of any photo-editing apps.
A Complete Guide to Adding and Editing Text in Paint 3D
Adding text to your image is one of the basic functionalities of any photo-editing apps.
 A Complete Guide to Fixing Blurry Text in Windows 10
Microsoft’s Windows 10 operating system enjoys a comfortable lead over the rivals in the desktop OS market share.
A Complete Guide to Fixing Blurry Text in Windows 10
Microsoft’s Windows 10 operating system enjoys a comfortable lead over the rivals in the desktop OS market share.
 A Complete Guide to Using Split Screen in Windows 10
Windows makes multitasking feel like a cakewalk.
A Complete Guide to Using Split Screen in Windows 10
Windows makes multitasking feel like a cakewalk.
 A Complete Guide to Using Print Screen in Windows 10
Have you been told to take a screenshot using the Print Screen key on your Windows 10 computer?
A Complete Guide to Using Print Screen in Windows 10
Have you been told to take a screenshot using the Print Screen key on your Windows 10 computer?
The article above may contain affiliate links which help support Guiding Tech. The content remains unbiased and authentic and will never affect our editorial integrity.