Computers have a myriad of apps that enhance the performance of certain features. But once in a while, these applications can experience issues when connecting to the internet. Try these fixes if Windows 11 apps suddenly stop connecting to a network.

Mostly, the issue occurs after a change of network adapters. It could also happen after a driver update. Whatever the case, you can try changing the network connection to resolve the issue.
If, for instance, you were on a wifi connection, consider shifting to an Ethernet connection. This way, you rule out issues with network adapters that could be causing problems.
In addition, try contacting your internet service provider. Slow connections or interruptions can result in apps not connecting to the internet. If those things don’t help, try out the fixes mentioned below.
1. Switch off the Windows Firewall
If you’re using a third-party firewall app, it could be preventing other apps from connecting to the internet. To resolve firewall issues, switch off that program and use Microsoft Defender (previously, Windows Defender). Here’s how you can do it.
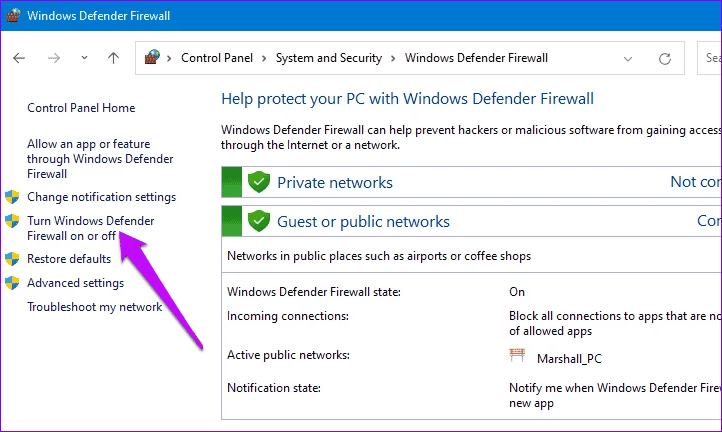
Step 1: Type Windows Defender firewall on the search bar and press Open.
Step 2: On the left-hand side, click Turn Windows defender on or off.
Step 3: On the Private and Public network Settings, select Turn off Windows Defender. Complete the process by pressing OK.
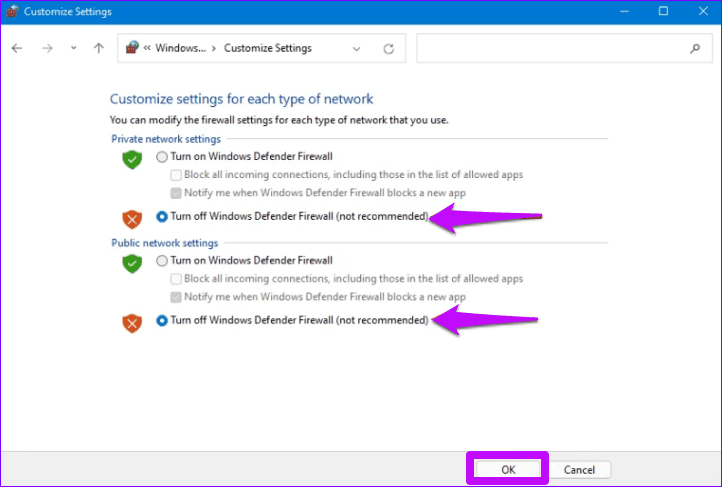
Step 4: Close the windows and restart your PC to update the changes.
2. Run the Windows Store Troubleshooter
At times, running the Windows store troubleshooter can clear common bugs. This will include errors due to recent updates or network adapter changes.
Step 1: Press Windows + I keys to open the Settings app.
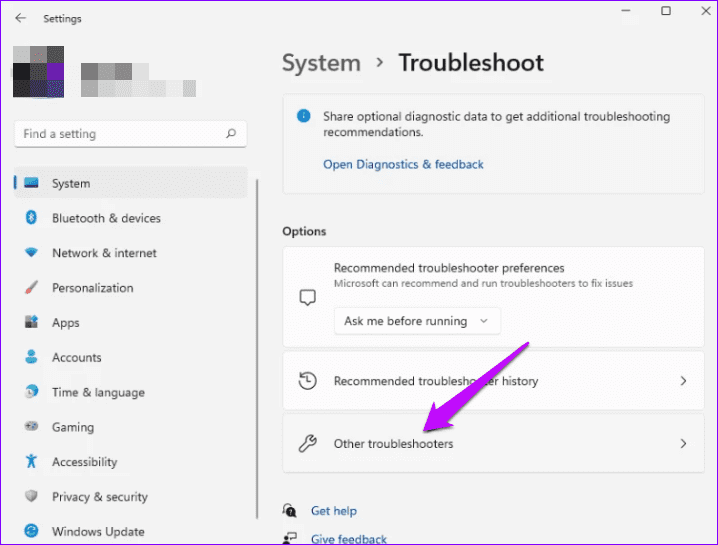
Step 2: Locate the System option and click on it.
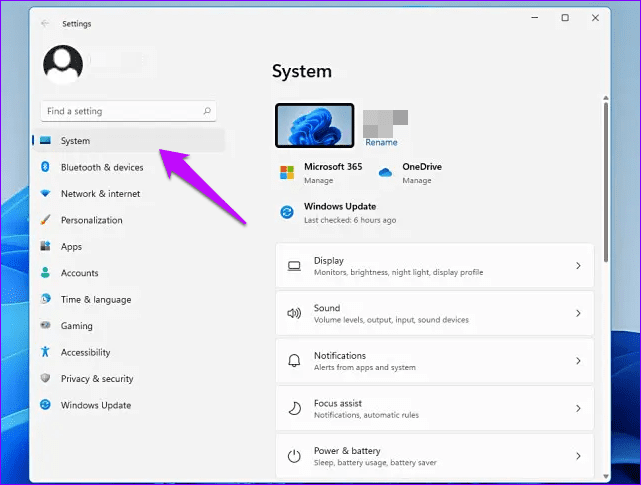
Step 3: On the right pane, select Troubleshoot
Step 4: Next, click on Other troubleshooters.
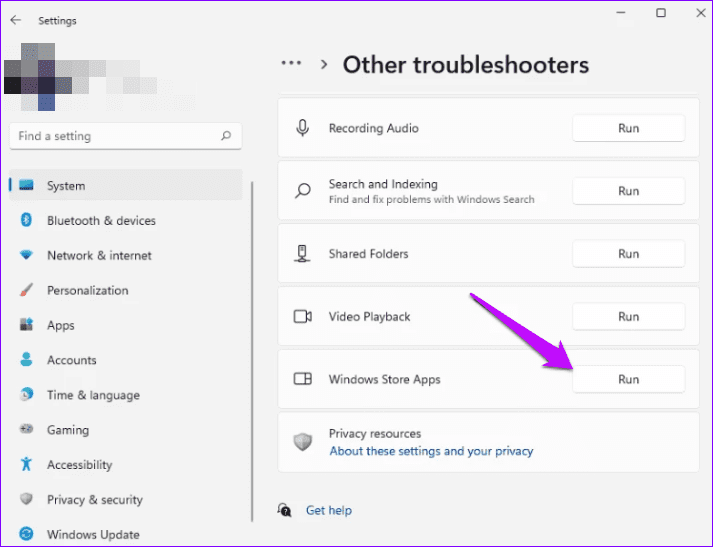
Step 5: Locate the Windows Store Apps and tap Run.
Wait for a few minutes for Windows to identify and fix the problems. Restart your computer and confirm if the app connects to the internet.
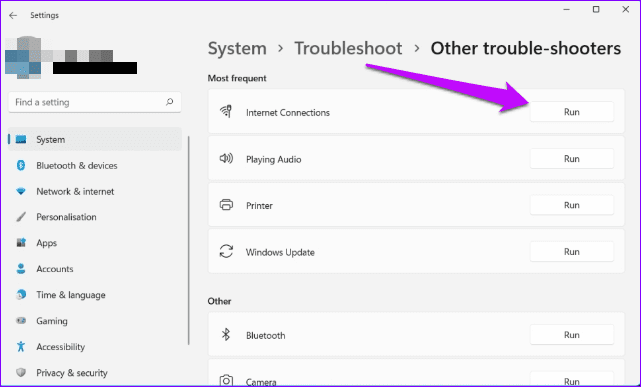
If the issue persists, you can run the internet troubleshooter to fix the problem. To do this, click on Internet Connections on the Other troubleshooter’s window. Next, run the troubleshooter, which should help diagnose and resolve internet issues.
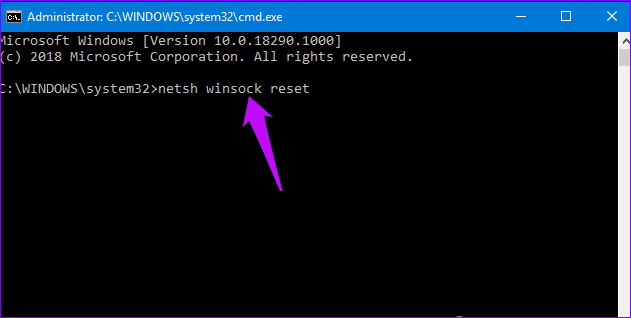
3. Reset Windows Sockets
In some instances, resetting Windows Sockets can help apps connect to the internet. To do this, run these commands.
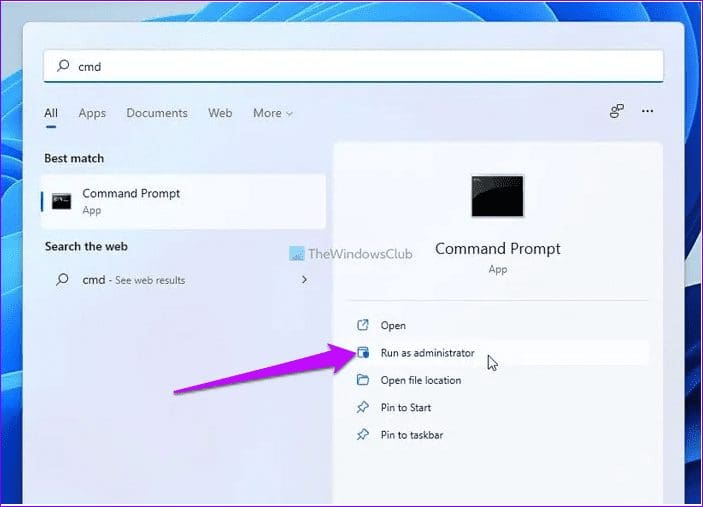
Step 1: Type cmd on Windows search bar.
Step 2: Select to run command prompt as an administrator.
Step 3: On the next window, type the following command
netsh winsock reset
Wait for the process to complete then restart your PC.
4. Clear the Store Cache
Clearing the store cache could be the solution you need to connect apps to the internet. To do this, you can run this command.
Step 1: Press the Windows + R keys to open the run dialog.
Step 2: In the dialog box, type wsreset and click Enter.
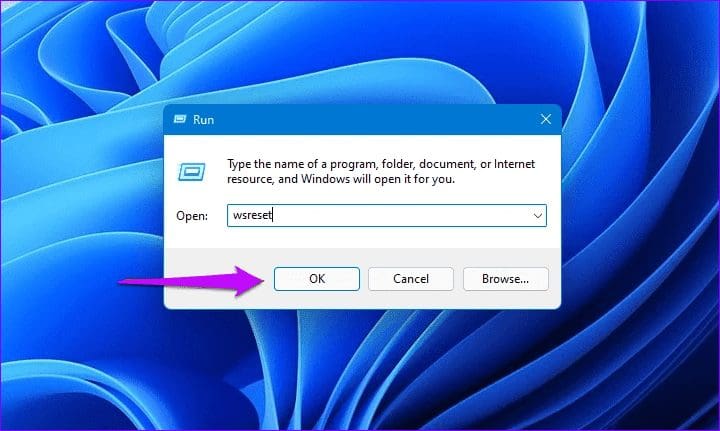
Wait for the process to end then confirm if the apps open with an internet connection.
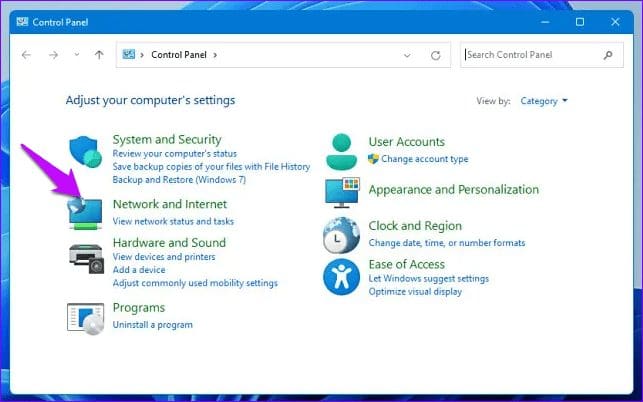
5. Set Up a New Connection or Network
Outdated or misconfigured connections can also cause internet issues with applications. To resolve connection problems, set up new statuses. Here’s how you can do it.
Step 1: Open the Control Panel by typing through the Windows search bar.

Step 2: Select Network and Internet.
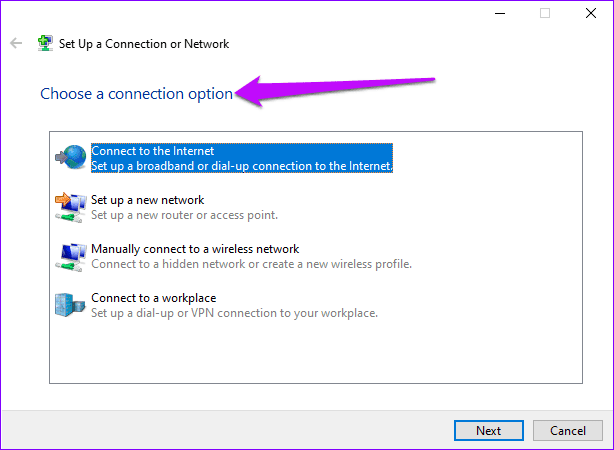
Step 3: Click Network and sharing. Then, tap Set up a new connection or network.

Step 4: Select a connection option, then follow prompts to complete the process. Once done, the computer should automatically connect to the new network.
6. Perform a Network Reset
If all the above fail, perform a network reset to give the connections a fresh start. This will uninstall all network drivers and reinstall them with default settings.
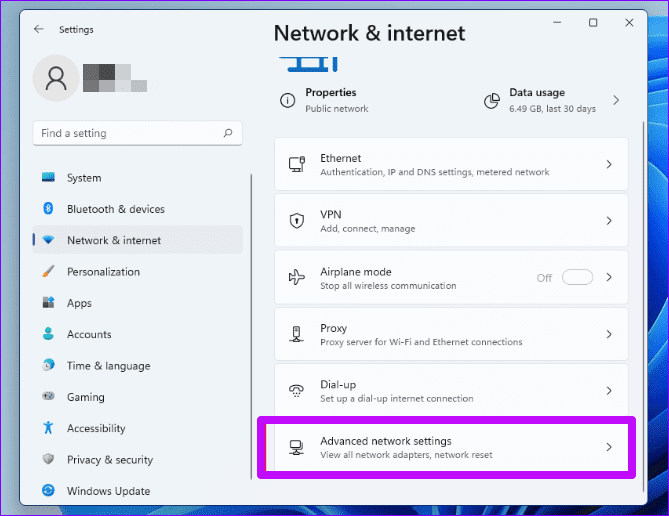
Step 1: Open Settings and select Network and Internet. Next, click on Advanced network settings.
Step 2: Click Network Reset.
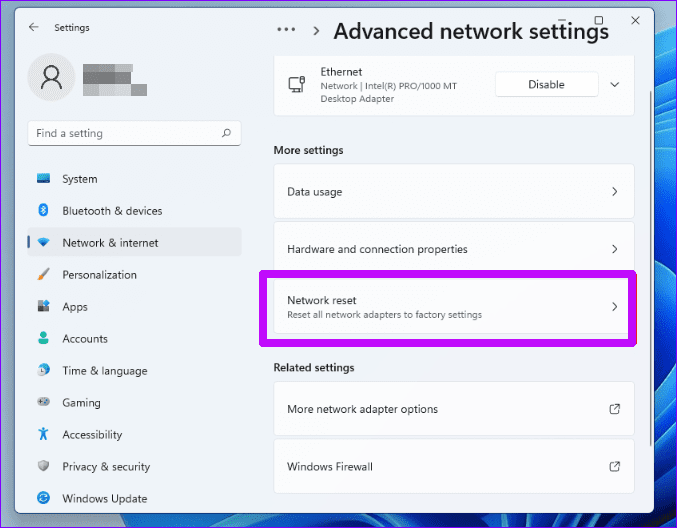
Step 3: Select to Reset now and complete the process by pressing Yes.

Connecting Your Apps to the Internet
The six best ways to fix Windows 11 apps when they won’t connect to the internet. To add to this, consider updating your network adapters. There is also the option of uninstalling then reinstalling recently added programs. By applying one of these solutions, you will have your applications connecting to the internet and running in no time.
Was this helpful?
Last updated on 07 February, 2022
Read Next
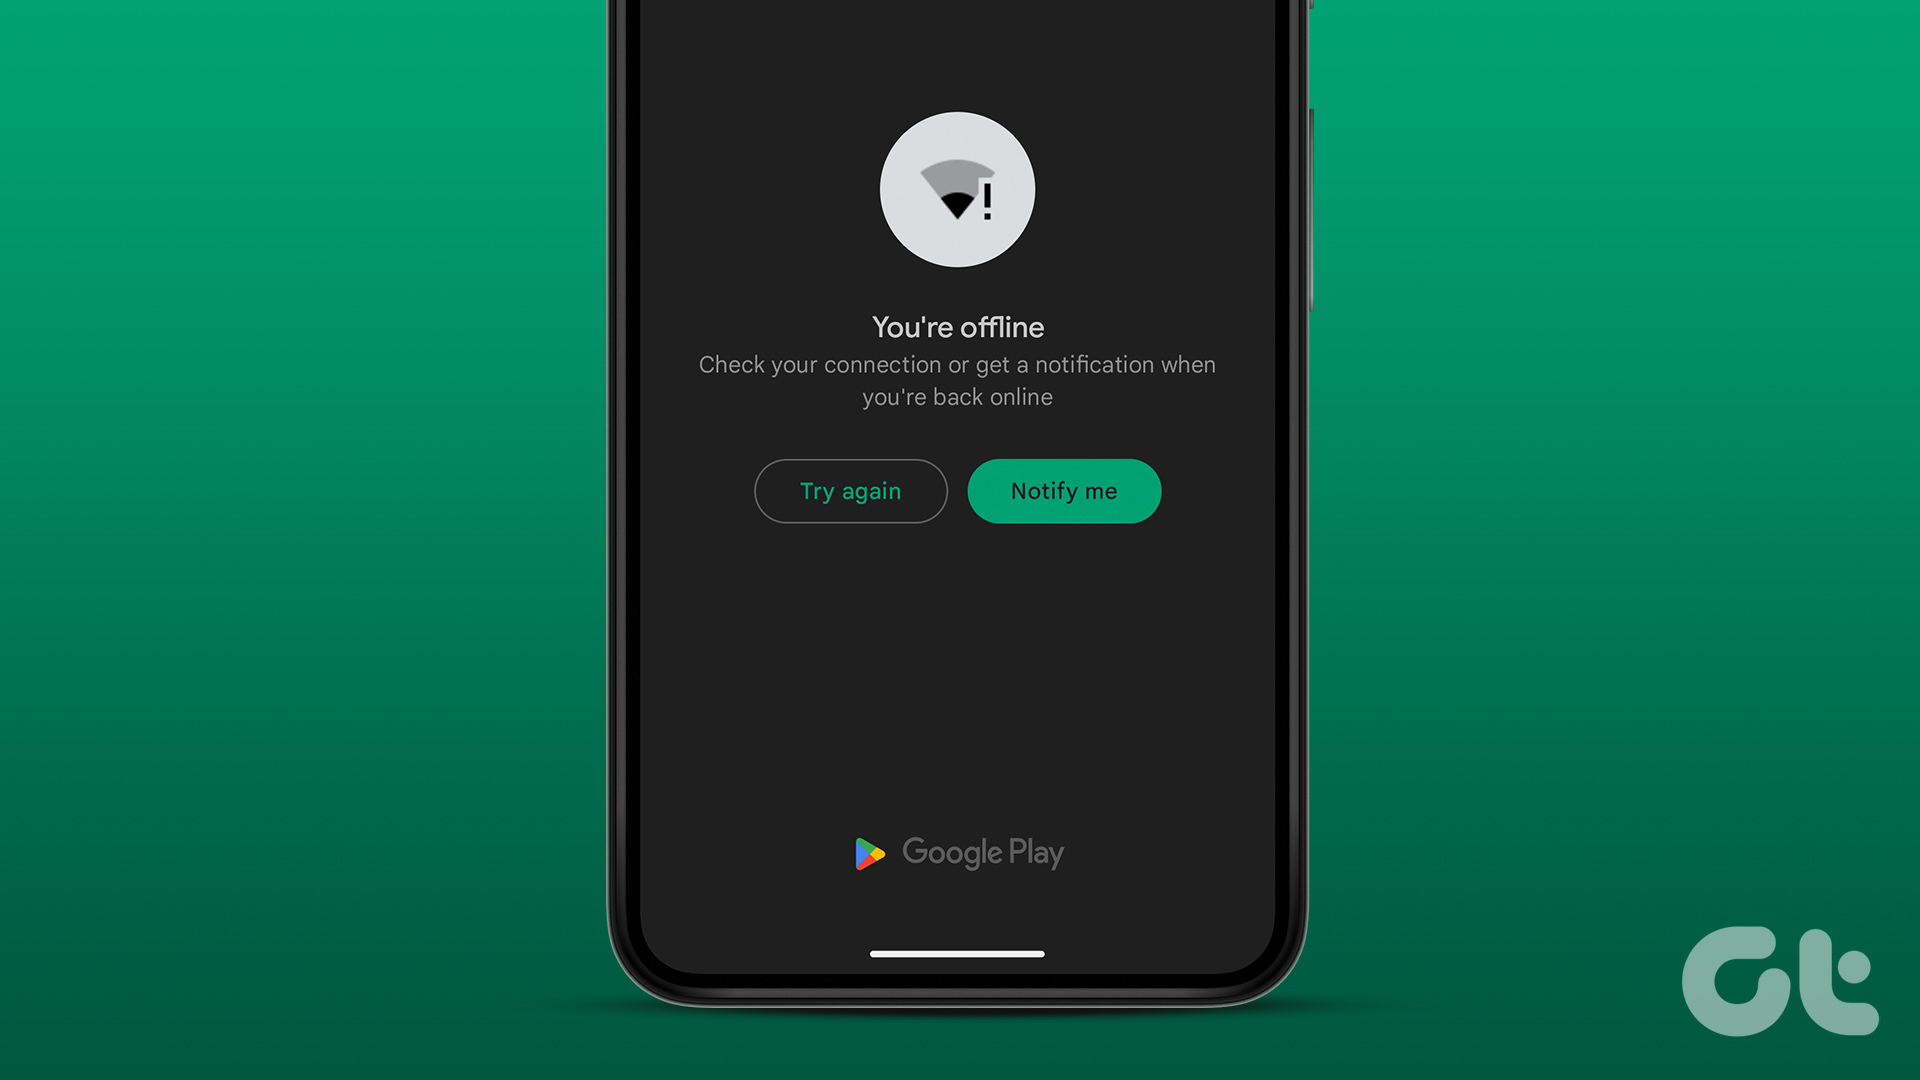 Top 7 Ways to Fix Google Play Store Won’t Connect to the Internet
When Google Play Store fails to connect to the internet on your Android, you may see error messages like 'No internet connection' or 'You're offline.' What's worse is that these
Top 7 Ways to Fix Google Play Store Won’t Connect to the Internet
When Google Play Store fails to connect to the internet on your Android, you may see error messages like 'No internet connection' or 'You're offline.' What's worse is that these
 12 Best Fixes for Windows 10 Laptop Won’t Connect to iPhone Hotspot
I usually travel light with my Windows laptop and iPhone.
12 Best Fixes for Windows 10 Laptop Won’t Connect to iPhone Hotspot
I usually travel light with my Windows laptop and iPhone.
 Top 10 Ways to Fix Apps Won’t Open on Android
Apps are what make your Android device truly useful and entertaining.
Top 10 Ways to Fix Apps Won’t Open on Android
Apps are what make your Android device truly useful and entertaining.
 Top 12 Ways to Fix OneDrive Won’t Stop Syncing Error on Windows 10
One of the fundamental features of a cloud storage app is sync.
Top 12 Ways to Fix OneDrive Won’t Stop Syncing Error on Windows 10
One of the fundamental features of a cloud storage app is sync.
 7 Best Ways to Fix OneNote Won’t Let Me Type Error in Windows 10
Microsoft OneNote is one of the oldest note-taking apps and a key component of Microsoft's Office Suite.
7 Best Ways to Fix OneNote Won’t Let Me Type Error in Windows 10
Microsoft OneNote is one of the oldest note-taking apps and a key component of Microsoft's Office Suite.
 10 Best Ways to Fix Windows 10 Won’t Wake up From Sleep Mode Error
The sleep mode in Windows 10 is useful for saving battery juice when taking those much-needed short breaks.
10 Best Ways to Fix Windows 10 Won’t Wake up From Sleep Mode Error
The sleep mode in Windows 10 is useful for saving battery juice when taking those much-needed short breaks.
 Top 6 Ways to Fix Xbox App Won’t Let Me Log In on Windows 11
The Xbox app is a popular platform for purchasing and downloading games for your Windows PC.
Top 6 Ways to Fix Xbox App Won’t Let Me Log In on Windows 11
The Xbox app is a popular platform for purchasing and downloading games for your Windows PC.
 4 Ways to Fix Microsoft Teams Meeting Add-in Won’t Appear in Outlook for Windows
Fix 1: Enable the Teams Add-In A common reason why the Microsoft Teams meeting option may disappear from Outlook is if you have accidentally disabled the related add-in.
4 Ways to Fix Microsoft Teams Meeting Add-in Won’t Appear in Outlook for Windows
Fix 1: Enable the Teams Add-In A common reason why the Microsoft Teams meeting option may disappear from Outlook is if you have accidentally disabled the related add-in.
The article above may contain affiliate links which help support Guiding Tech. The content remains unbiased and authentic and will never affect our editorial integrity.