Windows 10 packs a Troubleshooter to help you fix most of the system-level problems easily. For the most part, the Windows troubleshooter saves a lot of time by solving technical errors. But once in a while, the troubleshooter may fail. If Windows troubleshooter is not working on your computer, here are a few fixes you can try.

Issues with the Windows troubleshooter may appear in various ways.
- The Windows troubleshooter does not work at all.
- The Windows troubleshooter gets stuck.
- An error 0x80300113 pops out while troubleshooting.
- The message ‘an issue is preventing the troubleshooter from starting 0x80070002/0x8e5e0247’ appears.
- The error 0x803c010b pops up while troubleshooting.
Luckily, the solutions we’ve shared in this article will resolve either of these problems.
1. Start and Set Cryptographic Services to Automatic
If the cryptographic has stopped or isn’t running in the background, it’s likely that your troubleshooter won’t work. The changes may be caused by a broken application or simply a Windows error that failed to clear. Either way, starting the cryptographic services by running the service manager is the best way to resolve the problem. Follow this process to restart the service.
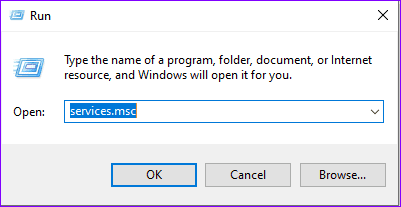
Step 1: Press Windows + R key, type services.msc in the dialog box, and click Enter.
Step 2: Scroll down and locate the Cryptographic services and double-click on it.

Step 3: Navigate to the Startup type and set it to Automatic. Also, confirm that the Service status is running. If it isn’t, press the Start button and this should get things rolling. Complete this process by pressing OK and Apply to save current changes.

2. Boot Your Device in Safe Mode
Often, booting your device in safe mode can fix the problem. Safe mode enables you to operate with fewer applications and this boosts the performance of your device. To boot your device in safe mode, follow these steps.
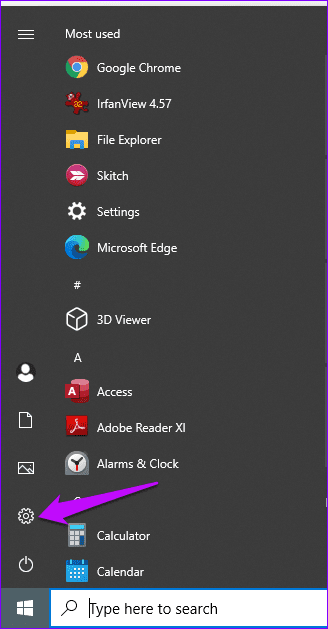
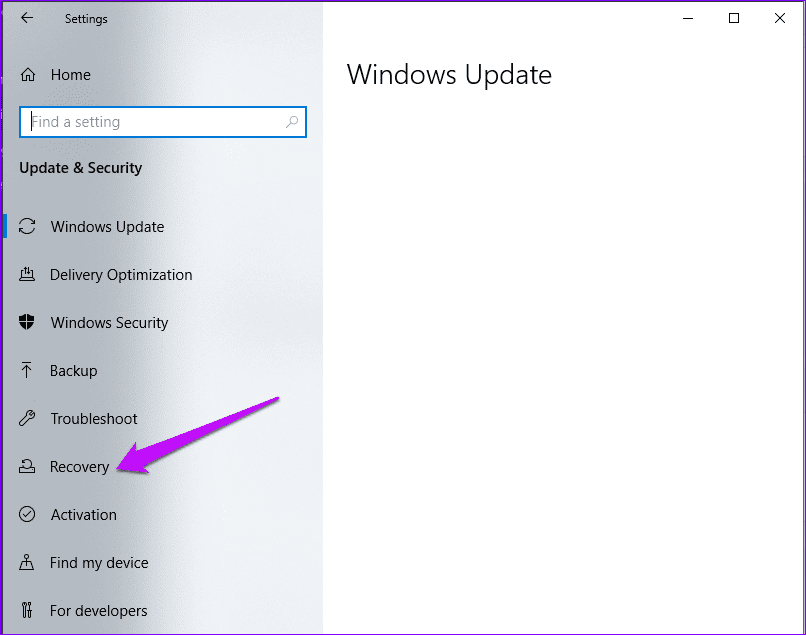
Step 1: Click on the Windows icons and select Settings.
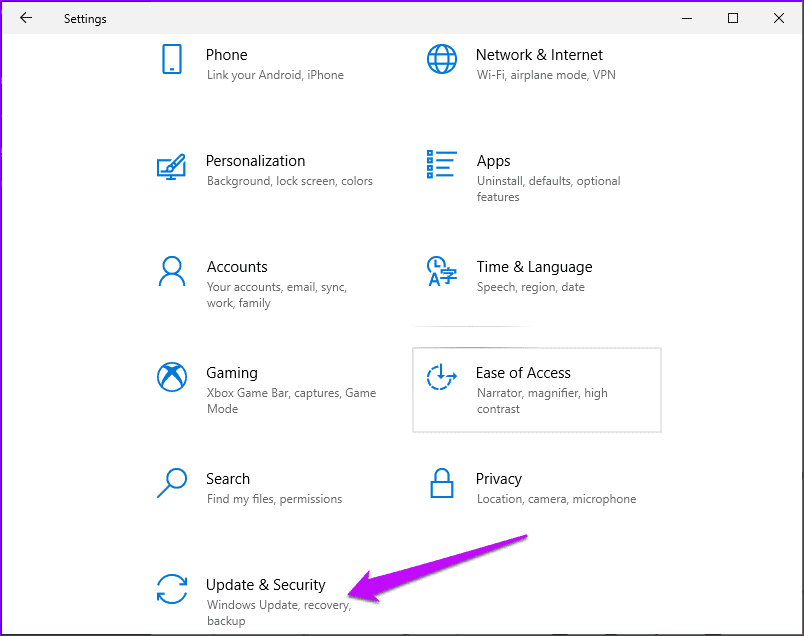
Step 2: Scroll down to the Update and Security option and click on it.
Step 3: Move to the left-hand side of the screen and press Recovery option.

Step 4: Locate the Advanced startup option and press Restart now.

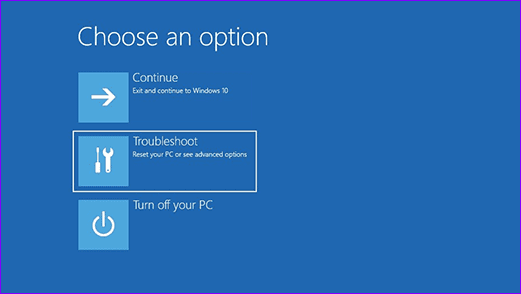
Step 5: Choose the Troubleshooting tab to open Advanced options.
Step 6: Under Advanced options, press Startup settings.

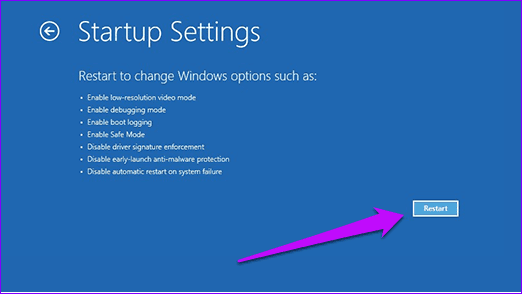
Step 7: On the next window, hit the Restart button.
Step 8: Press F5 to enable safe mode with networking.
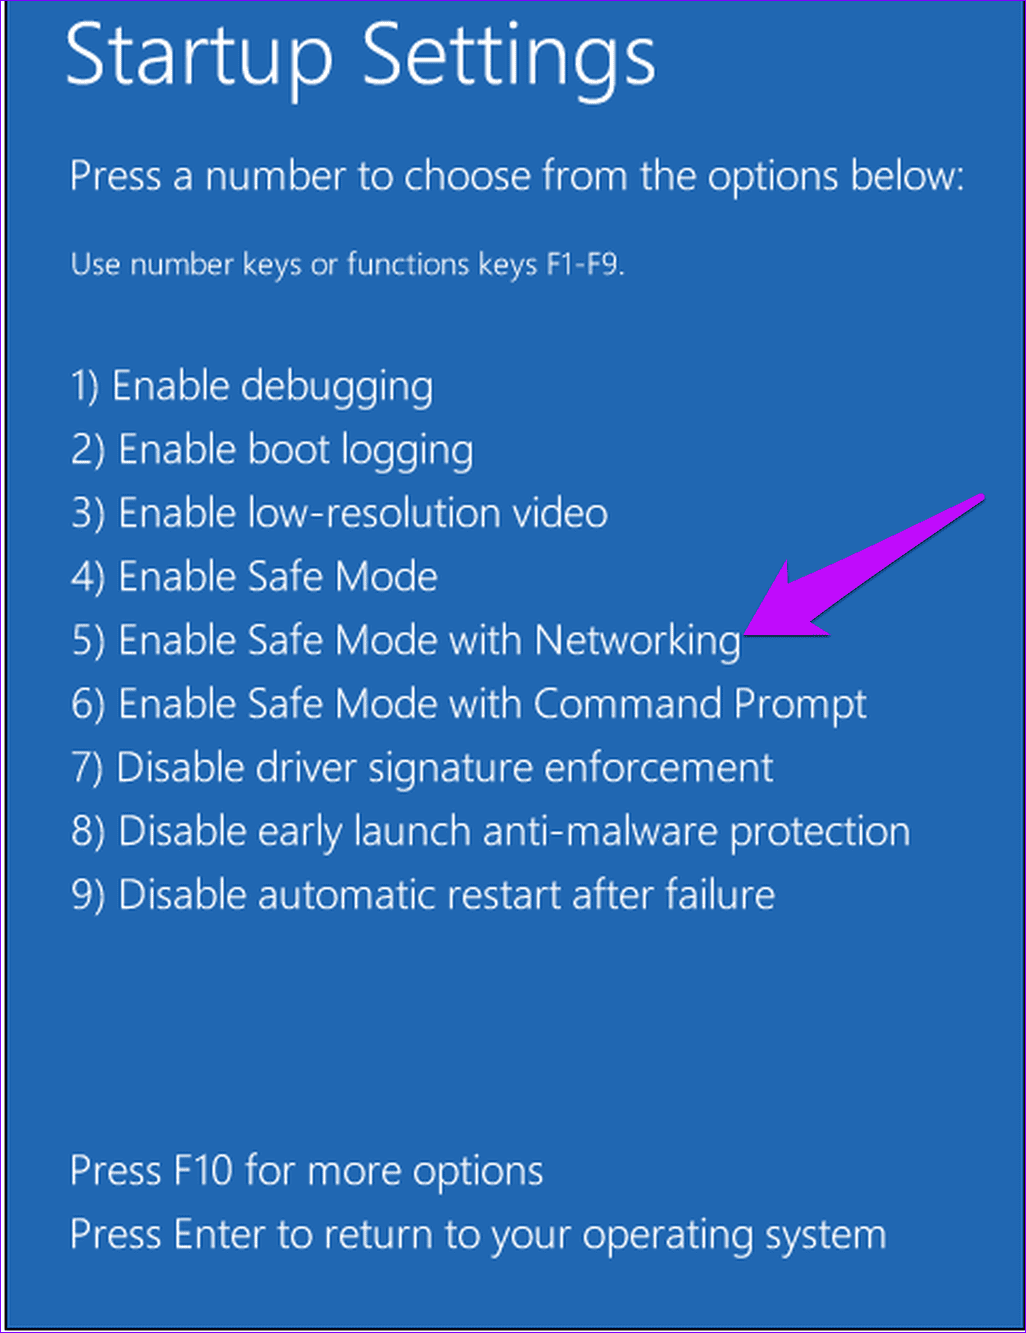
Attempt running the troubleshooter on safe mode and see if the issue is fixed.
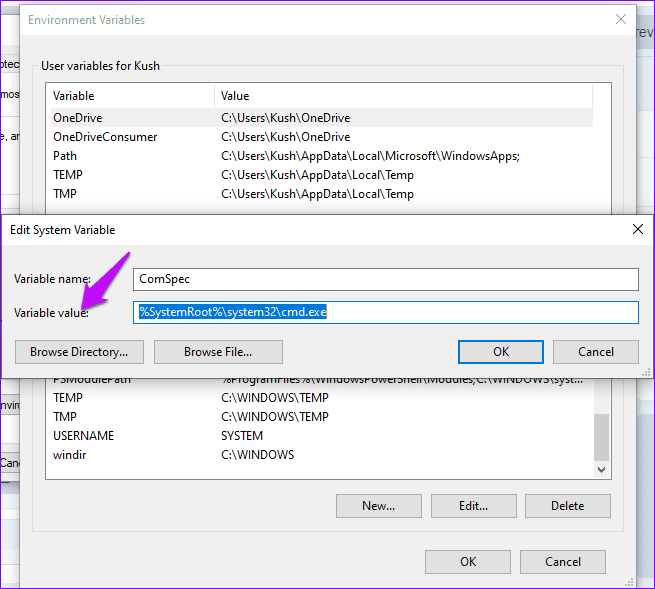
3. Confirm if the Environment Variables Are Well Set
If there are issues with the TEMP and TMP variables on your computer, then your programs may not know where to install, store, or find files. This may lead to the stopping or even crushing of the troubleshooter. To fix the problem, ensure the environment variables are well set.
Step 1: Navigate to the Windows search bar and type Control panel

Step 2: Type environment on Control panel’s search bar to open the Environment variables window.

Step 3: Click on ‘Edit the system environment variables’ to check if the value of TEMP and TMP is set.

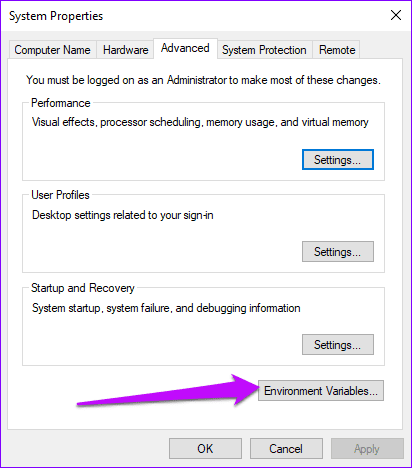
Step 4: Press Environment variables on the System properties windows.
Step 5: If either of the variables isn’t set, click on it and press the Edit button.
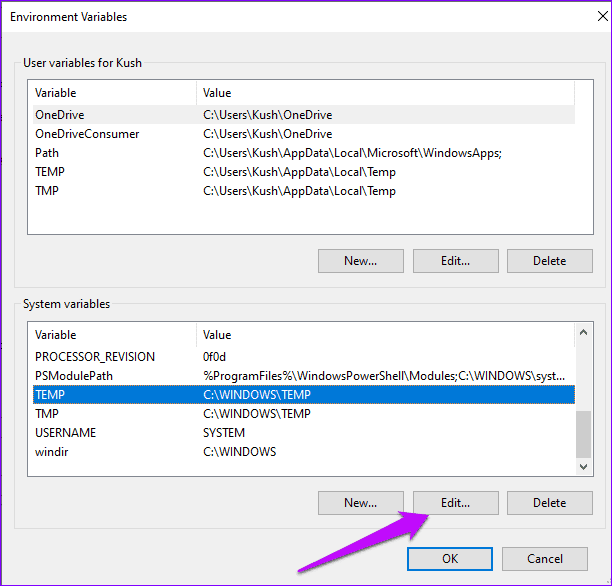
Step 6: Type C:\Temp in the Variable value box and press OK. Repeat the process for the other variables and this should resolve the troubleshooting problem.
4. Use the Command Prompt to Clear the DNS Cache
Flushing the DNS can help resolve accessibility issues with the troubleshooter. Here’s how you can run the command prompt.
Step 1: Locate the Windows search bar, type cmd, and choose to run as administrator.

Step 2: Type ipconfig /flushdns to begin flushing the DNS.
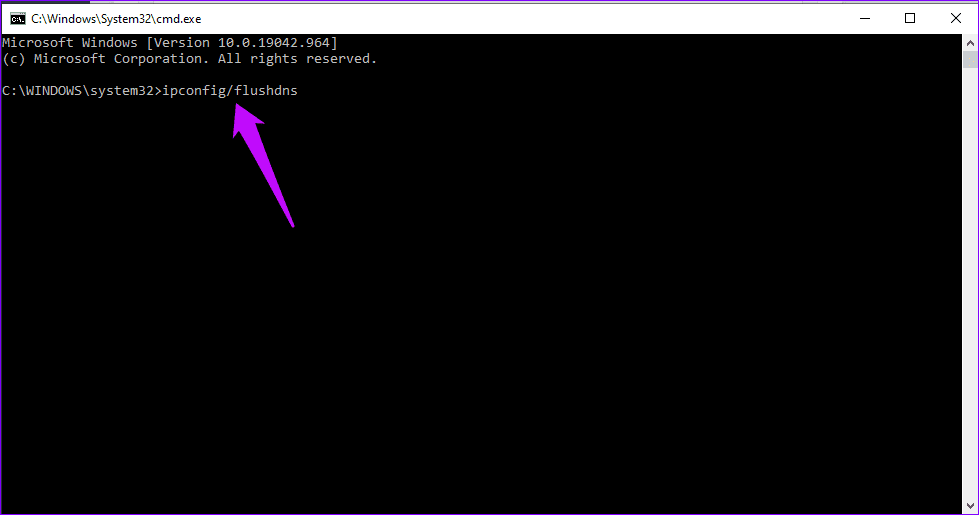
Once the process is complete, reboot your device and try running the troubleshooter.
5. Perform System Restore
To ensure problematic files affecting the troubleshooter are fixed, perform a system restore. A system restore will revert your device to a phase before the error and have fewer problems. Here’s how you can restore your system.
Step 1: Press Windows + S key, open Control panel, type restore in the search bar, and click on Create a restore point.

Step 2: On the System properties window click on System restore if it .

Step 3: On the next window, hit Next and if there’s a restore point available, click the ‘Show more restore points’ option. You can then select your preferred restore points and follow the prompts on your screen to complete the process.
Alternatively, you can choose to reset your PC to factory settings. Here’s how you can do it.
Step 1: Move to Settings, select Update and Security, and click Recovery.
Step 2: Click on the Get started option on the right-hand pane, and the next window will grant you the option to reset your PC by removing everything or keeping some files. Choose what you’d like to do, and your system will be reset.

Fixing the Troubleshooter
The solutions mentioned above should help fix issues with the troubleshooter. You may have to try one or all of the choices for the application to work. Having your troubleshooter working again generally improves the performance of your other applications.
Was this helpful?
Last updated on 13 July, 2021
Read Next
 4 Top Ways to Run the Program Compatibility Troubleshooter on Windows 10 and Windows 11
Are you facing a problem opening your apps on Windows 10 or Windows 11?
4 Top Ways to Run the Program Compatibility Troubleshooter on Windows 10 and Windows 11
Are you facing a problem opening your apps on Windows 10 or Windows 11?
 5 Fixes for “An Error Occurred While Loading the Troubleshooter” in Windows 11
Fix 1: Check the Diagnostic Service Status Windows troubleshooters rely on a few diagnostic services.
5 Fixes for “An Error Occurred While Loading the Troubleshooter” in Windows 11
Fix 1: Check the Diagnostic Service Status Windows troubleshooters rely on a few diagnostic services.
 Top 7 Ways to Fix Windows Key Not Working on Windows 10
Windows 10 operating system is full of keyboard shortcuts.
Top 7 Ways to Fix Windows Key Not Working on Windows 10
Windows 10 operating system is full of keyboard shortcuts.
 8 Ways to Fix Windows Security Not Opening or Working on Windows 11
Windows Security is a built-in security app that offers real-time protection against viruses and malware for your computer.
8 Ways to Fix Windows Security Not Opening or Working on Windows 11
Windows Security is a built-in security app that offers real-time protection against viruses and malware for your computer.
 8 Best Ways to Fix Windows Key Not Working in Windows 11
We rely on the Windows key in the operating system to open the Start menu and search for apps.
8 Best Ways to Fix Windows Key Not Working in Windows 11
We rely on the Windows key in the operating system to open the Start menu and search for apps.
 Top 7 Ways to Fix Telegram Notifications Not Working on Windows 10 and Windows 11
Telegram app is also available for desktops to let you connect with your friends from your Windows computer.
Top 7 Ways to Fix Telegram Notifications Not Working on Windows 10 and Windows 11
Telegram app is also available for desktops to let you connect with your friends from your Windows computer.
 6 Best Ways to Fix Keyboard Backlight Not Working on Windows 10 and Windows 11
A backlit keyboard provides a comfortable typing experience in a low-light environment.
6 Best Ways to Fix Keyboard Backlight Not Working on Windows 10 and Windows 11
A backlit keyboard provides a comfortable typing experience in a low-light environment.
 7 Best Ways to Fix Windows Subsystem for Android Not Working on Windows 11
Windows users always resorted to emulator software to run Android apps on their systems.
7 Best Ways to Fix Windows Subsystem for Android Not Working on Windows 11
Windows users always resorted to emulator software to run Android apps on their systems.
The article above may contain affiliate links which help support Guiding Tech. The content remains unbiased and authentic and will never affect our editorial integrity.