Preliminary Fixes
- Internet connection: Sharing your screen on Teams requires high-speed internet connectivity. To ensure you have good internet, visit Fast or use services like Speedtest.
- Close irrelevant apps: Too many apps and activity processes running in the background interfere with Microsoft Teams and its functionalities. To shut down running processes, open Task Manager > go to Processes > select the app you want to close > choose End task.
- Ensure you have permission for screen sharing: When on a call, click on the three-dot menu at the above menu bar > select Meeting Options > select Everyone under Who can bypass the lobby.
If none of the preliminary fixes help troubleshoot the issue, move on to the next fixes.
Fix 1: Enable Computer Audio During Teams Screen Sharing
Participants can also share the screen during Microsoft Teams video calls. But first, contact the admin to get the relevant permission.
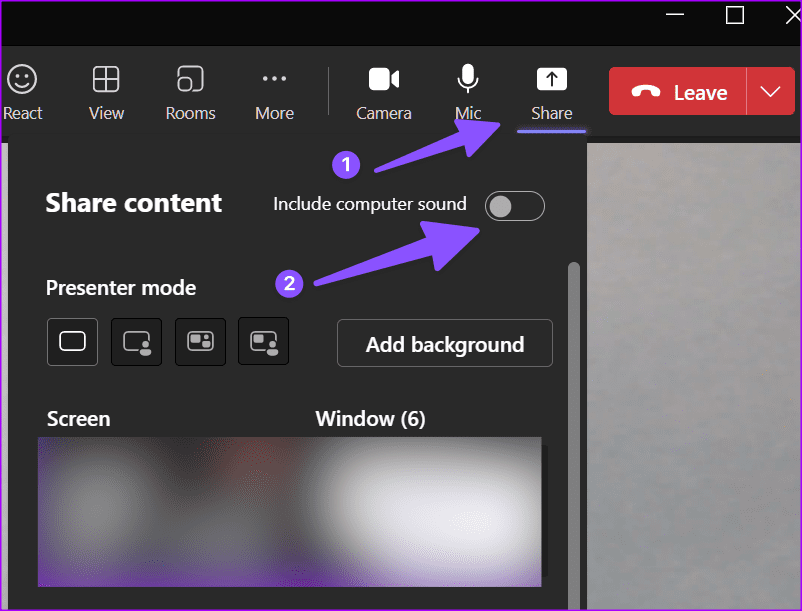
Step 1: Launch Microsoft Teams and start a video call with members. Hit the Share icon at the top.
Step 2: Enable the Include computer sound toggle, select a presenter mode if necessary, and share the display content with others.
Also Read: How to test audio in Microsoft Teams
Fix 2: Lower Display Resolution
Step 1: Open the Settings app on Windows 11 (Windows + I keys).
Step 2: Navigate to System > Display > Display Resolution.
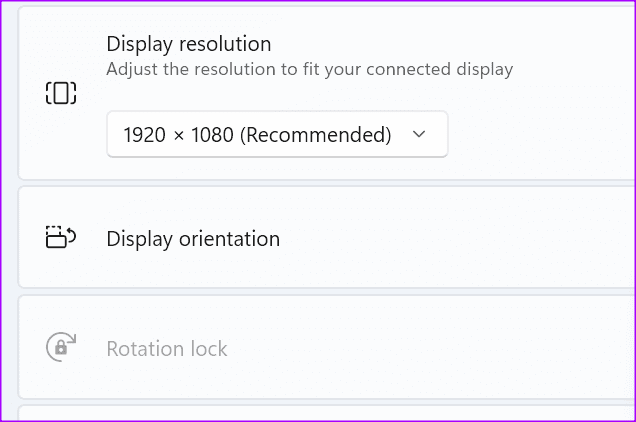
Step 3: Select low display resolution and reboot the PC.

Now, open Microsoft Teams and try sharing the screen again. If this fix didn’t help, move on to the next one.
Fix 3: Clear Microsoft Teams Cache
Step 1: Completely close the Microsoft Teams app on Windows 11.
Step 2: Press Windows + R keys to open the Run menu.
Step 3: Now, type the following command in the box and hit Enter.
%appdata%\Microsoft\Teams
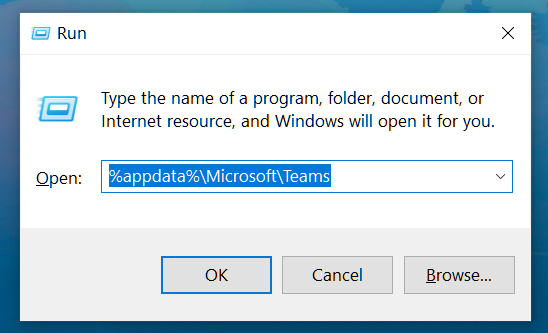
Step 5: It will open Files Explorer with the folder containing the Teams files. Select all and delete them from the PC
Now, reboot the PC and try using Microsoft Teams again.
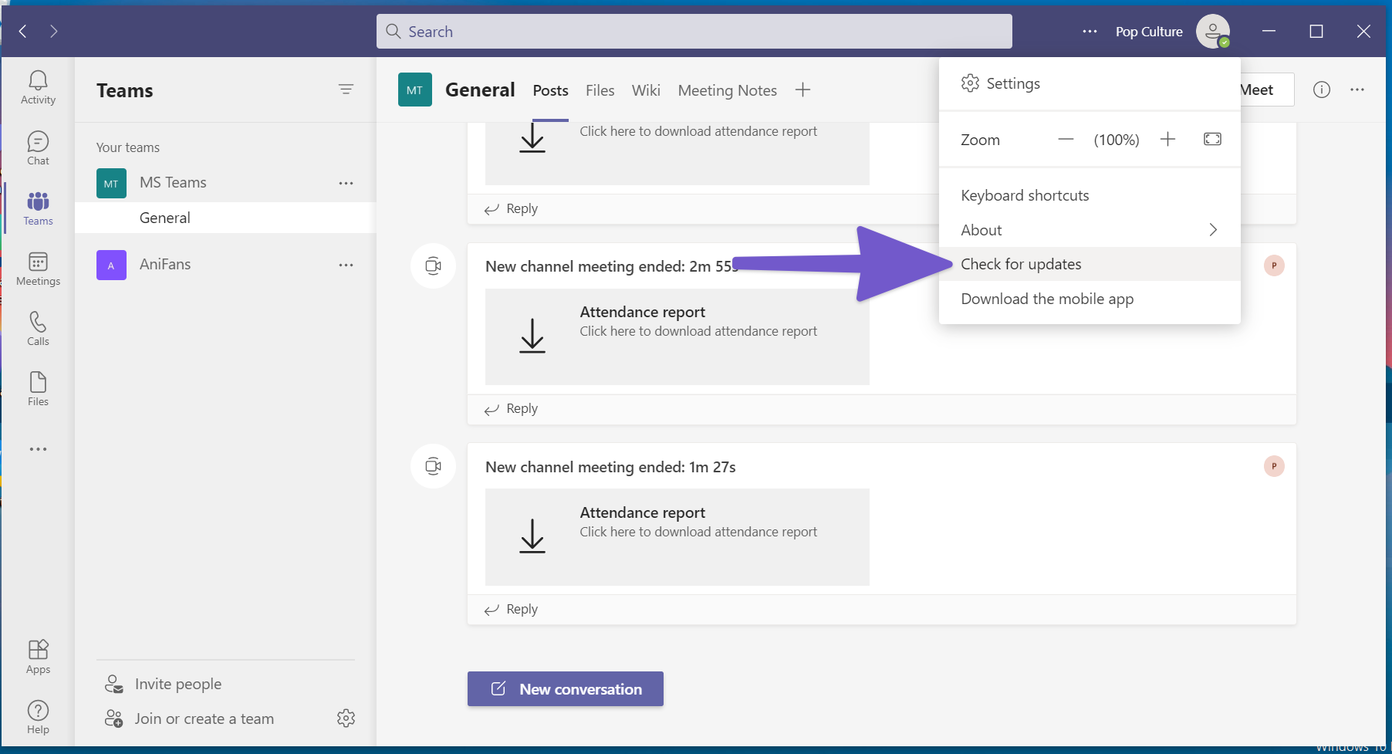
Fix 4: Update Microsoft Teams
Microsoft Teams screen sharing not working might be related to an outdated device build. The software giant regularly releases software updates to the app to add new features and fix bugs. To update:
Open Microsoft Teams > click on the three-dot option in the menu bar > check for updates.
FAQs
This might be a bug with the Teams app. Try restarting Teams or updating to the latest version.
Corrupted Teams files could be causing crashes. Try clearing the Teams cache or repairing the Teams app through Windows Settings.
Yes, certain antivirus programs might block screen-sharing features. To resolve this, temporarily disable or whitelist Microsoft Teams within your antivirus settings.
Was this helpful?
Last updated on 12 April, 2024
Read Next
 Top 7 Ways to Fix Microsoft Teams Screen Sharing Not Working on Mac
Aside from frequent sign-in errors, Microsoft Teams’ other glaring weakness remains in the screen sharing department.
Top 7 Ways to Fix Microsoft Teams Screen Sharing Not Working on Mac
Aside from frequent sign-in errors, Microsoft Teams’ other glaring weakness remains in the screen sharing department.
 Top 13 Things to Know About Screen Sharing in Microsoft Teams
Sharing the screen is quite important in video conferencing apps such as Zoom, Microsoft Teams, Google Meet, and others.
Top 13 Things to Know About Screen Sharing in Microsoft Teams
Sharing the screen is quite important in video conferencing apps such as Zoom, Microsoft Teams, Google Meet, and others.
 5 Best Fixes for Microsoft Teams Microphone Not Working on Windows 10
More businesses and organizations now use Microsoft Teams to manage their teams working from office or remotely.
5 Best Fixes for Microsoft Teams Microphone Not Working on Windows 10
More businesses and organizations now use Microsoft Teams to manage their teams working from office or remotely.
 6 Best Fixes for Microsoft Teams Reactions Not Working on Windows 11
Microsoft Teams lets you reply to a specific message with an emoji.
6 Best Fixes for Microsoft Teams Reactions Not Working on Windows 11
Microsoft Teams lets you reply to a specific message with an emoji.
 Top 6 Fixes for Polls Not Working in Microsoft Teams for Windows
Microsoft Teams has revolutionized how teams communicate and collaborate with its wide range of features.
Top 6 Fixes for Polls Not Working in Microsoft Teams for Windows
Microsoft Teams has revolutionized how teams communicate and collaborate with its wide range of features.
 5 Fixes for Spell Check Not Working in Microsoft Teams for Windows
Fix 1: Disable and Re-Enable the Spell Check Feature This may seem too simple to work, but disabling and re-enabling the spell check feature in Microsoft Teams can help.
5 Fixes for Spell Check Not Working in Microsoft Teams for Windows
Fix 1: Disable and Re-Enable the Spell Check Feature This may seem too simple to work, but disabling and re-enabling the spell check feature in Microsoft Teams can help.
 6 Best Fixes for FaceTime Screen Sharing Not Working on iPhone
FaceTime on your iPhone lets you connect with friends and family on video calls.
6 Best Fixes for FaceTime Screen Sharing Not Working on iPhone
FaceTime on your iPhone lets you connect with friends and family on video calls.
 Top 7 Fixes for We’ve Run Into an Issue Error in Microsoft Teams on Windows
Microsoft Teams is a popular business collaboration app among Windows users, and for good reason.
Top 7 Fixes for We’ve Run Into an Issue Error in Microsoft Teams on Windows
Microsoft Teams is a popular business collaboration app among Windows users, and for good reason.
The article above may contain affiliate links which help support Guiding Tech. The content remains unbiased and authentic and will never affect our editorial integrity.