Sometimes, your Mac may connect to a Wi-Fi network but fails to open any site or run apps. It can be irritating, especially when you are sitting down to get work done. We have faced a similar issue, and every time, different troubleshooting methods helped us rescue the situation. Read along to learn to fix Mac Wi-Fi connected but not working issue.

When the Wi-Fi does not work despite being connected can be confusing. It gets even more problematic when the Wi-Fi works perfectly fine on other connected devices such as your smartphone or smart TV. So what’s going on with your Mac? Let’s try to find the cause the fix the issue.
1. Forget and Reconnect Wi-Fi
Before we move to advanced troubleshooting methods, let’s try this simple trick. You need to forget and reconnect the Wi-Fi network on Mac. Follow the steps below.
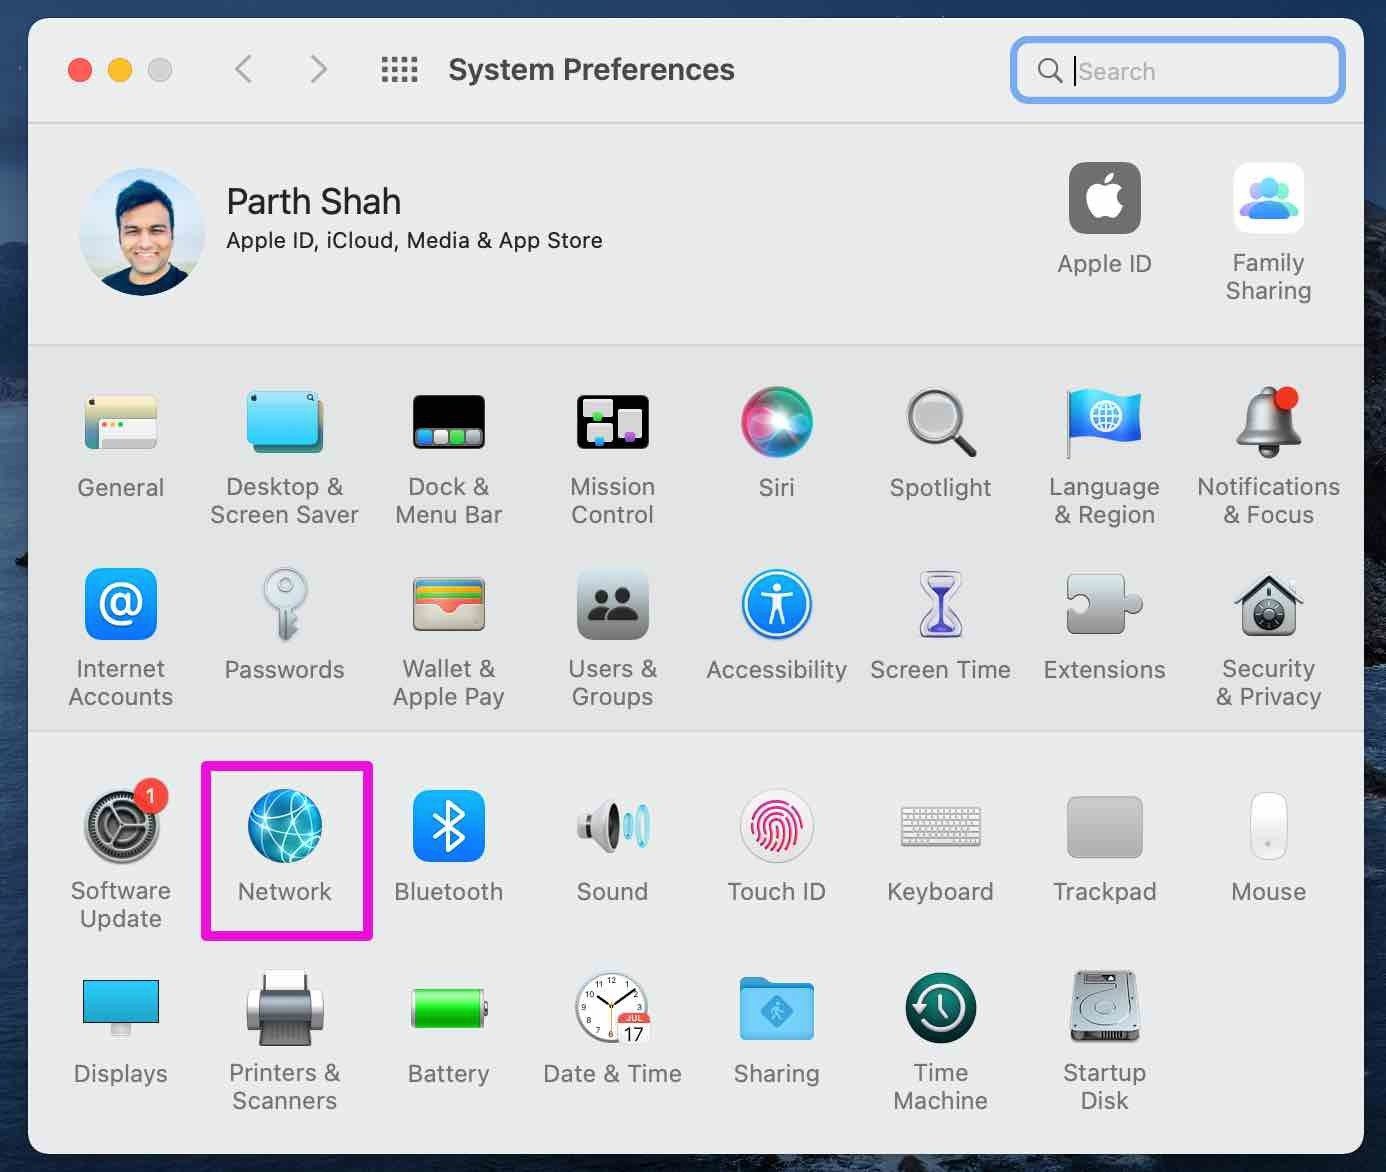
Step 1: Click on the little Apple icon in the menu bar.
Step 2: Open System Preferences menu.
Step 3: Go to the Network menu.
Step 4: Click on the – icon at the bottom and remove the connected Wi-Fi network from Mac.

Step 5: You can connect to the same Wi-Fi with a password from the Mac menu bar or the Control Centre.
2. Connect to 5 GHz Wi-Fi Frequency
With the new macOS version, some users have difficulty connecting to 2.4 GHz Wi-Fi frequency. If your router supports dual-band Wi-Fi frequency, you should opt for the 5 GHz Wi-Fi frequency.
While making the switch, you should also connect other devices to the 5 GHz Wi-Fi frequency at home or office.
3. Restart Mac
Sometimes a simple Mac reboot can help you troubleshoot the Wi-Fi connection on the device. You can Restart Mac from the menu bar.

Add Mac password again and check the active internet connection on Mac.
4. Disable iCloud Private Relay for Wi-Fi
With macOS Monterey, Apple has added iCloud Private Relay on Mac. Available for iCloud+ subscribers, iCloud Private Relay reroutes internet traffic on your Mac through an Apple-branded server.
iCloud Private Relay works in the Safari browser and the Mail app. If the Apple service is down, you might face internet-related issues on your Mac.
You can either completely disable iCloud Private Relay on Mac or turn it off for the connected Wi-Fi connection. Here’s what you need to do.
Step 1: Use Command + Space keys and search for System Preferences.
Step 2: Hit return and open the System Preferences menu.
Step 3: Go to Network.

Step 4: Select your current Wi-Fi connection and disable iCloud Private Relay for it.

Reboot your Mac and try to access the Internet again.
5. Remove All Wi-Fi Settings
This trick worked wonders for us. We deleted some old network files and the Wi-Fi started working again on Mac. Follow the steps below.
Step 1: Click on the Wi-Fi icon in the menu bar.
Step 2: Disable Wi-Fi on your Mac.
Step 3: Open the Finder menu on Mac.
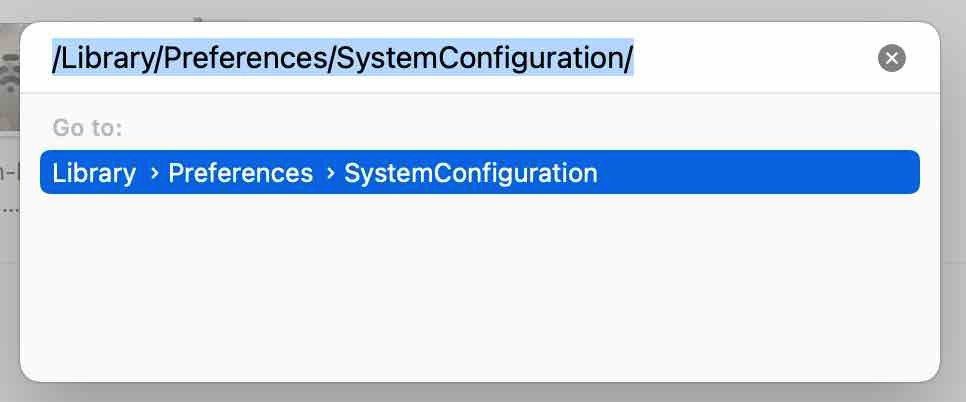
Step 4: Click on Go at the top and select Go To Folder.

Step 5: Enter the following and click Go.
/Library/Preferences/SystemConfiguration/
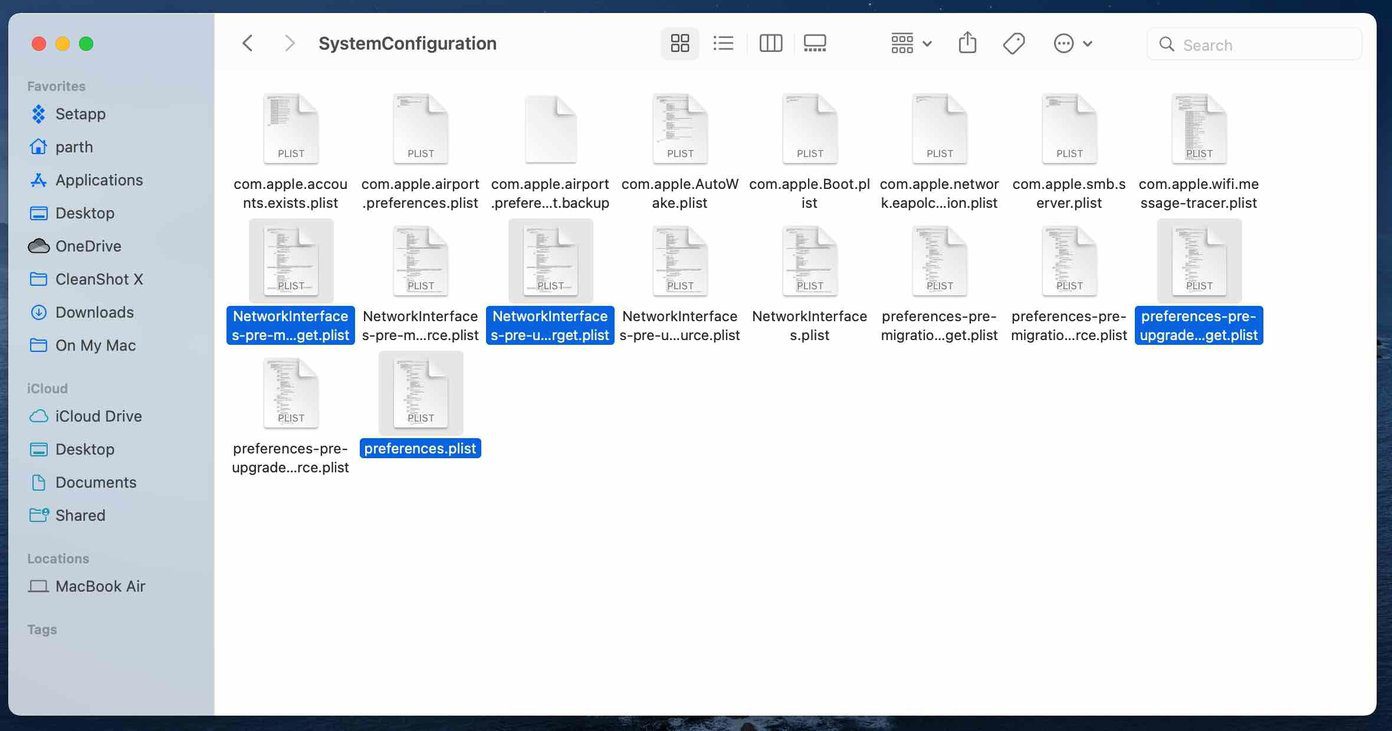
Step 6: It will open a window in Finder with dozens of network files.
Identify the following files from the list.
- com.apple.airport.preferences.plist
- com.apple.network.identification.plist
- com.apple.wifi.message-tracer.plist
- NetworkInterfaces.plist
- preferences.plist
Step 6: You can move these files to Trash from the same menu. First, copy the selected files and drop them on the Mac desktop.
Step 7: From there, move the files to Trash and clear the Trash.
Restart your Mac, and the system will create the relevant network files on your Mac. Now, you can go to Wi-Fi in the menu bar and connect it again. The Wi-Fi should work now, and you can test internet speeds from fast.com.
Get Internet Connection Running on Your Mac
If all the connected devices to the Wi-Fi network have problems with internet speeds, you should check the router and update its firmware. Which trick worked for you to fix the issue? Share your findings for our readers in the comments section below.
Was this helpful?
Last updated on 07 February, 2022
Read Next
 How to Fix iPhone Connected to Wi-Fi But Internet Not Working Issue
Not everything that you see is true, especially the symbols on our phone.
How to Fix iPhone Connected to Wi-Fi But Internet Not Working Issue
Not everything that you see is true, especially the symbols on our phone.
 Top 5 Ways to Fix Bluetooth Headphones Connected but No Sound on Windows 10
On a usual day, you'd hook your wireless Bluetooth headphones to your PC to listen to a song.
Top 5 Ways to Fix Bluetooth Headphones Connected but No Sound on Windows 10
On a usual day, you'd hook your wireless Bluetooth headphones to your PC to listen to a song.
 4 Best Ways to Fix Fire TV Stick Connected With Problems Error
Network-related issues on the Amazon Fire TV Stick are just as common as they are infuriating.
4 Best Ways to Fix Fire TV Stick Connected With Problems Error
Network-related issues on the Amazon Fire TV Stick are just as common as they are infuriating.
 Top 9 Ways to Fix iPad Connected to Wi-Fi But No Internet
While Apple offers optional cellular connectivity with the iPad, most users opt for Wi-Fi only model.
Top 9 Ways to Fix iPad Connected to Wi-Fi But No Internet
While Apple offers optional cellular connectivity with the iPad, most users opt for Wi-Fi only model.
 4 Ways to Fix Wi-Fi Connected but No Internet on Windows 11
Common Fixes Let's begin with some basic solutions to fix the Wi-Fi connected but no internet issue on your Windows machine: Check your internet plan - If you have exceeded
4 Ways to Fix Wi-Fi Connected but No Internet on Windows 11
Common Fixes Let's begin with some basic solutions to fix the Wi-Fi connected but no internet issue on your Windows machine: Check your internet plan - If you have exceeded
 Top 6 Ways to Fix Bluetooth Device Is Paired but Not Connected on Windows 11
You rely on Bluetooth to connect your Windows 11 PC to wireless peripherals like a keyboard, mouse, speakers, etc.
Top 6 Ways to Fix Bluetooth Device Is Paired but Not Connected on Windows 11
You rely on Bluetooth to connect your Windows 11 PC to wireless peripherals like a keyboard, mouse, speakers, etc.
 Top 8 Ways to Fix Wi-Fi Connected But No Internet on Android
At times, your Android does not have internet access even after connecting it to a Wi-Fi network.
Top 8 Ways to Fix Wi-Fi Connected But No Internet on Android
At times, your Android does not have internet access even after connecting it to a Wi-Fi network.
 Top 7 Ways to Fix Samsung Galaxy Phone Connected to Wi-Fi But No Internet
Most Samsung Galaxy phone users prefer a robust Wi-Fi connection to download large apps, games, TV shows, movies, and playlists from the likes of Netflix, Disney Plus, and Spotify.
Top 7 Ways to Fix Samsung Galaxy Phone Connected to Wi-Fi But No Internet
Most Samsung Galaxy phone users prefer a robust Wi-Fi connection to download large apps, games, TV shows, movies, and playlists from the likes of Netflix, Disney Plus, and Spotify.
The article above may contain affiliate links which help support Guiding Tech. The content remains unbiased and authentic and will never affect our editorial integrity.