In any photo editing app, the crop tool is the most useful one to remove unnecessary portions from an image. All simple and powerful photo-editors provide a basic crop tool. However, when it comes to cropping according to shapes, very few of them have anything to offer.
GIMP is the free photo-manipulation tool available for Windows, macOS, and Linux. Though it has been around for a while, it lacks the shape crop feature. However, that doesn’t mean you cannot achieve the same in it. All you need to do is follow a workaround. You can then crop images in any shape.
In this tutorial, we will tell you how to crop a picture into a circular shape in GIMP. You can use the same method for other shapes too, such as oval, alphabets, etc. Let’s get started.
How to Perform a Circular Crop in GIMP
Here are the steps:
Step 1: Launch GIMP and open the image in it that you want to crop.

Step 2: Since GIMP doesn’t offer a built-in way to crop an image into a circular shape, we will be taking the help of the Ellipse selection tool. For that, click on the Ellipse tool in the toolbar, the one that is oval shaped. Alternatively, press the E key on your keyboard to activate that tool.
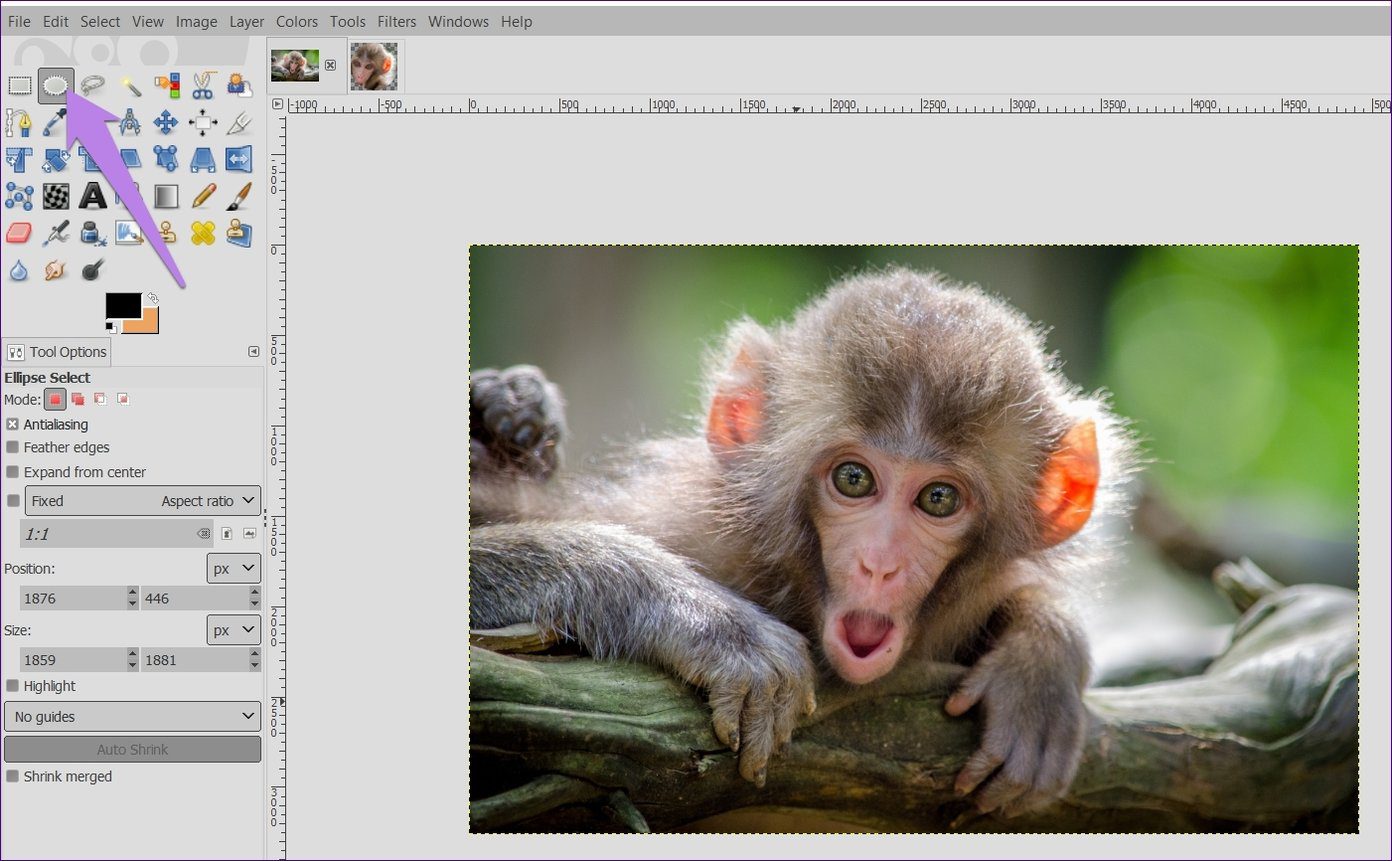
Step 3: Using your mouse draw a circle on the desired area of the image. By default, the circle will not be of the fixed shape. To keep the size fixed, check the Fixed option from the Tool Options present in the left sidebar. Then draw a circle.

Step 4: Click and drag the mouse on the selected area to change its position. To increase or decrease the selection size, use the four corners of the selection.
Step 5: Now, there are three methods to create a circular image. Let’s check them out individually.
Method 1: Paste on Another Image
If you want to paste the circular image directly on another image without saving it, here’s how to go about it.
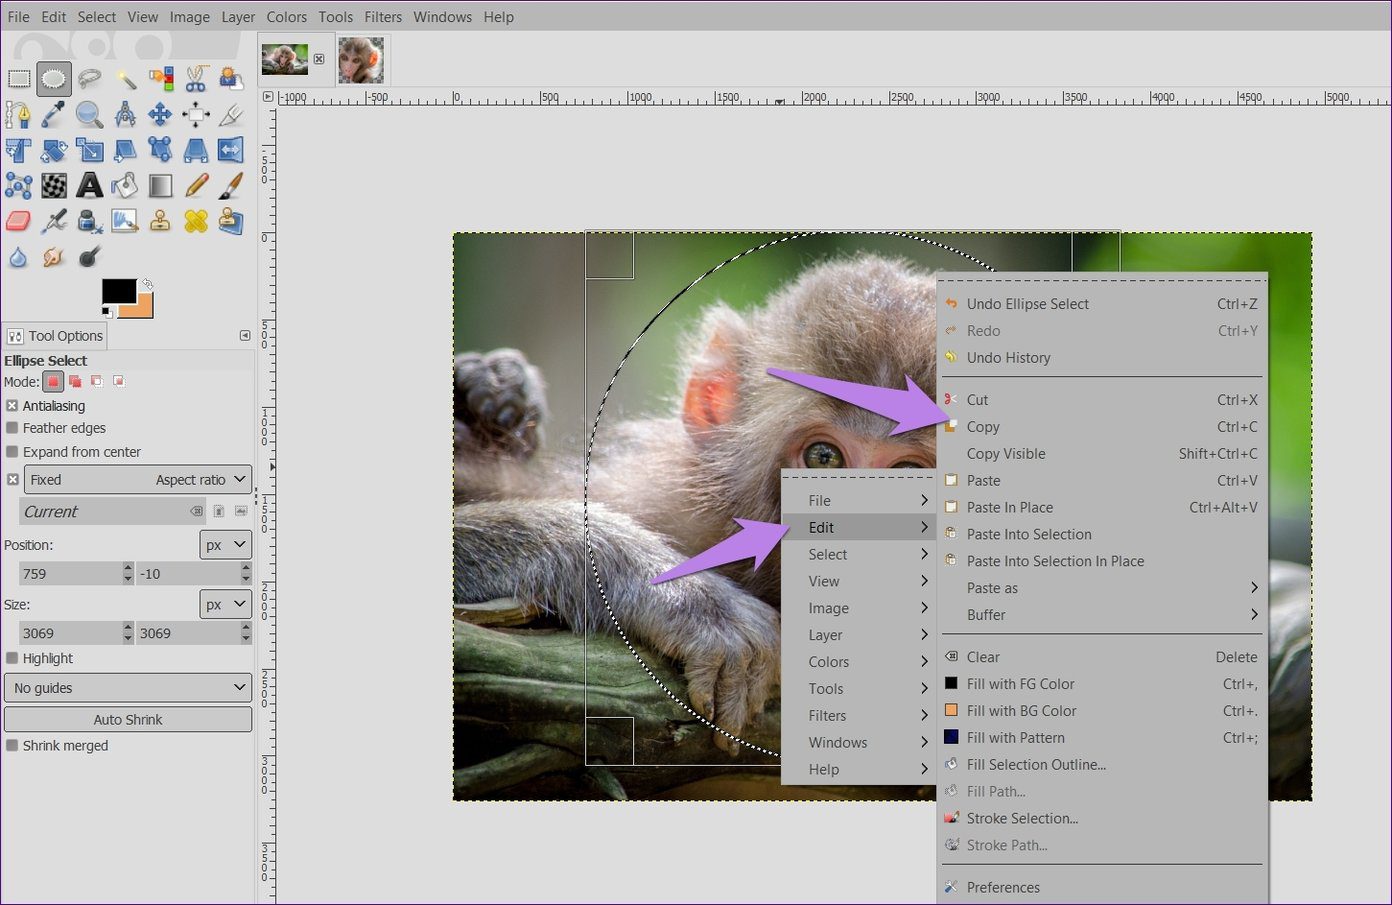
Step 1: Right-click on the selected area of step 4 above and go to Edit > Copy.
Step 2: Open the second image in GIMP using File > Open.
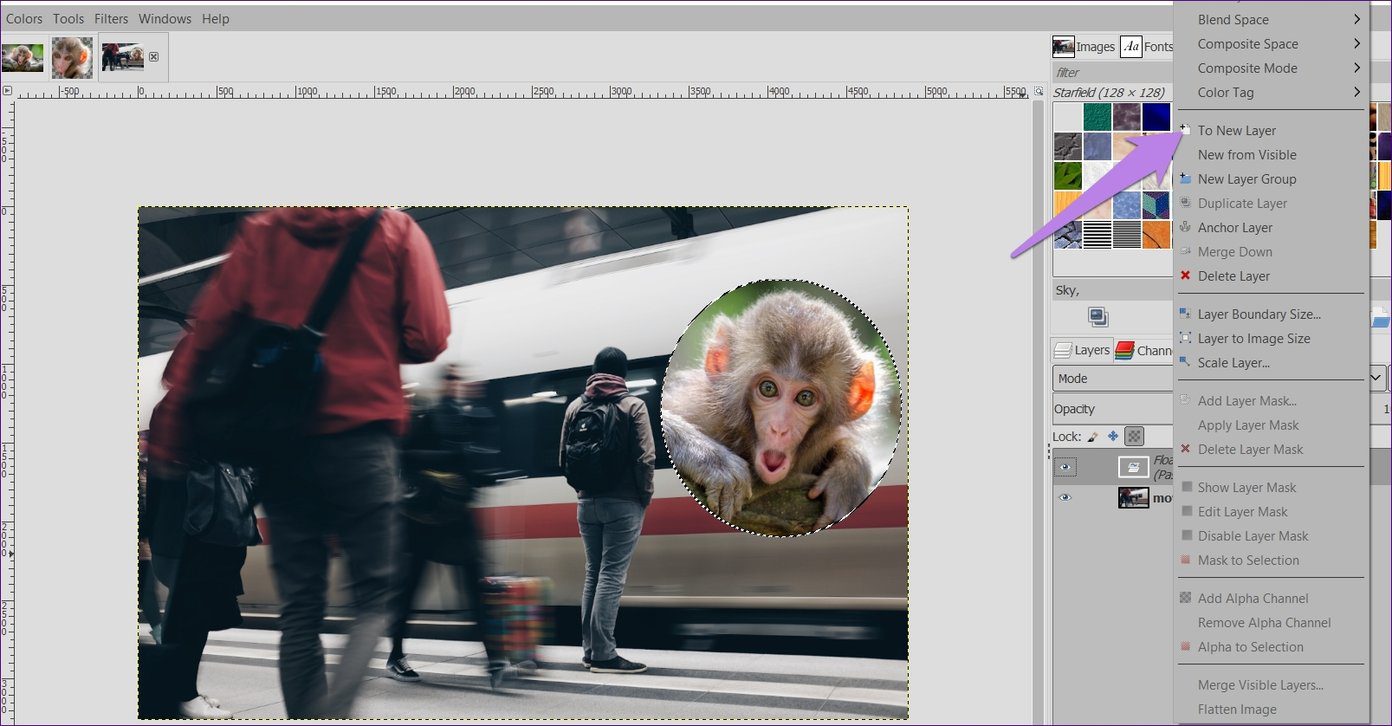
Step 3: Right-click on the new image and go to Edit > Paste. Alternatively, use the shortcut Ctrl + V (Windows) and Command + V (Mac).
Use the Scale and Move tools to adjust your pasted image.

Step 4: Under Layer in the sidebar, right-click on this Floating selection layer and choose To a new layer.
Step 5: Save the image using File > Export as.
Method 2: Remove Background
Another way to create a circular image is to remove the background. You will also get the image with a transparent background using this method.
To do so, follow these steps:
Step 1: Once you have selected your desired circular area using the Ellipse tool, right-click on the selection and choose Select > Invert. Alternatively, use the shortcut Ctrl + I. You will see that the outer area gets selected now.

Step 2: To get a transparent background, you need to add an alpha channel to your image. For that, right-click on your image layer under Layers tab in the sidebar and click on Add Alpha Channel.

Step 3: Again, right-click on the main image and select Edit > Clear. You can also press the Delete key. Doing that will remove the background leaving you with the circular image only.

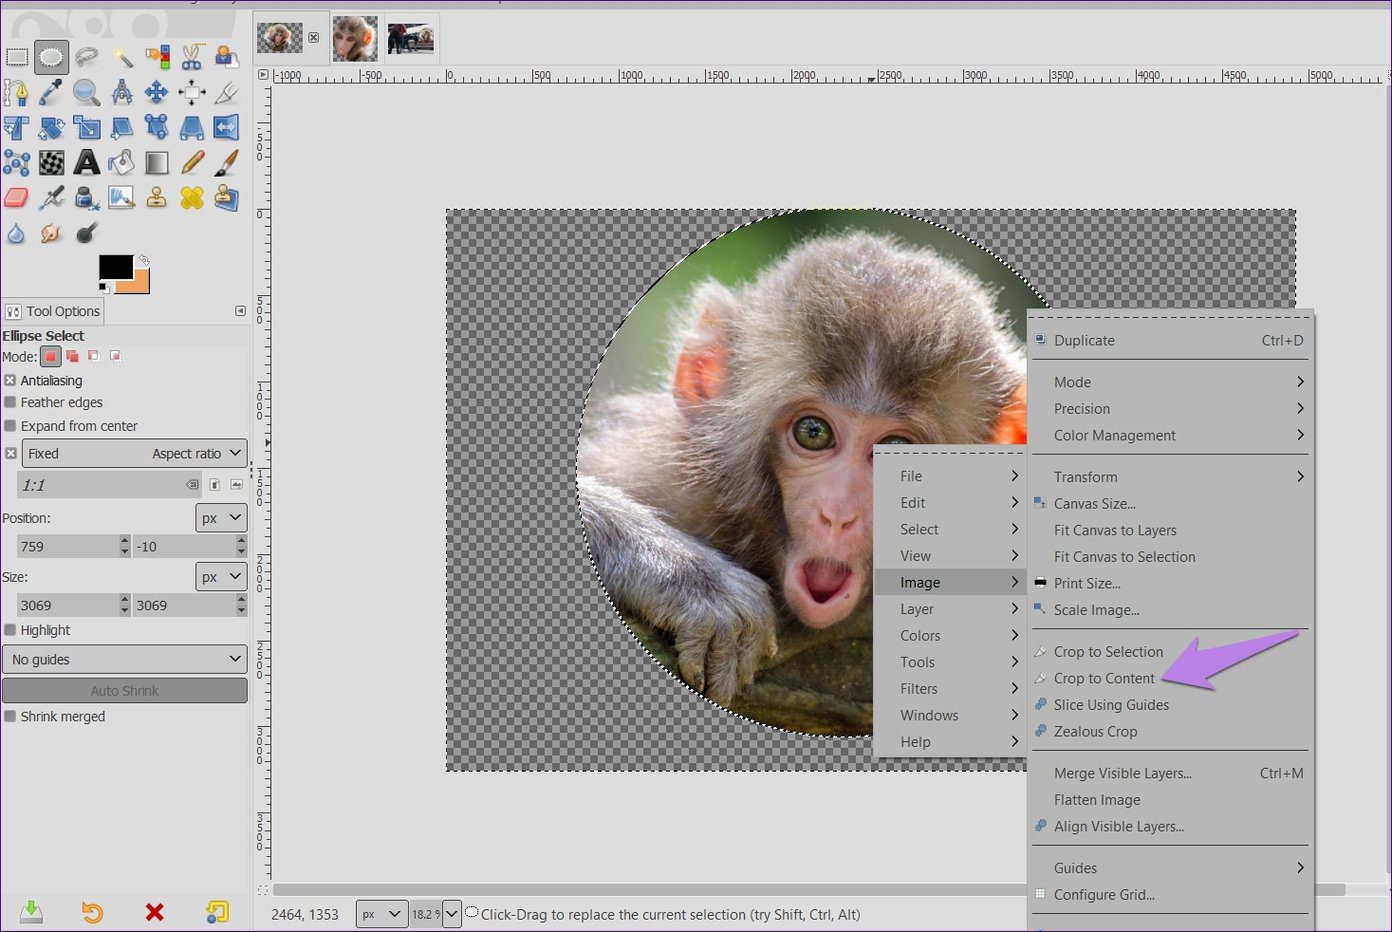
Step 4: If you save the image at this point, it will have an extra background around it. To make the size of your image the same as that of the circle, use the auto-crop feature. That is, go to Image > Crop to Content. You can also right-click and click on Image > Crop to Content.

Step 5: This step is very crucial. You need to save your image in the PNG format to keep the transparency. Saving it in JPG or other formats will add a background color to your image. When you have an image with a transparent background, you can use it on top of any image. It will look like as if it is part of the image.
To save in PNG format, go to File > Export as. Keep the extension as .png.

Method 3: Paste as New Image
If the above method sounds tedious, there’s an uncomplicated way too for keeping the background transparent of a circular image.
Here are the steps:
Step 1: Once you select your area using the Ellipse tool, right-click on it and go to Edit > Copy.
Step 2: Right-click again on the same image and choose Edit > Paste as > New Image. You can also use the shortcut Shift + Ctrl + V (Windows) and Shift + Command + V (Mac).

Doing that will open your circular image with a transparent background. Now all you need to do is save it in the PNG format using Export > Save as.

Go Round
Rounded images have several benefits. They are usable on social media as profile pictures. With a transparent background, you can put them on top of any image giving it a distinctive look. In GIMP, you can delete the circular cropped section and replace it with a new image too.
Next up: Layers form an important part of image manipulation in GIMP. Here’s how to use them in GIMP.
Was this helpful?
Last updated on 13 July, 2021
Read Next
 How to Crop an Image in Circle Shape in Paint 3D
Cropping an image is one of the basic needs while editing a picture.
How to Crop an Image in Circle Shape in Paint 3D
Cropping an image is one of the basic needs while editing a picture.
 How to Crop an Image Into a Circle in Google Docs
Google Docs is perhaps one of the most versatile tools out there.
How to Crop an Image Into a Circle in Google Docs
Google Docs is perhaps one of the most versatile tools out there.
 4 Ways to Crop a Picture into a Circle in PowerPoint
Pictures enhance the overall look and impact of a presentation.
4 Ways to Crop a Picture into a Circle in PowerPoint
Pictures enhance the overall look and impact of a presentation.
 How to Change Color of PNG Image and Text in GIMP
Many times, we have a single color image such as an icon or a logo whose color needs to be changed.
How to Change Color of PNG Image and Text in GIMP
Many times, we have a single color image such as an icon or a logo whose color needs to be changed.
 How To Change Image Background in GIMP
We know a picture is worth a thousand words.
How To Change Image Background in GIMP
We know a picture is worth a thousand words.
 How To Make Image Background Transparent Using GIMP
Not everyone uses Adobe Photoshop, neither does everyone like it.
How To Make Image Background Transparent Using GIMP
Not everyone uses Adobe Photoshop, neither does everyone like it.
 How to Tile an Image in GIMP
Not everyone likes Photoshop due to its pricing and slightly complicated nature for newbies.
How to Tile an Image in GIMP
Not everyone likes Photoshop due to its pricing and slightly complicated nature for newbies.
 How to Use Circle to Search on Android
We've all been there when we were browsing the internet and found something that we wanted more information about.
How to Use Circle to Search on Android
We've all been there when we were browsing the internet and found something that we wanted more information about.
The article above may contain affiliate links which help support Guiding Tech. The content remains unbiased and authentic and will never affect our editorial integrity.