Here’s how to create an RSVP invite on Google Forms, share it with your guests, and collect their responses in a few steps.
Make Google Forms for RSVP
Whether you are planning a birthday party, wedding, business event, conference, or gender reveal party, RSVPs are a vital part of organizing a great event. Google Forms can make the task a breeze and more efficient.
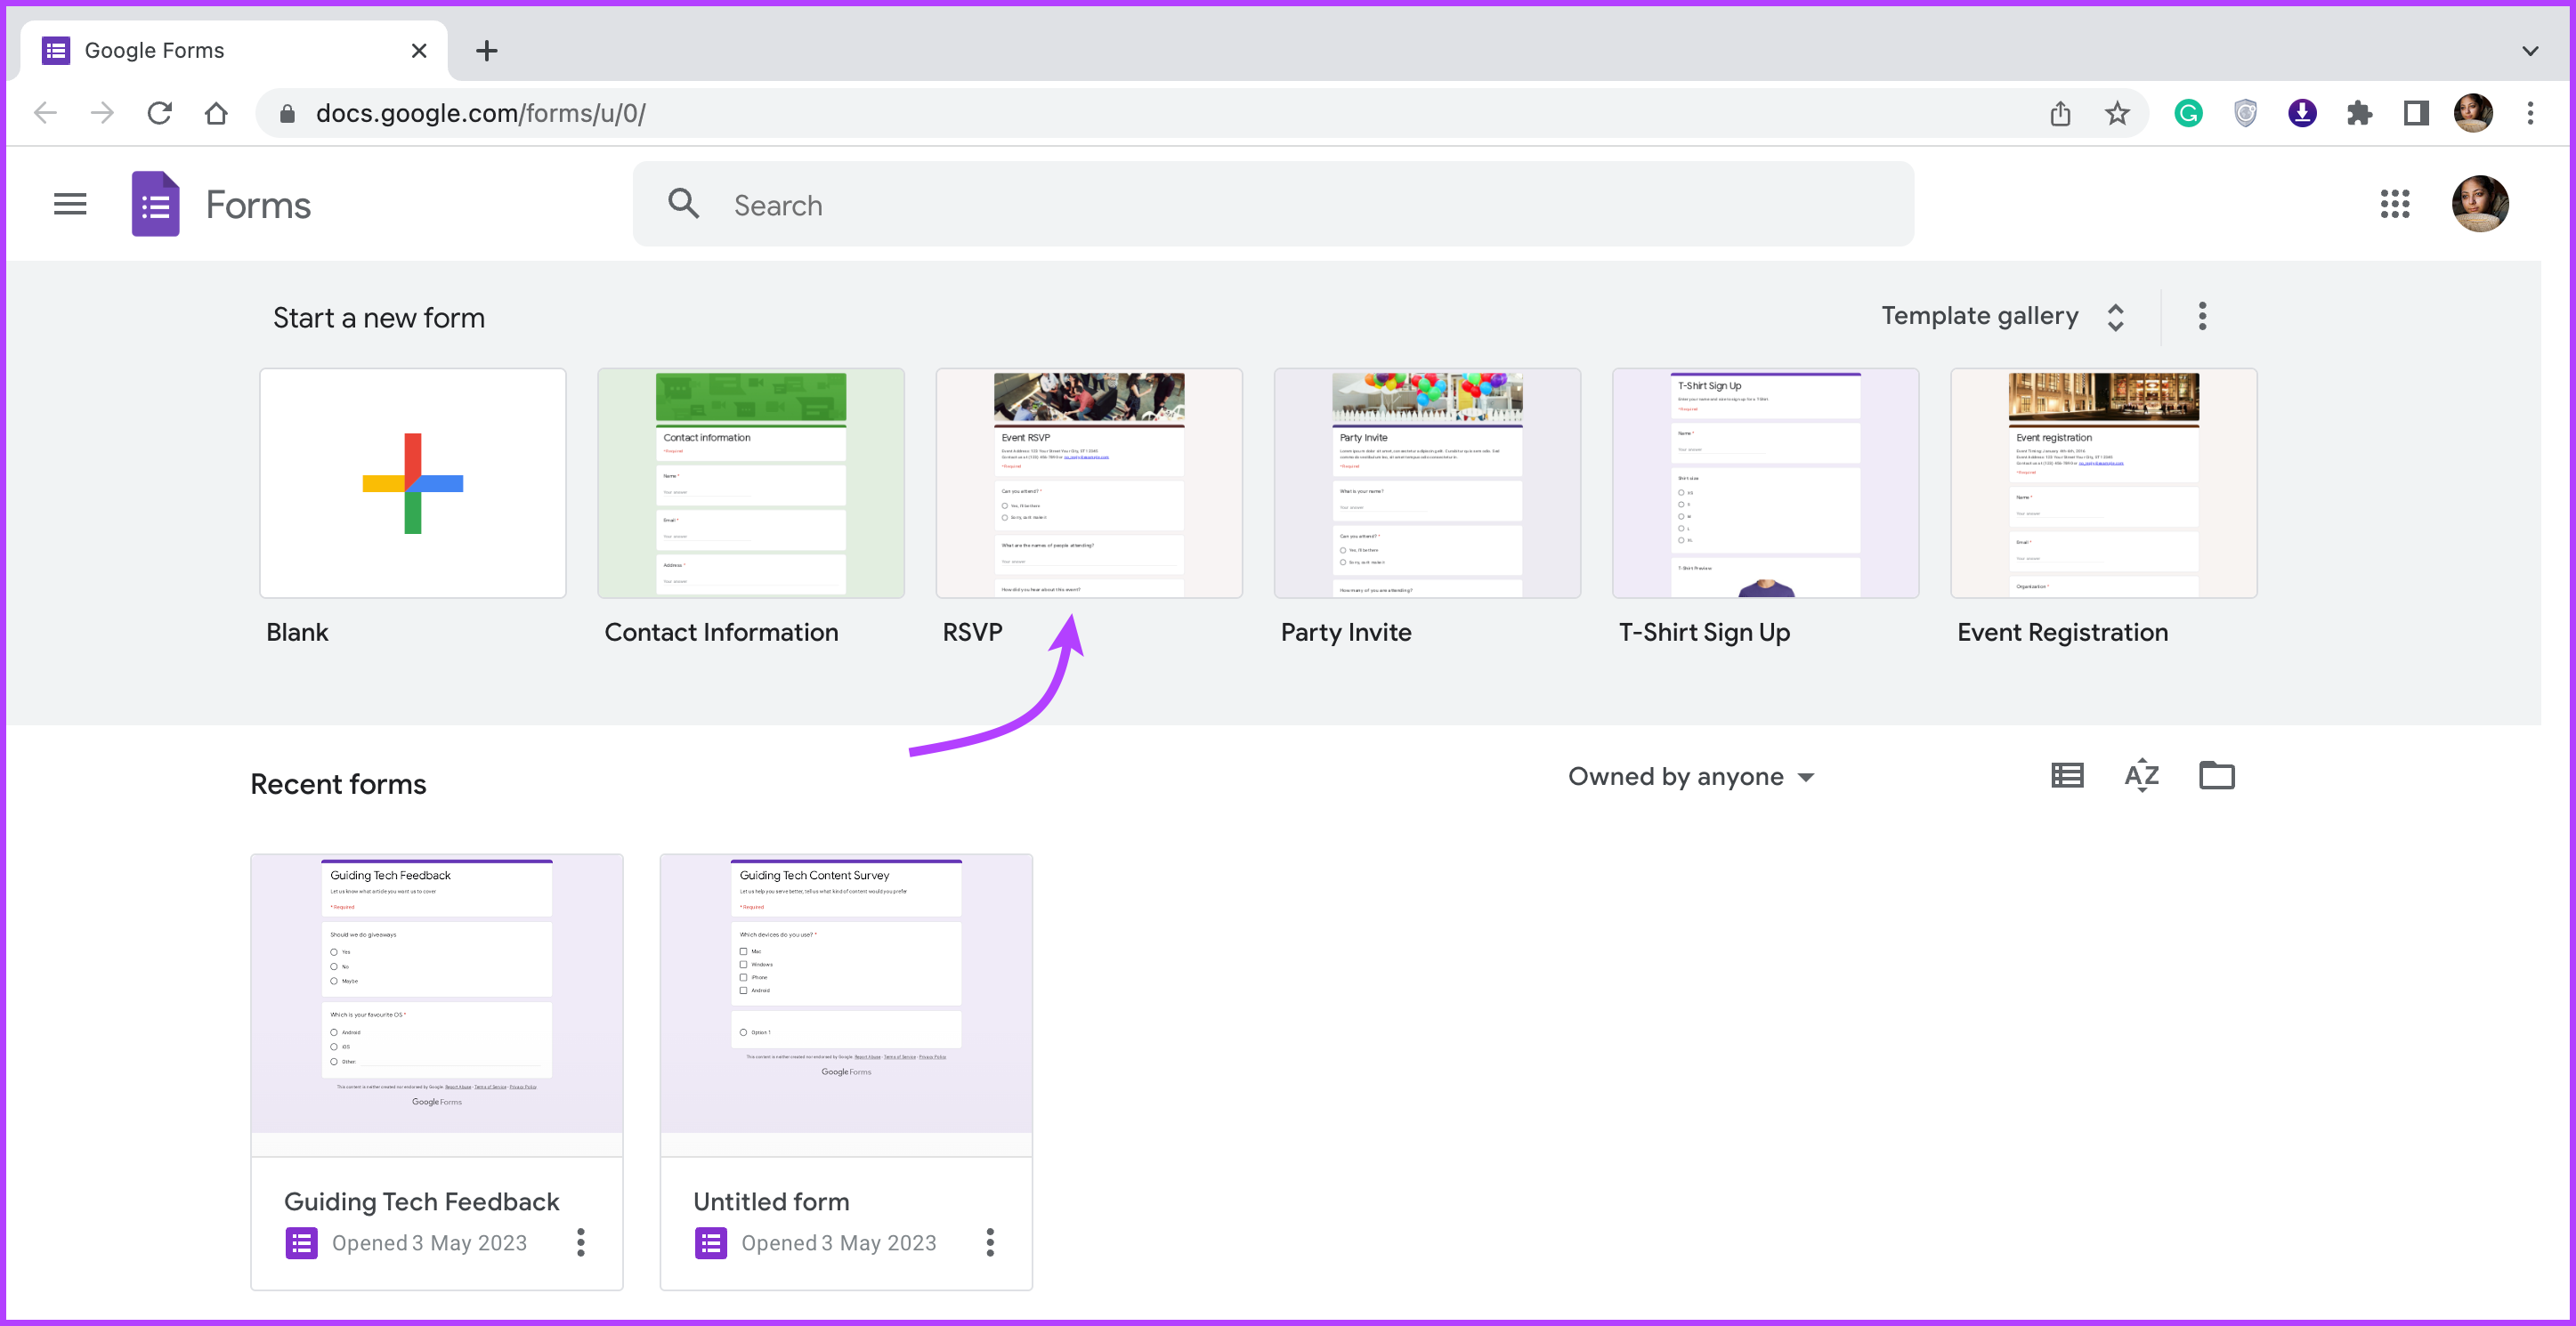
Step 1: Go to the Google Forms website and log in with your Google ID.
Step 2: Select the RSVP Template.
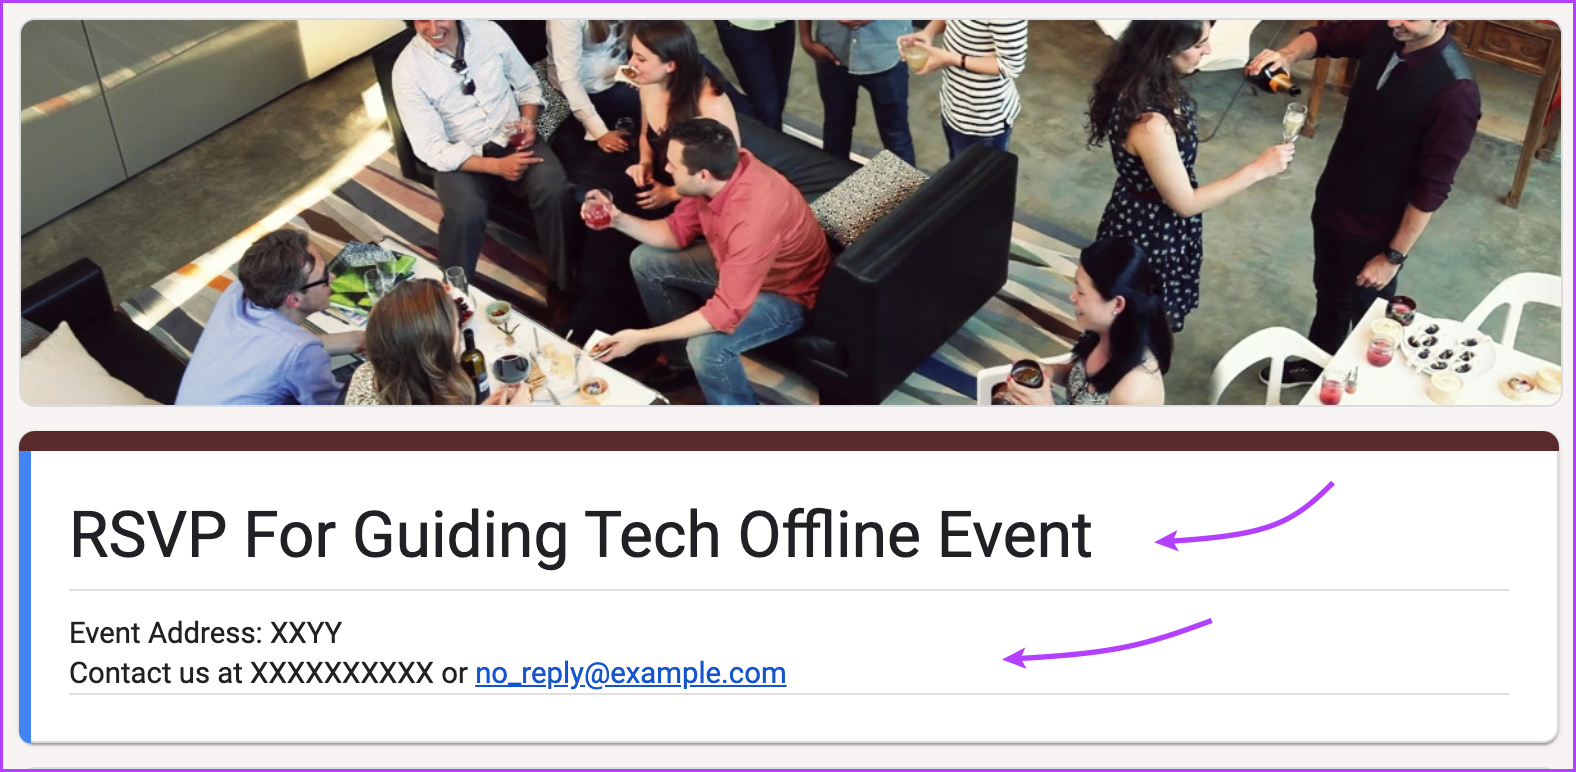
Step 3: Click the Title section and provide a title, like the event name. Also, add details like Event Address, contact details, etc.
Step 4: Now, click the sample question block and edit the question type, question, and options.
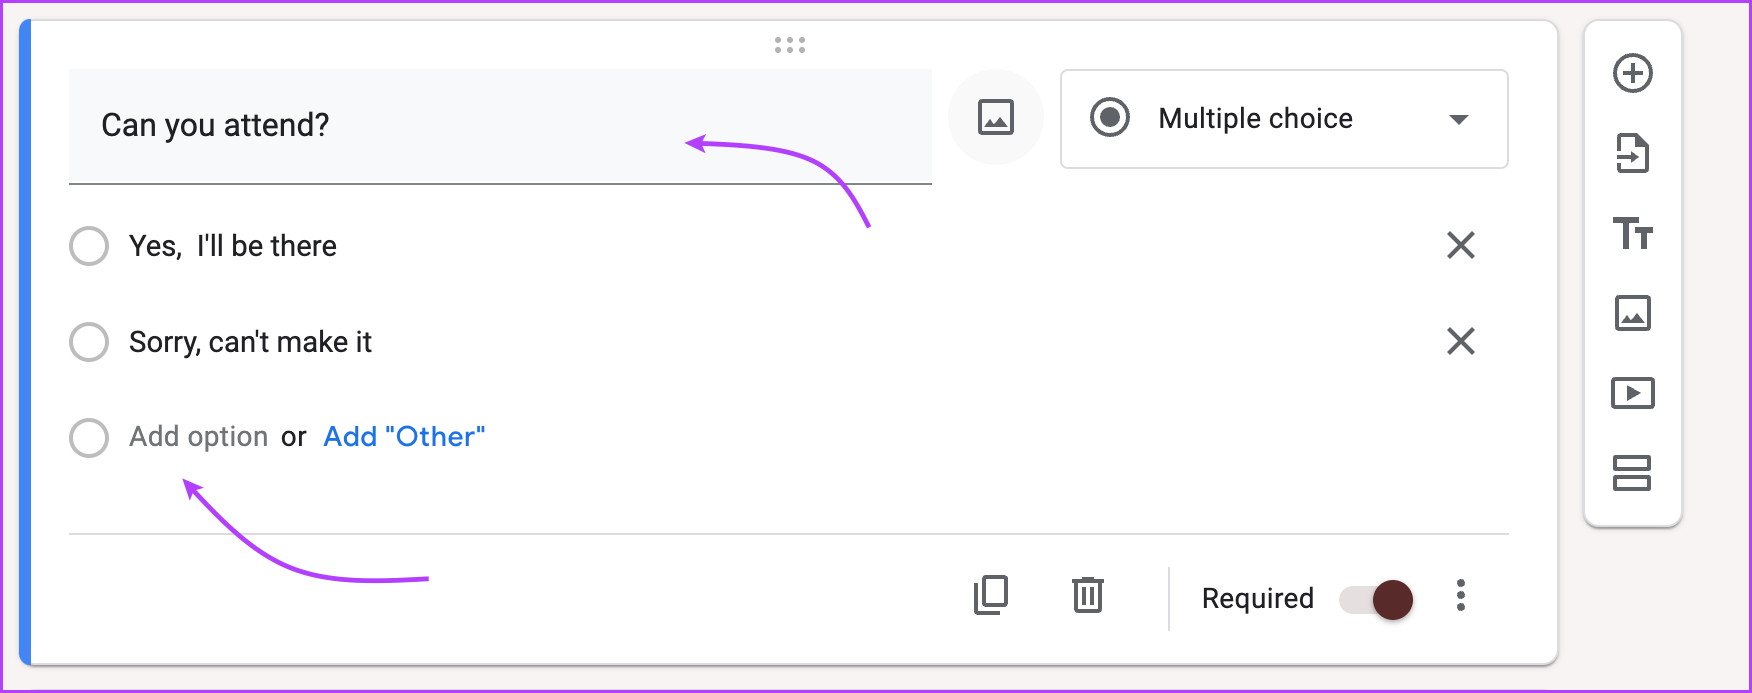
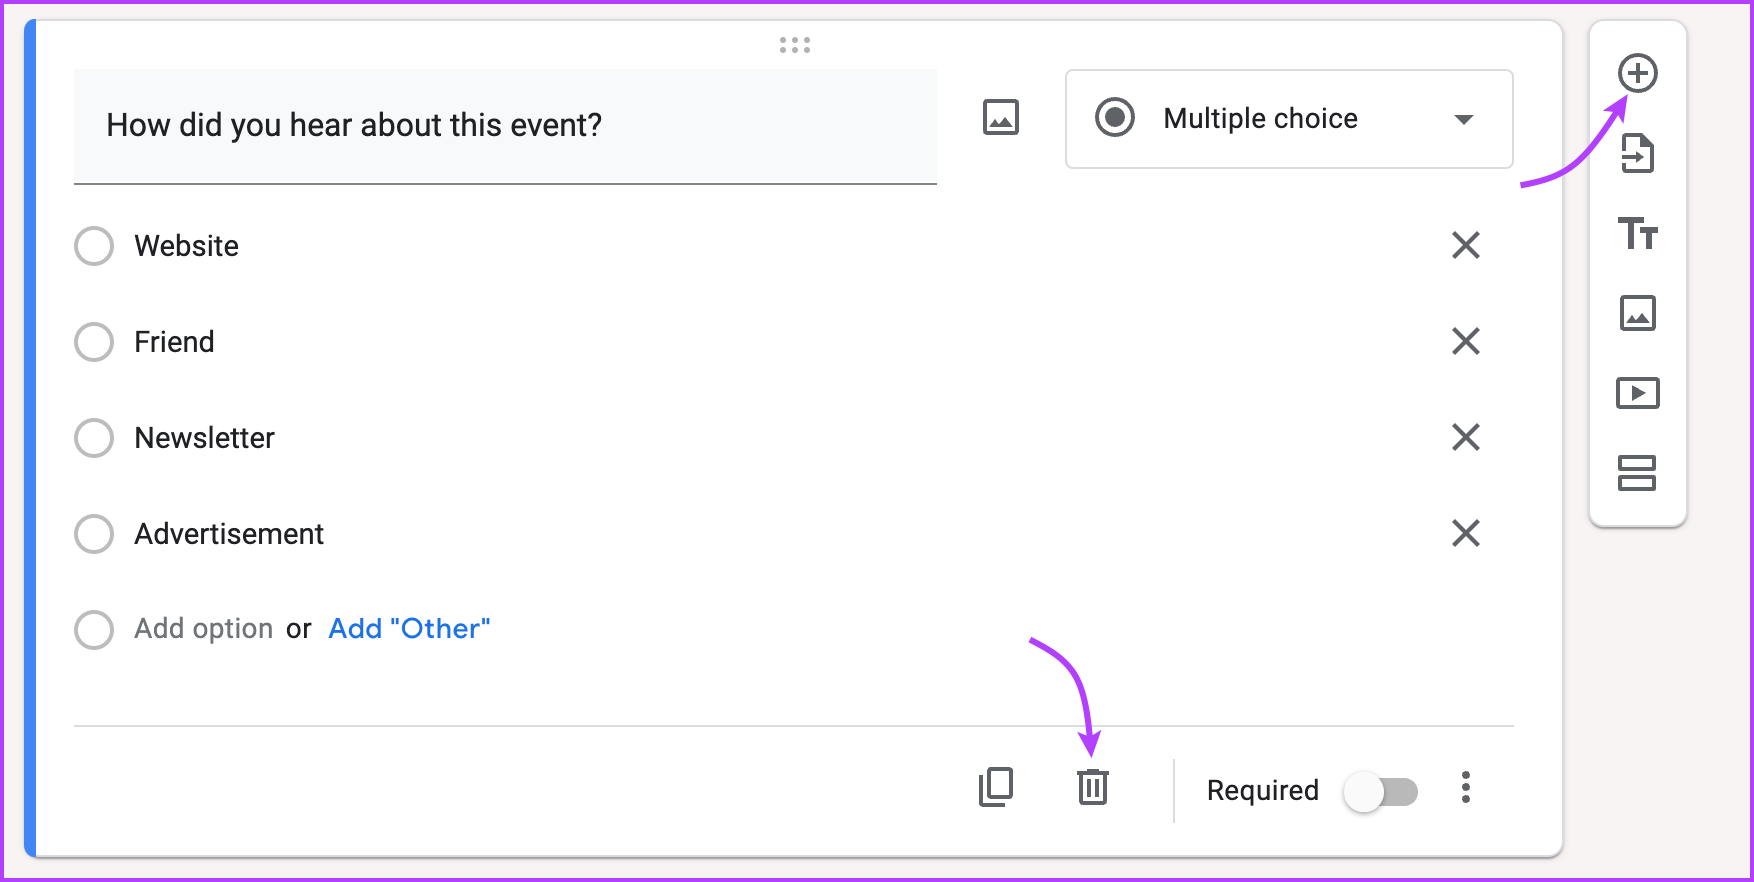
Step 5: Click the + icon from the floating sidebar to add a question. To delete a question, tap the bin icon from the bottom of the question.
And that’s it! This will create your basic RSVP form using Google Forms. Alongside confirming their presence, you can also ask guests about their meal preferences, accommodation requirements, etc. Moreover, you can inform them about the dress code, gift registry, or other details for the event.
Customize the Google RSVP Form
Google Forms offers various customization options to make your RSVP form visually appealing and aligned with your event’s theme. Here’s how you can customize your Google RSVP form:
Step 1: Tap the Theme button (paint palette icon) from the top-right corner. Here, you can,
- Change the font size and style of the header (title), question, or answers.
- Switch the Header image: Click the cross → Click Choose an image → browse and upload the image.
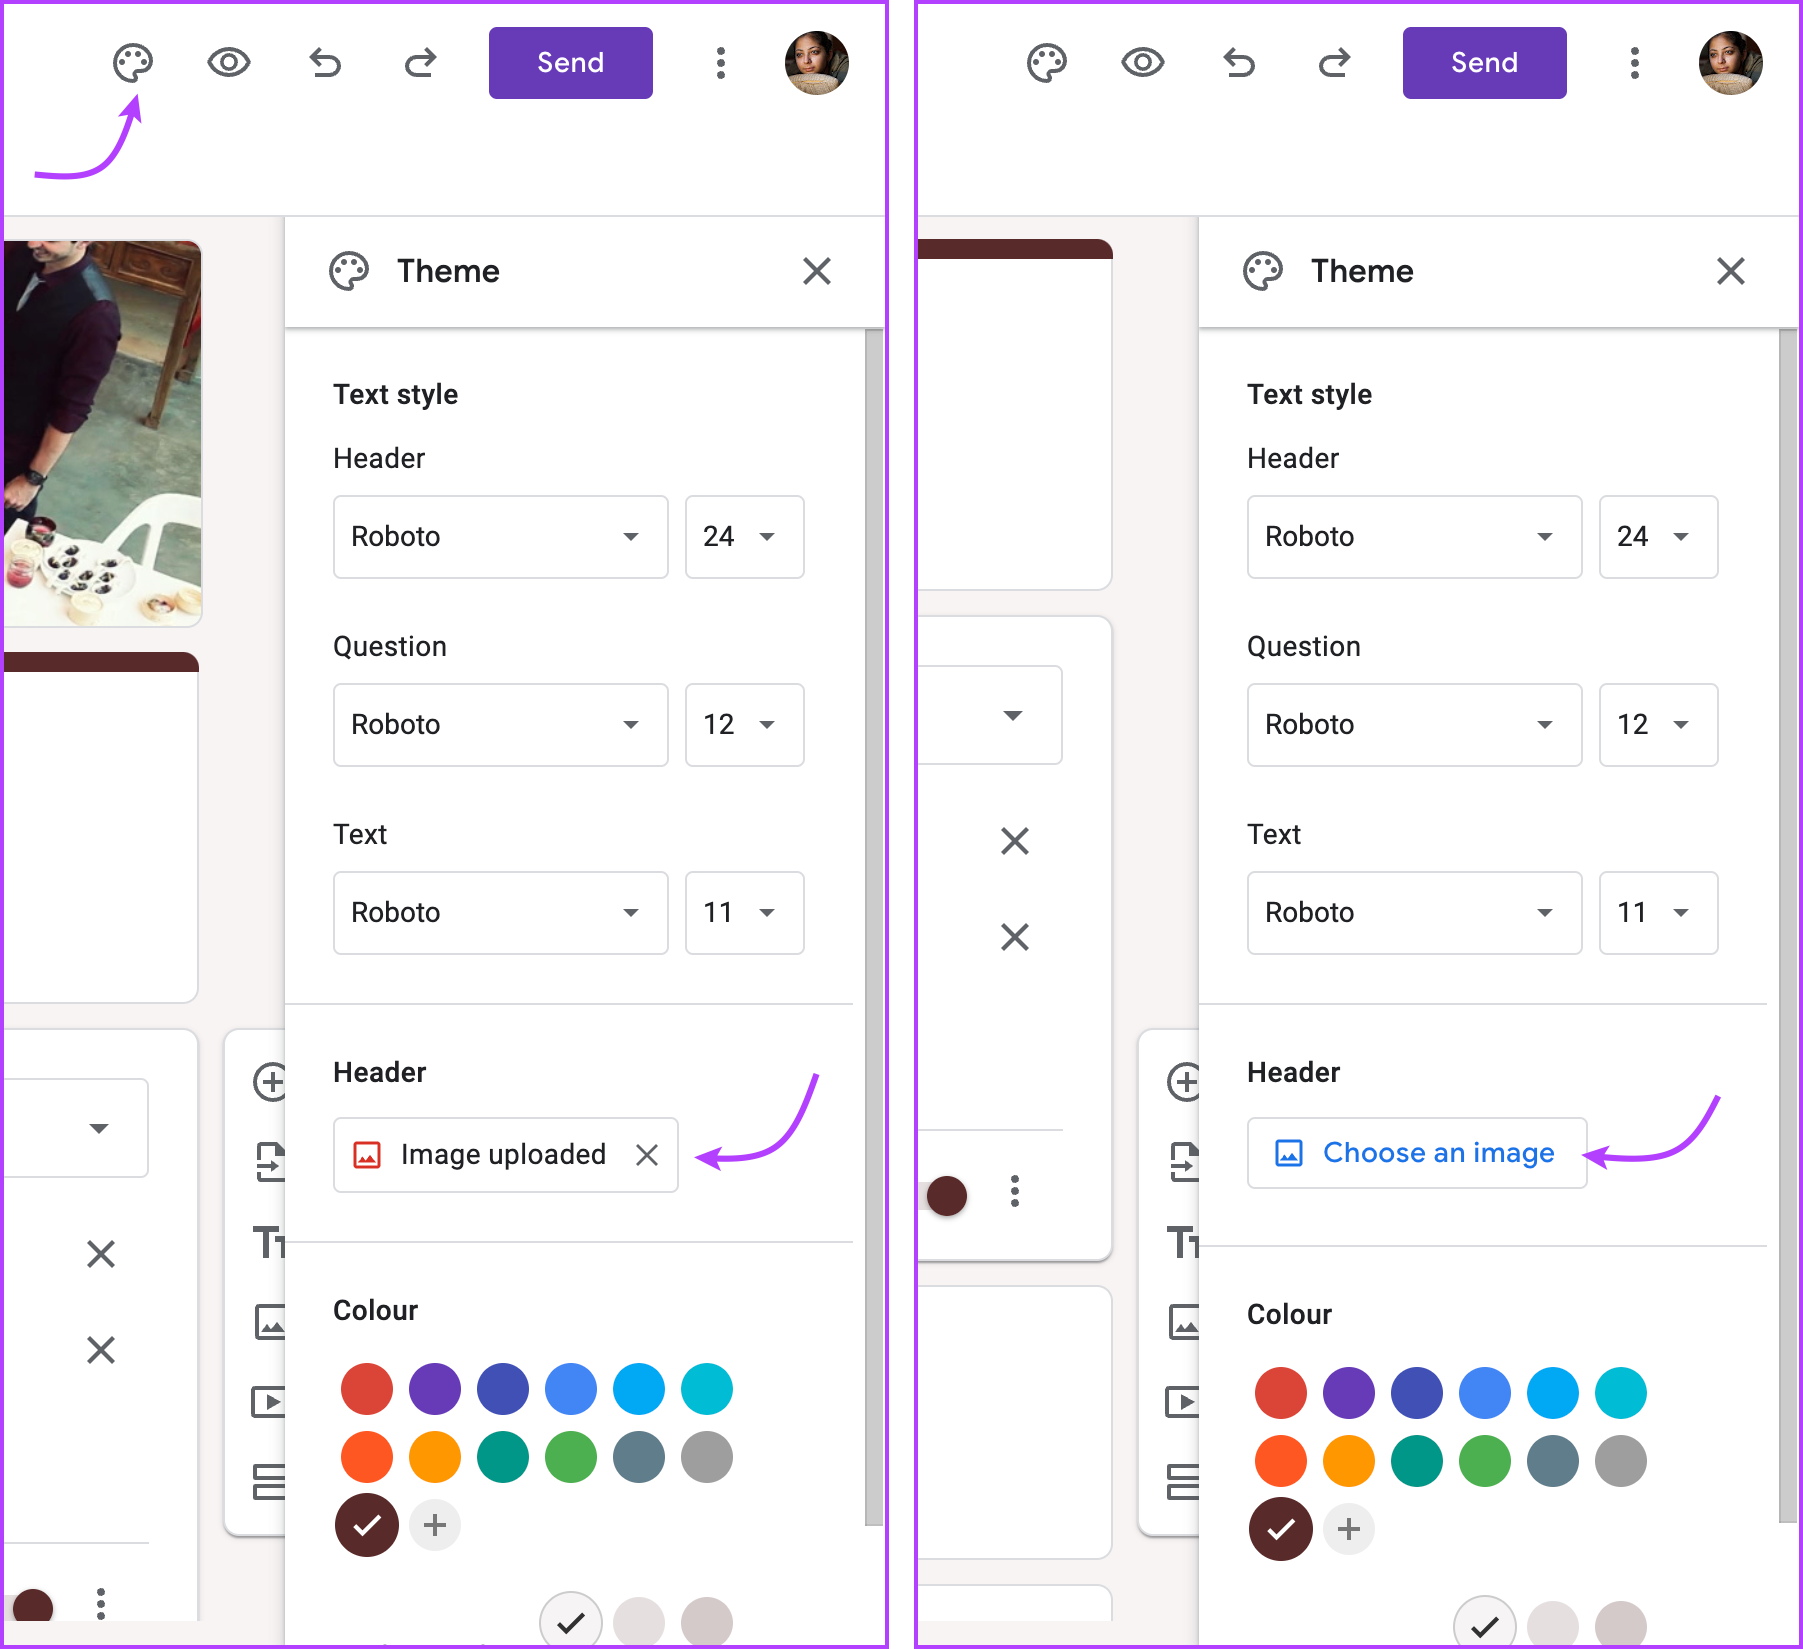
- Change the color of the form. Select any available option or choose a custom color scheme.
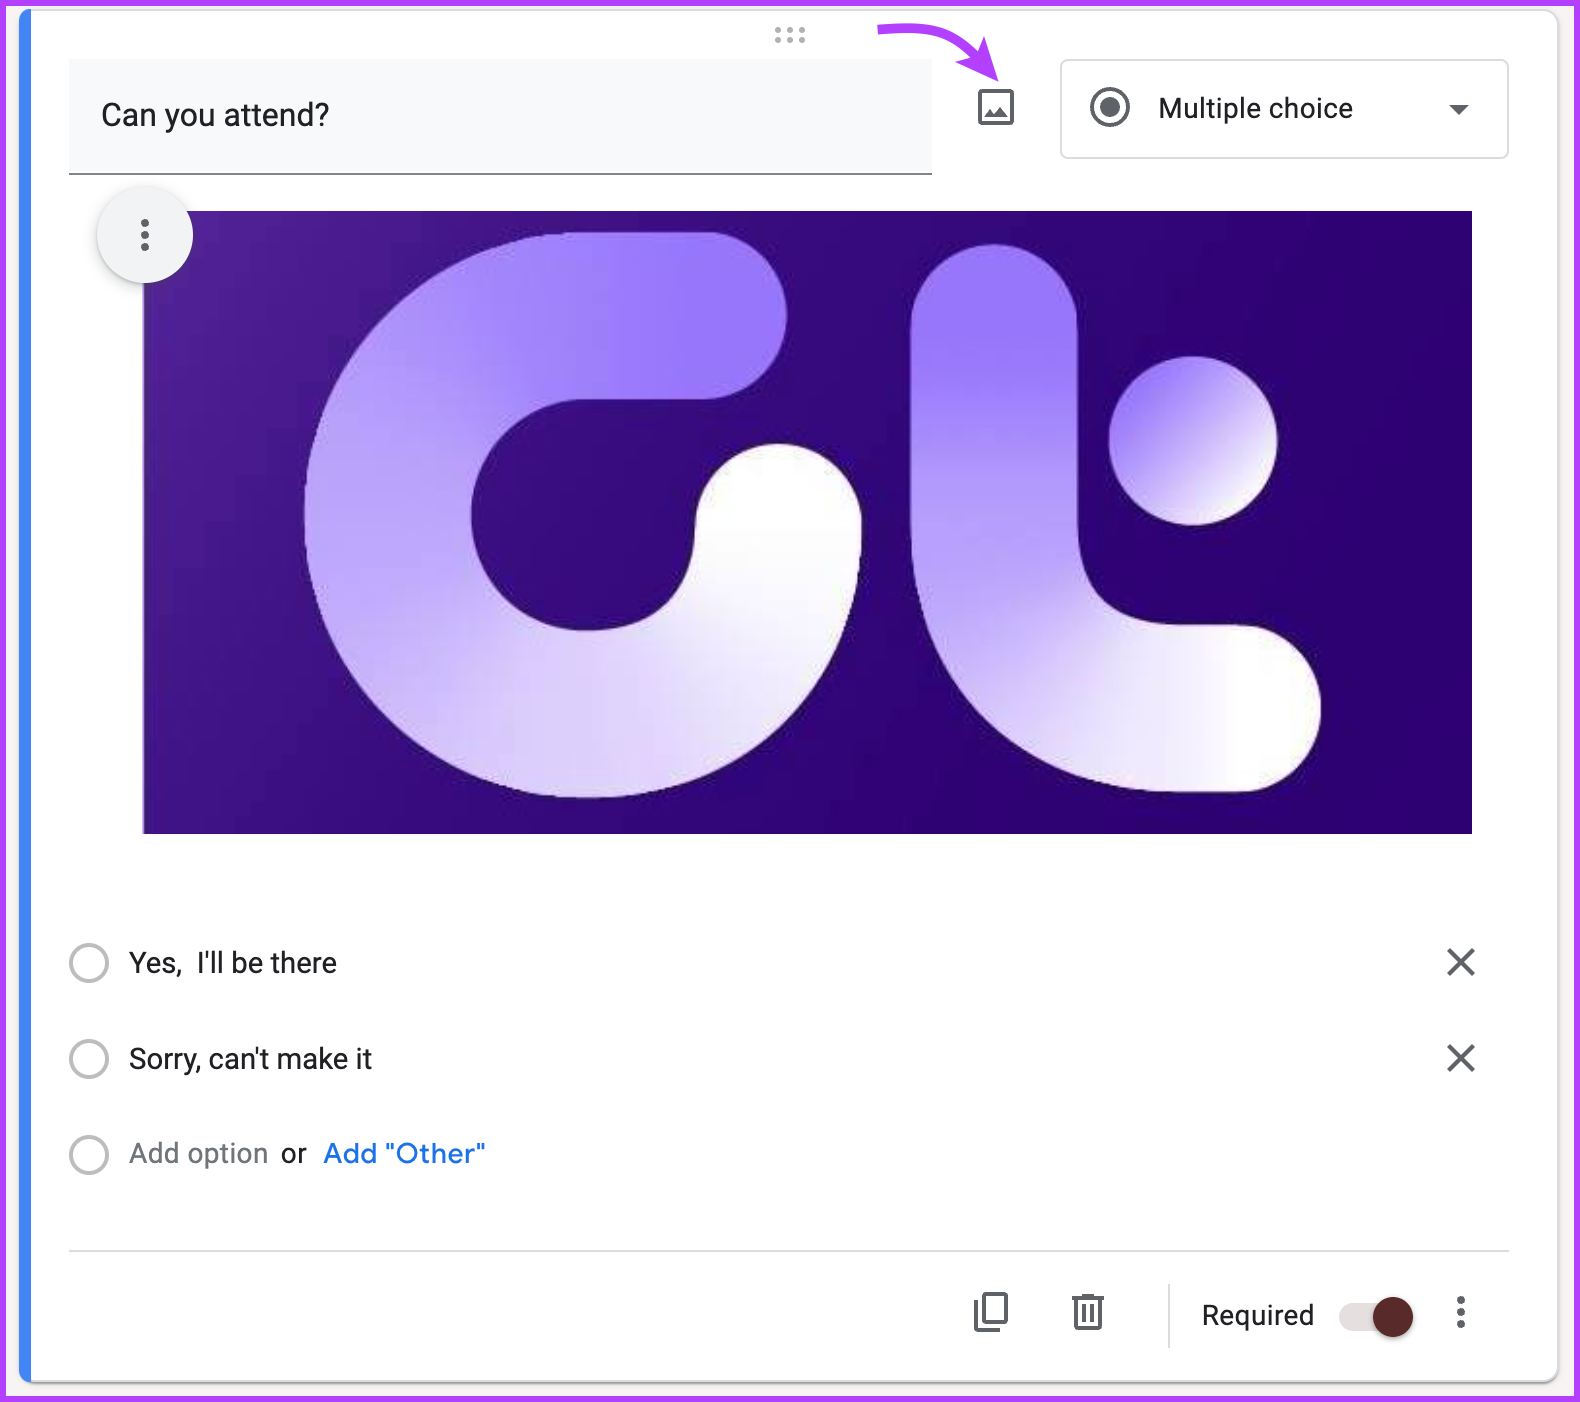
Step 2: To add images for individual questions (like for drinks or food menu), click the image icon next to the question → choose/upload a picture.
You can also add videos, create sections, etc., to make the RSVP Google Form more informative and interactive.
Create and Share an RSVP Link for the Google Form
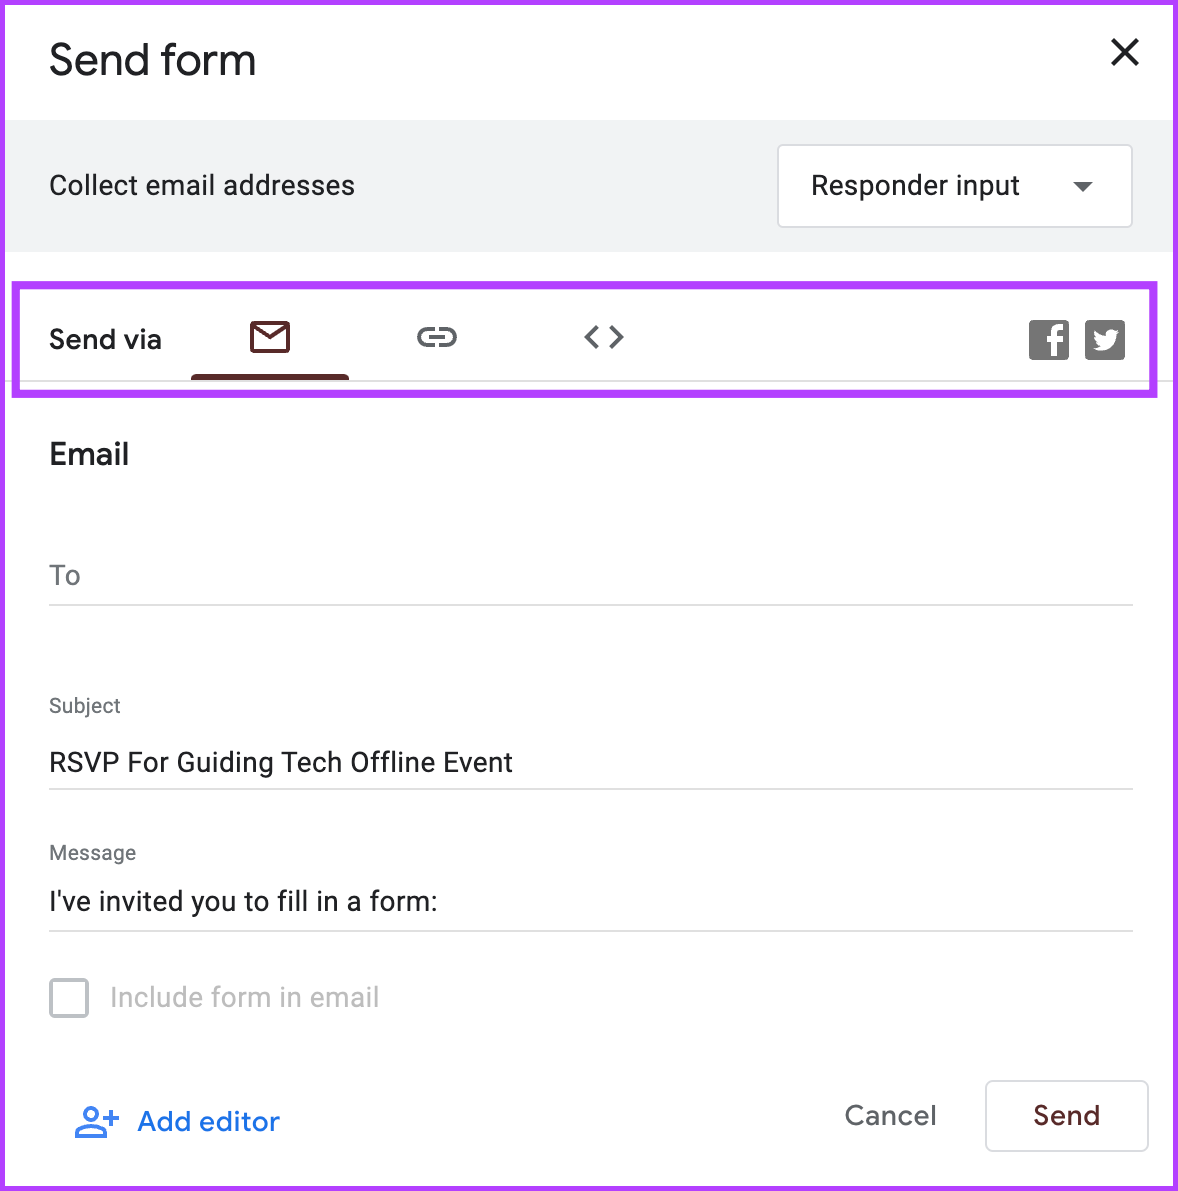
Step 1: Click Send from the top-right corner.

Step 2: Here, you can,
- Send the RSVP Google Form link via Email.
- Create a direct Link and share via text or any preferred method.
- Create an embedded link and add it to your website, blog, etc.
Set a Custom Confirmation Message
Before you send the RSVP link, you can also ensure that all the people on your guest lists are treated with a custom and courteous message based on their response.
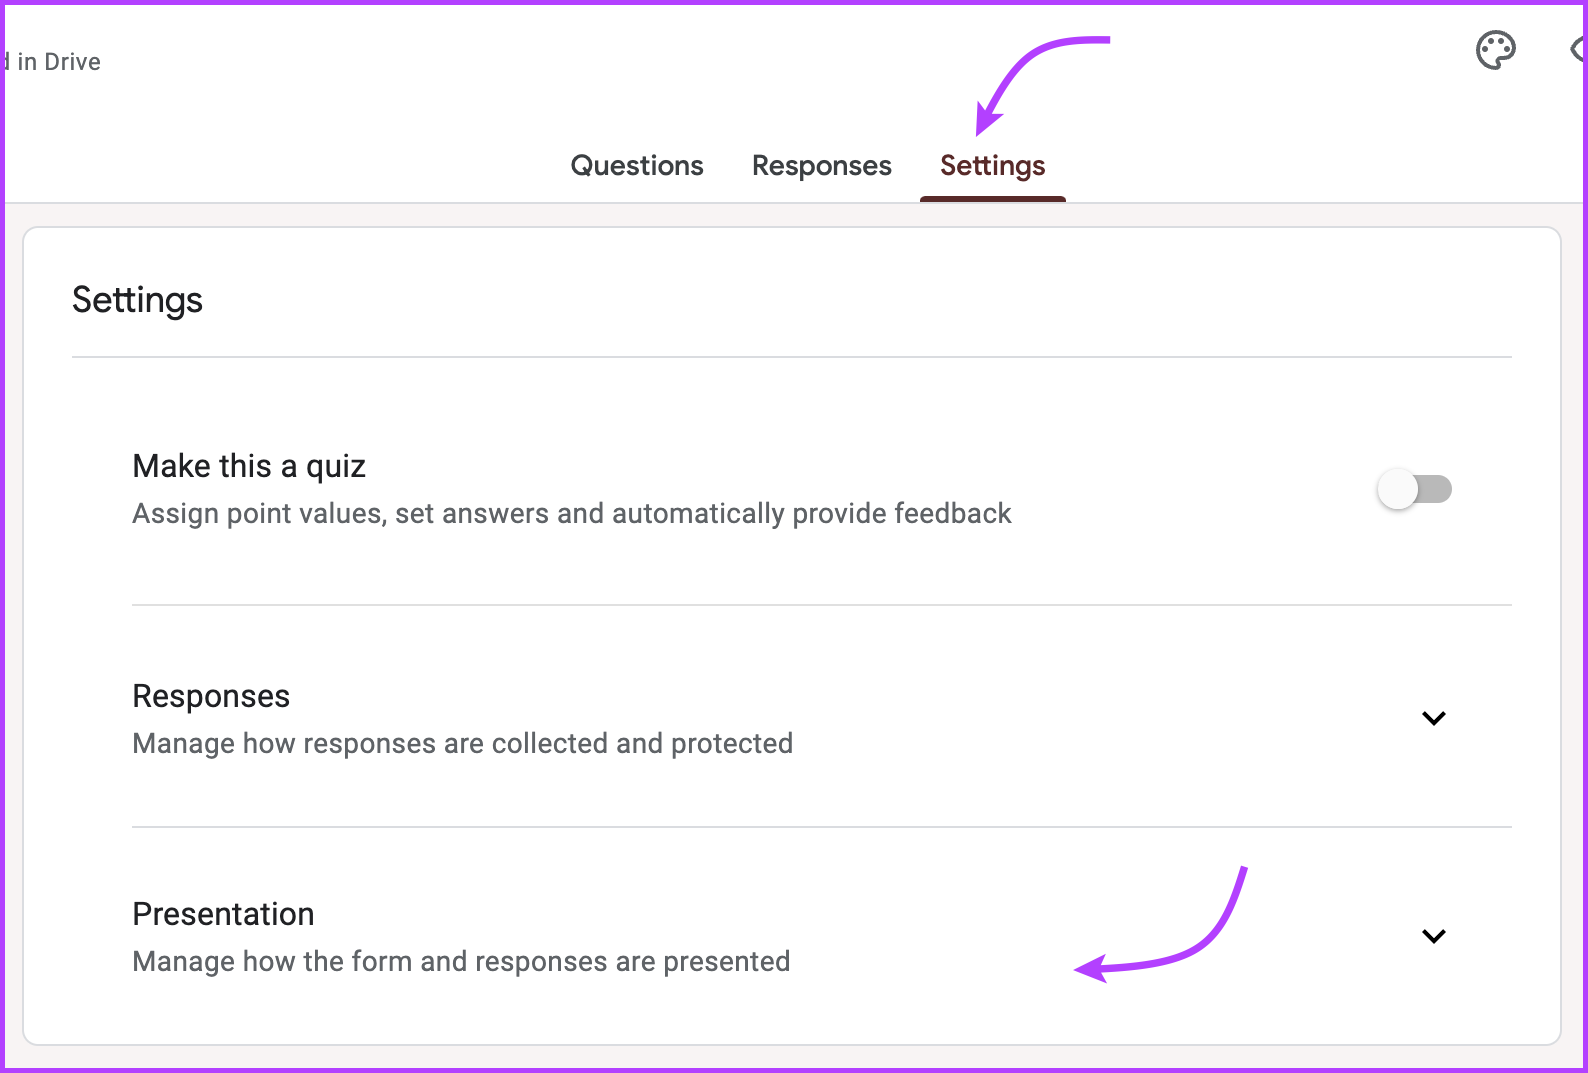
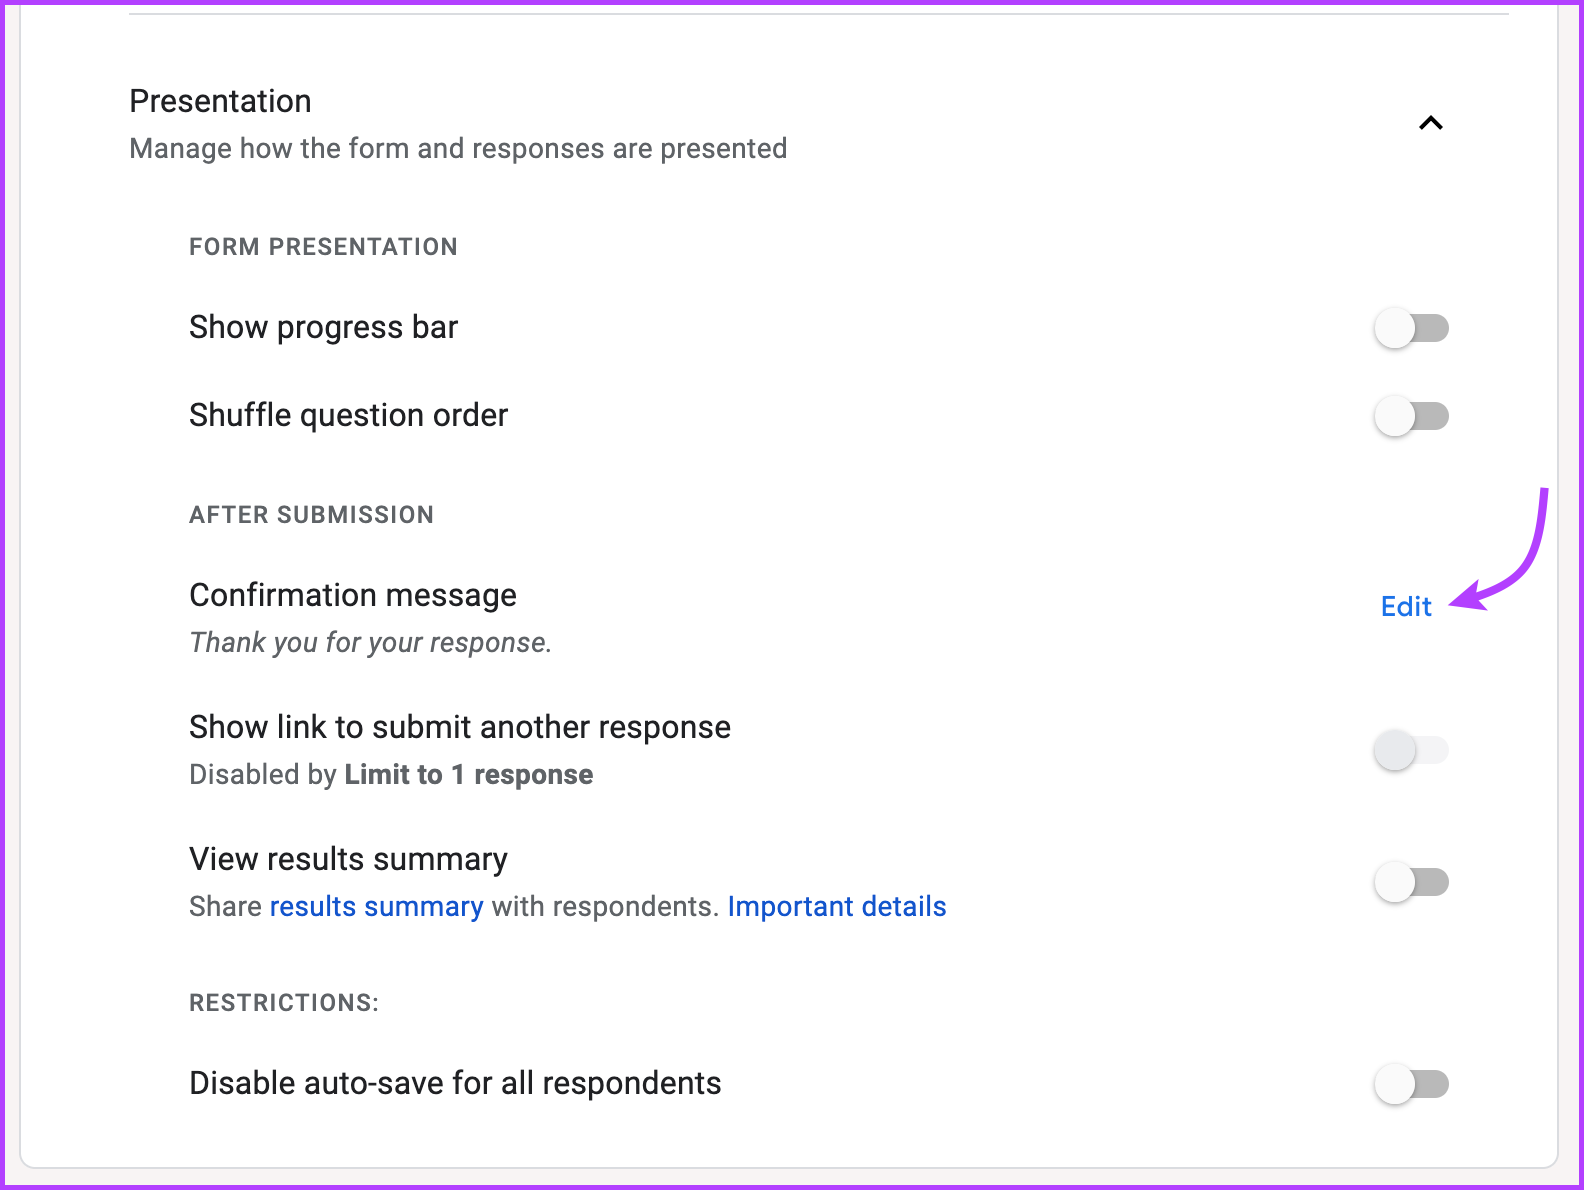
Step 1: Click the Settings tab and select Presentation.
Step 2: Here, click Edit next to the Confirmation message to customize it.
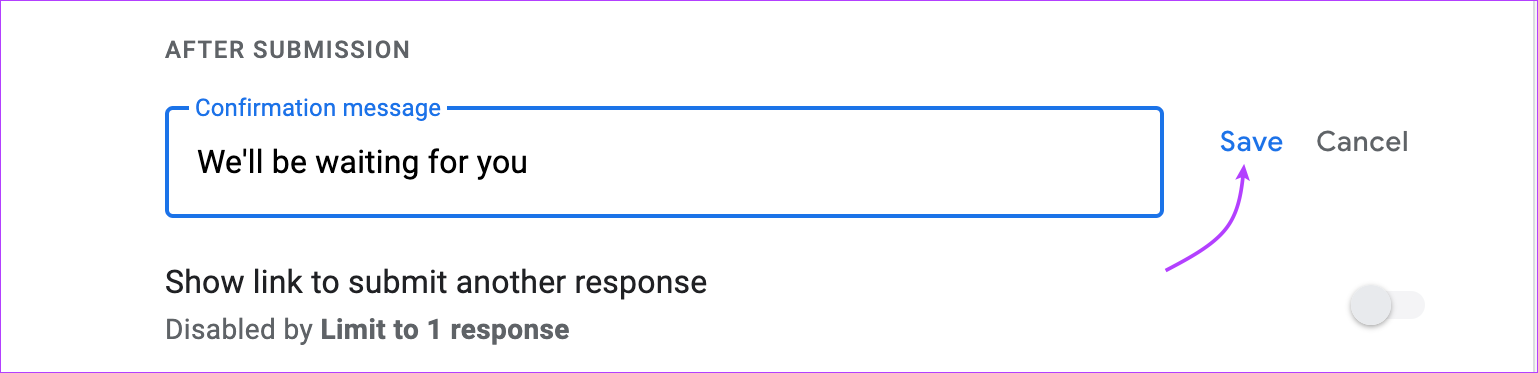
Step 3: Type your message and click Save.
Get Notified When Someone RSVPs for the Event
The task does not end here. Now, you need to be promptly notified when someone submits an RSVP response. Gratefully, you can set up email notifications and get alerted whenever a response is submitted.
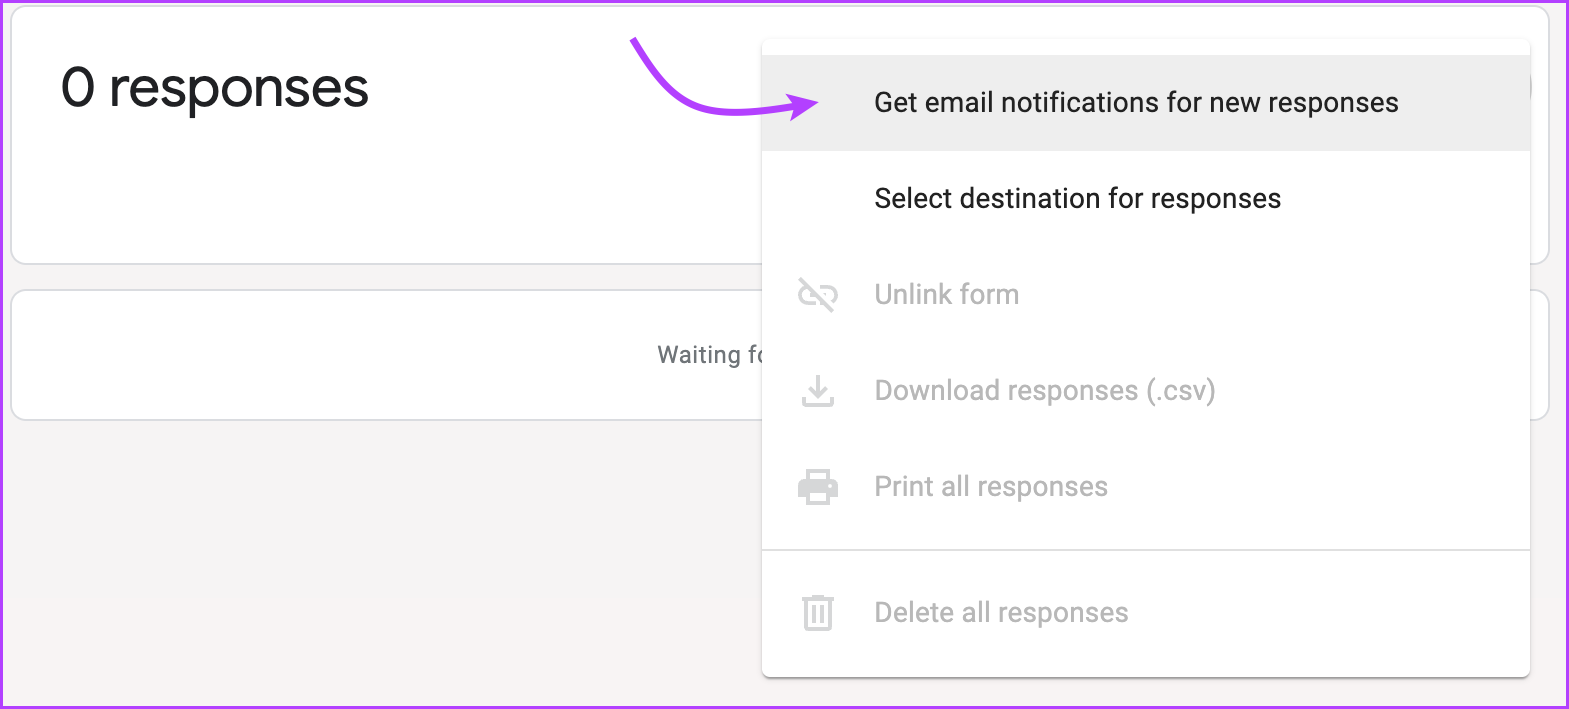
Step 1: Go to the Responses tab from the top. Click the three-dot icon.
Step 2: Select ‘Get email notifications for new responses’.
Track your RSVPs via Google Forms
There are multiple ways to check answers in Google Forms. The simplest one is to open the Google Forms Dashboard → open the RSVP form → tap Responses → view the responses.
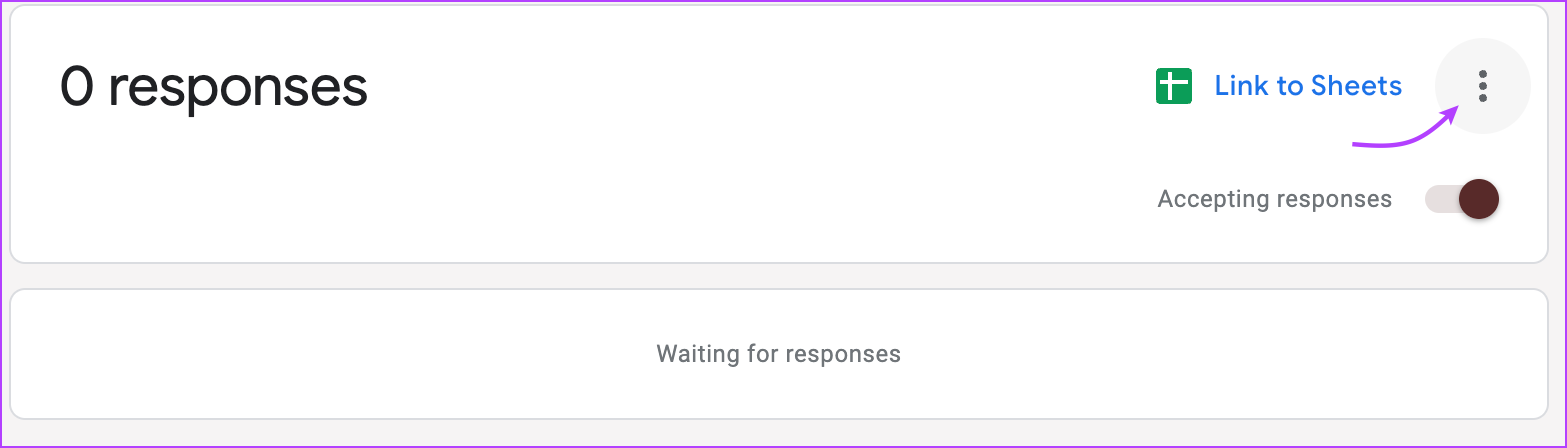
However, Google has also incorporated a smart feature to help you keep the RSVP responses well organized. In the Response section, tap Link to Sheets next to the Google Sheets icon.
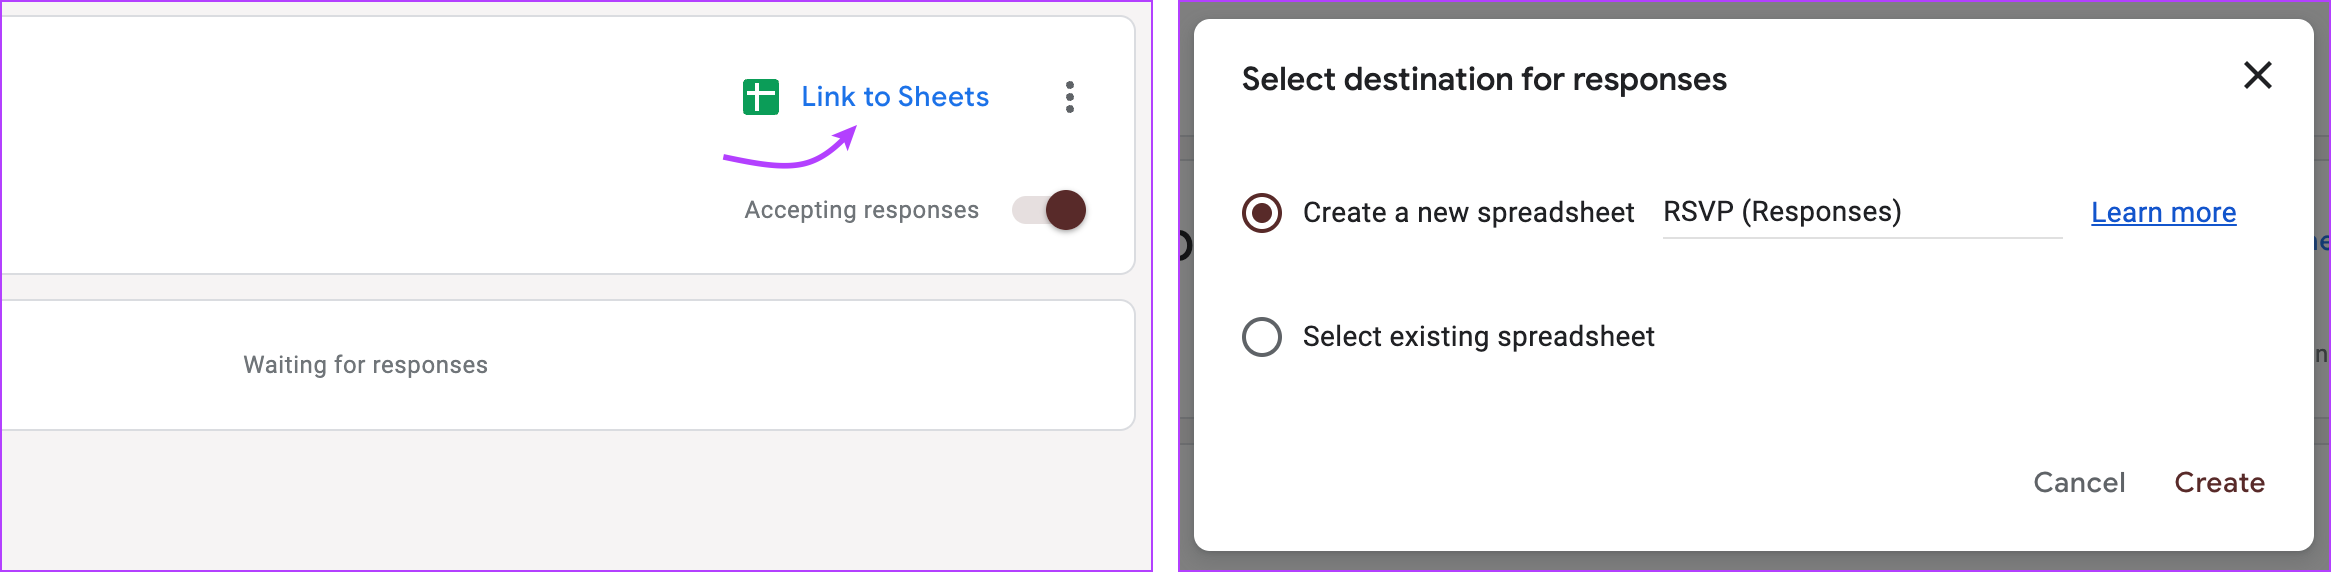
Select whether to create a new sheet or work with an existing one. And just like that, all the responses collected will be organized in a spreadsheet for you to track, share, and plan accordingly.
Manage Response Collection Settings
Notably, before sharing the Google invite for the RSVP form, you can also decide whether to,
- Collect the respondent’s email ID for identification, further communication, etc.
- Allow or disallow a respondent to change/update their answers.
- Allow or disallow multiple responses from one person.
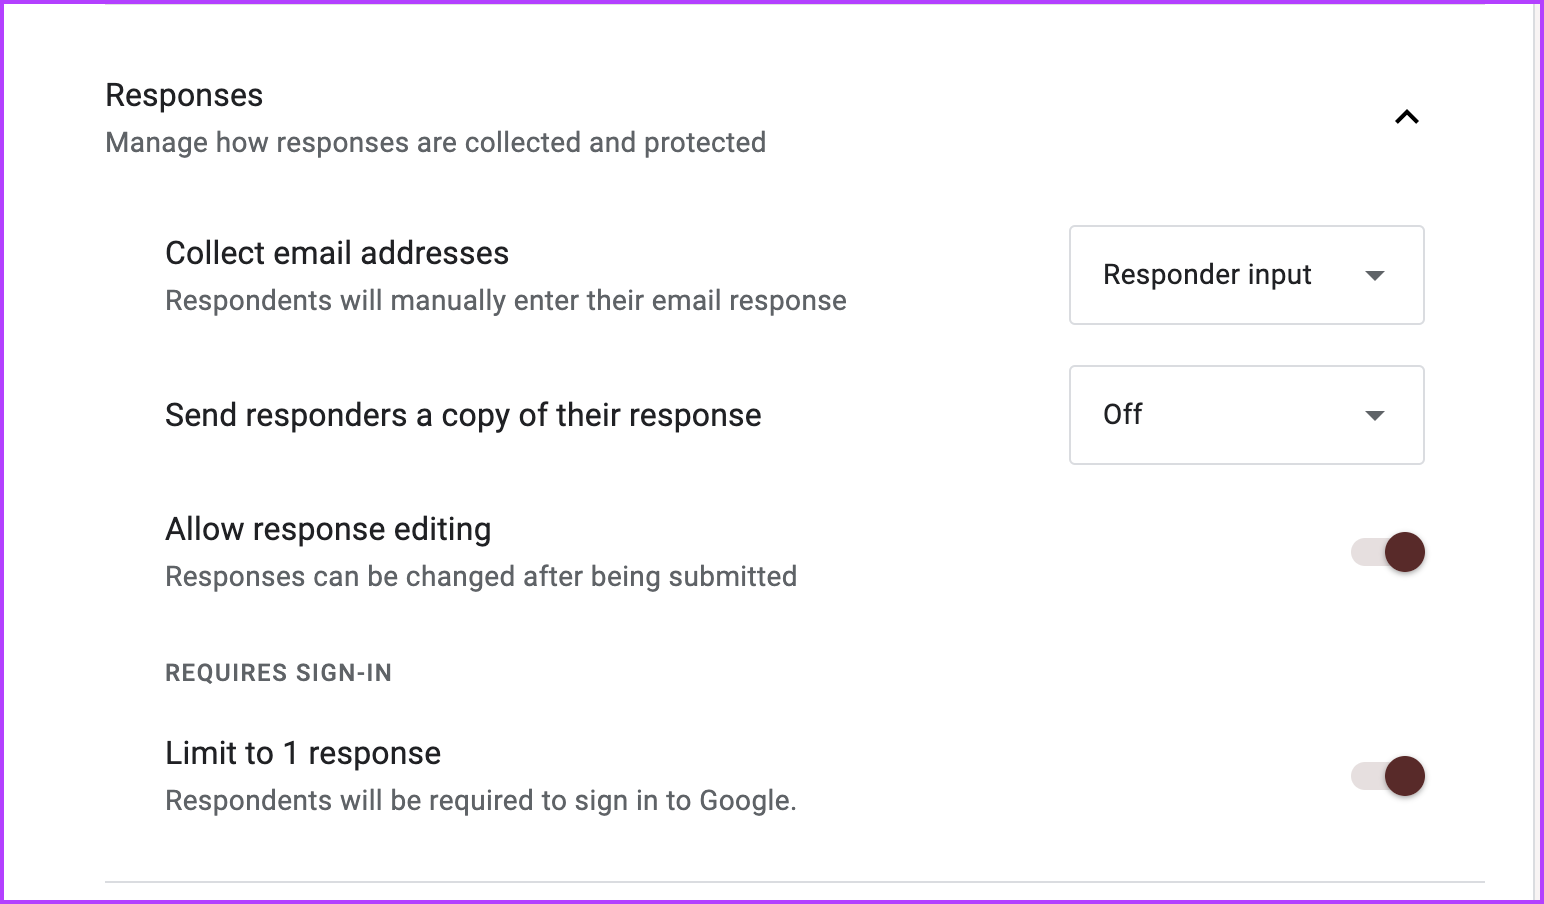
Step 1: Click the Settings tab → Responses.
Step 2: Open the drop-down menu next to Collect email addresses and select a suitable option.
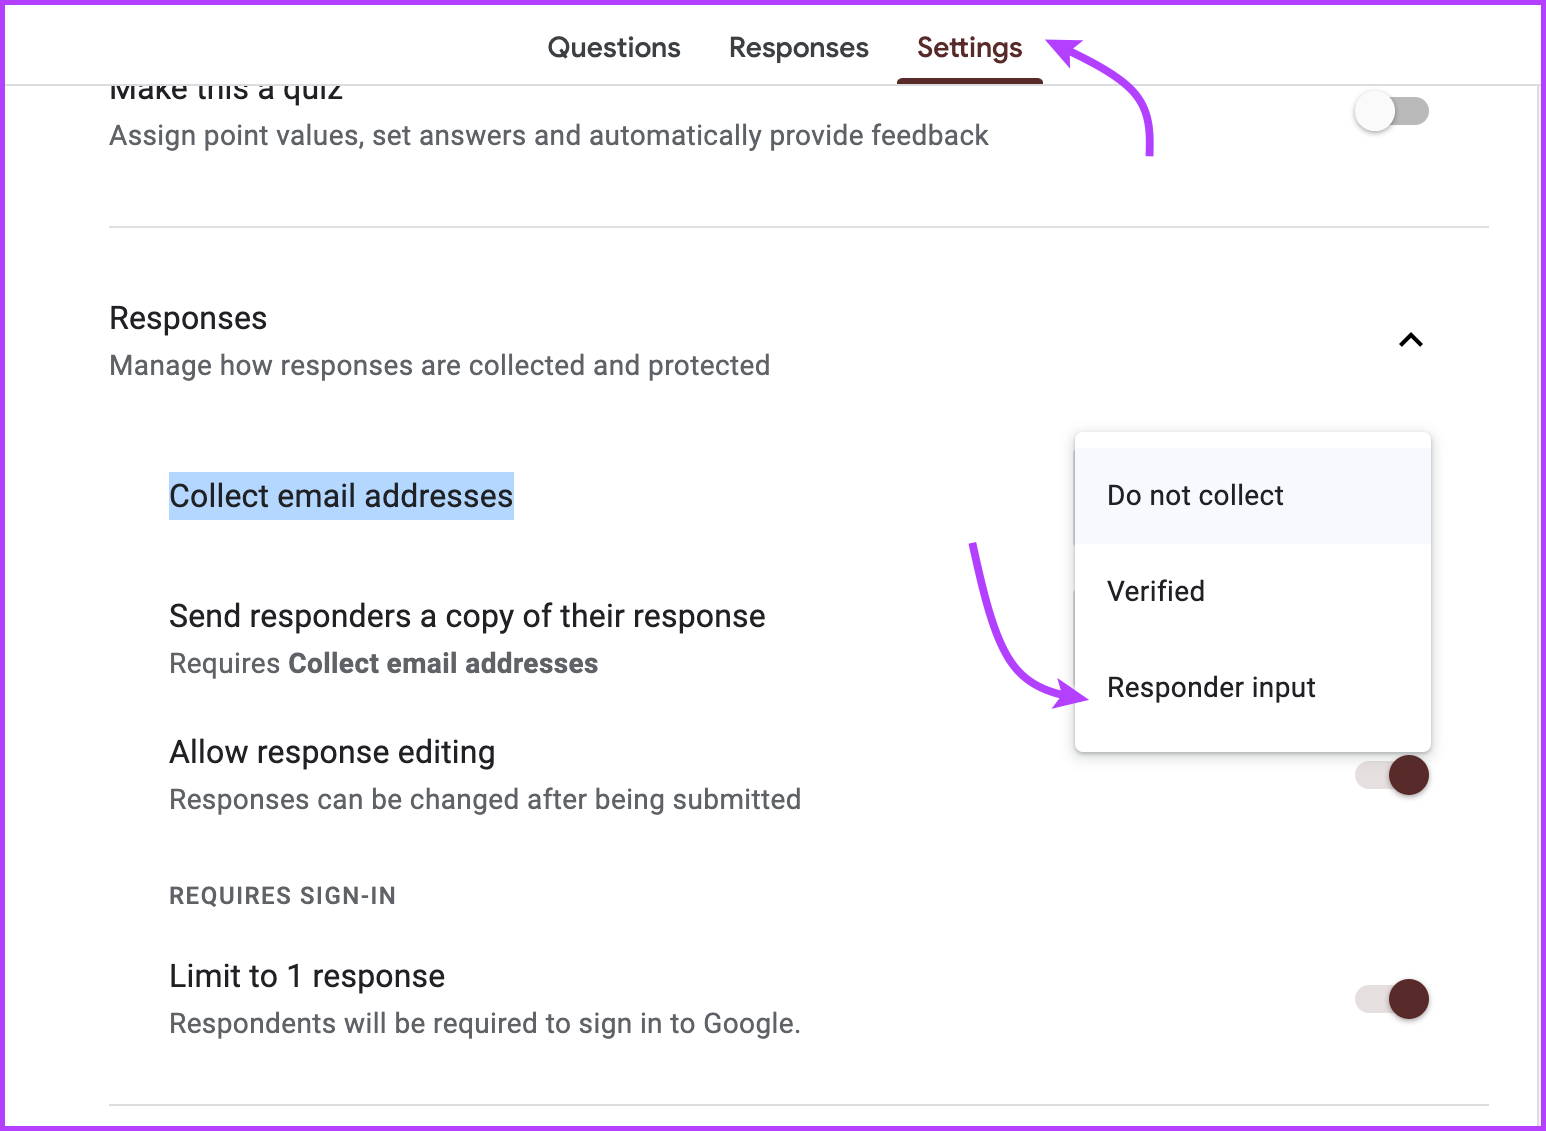
Step 3: Next up, you can also manage the following settings:
- Send responders a copy of their response – While optional, it will help the guests remember their response to your RSVP form.
- Allow response editing – If a guest changes their mind, you can be informed.
- Limit to 1 response – To avoid confusion of multiple RSVPs from the same guest.
Note: You can also send emails based on responses to each guest. However, it’s complicated. So, explore the options before you commit to the setting.
FAQs
1. Can I limit the number of RSVP responses?
While Google Forms does not offer a built-in feature to limit the number of RSVP responses, you can manually stop accepting responses when a certain number is reached. Go to the Responses tab → toggle off Accepting responses.
2. What is the full form of RSVP?
RSVP stands for Répondez s’il vous plaît, a French phrase that means Please respond.
A successful event requires proper planning. And to plan right, you must get your RSVP done right. Thankfully, creating an RSVP form using Google Forms is a convenient, easy-to-use, and efficient way to gather responses for your event.
Was this helpful?
Last updated on 01 April, 2024
Read Next
 How to Create a Fillable Form in Google Docs
Method 1: The Native Way Using Tables and Other Form Elements One of the best methods to create a form in Google Docs is to use Tables.
How to Create a Fillable Form in Google Docs
Method 1: The Native Way Using Tables and Other Form Elements One of the best methods to create a form in Google Docs is to use Tables.
 How to Create a Custom Form in Microsoft Outlook
Microsoft Outlook leats you create a Form.
How to Create a Custom Form in Microsoft Outlook
Microsoft Outlook leats you create a Form.
 How to Create Google Forms on Mobile: A Beginner’s Guide
Google Forms is the go-to option for many people when it comes to creating digital forms.
How to Create Google Forms on Mobile: A Beginner’s Guide
Google Forms is the go-to option for many people when it comes to creating digital forms.
 How to Save Google Form Responses to Different Sheets Easily
Google Forms is perhaps one of the most popular services for collecting surveys, and it's easy to see why.
How to Save Google Form Responses to Different Sheets Easily
Google Forms is perhaps one of the most popular services for collecting surveys, and it's easy to see why.
 4 Ways to Share Google Form Responses With Others
Want to give access to Google Form responses to someone else?
4 Ways to Share Google Form Responses With Others
Want to give access to Google Form responses to someone else?
 2 Best Ways to Import Questions Into Google Forms From Google Sheets
Typically, when you create a Google Form, you need to perform several steps.
2 Best Ways to Import Questions Into Google Forms From Google Sheets
Typically, when you create a Google Form, you need to perform several steps.
 How to Convert Google Forms to PDF, Google Docs, or Word
There are multiple ways to share Google Forms.
How to Convert Google Forms to PDF, Google Docs, or Word
There are multiple ways to share Google Forms.
 3 Ways to Check Answers in Google Forms
Method 1: View Responses Inside Google Forms One of the easiest ways to view the answers received on your Google Forms is from the Google Forms itself.
3 Ways to Check Answers in Google Forms
Method 1: View Responses Inside Google Forms One of the easiest ways to view the answers received on your Google Forms is from the Google Forms itself.
The article above may contain affiliate links which help support Guiding Tech. The content remains unbiased and authentic and will never affect our editorial integrity.