Managing emails is an arduous task. From replying to emails on time and adding reminders to essential emails, there are plenty of things vying for our attention. Also, a horde of spam emails littering the inbox adds up to the headache. In the end, an unorganized mailbox makes it difficult to find important emails.

Yes, email management is a tough business, but thankfully, it can be made simpler via rules. Outlook 365 Webmail supports a variety of rules that lets you forward emails to a particular folder. You can straightaway delete emails from a specific sender. Sounds cool, right?
Before we begin, let’s quickly run through how email rules work.
How Rules Work
Rules are the way to attain a clean and organized inbox. A typical rule consists of a trigger, an action, and an exception. Once the rule is triggered, it sets off an action like delete the email, add it to a folder, or forward it to another account.
When it comes to rules, Outlook 365 has plenty of options, both actions, and conditions. You can either match the subject or select a particular address or hand-pick a sender’s name.

And the best part is that you can add as many conditions as you like. All you have to do is select the right conditions.
The same is true of the actions – the choices are aplenty. So, all you have to do is make the rule, select the condition for processing more rules, and then bingo!

Now that we have established how rules work let’s see how to create them.
How to Create Rules in Outlook 365
Step 1: Open Outlook, and click on the Settings icon on the upper-right corner. Next, click View all Outlook Settings at the bottom.

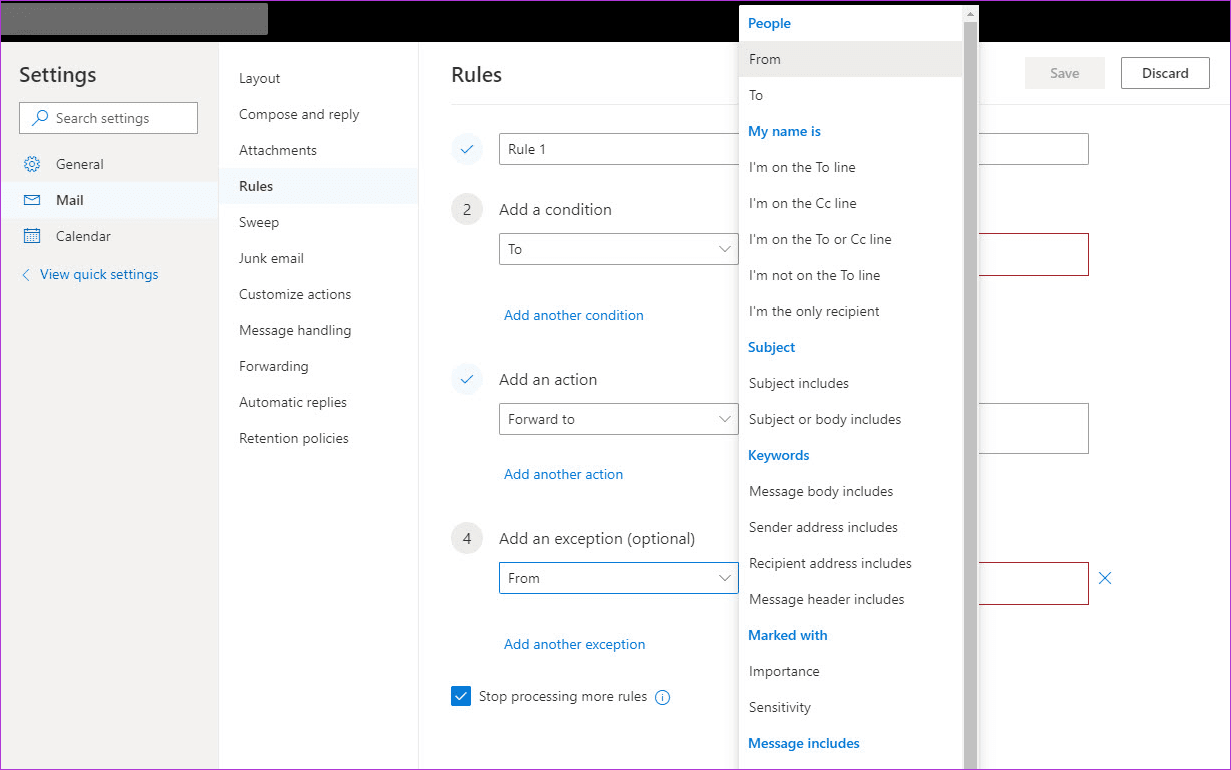
Step 2: Select Email from the left panel and then choose Rules. Now, tap on the Add new rules option, and give a name to your new rule.

If you are selecting the People conditions, you’d need to enter the right addresses. As for subjects, you’ll have to add the exact keywords.
Step 3: Once you have zeroed in on the condition, it’s time to add the action. The action constitutes what you’d like to do with the emails that match the above conditions.

Right now, Outlook 365 webmail lets you forward, Delete, Pin emails, among many others.
Step 4: Do you want the email rule not to trigger at times? If yes, click on Add an exception and enter the required condition.
Next, click Save. There, you have created an email rule.
NoteWhen to Use Stop Processing More Rule?
You must have noticed the Stop Processing More Rule checkbox while creating rules. That option applies if you have several rules on your inbox which could apply to a single message.
For example, let’s say that you have a rule A that moves all the newsletters from Guiding Tech to a folder named GT NL, and another Rule B that forwards all emails with keyword ‘Android’ to your secondary email account.

In this scenario, you wouldn’t want Rule B to run after Rule A executed successfully. That’s when the Stop Processing More Rules option come to the picture. After it meets a specific condition, it stops more rules from executing.
For that, you have to make sure that the priority of the rules are set accordingly, which we will see in the following point.
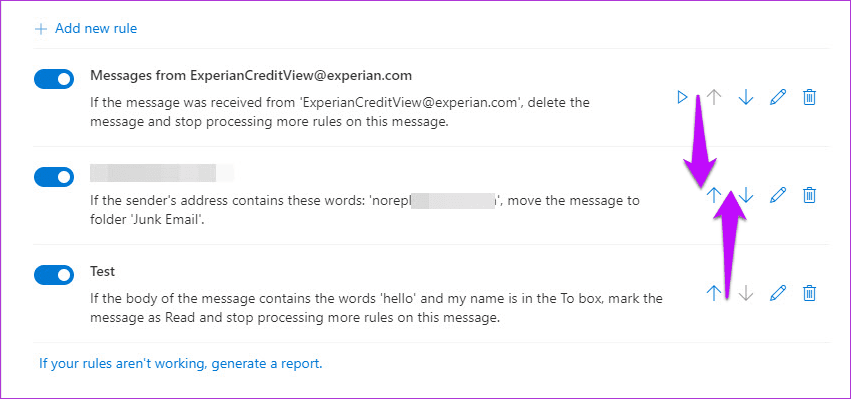
Editing and Managing Rules in Outlook 365
On Outlook 365, the rules run as per the order in the table. Thankfully, the order is not permanent, and you can change the priority.
To do that, click on the Up and Down arrows. To edit a rule, click on the Edit icon and make your changes. Don’t forget to save them!
Bonus Tips: Managing Emails Smartly
1. Sweep Emails
Sweep is another way to a cleaner inbox. Much like Rules, this one lets you automatically delete all email from a particular sender.
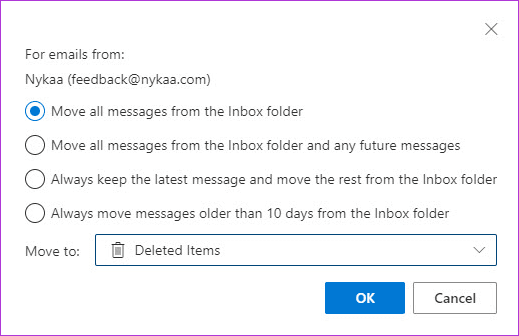
It doesn’t simply delete the emails. You can choose to remove the emails or to keep the latest email in the chain.
Sweeping an email is super easy. Just open the mail that bothers you, and tap on the Sweep icon at the top.
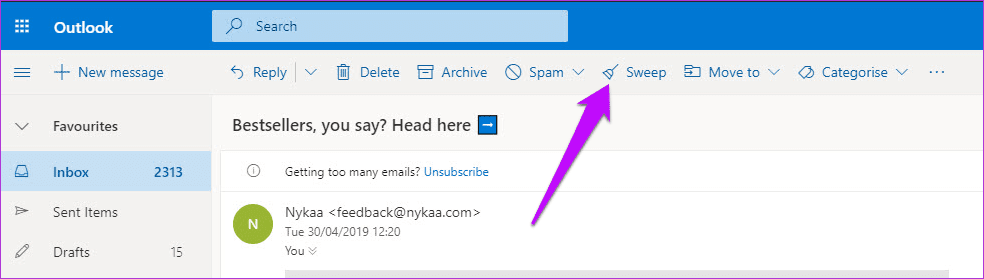
Next, select the options from the drop-down. The second one is the best one as it creates a rule automatically. Once done, hit Save.
Note2. Block Senders and Domains
Apart from the above, you can block certain senders and domains altogether. Just head over to the Junk email section, click on Add and enter the email addresses or the domain name.

At the same time, you can also add safe senders and domains. This option makes sure that important emails (or emails from important people) do not end up in the trash folder.
Simply tap on Add and add the domain name or the email addresses.
Hello, Smarter Inbox!
Well, that is how you can create and manage rules, and keep your inbox clean from all the meaningless clutter. After all, we can’t afford to miss out on the important emails, can we?
If you are using any interesting rules that you wish to share, do mention them in the comments section below.
Next up: Want to get rid of unwanted newsletters from your mailbox? The following post will show you how to do just that.
Was this helpful?
Last updated on 03 February, 2022
Read Next
 How to Create Rules to Filter Emails in Gmail
Most Gmail users are familiar with the email service's interface.
How to Create Rules to Filter Emails in Gmail
Most Gmail users are familiar with the email service's interface.
 How to Create and Manage Flagged Emails in Microsoft Outlook
When browsing your Outlook emails, you must take note of those that require an immediate or delayed response.
How to Create and Manage Flagged Emails in Microsoft Outlook
When browsing your Outlook emails, you must take note of those that require an immediate or delayed response.
 How to Fix Microsoft 365 Error 70003: Your Organization Has Deleted This Device
Microsoft 365 is an integral part of many businesses, enterprises, and education sections.
How to Fix Microsoft 365 Error 70003: Your Organization Has Deleted This Device
Microsoft 365 is an integral part of many businesses, enterprises, and education sections.
 How to Manage Sharing Permissions on Your Outlook Calendar
If you work in an organization, there's about a 40% possibility that your organization uses Microsoft Outlook for mailing.
How to Manage Sharing Permissions on Your Outlook Calendar
If you work in an organization, there's about a 40% possibility that your organization uses Microsoft Outlook for mailing.
 How to Create and Manage Chat Folders in Telegram
In most messaging apps, managing chats has to be the most complicated task at hand.
How to Create and Manage Chat Folders in Telegram
In most messaging apps, managing chats has to be the most complicated task at hand.
 How to Create and Manage a Custom Map in My Maps and Google Drive
Most users are familiar with Google Maps, which offers real-time GPS navigation and information about landmarks and transport conditions.
How to Create and Manage a Custom Map in My Maps and Google Drive
Most users are familiar with Google Maps, which offers real-time GPS navigation and information about landmarks and transport conditions.
 6 Best Microsoft Outlook Calendar Tips & Tricks to Manage It Better
The Microsoft Office Calendar is part of Microsoft 365 products and is not a stand-alone program.
6 Best Microsoft Outlook Calendar Tips & Tricks to Manage It Better
The Microsoft Office Calendar is part of Microsoft 365 products and is not a stand-alone program.
 How to Create and Manage Collections on Amazon Kindle
Kindle is a nifty gadget in any bookworm's arsenal, and it allows readers to embark on various literary adventures.
How to Create and Manage Collections on Amazon Kindle
Kindle is a nifty gadget in any bookworm's arsenal, and it allows readers to embark on various literary adventures.
The article above may contain affiliate links which help support Guiding Tech. The content remains unbiased and authentic and will never affect our editorial integrity.