On Windows 10, iCloud Drive doesn’t let you have any say as to where it downloads and syncs your files. It uses the primary partition on your PC by default. So unless you have lots of free disk space to play around with, this poses an obvious issue. Digging through the various iCloud settings won’t help you out either. Well, I tried.

But don’t worry. You can ‘trick’ iCloud Drive into using another location in Windows 10. And it’s quite easy to do that, as long as you don’t mind the hassle of having to re-download your iCloud Drive files back to your computer.
Let me start by explaining how the process works, and then follow up by walking you through the whole process step by step.
Symbolic Links to the Rescue
A while back, I wrote about changing the default iTunes backup location in Windows 10. For that, I used symbolic links. Otherwise known as symlinks, this native Windows functionality allows you to create a dummy folder and link it to a folder present in another location. The dummy folder works just like a real folder, but any files that are copied into it are actually saved to the folder that it’s linked to. Sounds fascinating, right?
And that’s what we will use to shift the location that iCloud Drive uses to download and sync your data as well. You create a symbolic link for the default iCloud Drive location and point it to a folder present on another partition or drive. That helps you free up space otherwise used by iCloud Drive on the primary partition. Uploads and downloads will function as usual, and you won’t even notice a difference.
Tip:
However, there is a slight catch. Before you create the symbolic link, you must turn off iCloud Drive. That removes all iCloud files from your computer, but they will be re-downloaded later after you re-activate iCloud Drive. You only have to do this once, and the whole process of shifting the default iCloud Drive storage location and recouping space on the primary partition is worth the trouble.
Changing iCloud Drive Storage Location
The following method works for both versions of iCloud for Windows — the traditional desktop app and the Microsoft Store app. You will not have to make any adjustments in the steps below for either version.
Step 1: Click the iCloud icon on the system tray, and then click Open iCloud Settings to bring up the iCloud app.

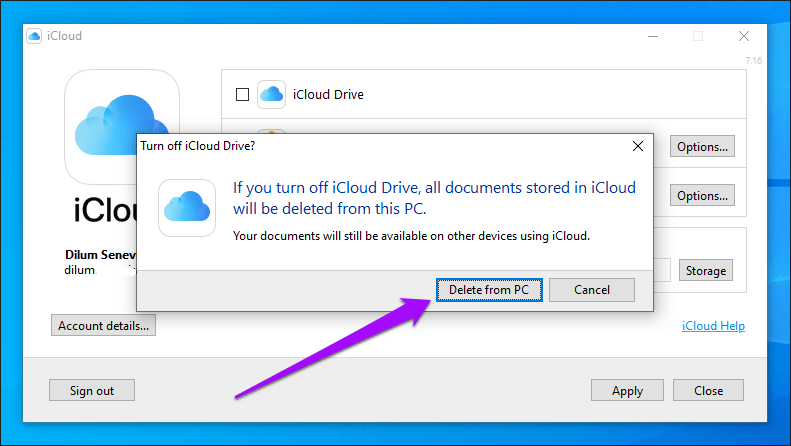
Step 2: Uncheck the box next to iCloud Drive, and then click Apply.

Step 3: Click Delete From PC on the confirmation box. This will delete all downloaded iCloud Drive files and folders from your computer. Exit the iCloud app afterward.
Note:
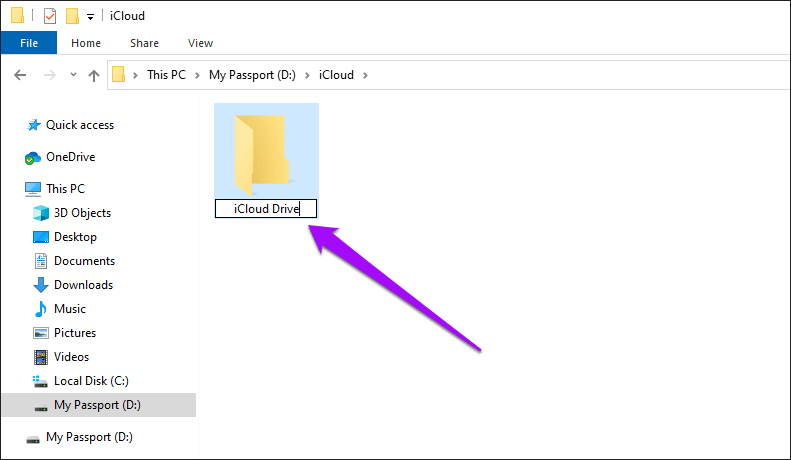
Step 4: Create a new folder within the partition or external drive where you want to change the iCloud Drive storage location to. You can insert any name, but I prefer naming it to ‘iCloud Drive’ to prevent confusion.
Note:
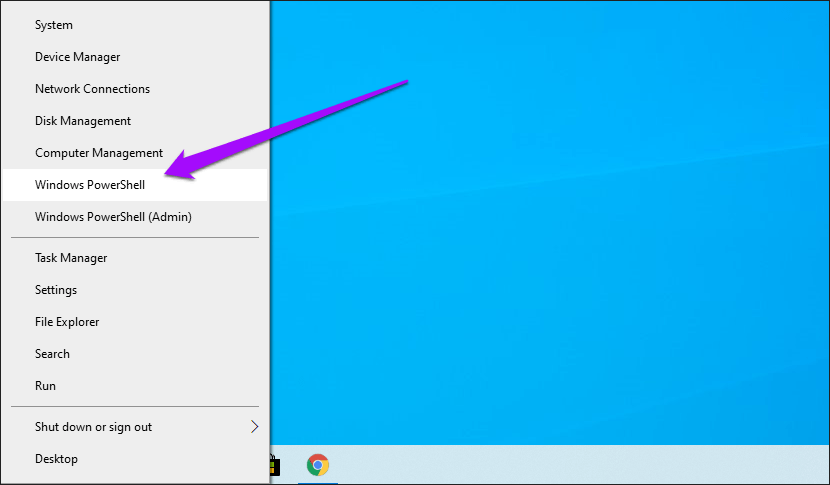
Step 5: Right-click the Start icon, and then click Windows PowerShell on the context menu.
Step 6: Make the necessary adjustments to the command below, and then type it into the Windows PowerShell console:
cmd /c mklink /J “C:\Users\username\iCloudDrive” “D:\iCloud\iCloud Drive”
- Replace username with your actual Windows username
- Replace D:\iCloud\iCloud Drive with the actual file path of the new iCloud Drive storage location.
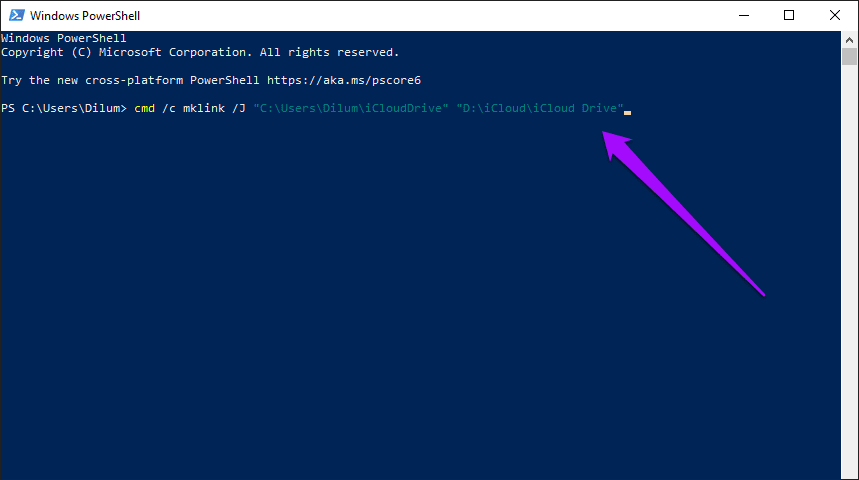
Step 7: Press Enter to execute the command. You should see a ‘Junction created for … ‘ message as confirmation.

Step 8: Relaunch the iCloud app via the system tray, and then re-enable iCloud Drive (check the box next to iCloud Drive, and then click Apply).

Your iCloud Drive files will then start to re-download. You can access them as usual by clicking the iCloud Drive icon within the system tray, and then clicking Open iCloud Drive.
But although the iCloud Drive files and folders do give off the appearance as if they are still present within the same iCloud Drive storage location as before, they are located within the new folder that you created in the steps above.
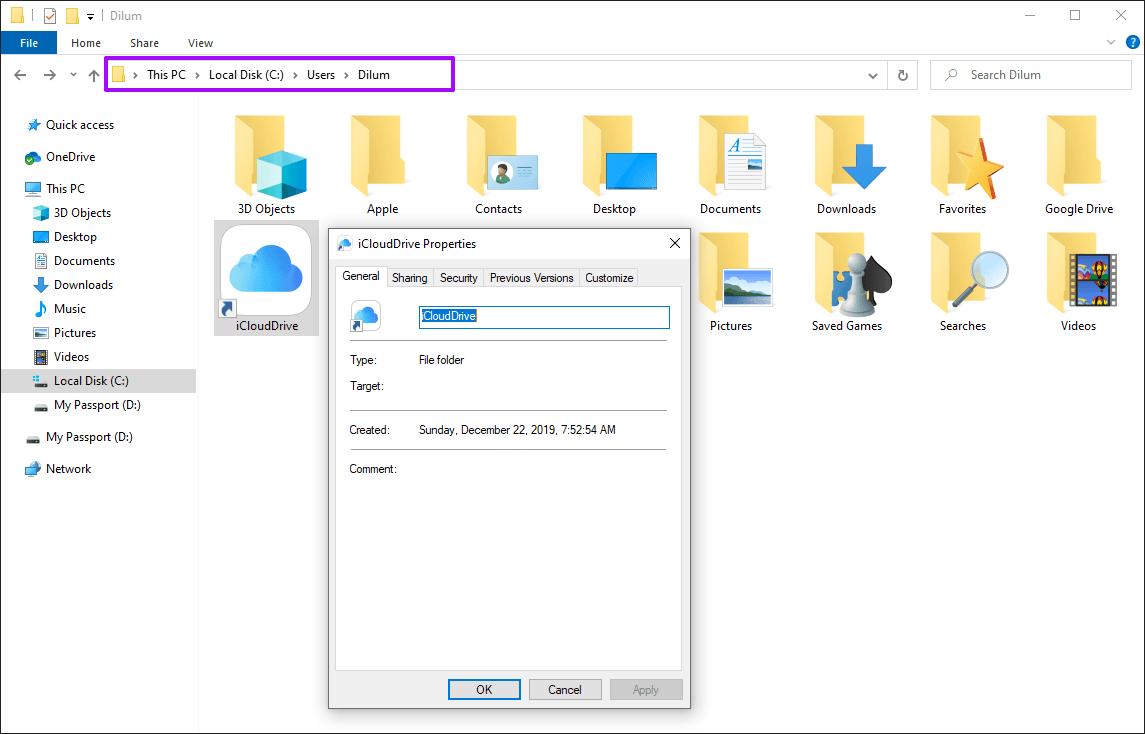
You can confirm this by visiting the default storage location (located within “C:\Users\username”). Right-click the iCloudDrive folder icon (which looks like a shortcut due to its symbolically linked nature), and then click Properties. It won’t relate to the fact that any space is being used.
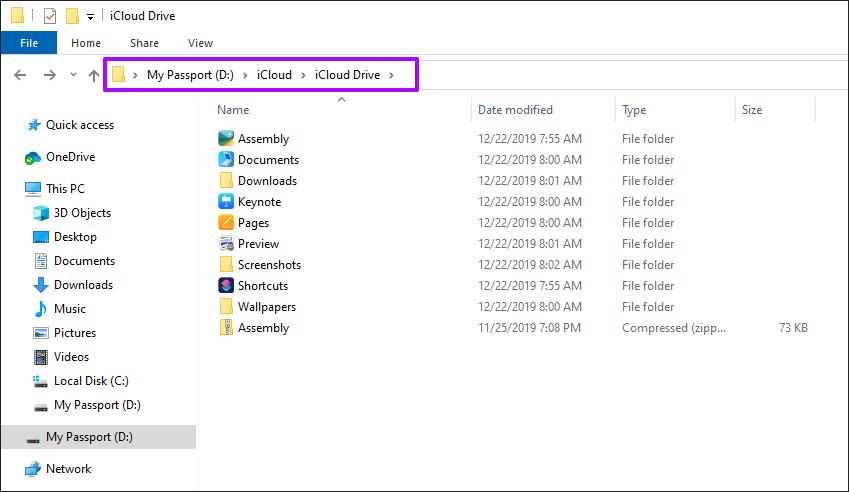
Now, go to the folder where the symbolic link points to, and you should see all of your files located there. The default iCloud Drive storage location is merely mirroring the items present in it.
If you want to go back to using the default iCloud Drive location to store your files and folders, disable iCloud Drive using the iCloud app, and then re-enable it. That should get rid of the symbolically linked folder, and things should be back to normal.
Drives Swapped
If you were close to running out of storage on your primary storage partition, then shifting the iCloud Drive storage location elsewhere will help you save valuable disk space. Yeah — it’s not the most convenient of ways since you have to re-download all of your files. But it sure beats having to spend time trying to scrounge up free space using other means when you can simply get rid of several gigabytes of storage at the very least quickly.
So, did you manage to shift the iCloud Drive storage location without any hitches? Let me know in the comments.
Next up: Are you getting pestered with iCloud notifications? Here’s how to turn them off in Windows 10.
Was this helpful?
Last updated on 07 February, 2022
Read Next
 Apple iCloud and iCloud Drive: How Different Are These Cloud Storage Services
People often confuse iCloud with iCloud Drive, but they don't mean the same thing.
Apple iCloud and iCloud Drive: How Different Are These Cloud Storage Services
People often confuse iCloud with iCloud Drive, but they don't mean the same thing.
 How to Change Folder Thumbnail in Windows 11
Folders in Windows 11 typically display thumbnail images that offer a quick preview of their contents.
How to Change Folder Thumbnail in Windows 11
Folders in Windows 11 typically display thumbnail images that offer a quick preview of their contents.
 How to Change Netflix Download Location on Windows 10 PC
One of the biggest advantages of streaming apps like Netflix and Amazon Prime is that you can download movies and TV shows for watching offline.
How to Change Netflix Download Location on Windows 10 PC
One of the biggest advantages of streaming apps like Netflix and Amazon Prime is that you can download movies and TV shows for watching offline.
 How to Change Screenshot Location in Windows 11
Microsoft Windows offers a handy screenshot key right on the keyboard.
How to Change Screenshot Location in Windows 11
Microsoft Windows offers a handy screenshot key right on the keyboard.
 How to Change Default Download Location on Windows 11
Windows allows you to divide and manage your storage easily.
How to Change Default Download Location on Windows 11
Windows allows you to divide and manage your storage easily.
 How to Change Epic Games Install Location on Windows
By default, most apps store data in C drive, and Epic Games is no exception.
How to Change Epic Games Install Location on Windows
By default, most apps store data in C drive, and Epic Games is no exception.
 How to Change or Fake Location in Chrome, Edge, and Firefox
Your location data is helpful to other apps and services when figuring out what sort of content might be appealing to you.
How to Change or Fake Location in Chrome, Edge, and Firefox
Your location data is helpful to other apps and services when figuring out what sort of content might be appealing to you.
 How to Change Weather Location on iPhone, iPad, or Apple Watch
If you own an iPhone or an Apple Watch, you probably know how convenient it is to check the weather forecast on these devices.
How to Change Weather Location on iPhone, iPad, or Apple Watch
If you own an iPhone or an Apple Watch, you probably know how convenient it is to check the weather forecast on these devices.
The article above may contain affiliate links which help support Guiding Tech. The content remains unbiased and authentic and will never affect our editorial integrity.