It’s been a while that I’ve moved from Safari to Chrome on iOS. Google’s browser is pretty good performance-wise, syncs my personal information seamlessly, and features an interface that’s both fun and easy to use. But Chrome’s complete inability to block ads does get on my nerves all the time. Too often, I’ve had to fall back to Safari for those ad-ridden sites that won’t allow a normal experience without an ad blocker.

Just the other day, I had enough of switching browsers. I browsed the App Store for Chrome-supported ad blockers. Of course, there aren’t any (who am I kidding?). But I didn’t give up. Crawled through various forums looking for workarounds, and to my surprise — I found a way! What you are going to learn isn’t the most convenient of ways to block ads, but let me share it with you so that you can decide for yourself.
AdGuard DNS to the Rescue
My workaround involves using the domain name system (DNS) servers of a popular ad blocking service called AdGuard. It requires nothing overly technical — set up the AdGuard DNS with your internet connection, and you end up filtering IP addresses and trackers related to major ad serving platforms. Pretty cool, huh? And if you were wondering, AdGuard is very open to you using their DNS servers, so it’s not as if you are doing anything wrong.
Just apply the AdGuard DNS to your internet connection, and you end up filtering IP addresses and trackers related to major ad serving platforms
But there’s a catch. Setting up AdGuard DNS servers on your iPhone or iPad blocks ads not just on Chrome, but on every other app as well — consider it as something akin to a system-wide adblocker. So, don’t be surprised to find out certain apps — such as free-to-play games — failing to work properly due to their inability to serve ads, in which case you have to consider resetting the DNS servers.
There’s another problem — iOS only lets you configure DNS servers for Wi-Fi connections. And even then, you need to do that manually for every Wi-Fi connection that you join — although not repeatedly when rejoining the same hotspot. So then, what about blocking ads while surfing on cellular data?
iOS only lets you configure DNS servers for Wi-Fi connections
To circumvent the limitation, I tried using a paid app that claimed to override default DNS settings for cellular data. Looked around even more for an alternative, and stumbled upon an app called DNSCloak that supposedly secures you from DNS spoofing. And to my pleasant surprise, it features a built-in AdGuard DNS server profile that you can use to get rid of ads on both Wi-Fi and cellular completely.
Regardless, I’m not going to forego changing Wi-Fi DNS servers manually. It’s risk-free compared to DNSCloak, which may have unknown security concerns that I’ll mention while we move along.
Blocking Ads on Wi-Fi
iOS lets you modify the DNS servers for any Wi-Fi connection quite easily. But as I mentioned earlier, you need to apply it whenever you connect to a new Wi-Fi hotspot — once you’ve configured the DNS servers, the device uses those settings whenever you rejoin the same hotspot.
In my case, I’ve set up the AdGuard DNS servers for my home Wi-Fi connection, as well as on public networks that I frequent to. And for those other random networks, I either deal with the ads or use DNSCloak if I find them too annoying.
The following steps should walk you through the process required to block ads on a Wi-Fi connection.
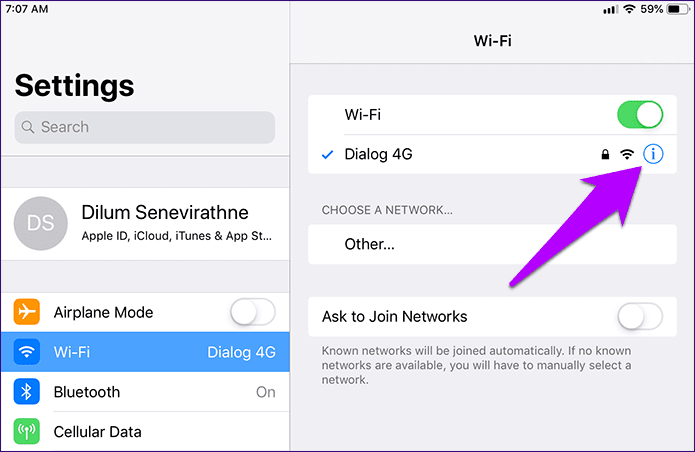
Step 1: On the iOS Settings app, tap Wi-Fi. Next, tap the i-shaped symbol next to the connected Wi-Fi network.
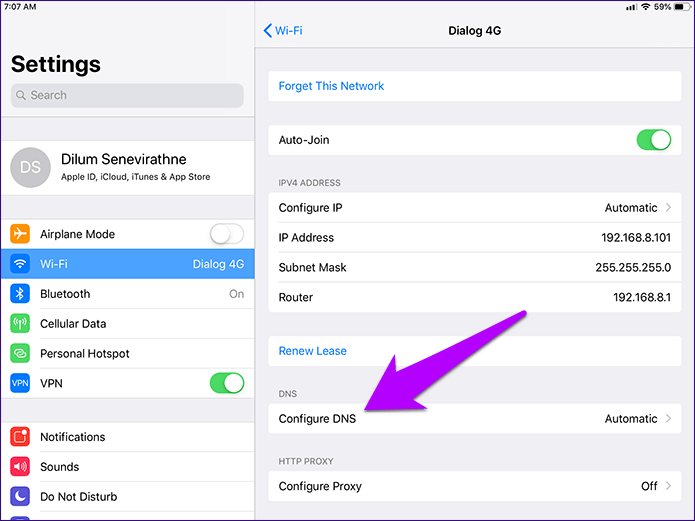
Step 2: Tap the option labeled Configure DNS.
Step 3: Tap Manual, and then remove the current DNS servers for your Wi-Fi connection.
Note: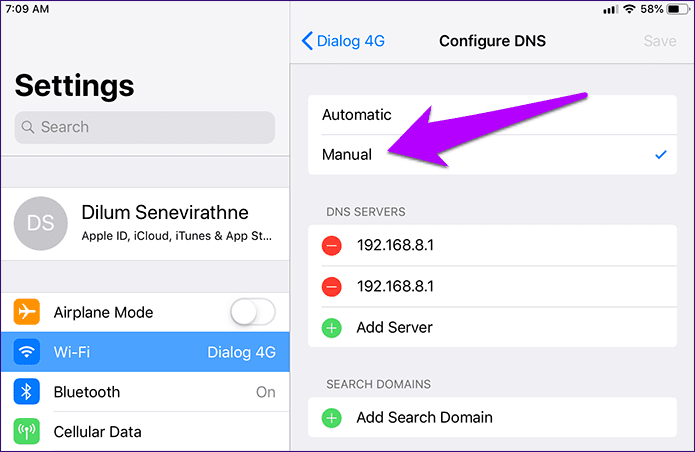
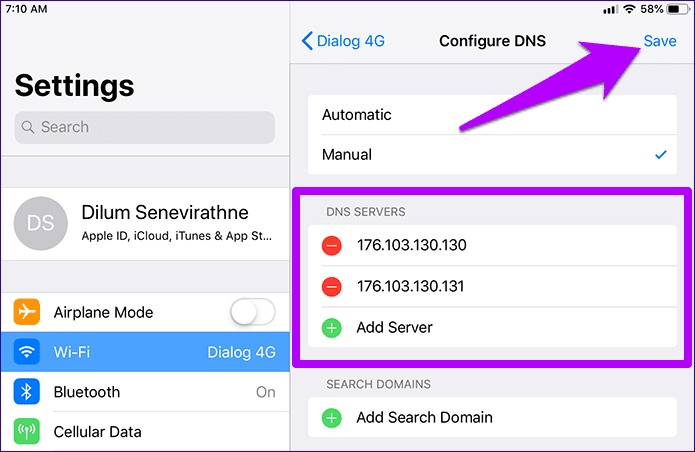
Step 4: Insert the following AdGuard DNS servers into two separate slots, and then tap Save.
176.103.130.130
176.103.130.131
That’s it. Now it’s time to head over to Chrome, load up any site, and enjoy an ad-free experience. I faced no issues while using the AdGuard DNS servers — they blocked nearly every ad that I came across, except for a few sites where I did encounter a few pop-up tabs. But for the most part, it felt refreshing to finally find ads gone from what’s now my favorite browser on iOS.
Blocking Ads with DNSCloak
I was quite lucky to stumble across DNSCloak. It’s a completely free app that offers the ability to thwart DNS spoofing. In simpler terms, DNSCloak verifies that there is no tampering with the responses to and from servers that you connect to. The app accomplishes that by using a virtual private network (VPN) profile, which does raise a few hairs.
VPNs, the free ones in particular, may carry certain privacy-related risks. But from the looks of it, I found that the app uses a dummy VPN which loops back connection requests to your iPhone or iPad and resolves them locally. Hence, you shouldn’t be too worried in terms of security. However, I recommend that you refrain from using DNSCloak when dealing with sensitive data as a precautionary measure.
DNSCloak uses a dummy VPN which loops back connection requests to your iPhone or iPad and resolves them locally
Regardless, what makes DNSCloak quite special is its inclusion of a pre-built AdGuard DNS profile that enables system-wide adblocking. And thanks to the fact that it funnels all connection requests through the dummy VPN profile. The app not only blocks ads on Wi-Fi connections but also on cellular data. That’s great news for Chrome users.
The following steps should walk you through blocking ads with the AdGuard DNS servers using DNSCloak.
Step 1: Download and install DNSCloak from the App Store.
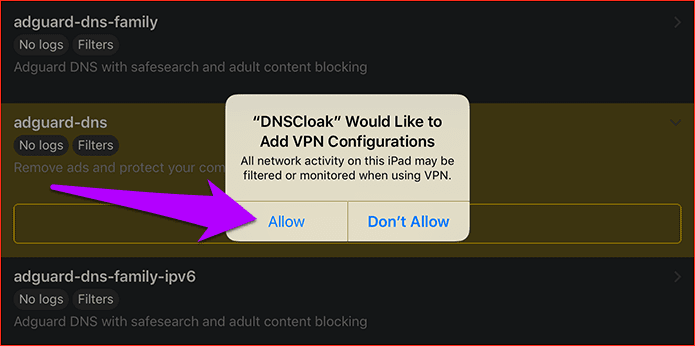
Step 2: Launch DNSCloak. You should see a list of DNS filters listed on the main screen of the app. Tap on the one labeled adguard-dns and then tap Use This Server.

Step 3: On the pop-up menu, tap Allow.
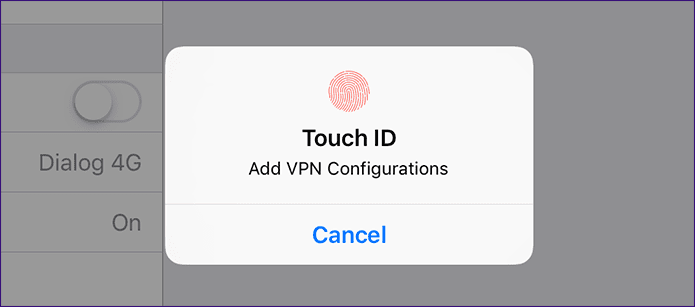
Step 4: Use Touch ID or Face ID to authenticate the new VPN configuration.
You can now surf on Chrome without encountering any advertisements on both cellular data and Wi-Fi. Do remember that the same applies to other apps as well.
Note:If you want to know that you’re actively using DNSCloack while surfing, turn on the Show VPN Icon from the DNSCloak Settings panel. That will make the VPN icon appear on the status bar of your iPhone or iPad. Neat stuff!

While you can use DNSCloak to block ads pretty easily, consider using the manual workaround discussed above for instances where your privacy is of the utmost importance. At the end of the day, you can’t really trust a free app too much regardless of what it claims to be. But when it comes to cellular data, it’s DNSCloak or nothing.
Freedom from Ads
An ad-free experience on Chrome for iOS finally feels damn liberating. Don’t get me wrong — I’m not against all advertisements. They provide a vital source of revenue for online content creators. My problem is with those annoying pop-up ads that websites shove in your face and you really have no choice. That ruins the browsing experience.
Thankfully, now we have a couple of alternatives like AdGuard DNS and DNSCloak to the rescue. So, what do you think of these workarounds? Any suggestions? The comments section is right below. In the meantime, check out this video that shows how to block ads on iPhone for free.
Was this helpful?
Last updated on 03 February, 2022
Read Next
 How to Block Websites on Chrome for iOS
Chrome for iOS is one of the best alternatives to Safari on iPhone and iPad.
How to Block Websites on Chrome for iOS
Chrome for iOS is one of the best alternatives to Safari on iPhone and iPad.
 How to Block or Soft Block Someone on Twitter
Are you tired of dealing with unwanted interactions or negative experiences on Twitter?
How to Block or Soft Block Someone on Twitter
Are you tired of dealing with unwanted interactions or negative experiences on Twitter?
 Play Solitaire in Windows 10 Without Paying, Watching Ads
When Windows 10 came out, the internet was abuzz with stories of how Microsoft was now showing unskippable video ads after each session of Solitaire.
Play Solitaire in Windows 10 Without Paying, Watching Ads
When Windows 10 came out, the internet was abuzz with stories of how Microsoft was now showing unskippable video ads after each session of Solitaire.
 How to Find out Which App Is Causing Pop-Up Ads on Android
The pop-up ads can be so annoying that it might drive you to punch your phone or the sites and apps that shove them in your face.
How to Find out Which App Is Causing Pop-Up Ads on Android
The pop-up ads can be so annoying that it might drive you to punch your phone or the sites and apps that shove them in your face.
 How To Remove Ads That Appear After Unlocking Android Phone
I know.
How To Remove Ads That Appear After Unlocking Android Phone
I know.
 Top 7 Free Gallery Apps Without Ads
We need a gallery app to view photos and videos on our Android phones.
Top 7 Free Gallery Apps Without Ads
We need a gallery app to view photos and videos on our Android phones.
 Top 2 Ways to Remove Ads from Samsung Galaxy Phone Lock Screen
Ads and pop-up banners appearing on your Galaxy phone’s lock screen and home screen can ruin the whole One UI experience for you.
Top 2 Ways to Remove Ads from Samsung Galaxy Phone Lock Screen
Ads and pop-up banners appearing on your Galaxy phone’s lock screen and home screen can ruin the whole One UI experience for you.
 How to Turn off Ads on Instagram: A Detailed Guide
Are you tired of annoying or irrelevant Instagram ads and want to eliminate them from your Instagram feed?
How to Turn off Ads on Instagram: A Detailed Guide
Are you tired of annoying or irrelevant Instagram ads and want to eliminate them from your Instagram feed?
The article above may contain affiliate links which help support Guiding Tech. The content remains unbiased and authentic and will never affect our editorial integrity.