Fix 1: Reset the Settings App
Step 1: Right-click the Start icon and select Terminal (Admin) from the list.

Step 2: Execute the following command to reset Windows settings.
Get-AppxPackage *windows.immersivecontrolpanel* | Reset-AppxPackage
Step 3: Check if the issue is resolved by opening Windows Settings using Win + I.
Fix 2: Run the SFC and DISM Scans
Corrupt or missing system files on your PC can sometimes make it difficult to open the Settings app. To replace or repair the corrupt files, use the SFC (System File Checker) and DISM (Deployment Image Servicing and Management) scans on your PC.
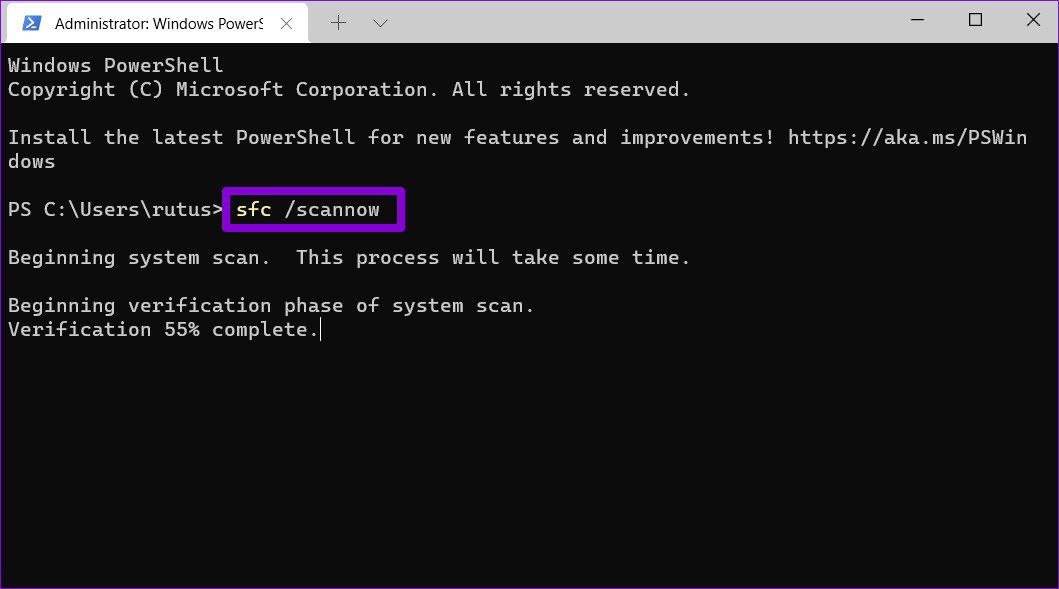
Step 1: Open Terminal (admin), type the below command, and press Enter.
sfc /scannow
Step 2: Run the following commands individually, pressing Enter after each to run the DISM scan.
DISM /Online /Cleanup-Image /CheckHealth
DISM /Online /Cleanup-Image /ScanHealth
DISM /Online /Cleanup-Image /RestoreHealth

After running the above scans, restart your PC and see if you can access the Settings app.
Fix 3: Re-Register the Settings App
If the problem persists, try re-registering the Settings app on your system by following the steps below:
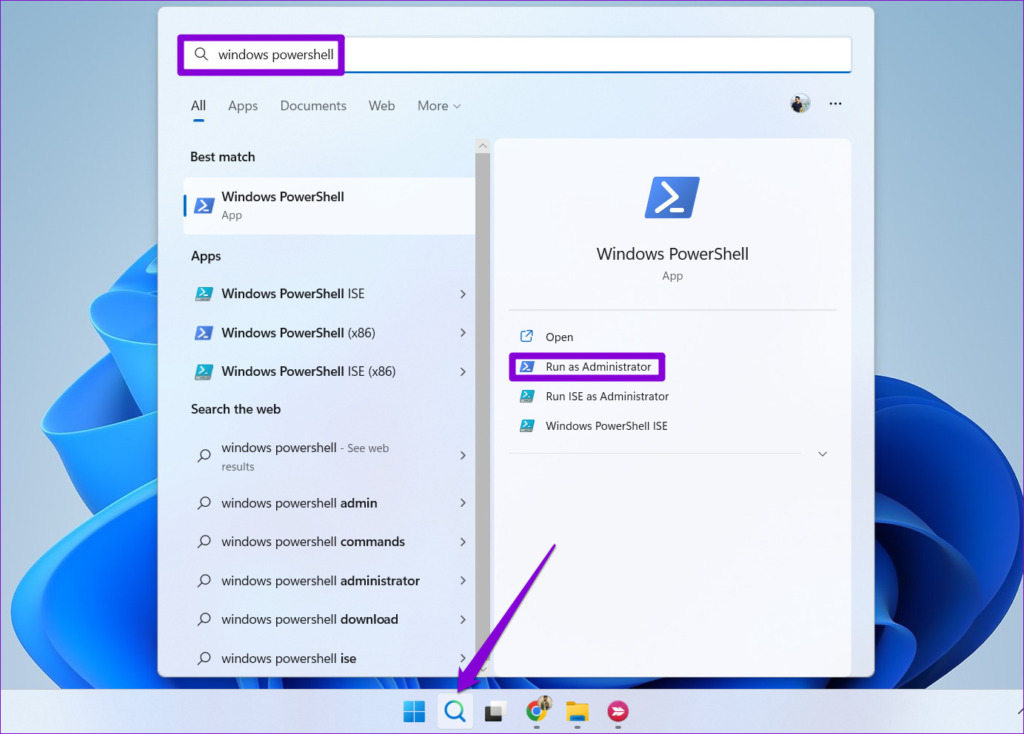
Step 1: Press Win + S, type powershell, and select Run as administrator.
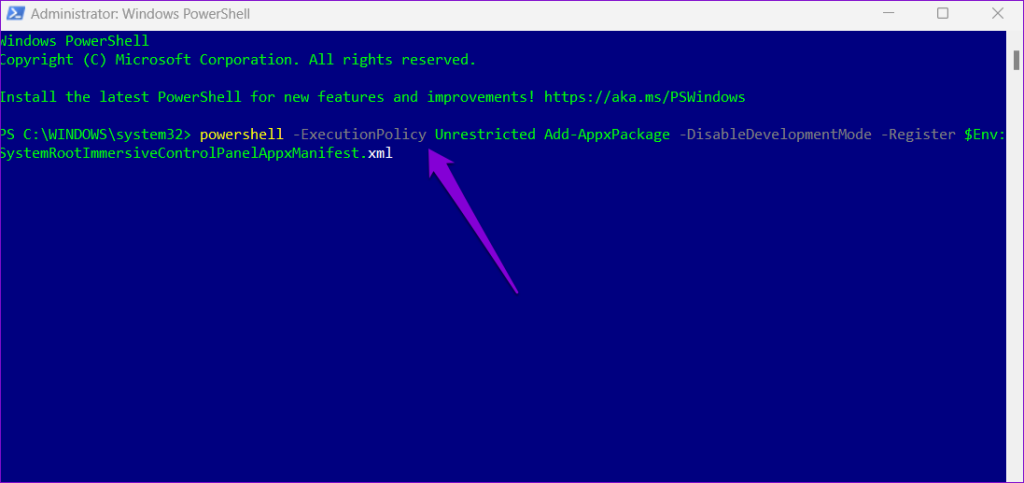
Step 2: Paste the command given below and press Enter.
powershell -ExecutionPolicy Unrestricted Add-AppxPackage -DisableDevelopmentMode -Register $Env:SystemRootImmersiveControlPanelAppxManifest.xml
Restart your PC after this and see if you can open the Settings app.
Fix 4: Check Group Policy Settings
Another reason you might be unable to access the Settings app in Windows 11 is if it has been disabled through Group Policy settings. Fortunately, it’s easy to re-enable the Settings app using the Group Policy Editor.
Step 1: Press the Windows key + R to open the Run dialog box. Type gpedit.msc in the box and press Enter to open the Group Policy editor.
Step 2: Use the left pane to navigate to the following Group Policy folder:
User Configuration > Administrative Templates > Control Panel
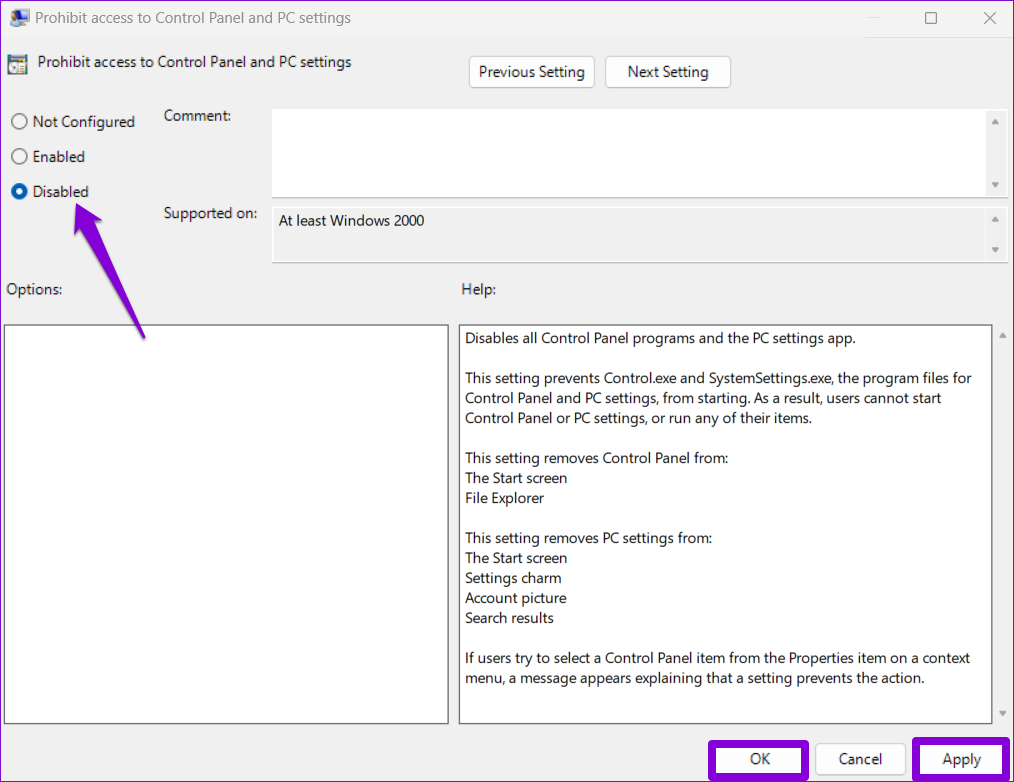
Step 3: Double-click the Prohibit access to Control Panel and PC settings policy in the right pane.

Step 4: Select the Disabled option. Then, click on the Apply button, followed by OK.
Fix 5: Create a New User Account
Problems with your current user account can also cause the Settings app to misbehave on Windows. If so, you can create and switch to a new user account.
Step 1: Open Windows Terminal with admin permission.
Step 2: Type the command given below and press Enter.
net user /add Username and Password
Replace Username and Password in the above command with the actual username and password you want to use.

Step 3: Give your account admin privileges by entering the command given below:
net localgroup administrators Username /add
Again, replace the Username in the above command with the username specified in the last step.

Switch to your newly created user account and try using the Settings app again.
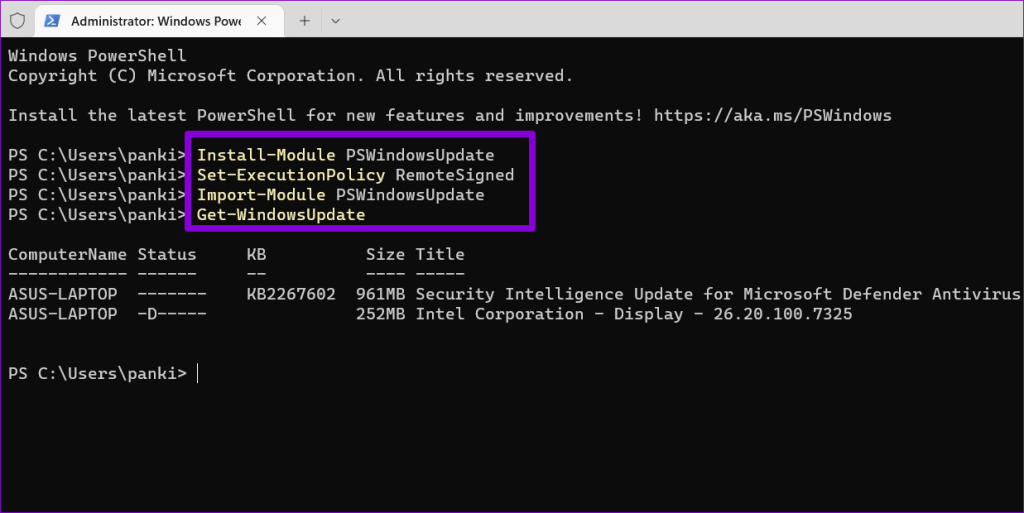
Fix 6: Install Windows Updates
Windows updates can sometimes go wrong, leading to issues like this one. The good news is that the Microsoft Windows team is quick to detect and fix such issues in subsequent updates.
Since you can’t access the Settings app, you must use PowerShell to download and install pending updates.
Step 1: Open PowerShell and execute the following commands:
Install-Module PSWindowsUpdate
Set-ExecutionPolicy RemoteSigned
Import-Module PSWindowsUpdate
Get-WindowsUpdate
Step 2: Run the command given below to download and install the update. Then, type A and press Enter to confirm.
Install-WindowsUpdate -KBArticleID KBNumber
Replace KBNumber in the above command with the KB number associated with the update you want to install.

Fix 7: Check in Safe Mode
Occasionally, conflicts between third-party apps and Windows 11 processes can cause issues like the one you are experiencing. You can try booting your PC into Safe Mode to check for this possibility.
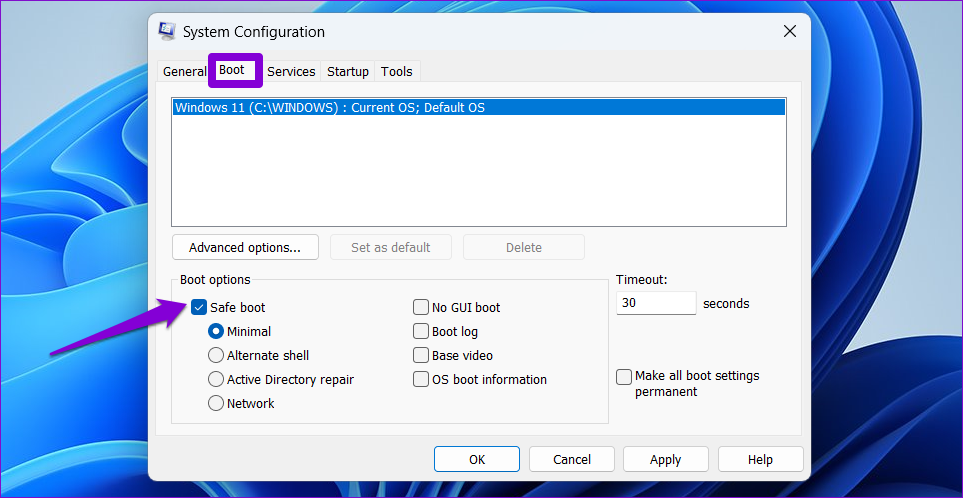
Step 1: Press the Windows key + R to open the Run dialog box. Type msconfig in the box and press Enter.
Step 2: In the System Configuration window, navigate to the Boot tab. Under Boot options, select Safe boot and press OK.
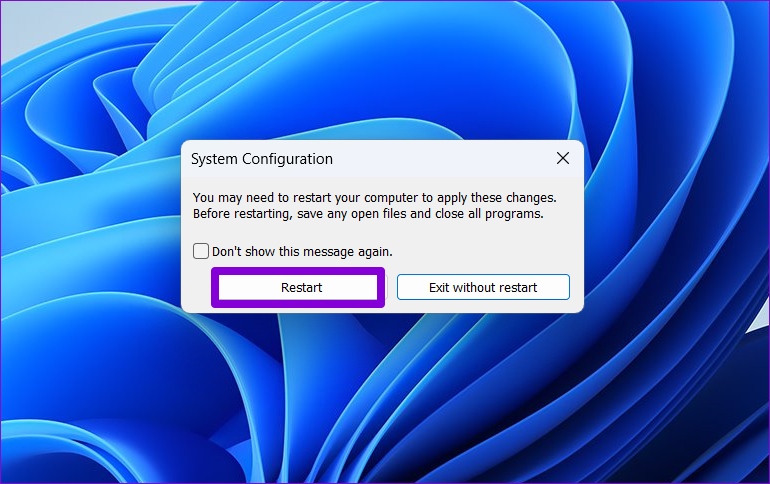
Step 3: Click on Apply and then OK.
Step 4: Click on Restart to enter Safe Mode.
If the Settings app works fine while your PC is in Safe Mode, consider removing some recently installed apps and programs to resolve the issue.
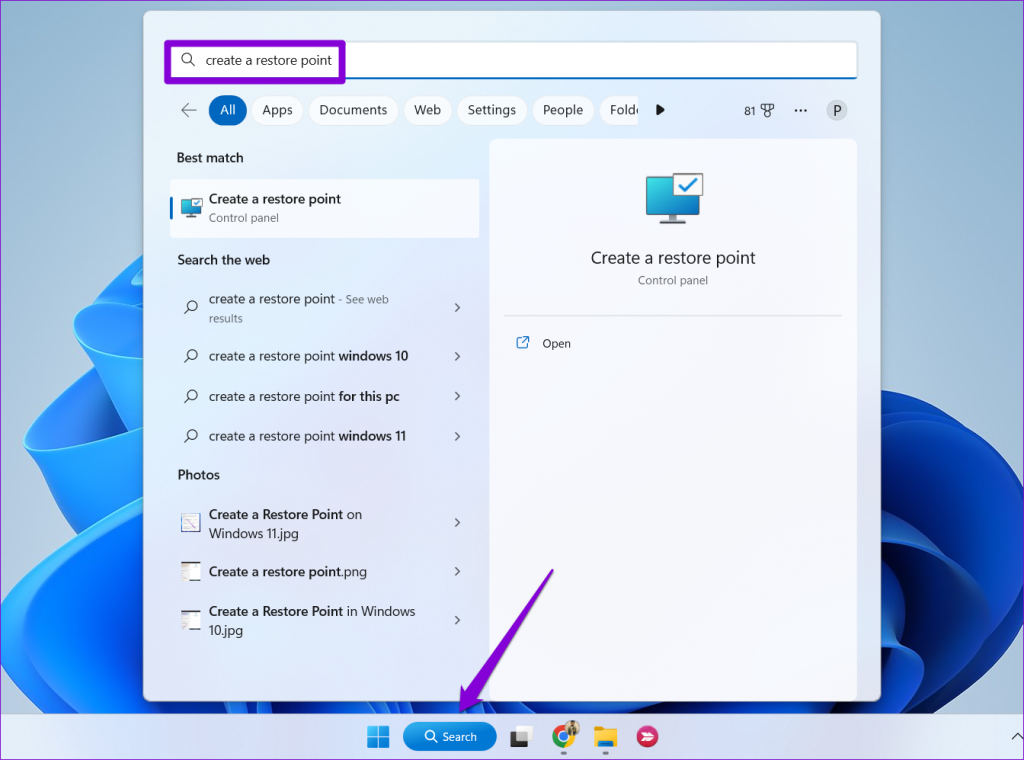
Fix 8: Use System Restore
System Restore is a handy feature in Windows that periodically takes a backup of your entire system. You can utilize this feature to restore your PC to a previous time when the Settings app was functioning correctly.
Step 1: Press Win + S, type create a restore point, and click the Create a restore point app from the search results.
Step 2: In the System Properties window, switch to the System Protection tab and click the System Restore button.

Step 3: Select Recommended restore and click Next.
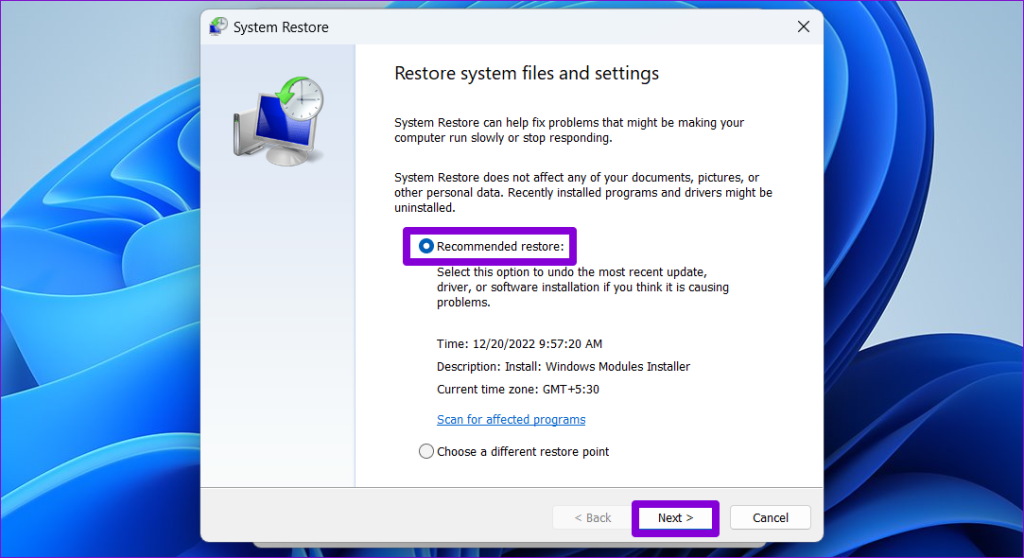
Step 4: Follow the wizard until the end to complete the process. Your PC will restart automatically. Once done, check if the settings app is working as expected.
Fix 9: Reset Windows
Lastly, if all else fails, consider resetting all the settings on your PC to fix the issue. Since you cannot access the Settings app, you must access Advanced Startup Options to reset Windows.
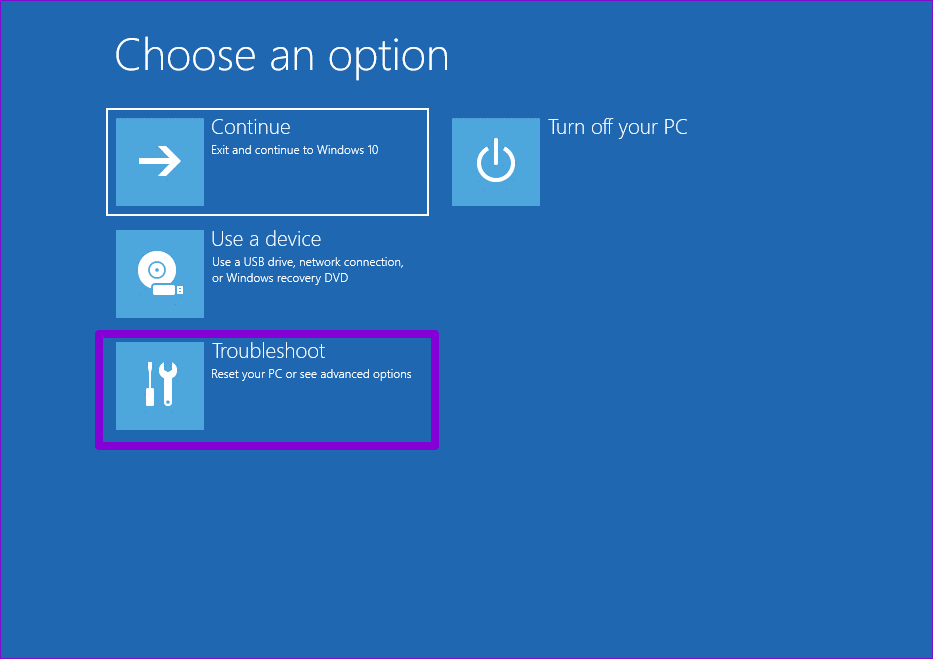
Step 1: Open the Start menu and click the power icon. Then, hold down the Shift key and select Restart.
Step 2: Wait for your PC to reboot into Advanced Recovery. Select the Troubleshoot option.
Step 3: Click on Reset this PC.
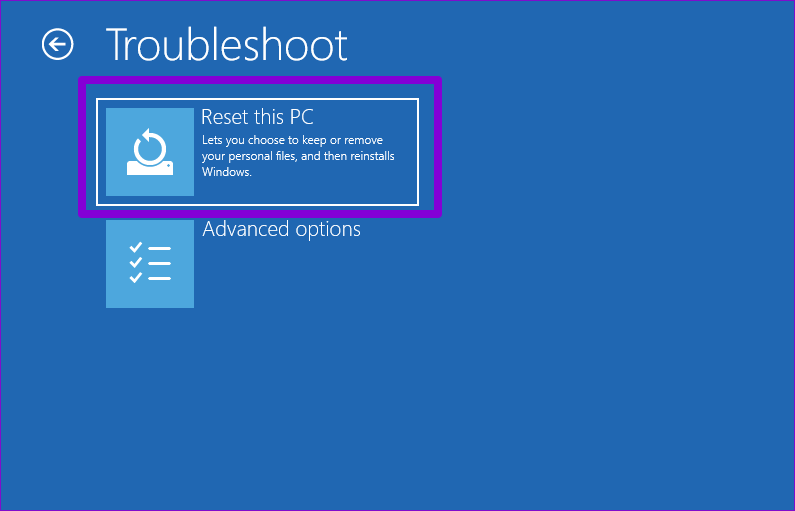
Step 4: Select Keep my files and follow the on-screen instructions to finish resetting your Windows 11 PC.

Once complete, log in with the same account and check if the settings app works. If it does, reinstall apps individually, as the reset would have removed them.
FAQs
Can I use the Control Panel instead of the Settings app?
Yes, you can use the Control Panel to adjust most, if not all, of your Windows 11 PC settings.
How do I show the Settings icon on the Start menu?
Open the Settings app and navigate to Personalization > Start > Folders. Then, enable the toggle next to Settings.
Was this helpful?
Last updated on 20 April, 2024
4 Comments
Leave a Reply
Read Next
 8 Ways to Fix Windows Security Not Opening or Working on Windows 11
Windows Security is a built-in security app that offers real-time protection against viruses and malware for your computer.
8 Ways to Fix Windows Security Not Opening or Working on Windows 11
Windows Security is a built-in security app that offers real-time protection against viruses and malware for your computer.
 Top 9 Ways to Fix Xbox App Not Opening in Windows 11
Microsoft recently renamed the Game Pass as PC Game Pass for PC users.
Top 9 Ways to Fix Xbox App Not Opening in Windows 11
Microsoft recently renamed the Game Pass as PC Game Pass for PC users.
 Top 10 Ways to Fix OneNote Not Opening on Windows 10 and Windows 11
Microsoft OneNote remains one of the feature-rich note-taking apps out there.
Top 10 Ways to Fix OneNote Not Opening on Windows 10 and Windows 11
Microsoft OneNote remains one of the feature-rich note-taking apps out there.
 Top 7 Ways to Fix Discord Not Opening on Windows 10 and Windows 11
Discord has appeals to everyone seeking a unique community features besides the gamers.
Top 7 Ways to Fix Discord Not Opening on Windows 10 and Windows 11
Discord has appeals to everyone seeking a unique community features besides the gamers.
 Top 5 Ways to Fix Firefox Not Opening on Windows 10 and Windows 11
Firefox is one of the popular web browsers that's privacy-centric browsers.
Top 5 Ways to Fix Firefox Not Opening on Windows 10 and Windows 11
Firefox is one of the popular web browsers that's privacy-centric browsers.
 Top 6 Ways to Fix Device Manager Not Opening on Windows 10 and Windows 11
The Device Manager on Windows is essential to enable or disable specific devices, update drivers, or troubleshoot various errors.
Top 6 Ways to Fix Device Manager Not Opening on Windows 10 and Windows 11
The Device Manager on Windows is essential to enable or disable specific devices, update drivers, or troubleshoot various errors.
 Top 5 Ways to Fix Windows Terminal Not Opening on Windows 11
Microsoft's Windows Terminal is a command-line tool that comes pre-installed on Windows 11.
Top 5 Ways to Fix Windows Terminal Not Opening on Windows 11
Microsoft's Windows Terminal is a command-line tool that comes pre-installed on Windows 11.
 How to Fix Links Not Opening or Working On the Twitter App
Some tweets have links attached to them.
How to Fix Links Not Opening or Working On the Twitter App
Some tweets have links attached to them.
The article above may contain affiliate links which help support Guiding Tech. The content remains unbiased and authentic and will never affect our editorial integrity.

When I run the suggested script in powershell I get the following message:
cmdlet Add-AppxPackage at command pipeline position 1
Supply values for the following parameters:
Path:
Any help would be great, thanks.
Why is you solution to settings not opening OPENING SETTINGS
LOL
Option Number 3 actually worked! It didnt look like it worked at first and then i gave up. When I came back to the laptop 2 days later it started running a windows update, and when it was complete, the settings app opened! I was only trying to run a factory rest.