The Photos app received a major upgrade with Windows 11. Besides an updated look and feel, you also get the film strip toolbar and multiview interface. You can open multiple images using the Photos app on your Windows 11 PC. However, browsing through a folder of photos can be a hassle.
![]()
Some users complain that they can’t browse their photos as the arrow keys don’t work in the Photos app. If you face the same problem, here are the best fixes for the Arrow keys not working in the Photos app on Windows 11.
1. Open Photos in Slideshow Mode
Starting with some basic solutions, you can first select and open your photos in a Slideshow mode using the Photos app. Usually, you click on a photo in a folder and start using the Arrow keys to see the next photos. For Slideshow mode, select all the photos in your folder or drive and then press Enter.
If you still cannot use the Arrow keys, refer to the next solution.
2. Set the Photos App As Default
A lot of third-party apps are available for Windows 11 to access and edit photos on your computer. If you have installed one such app and are using it as the default photo viewer, we suggest switching to the Microsoft Photos app as default and checking if that solves the issue.
Step 1: Right-click on a photo on your Windows 11 computer.
Step 2: Select Open With.

Step 3: Click on Choose Another App.

Step 4: Select Photos at the top and click Always at the bottom-left side.

Step 5: Open the files in the Photos app and check if the problem is solved.
Alternatively, here’s how you can set the Photos app as default.
Step 1: Click the Windows icon, search for Settings, and press Enter.

Step 2: Click on Apps from the left menu.
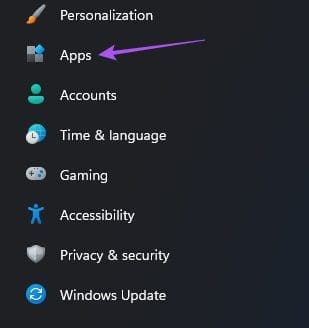
Step 3: Click on Default Apps.
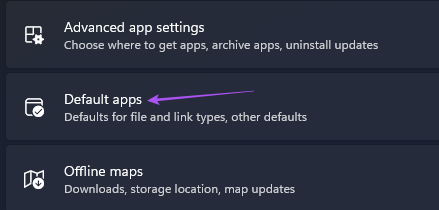
Step 4: Scroll down the list of apps and click on Photos.

Step 5: Select the file format for your photos. We will select JPEG as an example.

Step 6: Select Photos and click on Set As Default at the bottom.

You can select the format for your image files and set the Photos app as the default for viewing them.
Step 7: Close the window and try opening your photos to check if the problem is solved.
3. Turn Off Search Indexing Options
Searching any file or folder on your Windows 11 PC will take some time as the Indexing Options are enabled. The same goes for your photos, especially if they have larger file sizes. If the Arrow keys are still not working in the Photos app, you can try disabling the Search Indexing option for File Explorer on your Windows 11 PC. This will reduce the time taken for your photos to appear on your screen.
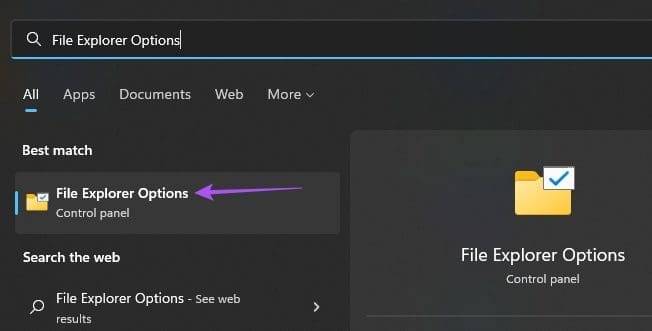
Step 1: Click the Search icon from the Taskbar, type File Explorer Options, and press Enter.
Step 2: Click the Search tab.

Step 3: Ensure that the option of ‘Don’t Use the Index When Searching in File Folders for System’ is unchecked.

Step 4: Click on Apply. Then click Ok at the bottom to confirm.

Next, close the window and try using the arrow keys in the Photos app.
4. Run Windows Store App Troubleshooter
Still, got nothing? You can try running the Windows Store App Troubleshooter on your computer. This tool will determine the issues with the default apps, including the Photos app. Do note that the Windows 11 Insider Build 25169 or higher will show Microsoft Store Apps troubleshooter as Windows Store Apps.
Step 1: Click the Windows icon, type Settings, and press Enter.
Step 2: Click on System from the left menu and scroll down to select Troubleshoot.

Step 3: Click on Other Troubleshooters.

Step 4: Scroll down and click on Run next to Windows Store.

Step 5: Follow the on-screen instructions to complete the troubleshooting process.
After that, open a few photos to check if the arrow keys work.
5. Reinstall the Photos App
Another option is to reinstall the Photos app on your Window 11 computer. This will remove all the corrupted cache files of the current version and install a fresh version on your computer. You may use PowerShell for removing the Photos app.
Step 1: Click the Windows icon, type Windows PowerShell, and press Enter.

Step 2: In the PowerShell window type the following command and press Enter.
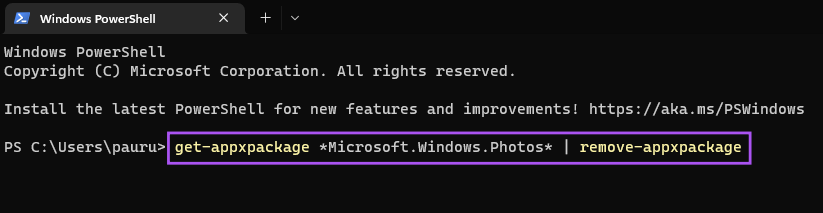
get-appxpackage *Microsoft.Windows.Photos* | remove-appexchange
Step 3: After removing the Photos app, open Microsoft Store on your computer and install the Photos app.

6. Install Pending Windows Updates
If none of the steps work for you, check for a version update of Windows on your computer. Since we are talking about a system app, you should look for a Windows update to remove any bugs or glitches which are hampering your experience.
Step 1: Click the Windows icon, type Settings, and press Enter.
Step 2: Click on Windows Update at the top-right corner.

Step 3: Click on Check For Updates in the top-right corner.

Step 4: If an update is available, download and install it.
After your computer restarts, use Photos app to check whether the Arrow keys work.
Scroll Your Photos
These solutions will help you fix the issue with Arrow keys in the Photos app. You can also read our post if the Photos app is not working on Windows 11.
Was this helpful?
Last updated on 08 November, 2022
Read Next
 How to Fix Windows Alt and F4 Keys Not Working Error on Windows 10
What do most people do when a computer peripheral or an accessory stops working suddenly?
How to Fix Windows Alt and F4 Keys Not Working Error on Windows 10
What do most people do when a computer peripheral or an accessory stops working suddenly?
 11 Ways to Fix Sticky Keys Not Working on Windows 10 Error
Sticky Keys are helpful to prevent you from pressing multiple keys at the same time.
11 Ways to Fix Sticky Keys Not Working on Windows 10 Error
Sticky Keys are helpful to prevent you from pressing multiple keys at the same time.
 3 Ways to Fix Keyboard Function Keys Not Working on Windows 11/10
Fix 1: Confirm Shortcut Keys Don't Disable Function Keys Keyboards with an Fn key allow two sets of actions on the function keys.
3 Ways to Fix Keyboard Function Keys Not Working on Windows 11/10
Fix 1: Confirm Shortcut Keys Don't Disable Function Keys Keyboards with an Fn key allow two sets of actions on the function keys.
 2 Ways to Remap Keyboard Keys in Windows 11
If you have ever felt constrained by the default keyboard layout on your Windows 11 machine, you are not alone.
2 Ways to Remap Keyboard Keys in Windows 11
If you have ever felt constrained by the default keyboard layout on your Windows 11 machine, you are not alone.
The article above may contain affiliate links which help support Guiding Tech. The content remains unbiased and authentic and will never affect our editorial integrity.