In a world where seamless connectivity is king, getting the most out of your Wi-Fi network is essential. However, there are times when your Wi-Fi router doesn’t cover your entire home and this is where Wi-Fi repeaters or Wi-Fi extenders come into play. While you can fork out extra on a dedicated Wi-Fi repeater, did you know you can use your Android phone as a Wi-Fi Extender too?
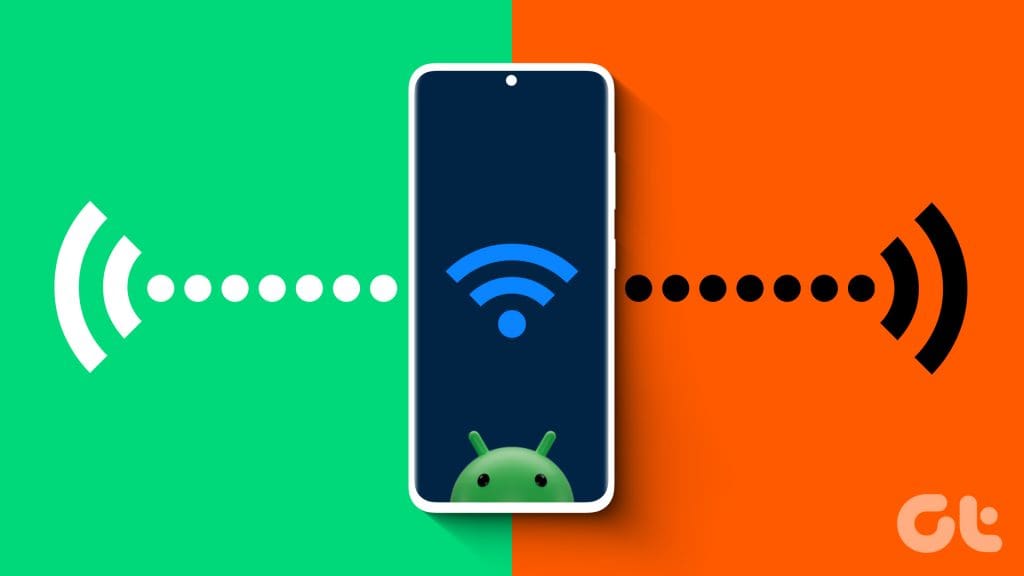
For those, who are unaware, a Wi-Fi repeater is used to extend the coverage area of your Wi-Fi network. It works by receiving your existing Wi-Fi signal, amplifying it, and then transmitting the boosted signal. In this guide, we’ll explore various ingenious methods to leverage your Android device for extending Wi-Fi coverage. Your pocket-sized powerhouse can morph into a Wi-Fi extender, boosting that signal and banishing those dead zones to oblivion. So let’s get to it.
Method 1: Using Android Settings
Most modern Android smartphones already possess the tools to become a Wi-Fi hero, hidden within their very settings. Here’s how to unleash the magic, depending on your Android flavor.
On Stock Android
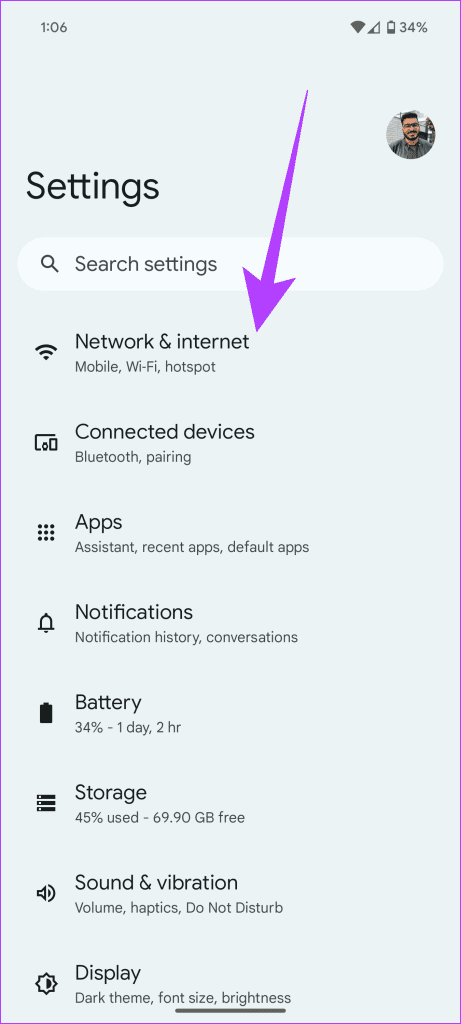
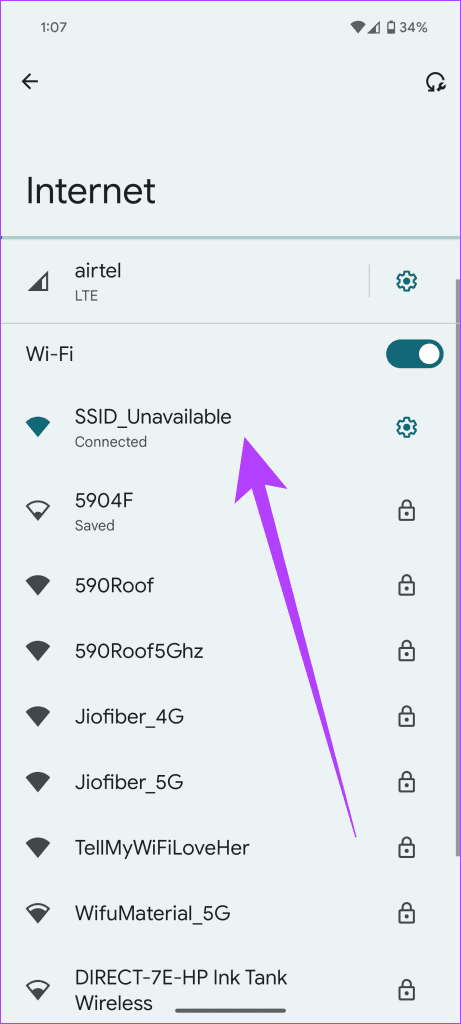
If you’re using a Google Pixel, Motorola, or any other Stock Android device, finding the option is super easy. Just navigate to Settings > Network & Internet > Internet, and then first connect to the Wi-Fi you wish to share.
Then, go back to the Network & Internet settings and tap on ‘Hotspot & tethering’. Here, enable the toggle next to the Wi-Fi hotspot. You can also tap on it to change the SSID name and password of your hotspot.

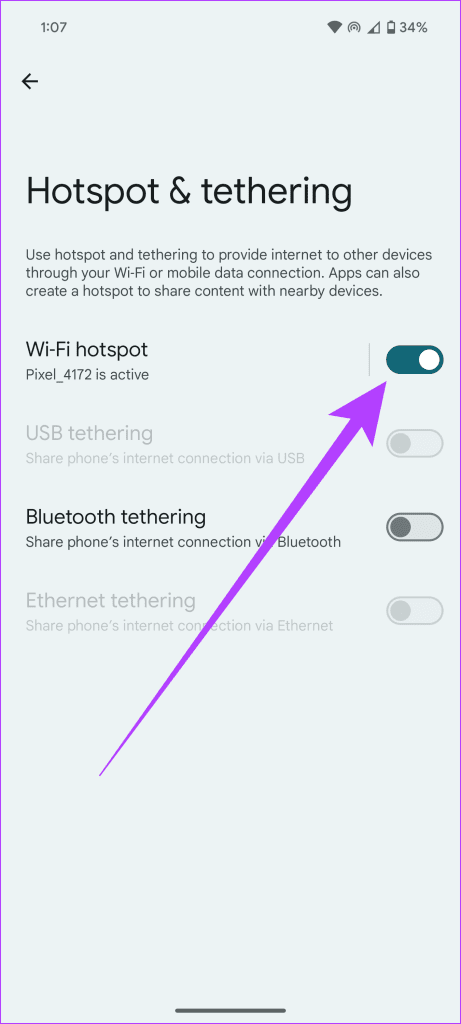
And that’s it. Your phone will now broadcast the internet connection as a separate Wi-Fi network.
On Samsung OneUI
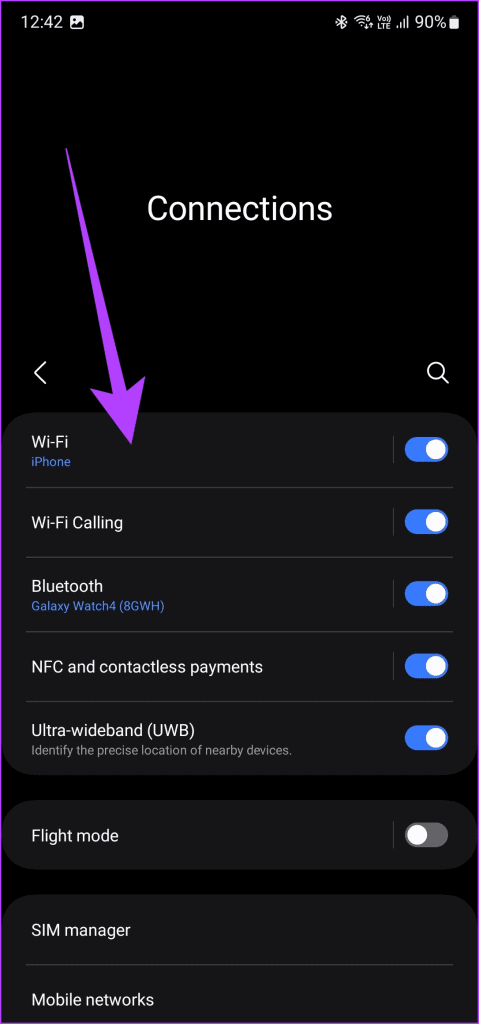
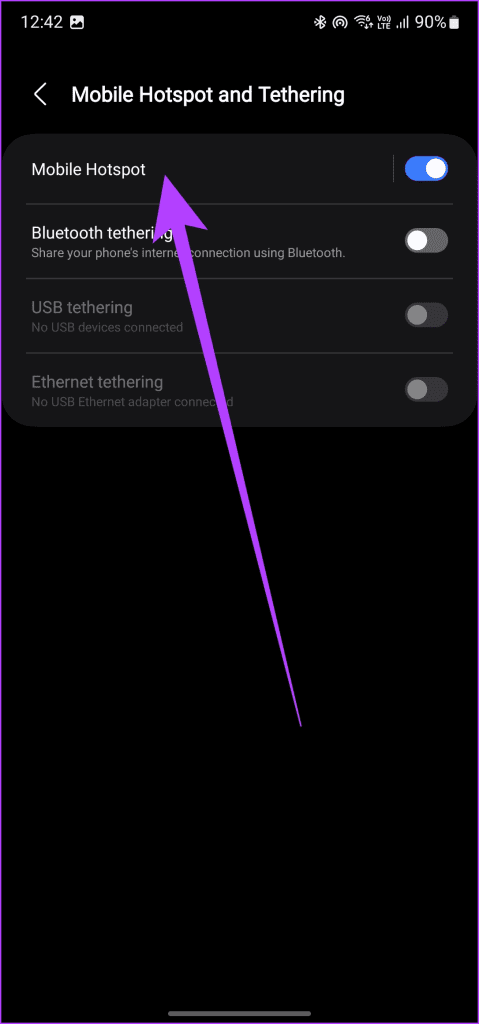
Samsung enthusiasts fear not! Your OneUI experience makes Wi-Fi extension a breeze. Head to Settings > Connections > Wi-Fi and connect to the Wi-Fi network you wish to extend. Once done, tap on ‘Mobile Hotspot and Tethering’.
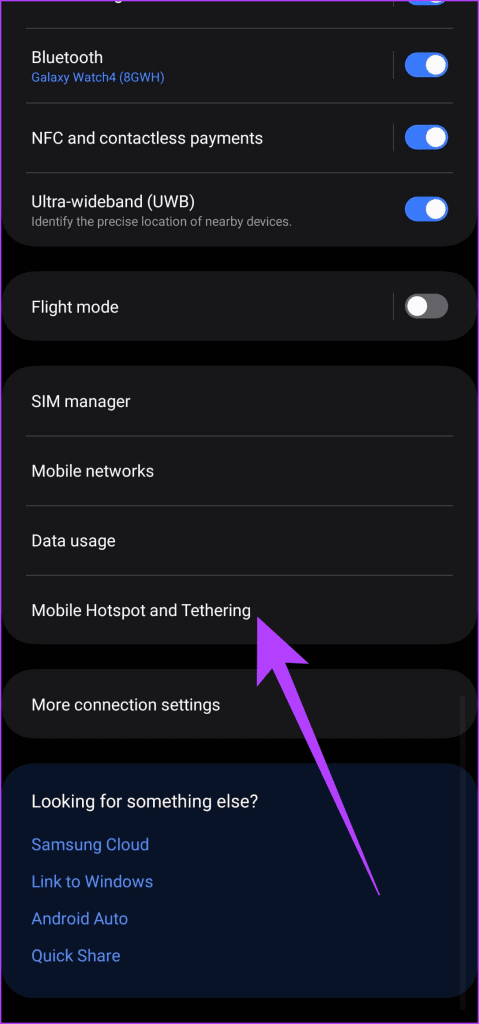
From here, enable the toggle next to ‘Mobile Hotspot’. You can also tap on the Mobile Hotspot text if you wish to modify the hotspot settings.

And that’s it. Your Samsung device transforms into a beacon of extended Wi-Fi coverage.
On OnePlus OxygenOS
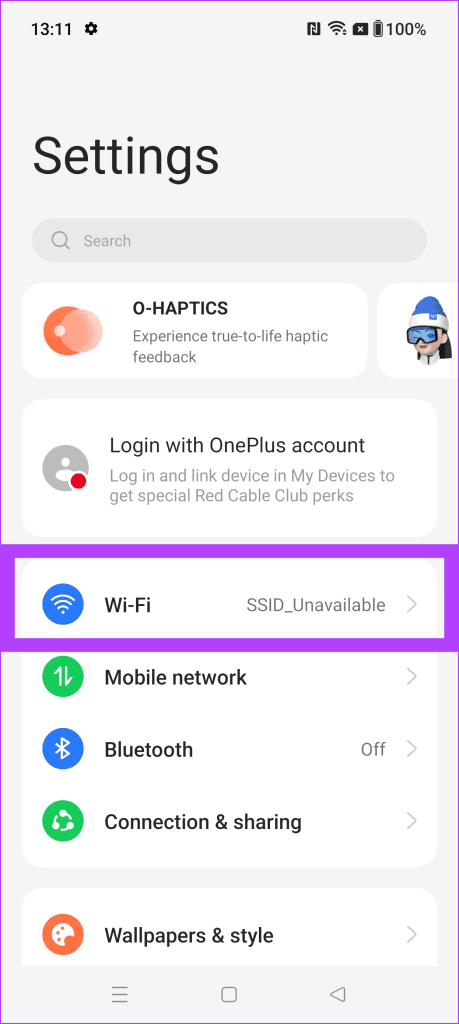
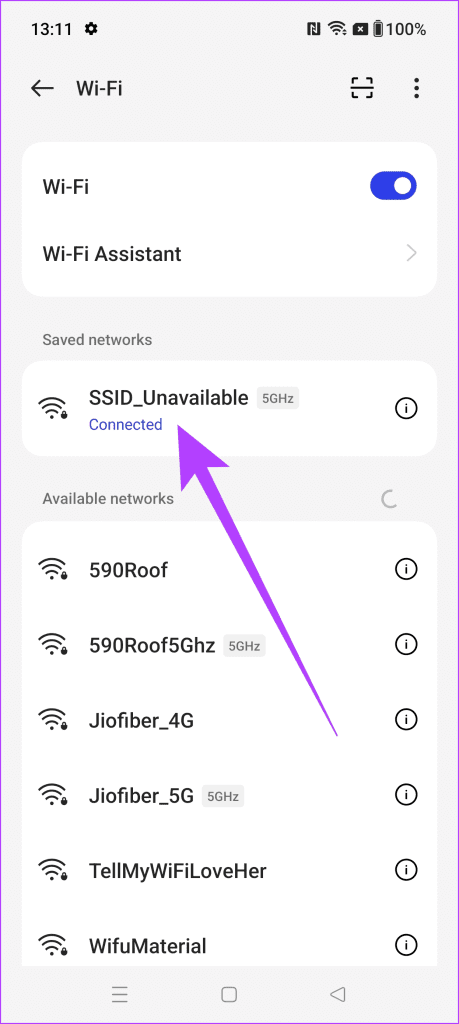
Even though OnePlus’ OxygenOS is quite close to Stock Android, it does have its naming convention for device settings. On your OnePlus device, head over to Settings > Wi-Fi, and connect to the Wi-Fi of your choice that you want to extend.
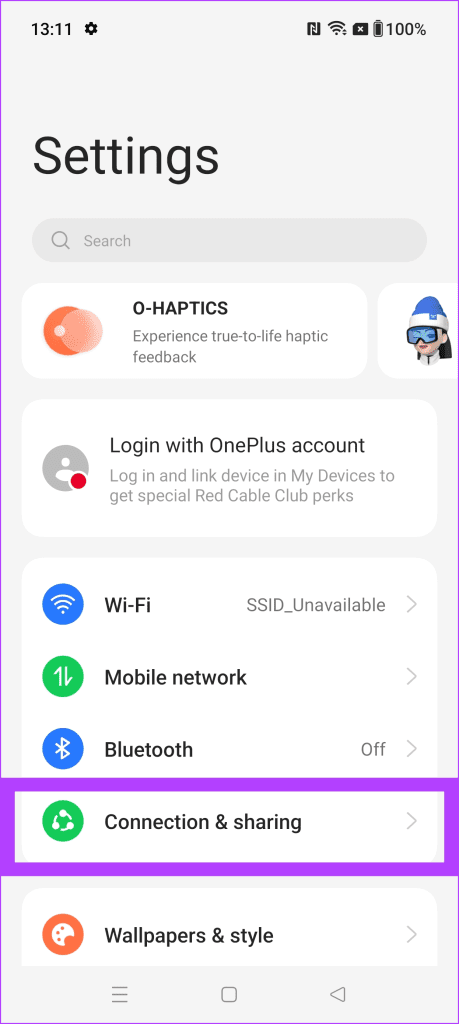
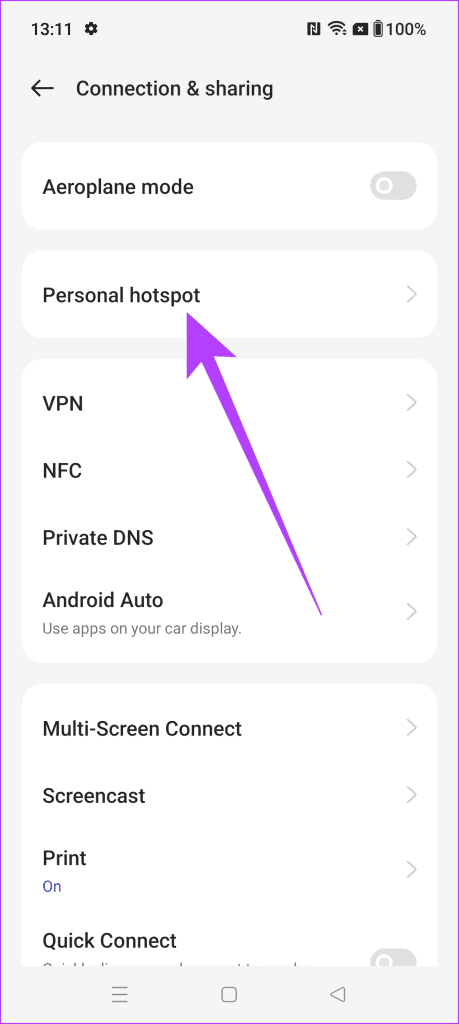
Then, head back to Settings, and tap on ‘Connection & sharing’. Here, tap on ‘Personal Hotspot’.
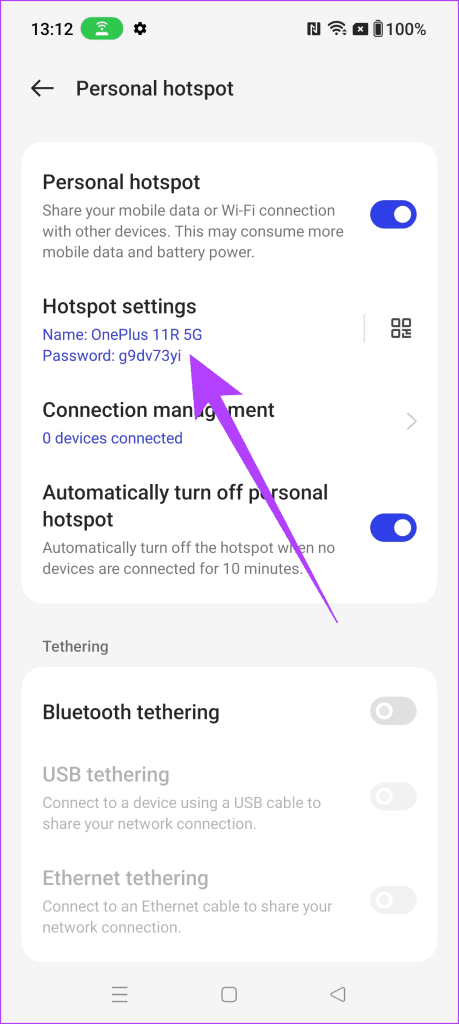
Finally, enable the toggle next to ‘Personal hotspot’. You can also tap on ‘Hotspot settings’ to change the SSID name and password of it.

Method 2: Using 3rd-Party Application
If you’re using an Android device with an older build or version, it’s possible that the above method doesn’t work for you. In that case, you can resort to using a 3rd-party application for the same. We recommend using NetShare for that. Here’s how to use NetShare to turn your Android phone into a Wi-Fi Extender.
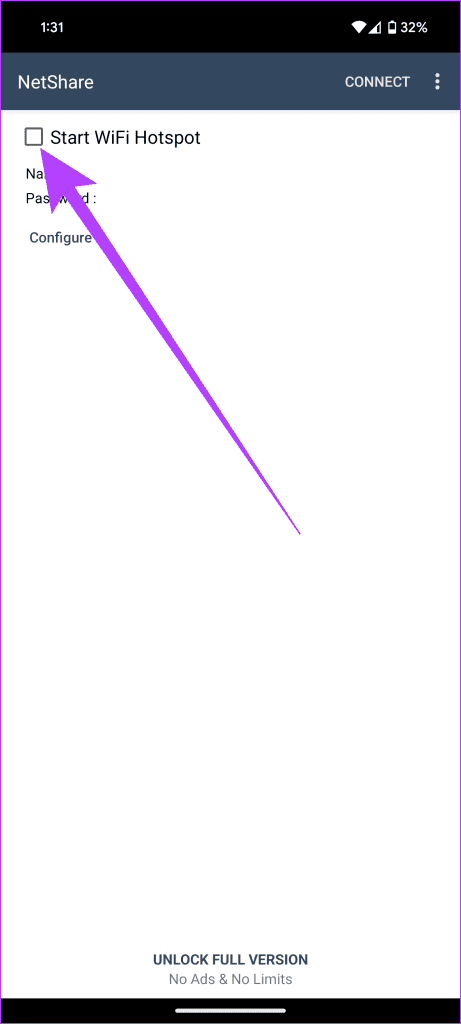
Step 1. Head to the Google Play Store and download the NetShare-no-root-tethering app.
Step 2. Once the app has been downloaded and installed, launch it. First off, check the box next to ‘Start WiFi Hotspot’. The app will now request certain permissions, which you can grant.

Step 3: The app will now generate a Wi-Fi name and password on its own. Do note these settings cannot be changed. Make a note of it, and you can use it to log in to other devices.
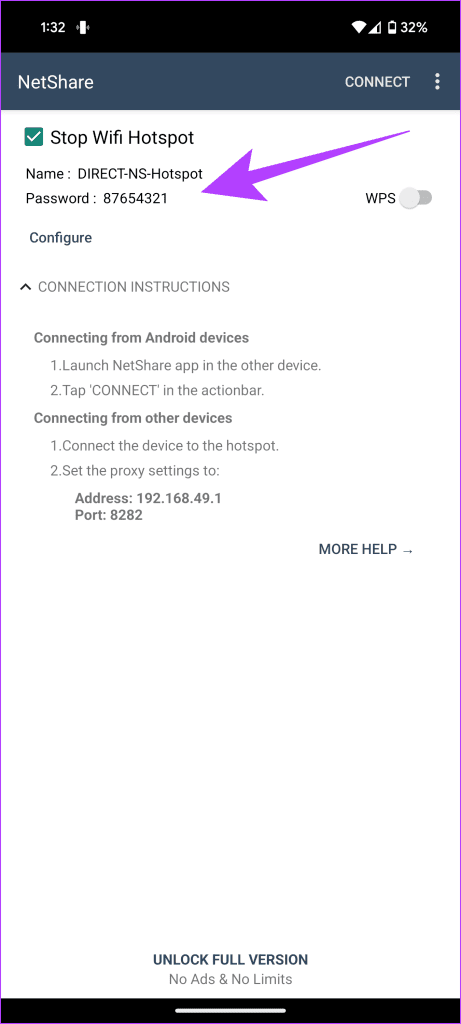
Do note that in some cases, directly connecting to the Wi-Fi might not work. In that case, NetShare also provides you with the proxy settings that you are required to use to be able to properly use the internet connection. For instance, on Windows, head over to Settings > Network & internet > Proxy, and select ‘Set up’ next to ‘Use a proxy server’. Now, enable the toggle, enter ‘192.168.49.1’ in the ‘Proxy IP address’ box, and enter ‘8282’ in the Port box.
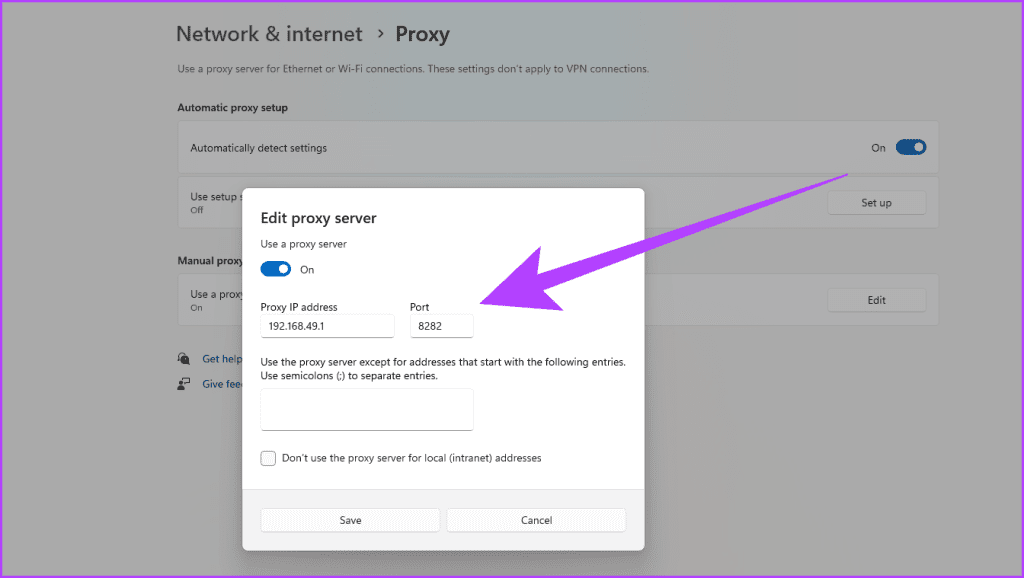
Once done, try connecting to the Wi-Fi hotspot once again, and everything should work seamlessly.
Do More with Your Android!
And there you have it – two dynamic ways to elevate your Android phone into a Wi-Fi extender. Whether you prefer the simplicity of built-in settings or the versatility of third-party apps, the power is in your hands. Transform your Android device into a beacon of connectivity, ensuring that no corner of your space is left untouched by the magic of Wi-Fi.
Also, here’s a bonus tip for you. Ever been to a hotel room where you have to log in to the Wi-Fi network on each device individually? Using this trick, you can login to the network on one Android device, and then share that network using a personal hotspot with all other devices. Every device that then connects to the Wi-Fi Hotspot of the Android device can use the Internet seamlessly without any login issues. The more you know!
Was this helpful?
Last updated on 29 December, 2023
Read Next
 Top 6 Wi-Fi Extender Wall Plugs With Ethernet Port
A wall Wi-Fi extender is useful when you want to expand and improve the wireless network's quality inside your home.
Top 6 Wi-Fi Extender Wall Plugs With Ethernet Port
A wall Wi-Fi extender is useful when you want to expand and improve the wireless network's quality inside your home.
 Google Phone App vs Samsung Phone App: How Different Are They
Our smartphones are like multi-tool kit, but the basic job of a phone is to make calls.
Google Phone App vs Samsung Phone App: How Different Are They
Our smartphones are like multi-tool kit, but the basic job of a phone is to make calls.
 New Budget Phone vs. Old Flagship Phone: Which Should You Buy
Thinking about getting a new phone?
New Budget Phone vs. Old Flagship Phone: Which Should You Buy
Thinking about getting a new phone?
 Microsoft Your Phone vs Samsung Flow: Which Is Better for Connecting Phone to Windows
I envy iPhone users for only one reason — the ability to link their Mac and iPhone easily.
Microsoft Your Phone vs Samsung Flow: Which Is Better for Connecting Phone to Windows
I envy iPhone users for only one reason — the ability to link their Mac and iPhone easily.
 How to Add, Remove, and Delete Samsung Account From Your Android Phone
You don't need a Samsung account to use your Android phone the same way you need a Google account.
How to Add, Remove, and Delete Samsung Account From Your Android Phone
You don't need a Samsung account to use your Android phone the same way you need a Google account.
 Why Unknown Apps Keep Installing Automatically on Android Phone
Getting unknown apps installed on your Android randomly can get irritating.
Why Unknown Apps Keep Installing Automatically on Android Phone
Getting unknown apps installed on your Android randomly can get irritating.
 How to Find Lost AirPods on an Android Phone
Losing your AirPods would be one of the worst feelings ever.
How to Find Lost AirPods on an Android Phone
Losing your AirPods would be one of the worst feelings ever.
 How to Turn Off Android Phone Sensors and Why You Should Do It
In this fast-paced world, mobile phones help you not only keep up but also work efficiently.
How to Turn Off Android Phone Sensors and Why You Should Do It
In this fast-paced world, mobile phones help you not only keep up but also work efficiently.
The article above may contain affiliate links which help support Guiding Tech. The content remains unbiased and authentic and will never affect our editorial integrity.