If you’ve landed on this page, it means that the Amazon Echo setup process is giving you a hard time too. You are not alone. Many people are having issues setting up Amazon Echo and Alexa. Although the Echo setup process is quite easy, if you skip some minor steps, you are doomed. Whatever the issue you are facing, this post shall help in fixing Amazon Echo and Alexa setup problems.

Many times, the Alexa app is stuck on the white screen and doesn’t let you complete the setup process. Other times, you will see that the ring light is stuck on blue when you actually need the orange light to start the setup process. Similarly, for some users, the Echo won’t connect to Wi-Fi during setup or the Alexa app can’t find Echo in setup mode. In this post, I have mentioned the following solutions to ease the Amazon Echo setup process:
- Set up Amazon Echo and Alexa properly
- Restart Echo and router
- Turn off Bluetooth during setup
- Ensure you are using the correct Wi-Fi password
- Connect to different Wi-Fi band (2.4Ghz/5Ghz)
- Switch to WPA2 Security in router settings
- Update Alexa app
- Reinstall Alexa app
- Disable Smart Network or Smart Wi-Fi Switcher (Android)
- Change the date and time of your phone
- Update Android System Webview (Android Only)
- Disable Ad Blockers and VPNs
- Connect to Your phone’s hotspot
- Deregister Echo device
- Factory Reset Echo
1. Set Up Amazon Echo and Alexa Properly
The first step to fix Amazon Echo and Alexa setup problems is to follow the correct steps to set it up. Use these steps to set up Amazon Echo and Alexa properly:
Note: You don’t need Amazon Prime to set up Amazon Echo.
Step 1: Install the Alexa app on your Android or iOS device. But, don’t open it yet.
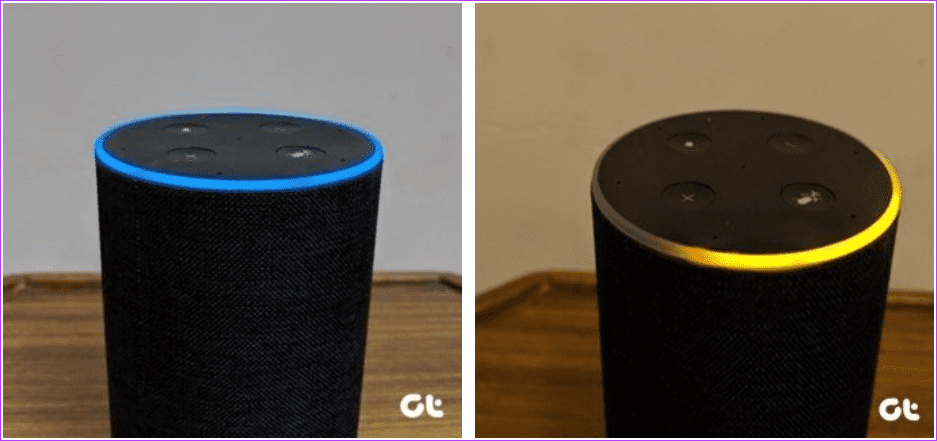
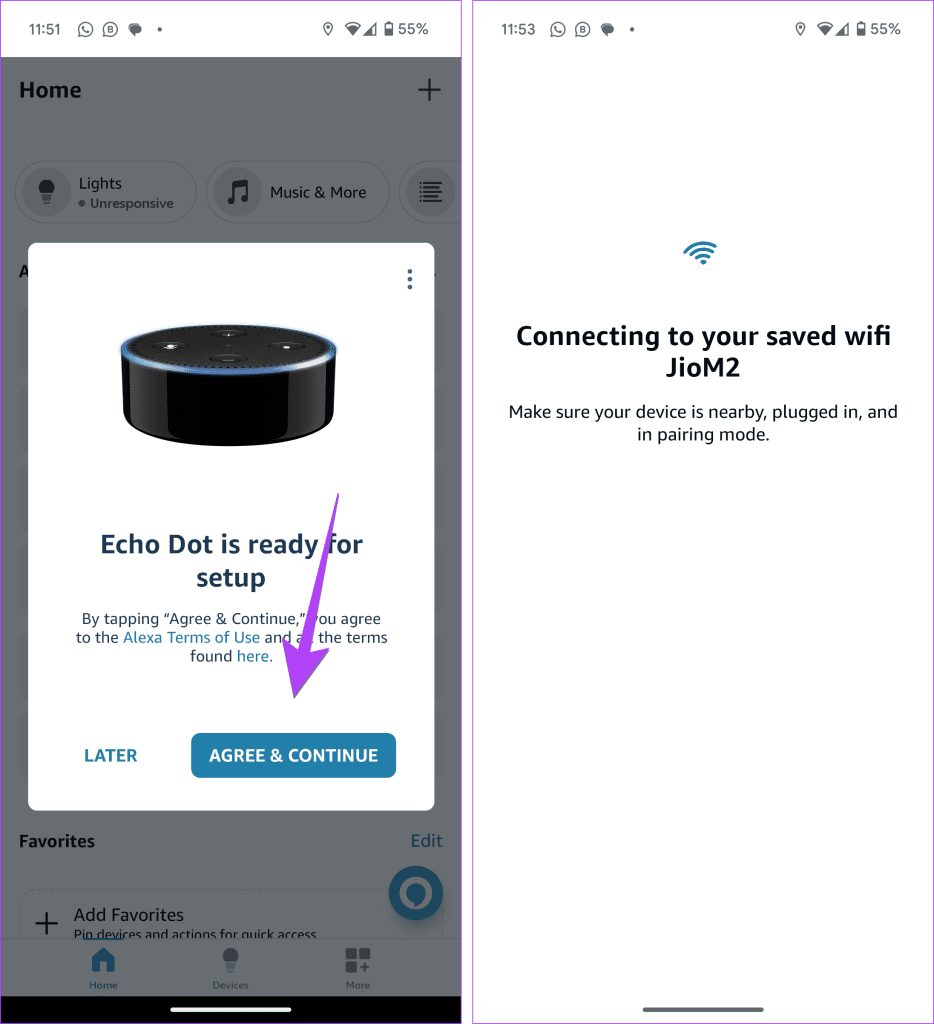
Step 2: Plug the Amazon Echo device into an electric socket. It will light up and the ring will turn blue for a minute or two. Once the ring turns yellowish orange, you will hear the command, “Your device is ready to set up”. At this point, launch the Alexa app that you installed on your phone.
Step 3: You’ll be asked to sign in using your Amazon account. If you have an Amazon account, use your existing credentials. If, however, you are a new user, create a new Amazon account.
Step 4: A pop-up screen will show up in the Alexa app suggesting that the Echo device is ready to set up. Tap on Agree & Continue.
Note: If the setup doesn’t start automatically, go to the Devices tab at the bottom and tap on the Add (+) followed by Add device. Select Amazon Echo. Follow the on-screen instructions.
Step 5: After that, your Amazon Echo will connect to the Wi-Fi saved on your phone. And it should be ready to use in a few seconds. Now, in case Echo won’t connect to Wi-Fi during setup, follow the next step.
Tip: Learn how to fix Amazon Echo is offline error.
How to Fix Echo Won’t Connect to Wi-Fi During Setup
If Echo doesn’t connect to Wi-Fi or you are getting errors like incorrect Wi-Fi password while setting it up, then use these steps to set up Amazon Echo:
- Install the Alexa app on your phone
- Plug in Amazon Echo
- Sign into your Amazon account
- Add the Echo Device to the Alexa app
- Connect to Amazon Wi-Fi
- Connect to Actual Wi-Fi
Here’s a detailed version of the above steps:
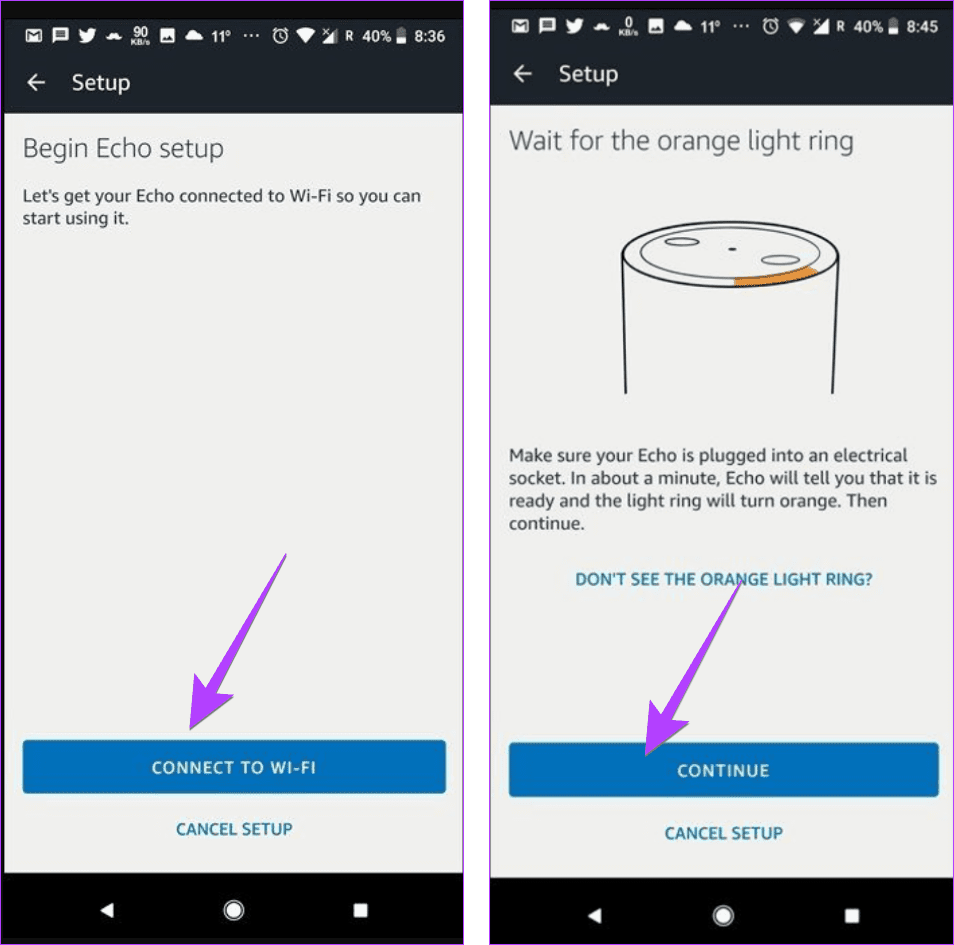
Step 1: Follow the first four steps of the above method.
Step 2: After that, you’ll be asked to connect to Wi-Fi on the screen that says Begin Echo Setup. Tap the Connect to Wi-Fi button. You will then be taken to the Wait for the orange light ring screen. If your Amazon Echo device is showing the orange light, well and good. Tap Continue.
However, if your Echo device is stuck in the blue light ring, press the Action button of your Echo device for 5-10 seconds until you get the orange light ring. Then, tap the Continue button on your Alexa app.
Step 3: You’ll then be taken to the Manually connect to Echo screen. This step allows the Echo to eventually connect to your actual Wi-Fi. This step is very crucial and it’s important to follow it carefully. Here’s what you need to do.
Leave the Alexa app and open the Wi-Fi Settings on your phone. Under Wi-Fi connections, you’ll see a new Wi-Fi connection with the name Amazon-xxx, where ‘x’ can be any digit. Tap this Wi-Fi network to connect. As soon as you tap the connection, your Echo device will then say its first words that you are connected. Now there’s another important step that you need to do on both Android and iPhone.
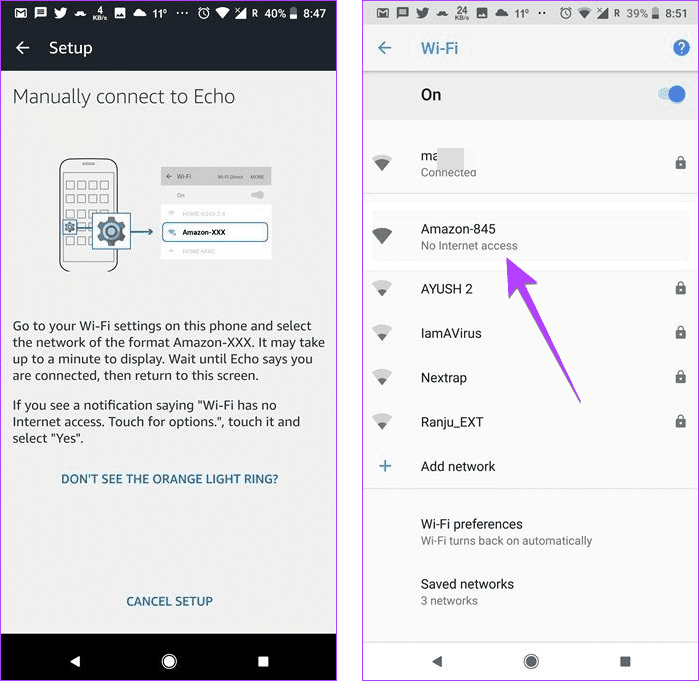
Important Step for Android Phones
Once you connect to the Amazon Wi-Fi, you’ll get a notification saying Wi-Fi has no Internet access on Android. Tap the notification and select Yes from the pop-up menu. This step is also extremely important. If you don’t tap the notification and press Yes, you will face the Wi-Fi setup issue on Echo.
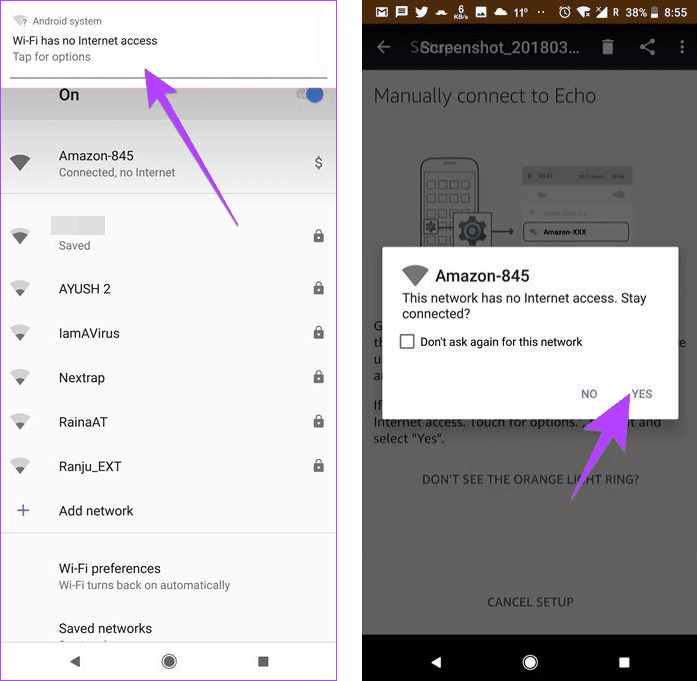
If, somehow, you missed the Wi-Fi has no Internet access notification and your Echo is now showing the violet light ring, hold the Action button on your Echo device to enter setup mode again.
Then, repeat the steps mentioned above and this time make sure to tap the Wi-Fi has no Internet access notification followed by selecting Yes from the menu. Once you tap Yes, go back to the Alexa app and you will be connected successfully. Tap the Continue button.
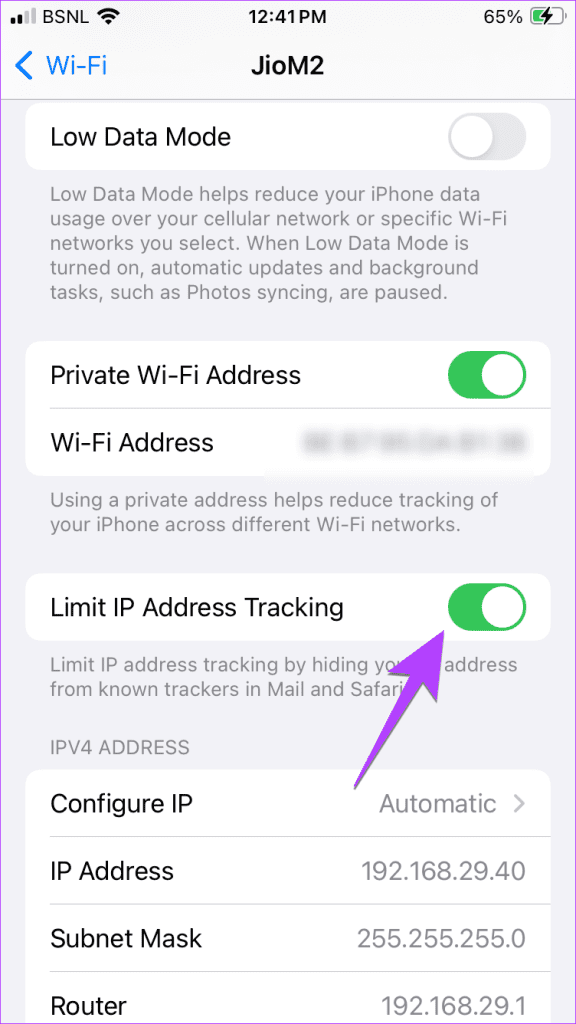
Important Step for iPhone
On iPhone, once you connect to the Amazon Wi-Fi network, tap on the Wi-Fi network and disable Limit IP Address Tracking. Once you do that, go back to the Alexa app.
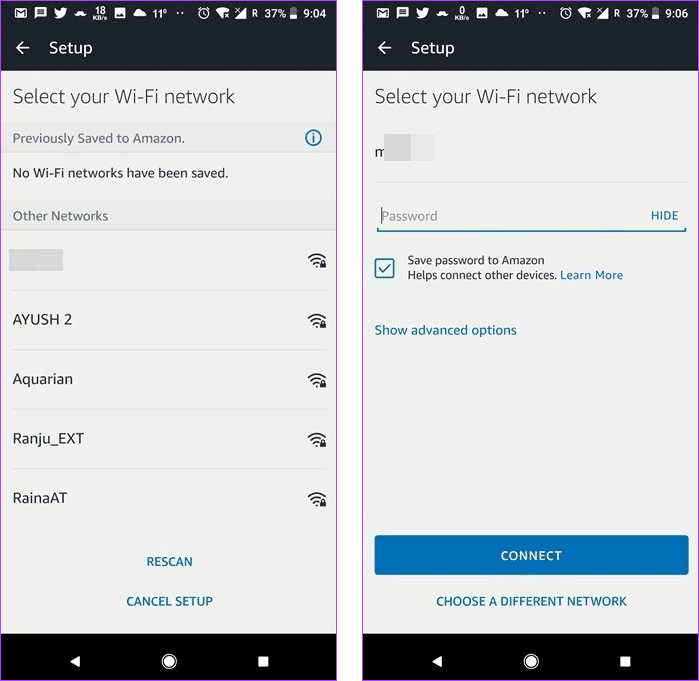
Step 4: You’ll then be asked to select your Wi-Fi network. Tap your Wi-Fi network and enter the password. Finally, hit the Connect button. Your Echo device will then finish the setup process and you’ll be notified on the next screen that the setup is complete. Tap the Continue button. That’s all you have to do to set up Echo and Alexa without any issues.
If you follow the above-mentioned steps, hopefully, Amazon Echo will work perfectly fine for you. If you’re still facing issues, follow the next set of fixes.
Tip: Check out other ways to fix Amazon Echo won’t connect to Wi-Fi issue.
2. Restart Echo and Router
If the Alexa app can’t find Echo in setup mode or Echo won’t connect to Wi-Fi during setup, simply restart the Echo device and your Wi-Fi router. To restart the Echo and the router, unplug them from the power supply and then plug them back.

3. Turn off Bluetooth During Setup
To fix Amazon Echo and Alexa setup problems, turn off Bluetooth on the phone from which you are trying to set up Echo. You can turn it off before starting the setup process or after your phone connects to the Amazon Wi-Fi network. For many users, if Bluetooth is kept enabled when the phone connects to Amazon Wi-Fi, they get the Wi-Fi password is incorrect error message when connecting to the actual Wi-Fi.
Tip: Know how to put Alexa in Bluetooth pairing mode.
4. Ensure You Are Using the Correct Wi-Fi Password
If you are getting the Wi-Fi password is incorrect error while setting up your Echo device, ensure that you are actually entering the correct Wi-Fi password. There are chances you may have changed the password and you are trying to use the old password. To be on the safe side, view your saved Wi-Fi password on Android and iPhone.
5. Connect to Different Wi-Fi Band (2.4Ghz/5Ghz)
If your Echo device is having a Wi-Fi problem during setup, you should try switching the Wi-Fi band from 2.4 GHz to 5 GHz or vice versa while selecting the Wi-Fi network.
6. Switch to WPA2 Security in Router Settings
If the Echo device isn’t detecting Wi-Fi during setup, there are chances your Wi-Fi network is using WPA3-Personal security. It seems Echo devices work best with WPA2. So go into your router settings and switch to WPA2 security.
7. Update Alexa App
Sometimes, the problem is neither in your Echo nor in your Wi-Fi but in the Alexa app. To fix it, all you need to do is update the Alexa app from the Play Store (Android) or App Store (iPhone) and that will fix the Echo setup issue.
8. Reinstall Alexa App
If you’re stuck on the white screen of the Alexa app during the setup process, you should try reinstalling the Alexa app on your phone. Reinstalling the app will also help if Echo doesn’t enter setup mode. For that, first, you will need to uninstall the app followed by installing it again.
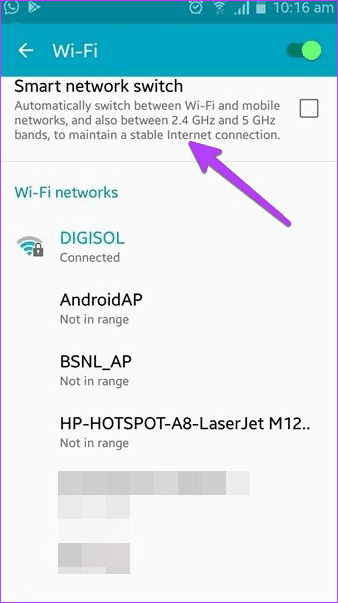
9. Disable Smart Network or Smart Wi-Fi Switcher (Android)
If you’re stuck on the setup process on devices like Samsung and OnePlus, you need to disable the Smart Network Wi-Fi setting. To do so, follow the steps:
Step 1: Leave the Alexa app and open phone Settings.
Step 2: Go to the Wi-Fi Settings of your phone. In older Samsung phones, you’ll find the Smart network switch on this screen itself. Uncheck the option if it’s on. On the new Samsung devices, tap the three-dot menu at the top-right corner or tap Advanced Settings. Turn off the Smart Network option or Switch to mobile data as it is called now. Go back to the Alexa app and it should be connected. Similarly, look for the Smart Wi-Fi Switcher option in the OnePlus Wi-Fi Settings.
10. Change the Date and Time of Your Phone
Many times, due to a conflict in the date and time of your phone, Alexa and Echo do not complete the setup process properly. You have to change the date and time settings on your device from Manual to Automatic.
To do so, open the device settings of your phone (Android or iPhone) and navigate to the Date and time settings. Enable the toggle for Automatic date & time.
11. Update Android System Webview (Android Only)
A normal user will never think of updating the apps if they are facing setup issue on their Echo. However, surprisingly, you have to update the Android System WebView app (if an update exists) to fix this issue.
To do so, follow these steps:
Step 1: Open the Play Store app on your device and search for Android System Webview.
Step 2: If you see an update button for Android System Webview, tap it to update the app. Once updated, try setting up Amazon Echo and Alexa again.
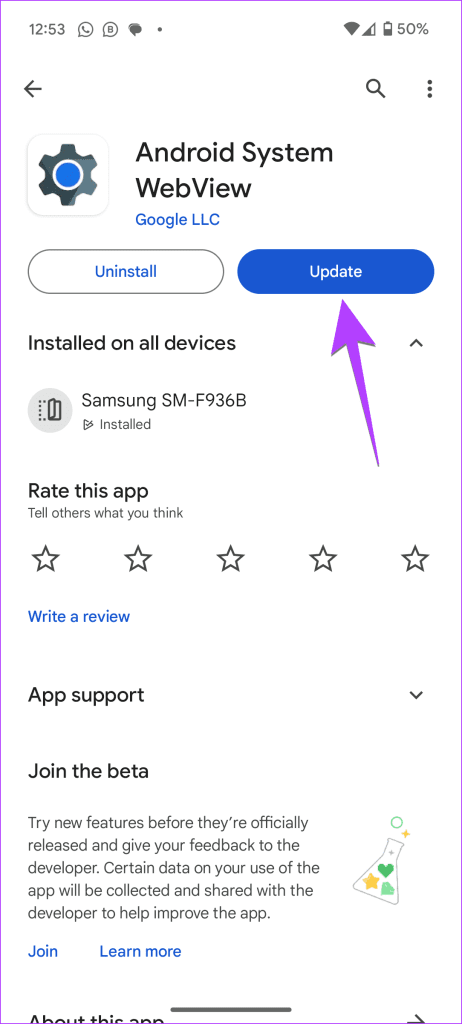
Tip: Learn how to fix Android System WebView not updating.
12. Disable Ad Blockers and VPNs
If your phone has ad blocker apps or VPN installed, disable them while setting up Amazon Echo and Alexa. Once disabled, try the setup process mentioned in the first fix.
13. Connect to Your Phone’s Hotspot
If Echo refuses to connect to your regular Wi-Fi, you should set it up using your phone’s hotspot. Enable the hotspot before starting the setup process on Echo, then select the Amazon Wi-Fi network followed by choosing the phone’s hotspot. Once Echo is successfully set up, you can change the Wi-Fi to your home Wi-Fi.
Tip: To change Wi-Fi in the Echo device, open the Alexa app and tap on your Echo device. Select Change next to Wi-Fi network and select the new Wi-Fi that you want to connect to.
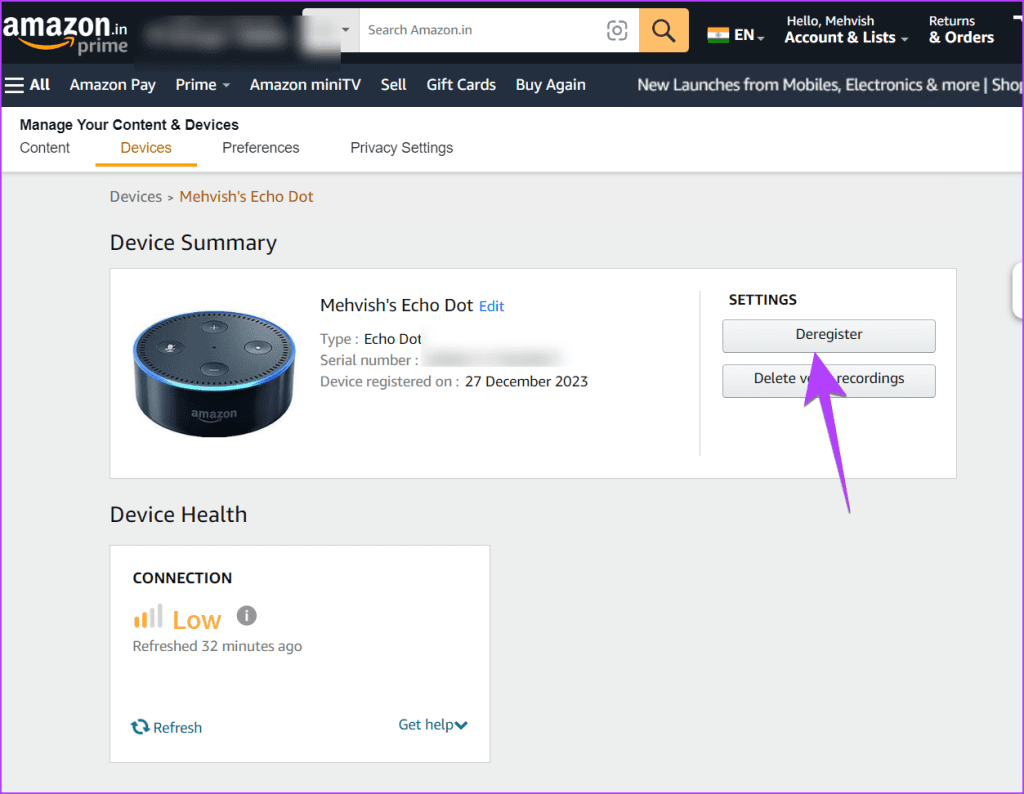
14. Deregister Echo Device
In case you are trying to set up an Echo device after resetting it, you should deregister the device first before you set it up again, otherwise, you might get the “There was a problem setting up your device” error message.
For that, open Amazon’s Manage content and devices page. Click on Devices at the top and select your Echo device.
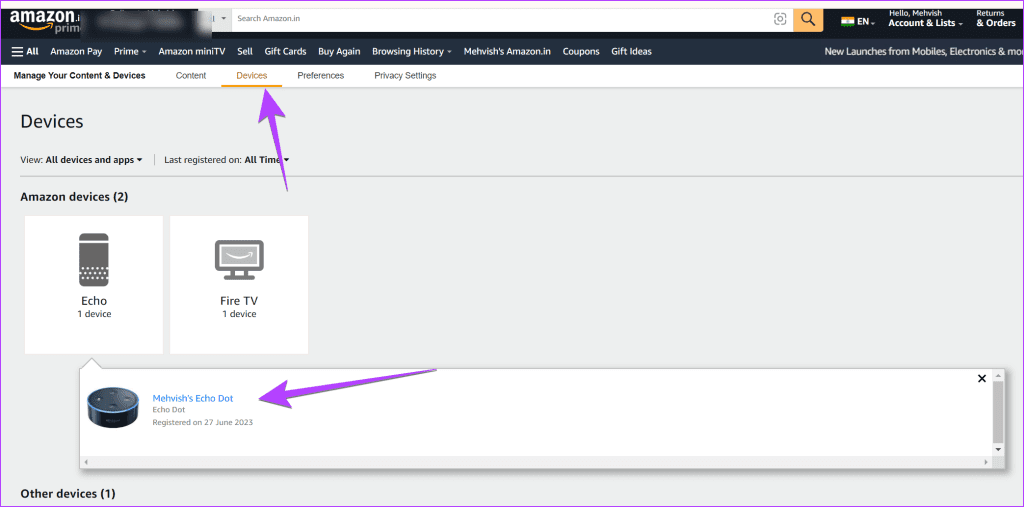
Then, click on the Deregister button on the next screen.
15. Factory Reset Echo
If the Alexa app can’t find Echo in setup mode, you should factory reset your Echo device using physical buttons and then try setting it up again as shown in the first fix.
Time to Set Up Amazon Echo
We hope you were able to fix Amazon Echo and Alexa setup problems. Once you start using Echo, learn how to change Alexa’s name and voice. If you need any other help related to Amazon Echo, do let us know.
Was this helpful?
Last updated on 27 December, 2023
Read Next
 Why Is Alexa Responding But Not Talking on Amazon Echo and How to Fix
What’s the use of a smart speaker if it doesn’t respond to your queries?
Why Is Alexa Responding But Not Talking on Amazon Echo and How to Fix
What’s the use of a smart speaker if it doesn’t respond to your queries?
 Top 8 Ways to Fix Amazon Echo Alarm Won’t Turn off Issue
Smart speakers are cool until they start having a brain of their own.
Top 8 Ways to Fix Amazon Echo Alarm Won’t Turn off Issue
Smart speakers are cool until they start having a brain of their own.
 Top 6 Ways to Fix Amazon Echo Stuck on Blue Light
An Amazon Echo speaker or display can be of great help if you wish to add a touch of smartness to your home.
Top 6 Ways to Fix Amazon Echo Stuck on Blue Light
An Amazon Echo speaker or display can be of great help if you wish to add a touch of smartness to your home.
 Top 7 Ways to Fix Amazon Echo Sound Keeps Cutting Out
Amazon Echo smart speakers come in several price offerings.
Top 7 Ways to Fix Amazon Echo Sound Keeps Cutting Out
Amazon Echo smart speakers come in several price offerings.
 8 Ways to Fix Alexa Not Playing Amazon Music
Some Basic Fixes Restart your Echo device: You should start the troubleshooting process of Alexa not playing Amazon Music by restarting your Echo.
8 Ways to Fix Alexa Not Playing Amazon Music
Some Basic Fixes Restart your Echo device: You should start the troubleshooting process of Alexa not playing Amazon Music by restarting your Echo.
 Top 9 Ways to Fix Telegram Connecting Problems on iOS and Android
Telegram is jumping the popularity charts on both iOS and Android.
Top 9 Ways to Fix Telegram Connecting Problems on iOS and Android
Telegram is jumping the popularity charts on both iOS and Android.
 Top 5 Ways to Fix Some Update Files are Missing or Have Problems Error on Windows 11
Microsoft regularly releases updates for Windows 11 to keep your system secure and bug-free.
Top 5 Ways to Fix Some Update Files are Missing or Have Problems Error on Windows 11
Microsoft regularly releases updates for Windows 11 to keep your system secure and bug-free.
 4 Best Ways to Fix Fire TV Stick Connected With Problems Error
Network-related issues on the Amazon Fire TV Stick are just as common as they are infuriating.
4 Best Ways to Fix Fire TV Stick Connected With Problems Error
Network-related issues on the Amazon Fire TV Stick are just as common as they are infuriating.
The article above may contain affiliate links which help support Guiding Tech. The content remains unbiased and authentic and will never affect our editorial integrity.