FLAC is a great codec for storing digital audio files uncompressed, which allows you to enjoy your music as it was meant to sound.
But what if you want to play those audio files on a standard CD player, like the one in your car? (I know, I know, CDs are hardly in vogue these days, and will soon be extinct, but there’s no escaping them just yet)

While some players will allow you to listen to MP3 or WMA files, you rarely find a standalone CD player that works with FLAC.
However, you can pretty easily create an audio CD from FLAC files, using the popular (and free) software ImgBurn.
Using ImgBurn To Create An Audio CD from FLAC Files
What will you need for this? Well, obviously, you’ll need to have your FLAC files at hand, a computer with a CD writer and a blank CD. You’ll also need to have ImgBurn installed.
Step 1: I will presume that you already have ImgBurn installed. Let’s make sure FLAC files can be handled and you don’t get an error. To do so, download madFLAC and unpack the RAR file to a location you can easily find on your hard drive.
Step 2: Run install.bat.
The codec will be installed in an instant. You will get a message like the one below if the codec has been successfully registered.

Step 3: Start ImgBurn and insert the blank CD in your CD writer.
Now, let’s build the image (CUE) file for your audio CD. This can be easily done in ImgBurn. In the top menu, go to Tools. Then, click Create CUE File.

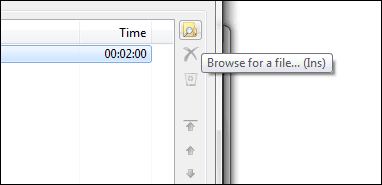
Step 4: We’ll now add the desired FLAC files to your future audio CD. Click the Browse for a file button.
Step 5: Select the files you want. If they are in different folders, you’ll have to go through the process until you’ve added them all.

Cool Tip: If you want to save some time, make sure you copy all of the files you want on your audio CD in the same folder. That way, you can just take them all from there, without having to spend time looking for them.
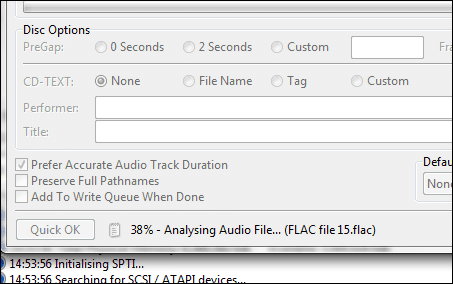
Step 6: ImgBurn will now analyze your files and see if everything will go according to plan. If you’ve followed the instructions above, there’s no reason why you should get any errors. If you don’t have the FLAC code installed, this is usually where you’ll be told that the software isn’t capable of handling your files.
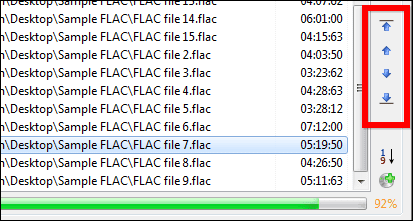
Step 7: Use the arrow buttons on the right side of the window to change the order of your CD tracks.
Step 8: Once you’re happy with the order, make sure you tick Add to write queue when done, after which you can click OK at the bottom of the window.

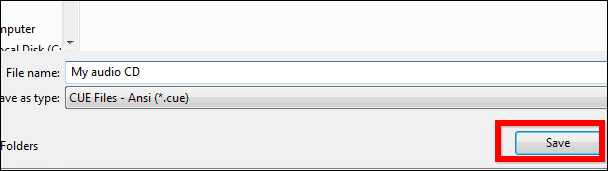
Step 9: Save the CUE file on your hard drive. You’ll get a success message once it’s saved.
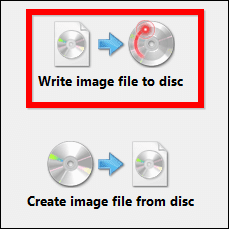
Step 10: Click Write image file to disc in the main menu.
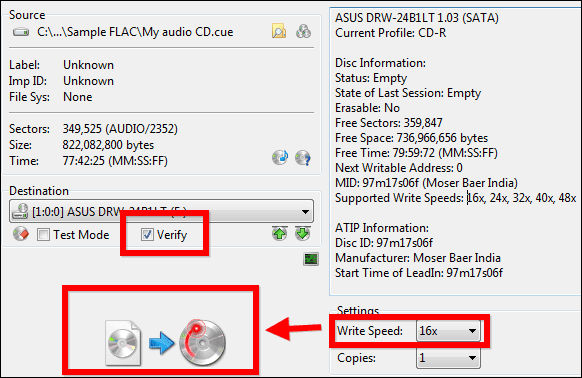
Step 11: You’ve added your image to the write queue, so there are just a couple of things left to do. Select the write speed (I suggest not going over 16X, as your CD might be rendered unplayable by some players).
I also suggest ticking Verify, so that you’re sure everything went smoothly (even if takes a bit more time).
Once everything’s selected, click the Write button.
Step 11: (Not absolutely necessary) If you think you won’t be writing the image again, you can tick Delete Image while the CD is being burnt. ImgBurn will delete the image file.

Once the writing (and verifying is done), you can go ahead and listen to your audio CD and enjoy the excellent sound levels and crystal clear notes in the music.
Was this helpful?
Last updated on 02 February, 2022
Read Next
 How to Easily Extract Audio From Video Files Using Audacity
In our post 13 awesome (and free) tools to rip audio from video, we listed the awesome all-things-sound-and-audio tool Audacity but stated that there was no direct way to extract
How to Easily Extract Audio From Video Files Using Audacity
In our post 13 awesome (and free) tools to rip audio from video, we listed the awesome all-things-sound-and-audio tool Audacity but stated that there was no direct way to extract
 How to Insert Audio Files into Microsoft Word
Method 1: Using a Simple Drag and Drop The easiest way to insert audio in Microsoft Word is to use a simple drag-and-drop method.
How to Insert Audio Files into Microsoft Word
Method 1: Using a Simple Drag and Drop The easiest way to insert audio in Microsoft Word is to use a simple drag-and-drop method.
 How to Create and View Batch Files (BAT) on Windows 11
While Windows makes it easy to install and remove programs, some of them require complex steps to be under taken in PowerShell or Command Prompt.
How to Create and View Batch Files (BAT) on Windows 11
While Windows makes it easy to install and remove programs, some of them require complex steps to be under taken in PowerShell or Command Prompt.
 Samsung My Files vs Google Files: Which File Manager Is Better on Galaxy Phones
Samsung apps are bundled to replace the official Google Apps in the One UI.
Samsung My Files vs Google Files: Which File Manager Is Better on Galaxy Phones
Samsung apps are bundled to replace the official Google Apps in the One UI.
 How To Create and Add Password To ZIP Files on Mac
A ZIP file on your Mac lets you package and organize data without acquiring too much storage space.
How To Create and Add Password To ZIP Files on Mac
A ZIP file on your Mac lets you package and organize data without acquiring too much storage space.
 How to Enable Audio in TeamViewer on Windows 10 (and More Tips)
So the other day, I was troubleshooting an issue on my friend's PC using TeamViewer.
How to Enable Audio in TeamViewer on Windows 10 (and More Tips)
So the other day, I was troubleshooting an issue on my friend's PC using TeamViewer.
 11 Easy Ways to Fix HDMI Audio Not Working in Windows 11
When watching a movie, series, show, etc., using HDMI audio seems to have become a staple.
11 Easy Ways to Fix HDMI Audio Not Working in Windows 11
When watching a movie, series, show, etc., using HDMI audio seems to have become a staple.
 Top 6 Ways to Fix No Audio Device Is Installed Error on Windows 11
Are you getting the 'No audio device is installed' error when you play music or a video file on your Windows 11 computer?
Top 6 Ways to Fix No Audio Device Is Installed Error on Windows 11
Are you getting the 'No audio device is installed' error when you play music or a video file on your Windows 11 computer?
The article above may contain affiliate links which help support Guiding Tech. The content remains unbiased and authentic and will never affect our editorial integrity.

