Windows 11 has entirely refreshed the right-click or context menu in Windows 11 and replaced it with a completely new menu. While this new redesign has removed some unnecessary shortcuts and options, the new look can be a bit daunting at first. Thankfully, it can be easily customized to suit your needs. In this article, we will guide you on how to change the right-click menu in Windows 11.
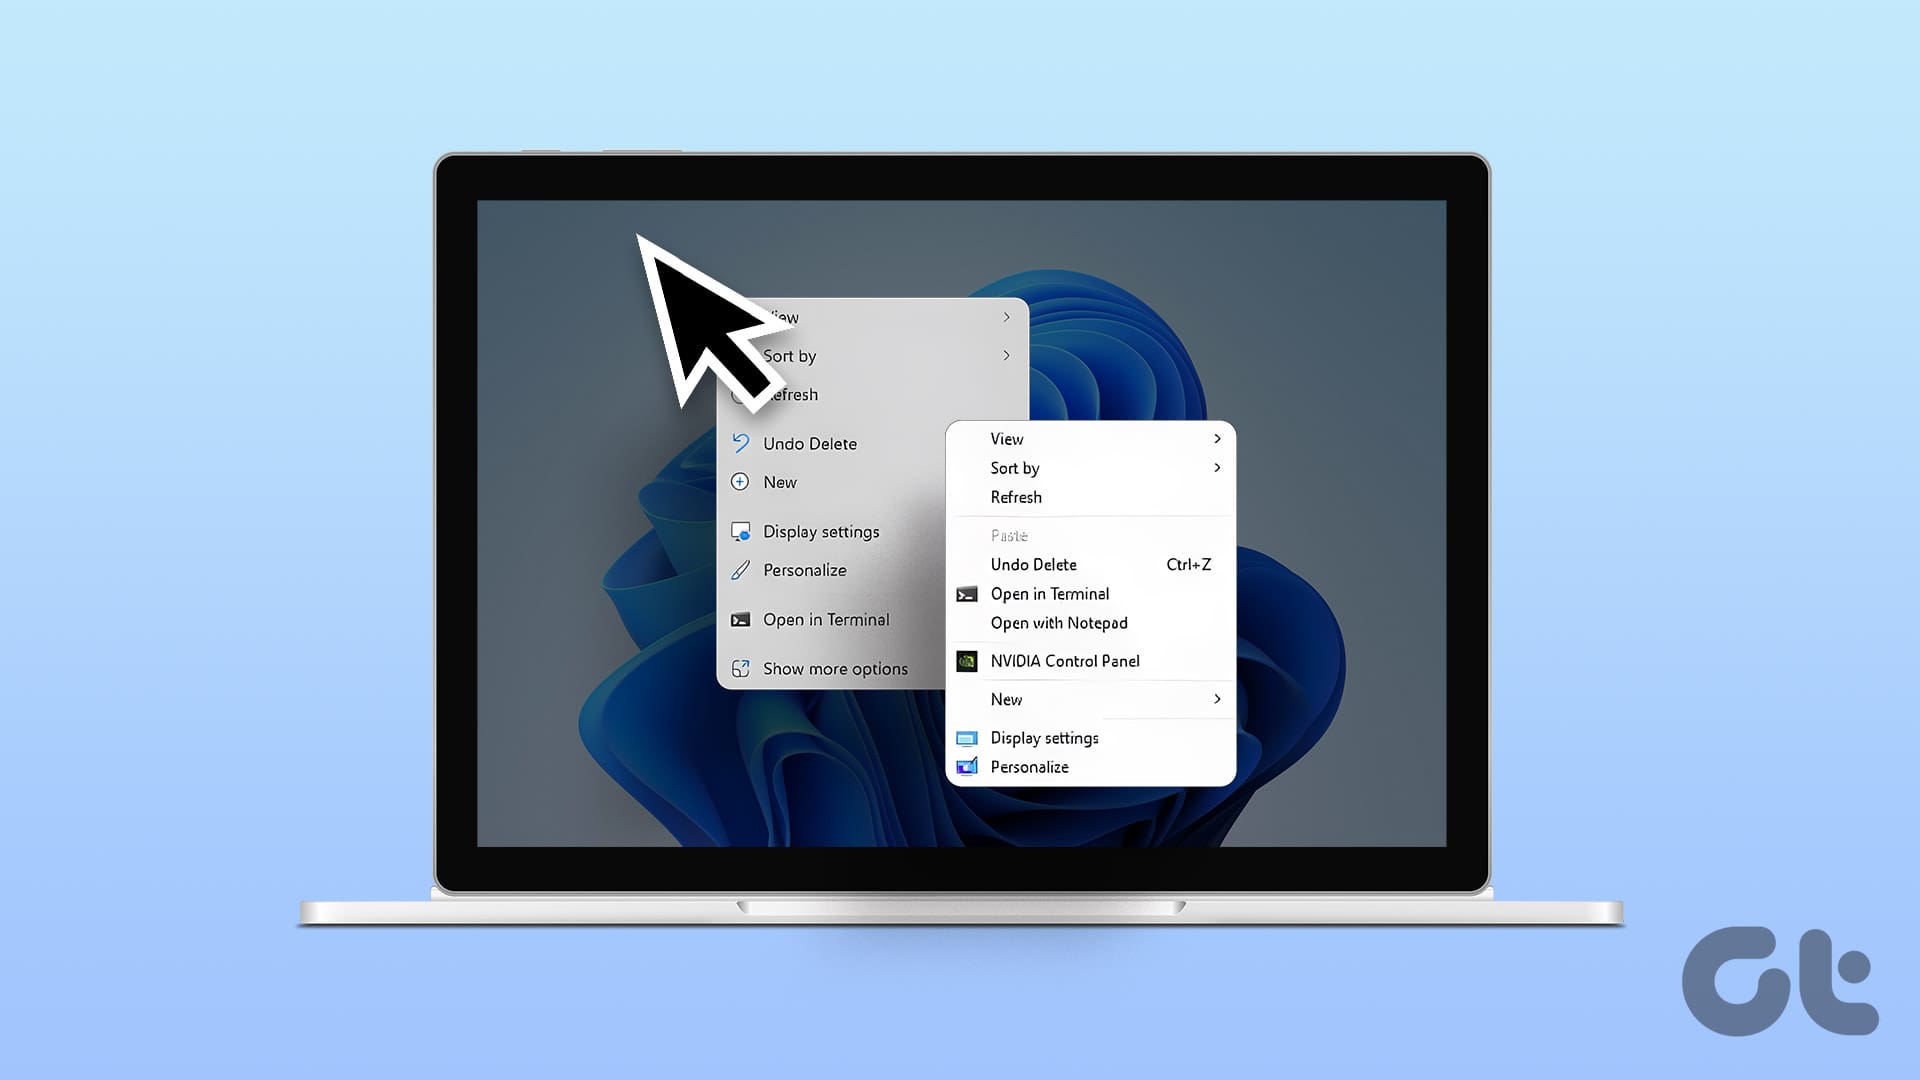
Now, you might ask yourself, ‘why would you want to change the right-click menu in Windows 11?’ The answer is simple – personalization and efficiency. Your PC should adapt to your preferences, not the other way around. Customizing the right-click menu streamlines your access to frequently used functions, saving you valuable time and improving your computing experience. With this understanding, let’s begin with the article.
Here’s how to change and customize the right-click menu in Windows 11.
How to Change the Right-Click Menu in Windows 11
Changing the right-click menu in Windows 11 is fairly simple and straightforward. There are two ways to go about it. We will explain each method in a step-by-step format.
Let’s begin with the first one.
Method 1: Change Right-Click Menu Options Using Registry Editor
This method may seem complex, but the steps are simple to follow. However, because we will use the Registry Editor, we recommend backing up the Windows Registry before proceeding with the steps below.
Step 1: Firstly, press the Windows key on your keyboard. Then, type Registry Editor and click ‘Run as administrator.’
Note: Alternatively, press the Windows + R key to open the Run dialog box, type regedit.exe, and click OK to open Registry Editor.

In the prompt, select Yes.
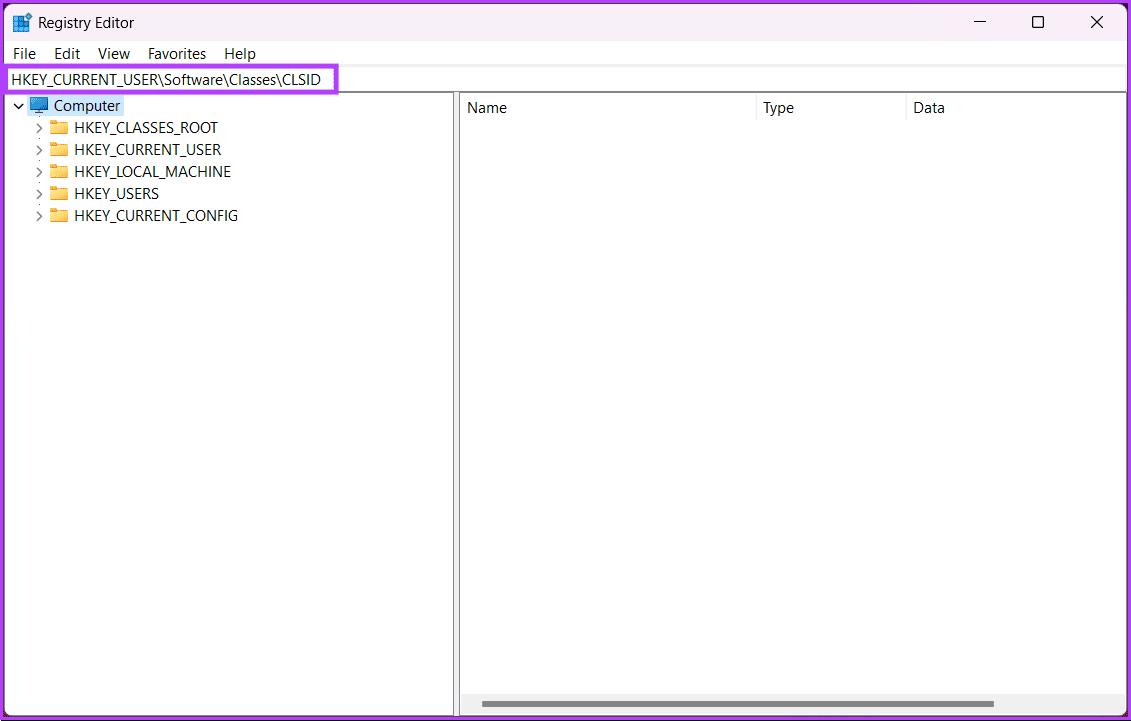
Step 2: In the top address bar, enter the following path:
HKEY_CURRENT_USER\Software\Classes\CLSID
Note: You can manually navigate to the section too.
Step 3: Once the path opens, right-click and select New > Key.
This will create a new key on the left panel.
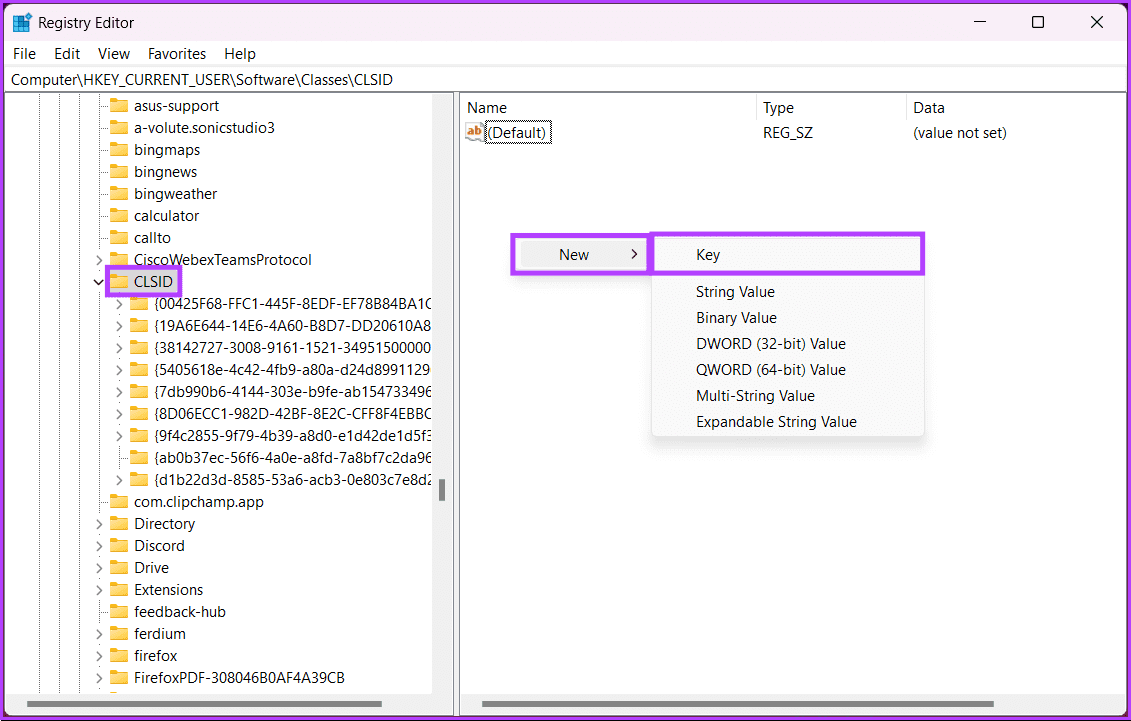
Step 4: Once done, rename the key with the following:
{86ca1aa0-34aa-4e8b-a509-50c905bae2a2}
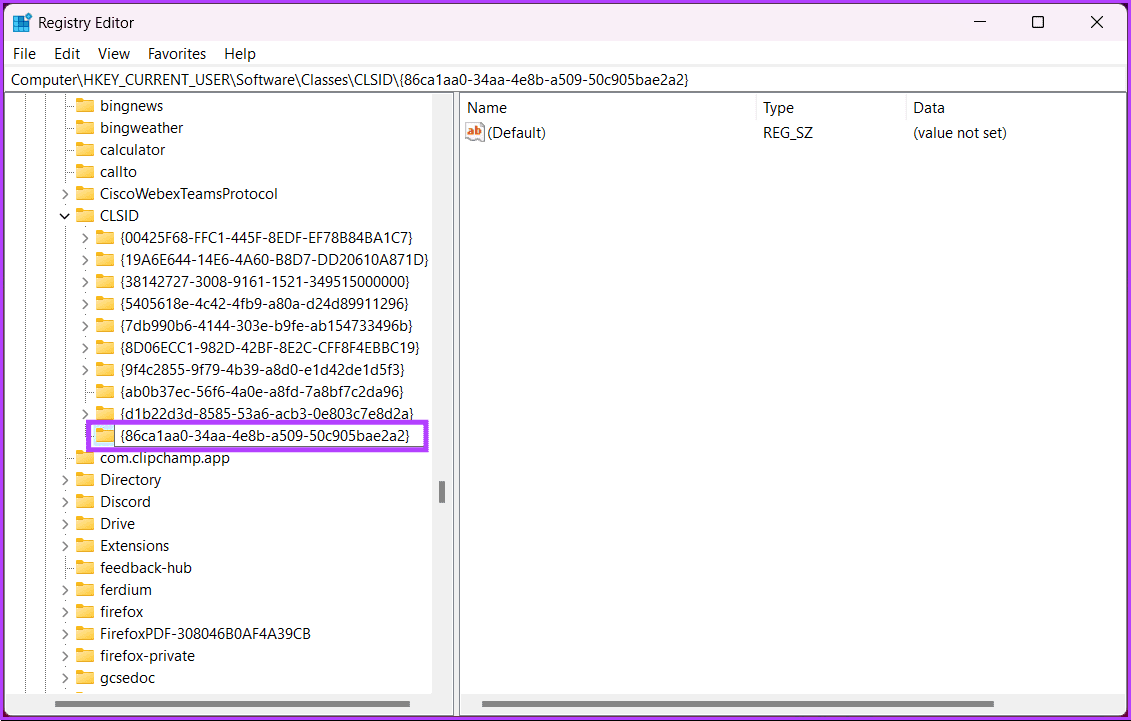
Step 5: Select the newly-created key. Then, right-click on the right panel and choose New > Key.

Step 6: Now, rename the newly created key to the name below;
InprocServer32
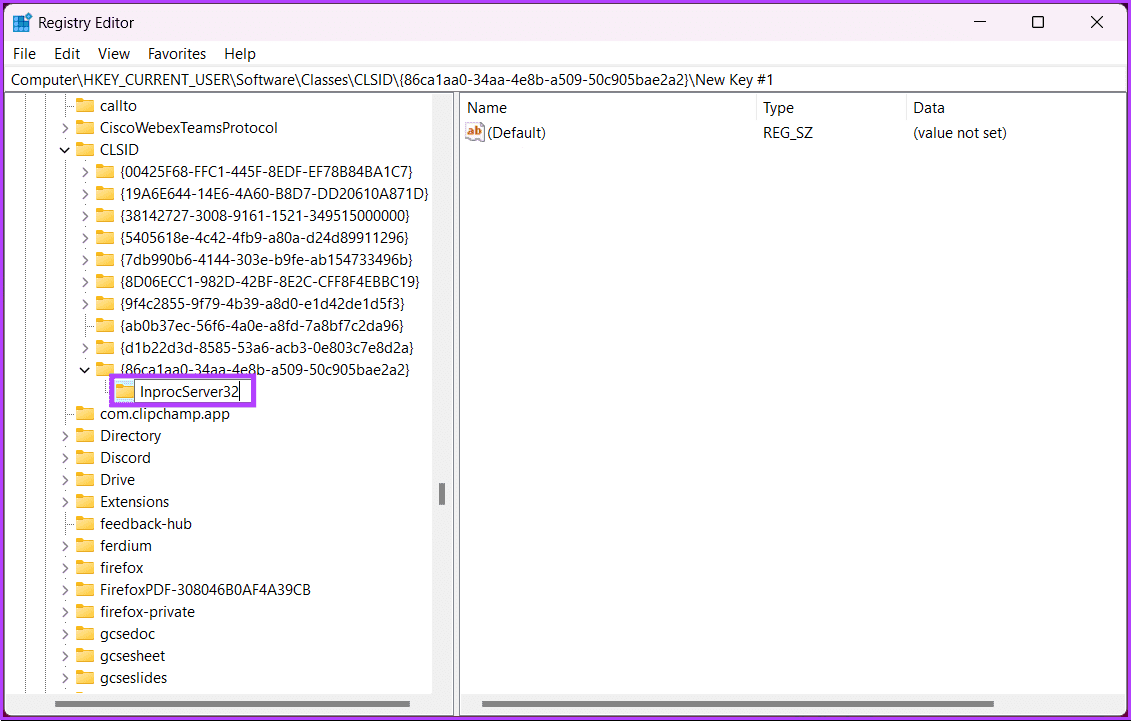
Step 7: Select the newly created InprocServer32 folder. On the right pane, double-click on Default.

Step 8: Finally, keep the Value Data field empty and hit the OK button.

That’s it. Now, all you need to do is restart your Windows 11 laptop/PC to be welcomed by the old context menu. However, if you want to bring back the new context menu, just delete the InprocServer32 key from the registry editor.
If the steps are too complicated for you to follow, move on to the next one.
Method 2: Edit Context Menu Using Command Prompt
Step 1: Press the Windows key on your keyboard. Then, type Command Prompt and click ‘Run as administrator.’
Step 2: Now, type or copy-paste the following command and hit Enter:
reg add "HKCU\Software\Classes\CLSID\{86ca1aa0-34aa-4e8b-a509-50c905bae2a2}\InprocServer32" /f /ve

This simple action will add both keys in the correct sequence. And that’s about it. Reboot your PC to implement the changes. And once it boots back up, you will now see the old menu when you right-click on your PC.
Also Read: How to show seconds on Windows 11 clock
How to Add or Remove Menu Options to the Right-Click Menu
Now that you have your old menu back, if you want to take one step further, you can tweak it to add a couple of your frequently-used apps. The apps will appear in the first menu, saving you time in the long run.
Note: You can add only apps and not folders and files. For the latter, you have to take the aid of the Taskbar.
Method 1: How to Customize Context Menu Using Registry Editor
Adding apps to the context menu in Windows 11 also involves editing the registry entries. For demonstration, we will add Notepad to the right-click menu. Follow the below-mentioned steps.
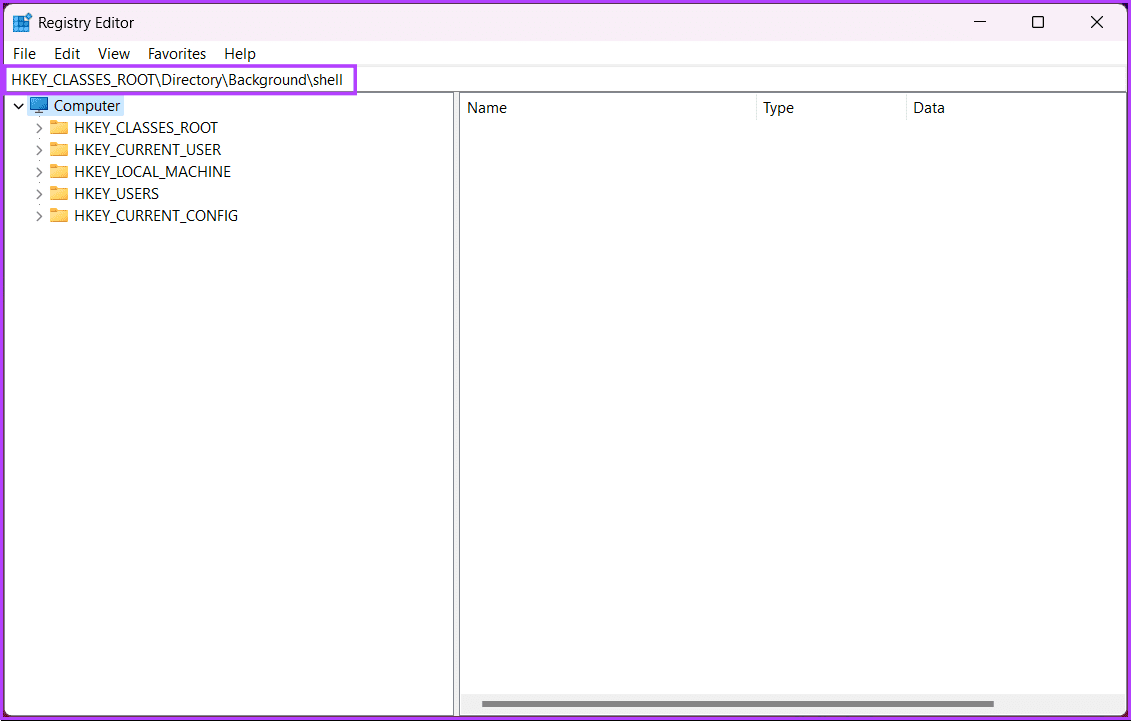
Step 1: Firstly, open the Registry Editor and navigate to the path below:
HKEY_CLASSES_ROOT\Directory\Background\shell
Step 2: Right-click on the right panel, choose New and select Key.
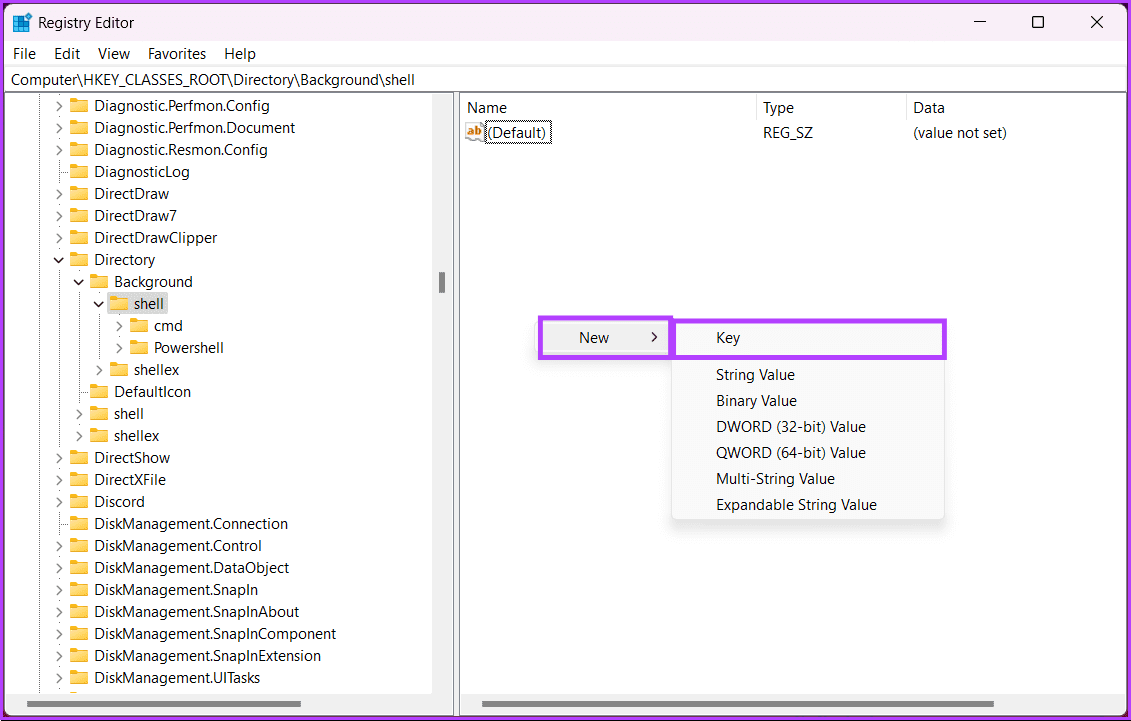
Step 3: Name the key as Notepad.
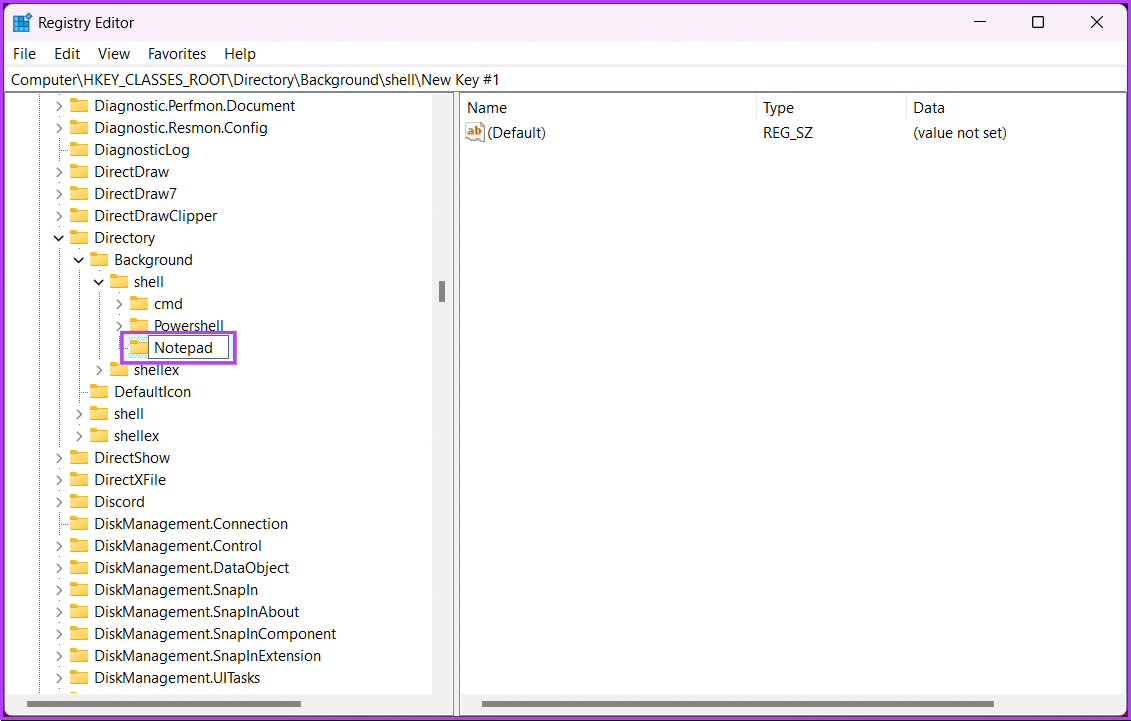
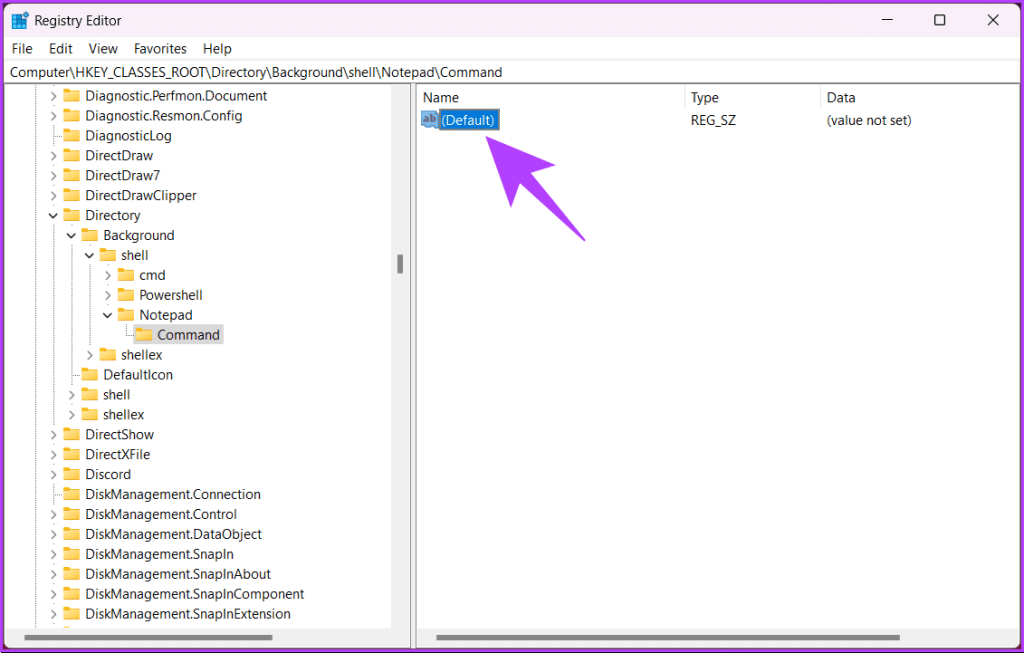
Step 2: Under the Notepad key on the right pane, double-click on Default.
Step 3: Double-click on Default and add ‘&Notepad’ under Value data.

Step 4: Select the newly created key, and right-click again to add a new key underneath the Notepad folder. Rename it as command.
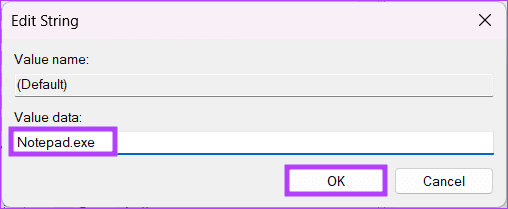
Step 5: Under the Command key on the right pane, double-click on Default.
Step 5: Finally, in the Edit String, under Value data, enter the below command and click OK.
Notepad.exe
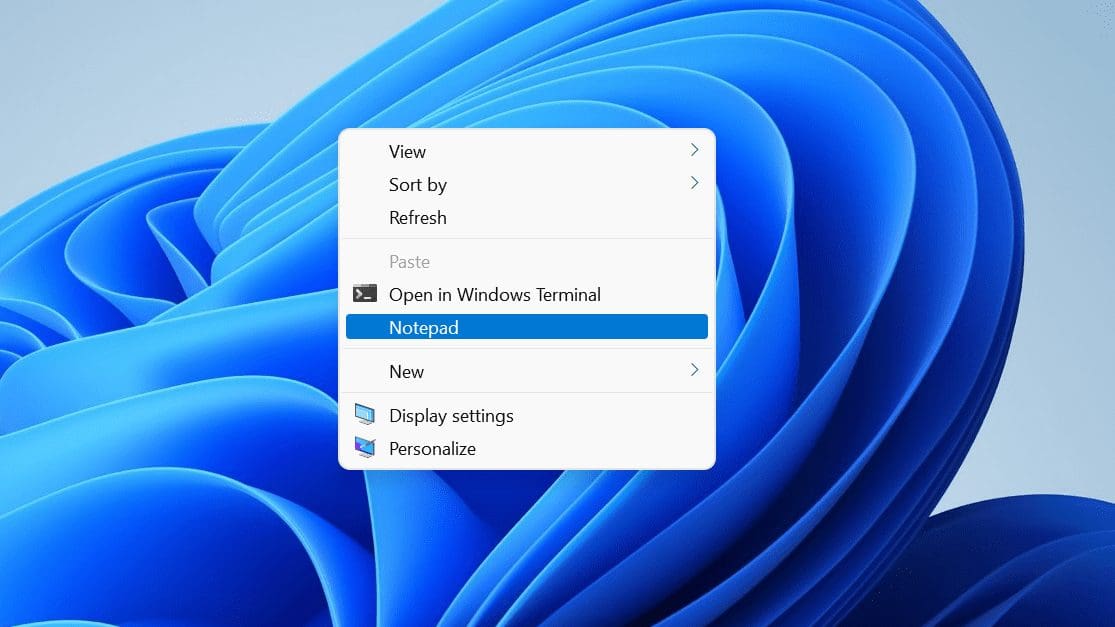
Head back to the desktop and right-click to see the new values in the context menu. If you, however, change your mind and want to remove an app from the right-click menu in Windows 11, follow the above steps and remove the entries under the Shell folder.
You can also add the apps directly to the right-click menu in Windows 11 without reverting to the old menu. The only limitation is that they will be available only when you click on Show more options.
If the steps are too long for you to follow, check out the next method.
Method 2: Change Right-Click Options Using Third Party Tool
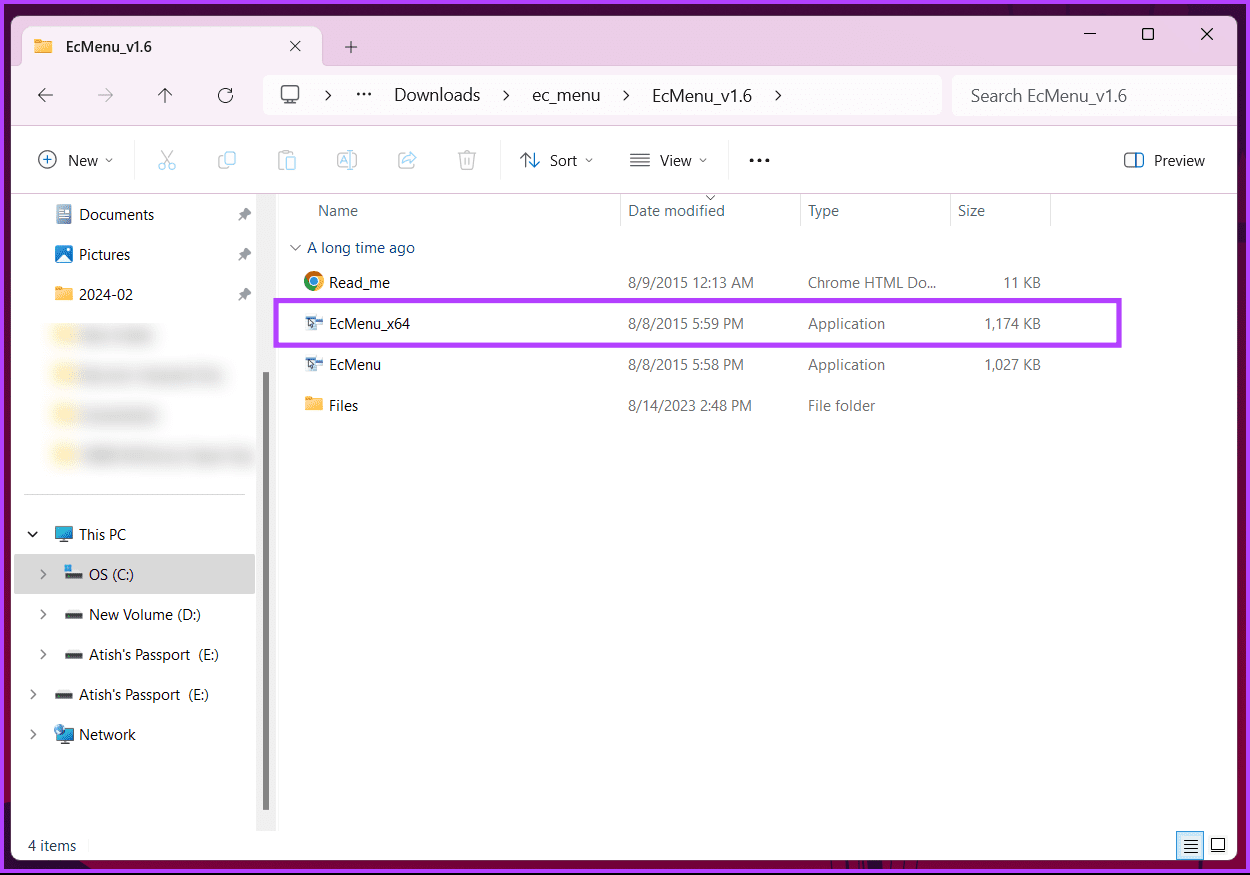
There are multiple tools available to customize the items on the right-click context menu, especially if you don’t want to go through the hassle of changing the settings or adding keys to the Registry Editor. For this demonstration, we will go with the ‘Easy Context Menu’ tool. Follow the below steps.
Step 1: Firstly, go to the Easy Context Menu’s official site from your preferred browser on Windows 11.
Step 2: Scroll down and click the Download button.

Step 3: Extract the file and double-click on the application to launch.
Note: The app is portable, so you don’t need to install it on your PC.
The tool will display a list of tools and settings you can add to your right-click context menu.
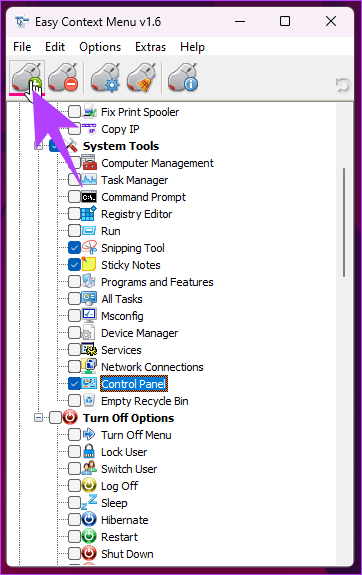
Step 4: Scroll through the options and check the box next to them if you want to include them in your right-click menu.
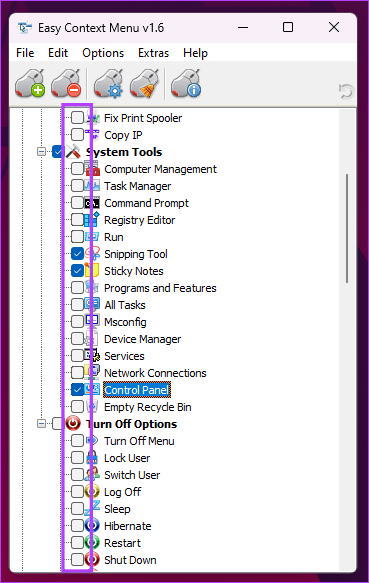
Step 4: Finally, once you have selected all the options you need, click Apply Changes.
There you have it. You have successfully customized the context menu on your Windows 11 PC. If you have any queries we missed addressing, check out the FAQ section below.
FAQs on Customizing the Right-Click Menu in Windows 11
By default, Windows 11 does not provide a built-in option to rearrange items in the right-click menu. Third-party tools may offer this functionality, or you can explore registry tweaks for more advanced customization.
Windows updates may overwrite certain registry changes or settings, potentially reverting customizations. It’s a good practice to check and reapply your customizations after major system updates.
Customize Right-Click Menu
Now that you know how to change the right-click menu in Windows 11, you can customize it as per your requirements and put the frequently used apps and options over there, thus enhancing your Windows experience. You may also want to read how to hide or delete the Recycle Bin icon in Windows 11.
Was this helpful?
Last updated on 26 February, 2024
18 Comments
Leave a Reply
Read Next
 How to Fix a Slow Windows 10 Desktop Right-Click (Context) Menu
The desktop right-click menu, otherwise known as the desktop context menu, provides instant access to numerous useful options ranging from aligning desktop icons to customizing display settings.
How to Fix a Slow Windows 10 Desktop Right-Click (Context) Menu
The desktop right-click menu, otherwise known as the desktop context menu, provides instant access to numerous useful options ranging from aligning desktop icons to customizing display settings.
 Top 7 Ways to Fix the Left Click Mouse Button Not Working on Windows 10
It's distracting to have a mouse that doesn't work properly.
Top 7 Ways to Fix the Left Click Mouse Button Not Working on Windows 10
It's distracting to have a mouse that doesn't work properly.
 How to Enable Single Click in Windows 11 and Earlier Versions
Double-clicking the left mouse button is the conventional way to open apps and windows on Windows PCs.
How to Enable Single Click in Windows 11 and Earlier Versions
Double-clicking the left mouse button is the conventional way to open apps and windows on Windows PCs.
 The 8 Best Fixes for Right-Click Not Working on Windows
The right-click function on Windows is important; it opens a context menu with multiple options.
The 8 Best Fixes for Right-Click Not Working on Windows
The right-click function on Windows is important; it opens a context menu with multiple options.
 How to Enable or Disable Mouse Click Sound in Windows 10 and 11
Whether it's a full-size mouse or trackpad on your laptop, it's almost impossible to imagine a PC without a mouse.
How to Enable or Disable Mouse Click Sound in Windows 10 and 11
Whether it's a full-size mouse or trackpad on your laptop, it's almost impossible to imagine a PC without a mouse.
 Top 5 Ways to Change Priority Level for Programs on Windows 10 and Windows 11
Windows splits your PC’s resources among all running programs based on the priority levels.
Top 5 Ways to Change Priority Level for Programs on Windows 10 and Windows 11
Windows splits your PC’s resources among all running programs based on the priority levels.
 How to Fix Microsoft Store Click Get or Install and Nothing Happens Issue
Windows 10's Microsoft Store contains a decent library of apps, some of which — such as iTunes — work better than traditional desktop programs.
How to Fix Microsoft Store Click Get or Install and Nothing Happens Issue
Windows 10's Microsoft Store contains a decent library of apps, some of which — such as iTunes — work better than traditional desktop programs.
 How to Change Folder Thumbnail in Windows 11
Folders in Windows 11 typically display thumbnail images that offer a quick preview of their contents.
How to Change Folder Thumbnail in Windows 11
Folders in Windows 11 typically display thumbnail images that offer a quick preview of their contents.
The article above may contain affiliate links which help support Guiding Tech. The content remains unbiased and authentic and will never affect our editorial integrity.


There is no CLSID entry listed under HKEY_CURRENT_USER\Software\Classes\ on my new Lenovo Ideapad PC that uses Windows 11.
Yes it does, maybe you´re looking at the first folders that start with a dot (.*), I had the same problem. Scroll way down and you´ll find it.
I had the same problem. If you, like me, run regedit on the system account:
psexec -s -i regedit.exe
then there will be no CLSID entry
just run the plain vanilla regedit.exe as the current user, and CLSID will show up
Wow. thanks a Lot ????
Thanks a lot for this very helpful tip! Win 11 is excellent but the context menu, compared to Win 10, is frustrating. Why make people click a couple of times when they’re used to doing it just once?
Works like a charm. THANKS A LOT, it was driving me crazy.
Ugh this is too complex for me, we really need microsoft itself to make this an easy option for people in the personalise menu. Not all of us are tech wizards.
Thanks! New one was really killing productivity.
This nerfed the right-click menu, as it didn’t have all the normal right-click options one being Delete! So, I had to undo your suggested changes.
Thank you! I have cerebral palsy, have been using computers since pre GUI operating systems, and am growing tired of restrictions such as this and the skinny scroll bars and the cut down right click menu. No, we cannot stand still, but these pointless, productivity limiting changes really baffle me. What do Tim Cook and Bill Gates hope to achieve?
If anybody has a way of forcing conventional scroll bars in all applications, I would be eternally grateful. The situation is limiting my choice of software which previously, only happened due to cost.
Something has gone wrong here folks.
Thank you again.
Sjd_22
I have seen a right click context menu at my previous employer that had copy and paste as one menu choice so that we could quickly copy a folder and its contents with one click any idea how to get that to work.
You should move command line option as the first and recommended option- it is simpler and not error-prone as multiple UI steps with regedit.
It makes your article more useful than a few similar returned by Google.
Could you tell me exactly how I could remove “Include in Library” and “Restore Previous Versions” from the context menu in file explorer” with the instructions you gave here??
Sadly, this approach does not always work. Thanks anyway though.
Command prompt worked like a charm. Thank you!! So much happier now 🙂
I took the easier route of copying and pasting at the command prompt. It did EXACTLY what we needed, and removed a source of annoyance quickly and easily. Thank you!
Thank you. I went with the command line option, and it worked beautifully. Microsoft needs to stop making Windows more difficult to use, and fix the stuff that’s broken instead.
Thank you! I really appreciate your article on how to do this. I had tried the instructions on other websites, but they said the first part was HKCU\, but it should have said HKEY_CURRENT_USER\ as this article does. While I wasn’t able to get the command prompt option to work, once I followed your instructions, I was able to add it using the Registry, and it worked without even having to log out and back into Windows. I really missed being able to use the full right-click menu. Thank you so much.