On seeing that a 12 year old kid was still alive in me, one of my closest friends decided to gift me a Sony PSP this birthday. As soon as I opened the box and played games for few minutes, I was more curious about things I can do on it than just playing games all day (that was the tech blogger in me speaking). But when I searched the internet everything demanded a custom firmware running on the PSP and that was enough of a reason for me to install a custom firmware on my Sony PSP® E-1004 Street.
There are two ways you in which you can run a custom firmware on PSP. One is the temporary hack and other is the permanent one. In temporary hack, PSP runs the custom firmware as long as its switched on/standby but after restarting it, things go back to default. The permanent one on the other hand means that the fix will remain even after restarting the PSP.
In this post we will be seeing how we can use temporary hack to use custom firmware on PSP E-1004 Street. Advantages of using temporary hack is that the device warranty is not violated and even if something goes wrong, there is no fear of bricking the device. Moreover, reapplying the fix after restarting PSP takes only a few seconds. So let’s start
Things to Arrange.
- A PSP memory stick to save files. Please use the memory stick that you use on a regular basis.
- A memory card reader or a PSP USB cable to mount the memory stick on your computer.
- Make sure your PSP is adequately charged.
Installing the Custom Firmware
Step 1: Turn on your PSP and navigate to Settings—>System Settings to open PSP System Information. Here go to Check your System Software information and proceed only if the version is 6.60.
Step 2: Download the Light Custom Firmware (LCFW) and extract the files on your computer. Also, mount the PSP Memory Stick to your computer.
Step 3: Having done that, transfer the two folders FastRecovery and PROUPDATE to PSP/GAME folder on your memory stick.

Step 4: If you are using USB connection, un-mount the memory stick or if you are using the memory card reader, transfer the memory stick to PSP and restart the device.
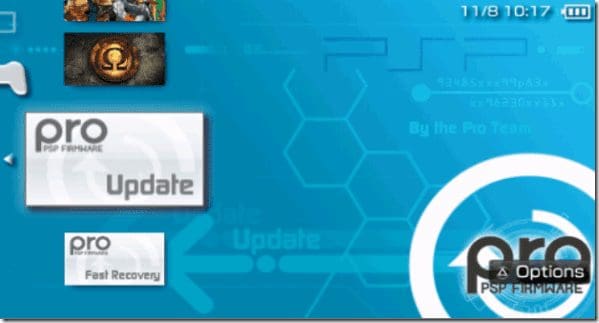
Step 5: Now navigate to Game—> Memory Stick and run the pro Update file.
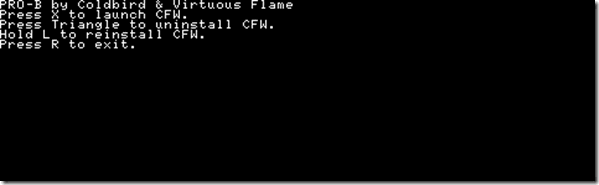
Step 6: Your PSP will restart and launch CFW installation. Simply press X button and follow the on-screen instructions your PSP to install the LCFW.
That’s all, after you restart your computer your PSP will be hacked and running the custom PRO B9 firmware which you can check in PSP system settings. As the fix is temporary, it will be erased as soon as you turn off your PSP.

To install the custom recovery after restarting your PSP, you just need to run the pro Fast Recovery file from Games—>Memory Stick section.

Conclusion
You can now install custom plugins on PSP and use it as you like. We will be seeing many posts on customizing PSP in the coming days and the first one will be about installing custom themes on PSP.
Moreover, after installing the custom firmware you will be able to run modified ISO games on your PSP. You can use it to test a game but we recommend buying an authentic original PSP game if you are planning to play it.
Was this helpful?
Last updated on 03 February, 2022
Read Next
 How to Install the Latest Firmware Update on Samsung Galaxy Buds
Samsung has been doing an impressive job with the Galaxy Buds lineup.
How to Install the Latest Firmware Update on Samsung Galaxy Buds
Samsung has been doing an impressive job with the Galaxy Buds lineup.
 How to Upgrade the Firmware of Your SSD on Windows 10
A Solid State Drive (SSD) has many advantages over a traditionally spinning hard drives with moving parts.
How to Upgrade the Firmware of Your SSD on Windows 10
A Solid State Drive (SSD) has many advantages over a traditionally spinning hard drives with moving parts.
 How to Update Apple TV Remote Firmware
Updating your Apple TV to the latest tvOS version adds certain features and functionality.
How to Update Apple TV Remote Firmware
Updating your Apple TV to the latest tvOS version adds certain features and functionality.
 How to Install Custom Watch Faces on Amazfit Watches
The Huami Amazfit watches may not be as slick or feature-rich as their $399 counterparts (like Apple Watch or the Galaxy Watch), but they sure pack a punch.
How to Install Custom Watch Faces on Amazfit Watches
The Huami Amazfit watches may not be as slick or feature-rich as their $399 counterparts (like Apple Watch or the Galaxy Watch), but they sure pack a punch.
 6 Best Universal Remotes for TVs: Samsung, Sony, LG, Apple TV, and More
Do you have a cluttered coffee table with multiple remotes for your TV, sound bar, streaming devices, and other AV equipment?
6 Best Universal Remotes for TVs: Samsung, Sony, LG, Apple TV, and More
Do you have a cluttered coffee table with multiple remotes for your TV, sound bar, streaming devices, and other AV equipment?
 5 Best Sony Soundbars in 2023: Sonic Marvels
Buying a new soundbar can be tricky.
5 Best Sony Soundbars in 2023: Sonic Marvels
Buying a new soundbar can be tricky.
 4 Best Sony WF-1000XM5 Protective Cases That You Can Buy
The Sony WF-1000XM series of TWS earphones have come a long way over the years.
4 Best Sony WF-1000XM5 Protective Cases That You Can Buy
The Sony WF-1000XM series of TWS earphones have come a long way over the years.
 4 Best Sony Speakers for Travel in 2024
Sony is among the leading audio brands in the world.
4 Best Sony Speakers for Travel in 2024
Sony is among the leading audio brands in the world.
The article above may contain affiliate links which help support Guiding Tech. The content remains unbiased and authentic and will never affect our editorial integrity.