A few days back, I visited a coffee shop and like always I asked the barista for the Wi-Fi password. But the reaction I got was something I never expected. Now, usually, I get the Wi-Fi password on my bill for prepaid orders which I put in my Chromebook to get started. Hot coffee with some writing to do, that’s how the next few hours go.

That day, the barista came over to my table, asked me to look in a different direction (that’s what pissed me off) while he typed in the password. I was like, “what did he think I would do with his Wi-Fi password? Sell it on eBay may be. If he is so insecure, he should change it on a daily basis rather than asking the customers to look in a different direction.”
Anyways, I quickly finished my coffee and before leaving, I went over to the guy and handed over the bill to him with the Wi-Fi password he was so possessive about. He was surprised but I loved the look on his face.
It’s quite tricky to find the Wi-Fi password of the connected network on a Chromebook, but as you can see, it can be useful at times. Let’s have a look how I did it.
Also Read: How to find saved Wi-Fi password on Windows 10, Android and iOS.
A Few Things to Clarify
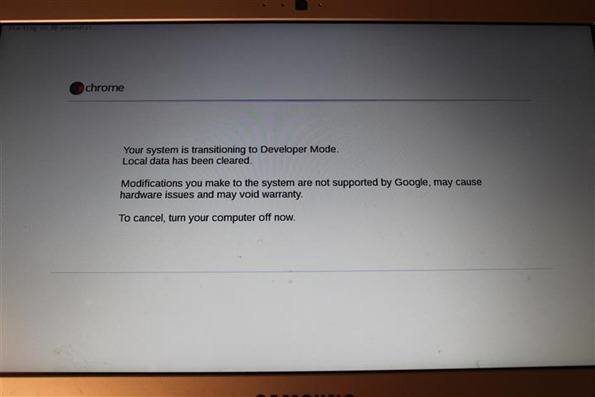
The trick will only work if the Chromebook has developer mode enabled on it. The good part is, if it’s not already in the developer mode, we will show you how to get that done. But enabling it will power wash your Chromebook which means that all your profiles, saved files and even Wi-Fi password will be deleted.
So that means you will only be able to get Wi-Fi passwords of the network you connect to after putting the Chromebook in developer mode.
Booting Chromebook into Developer Mode
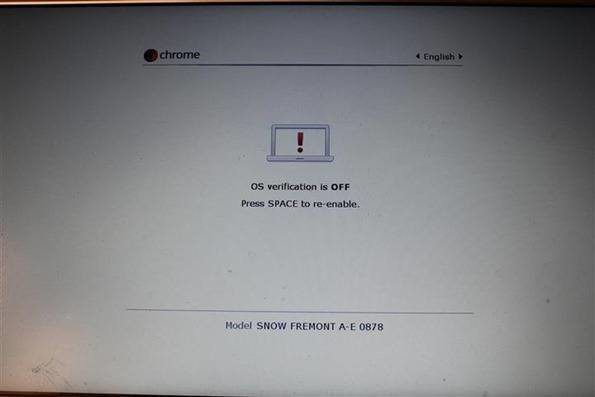
To begin, you will have to press the Esc, Refresh and Power Button on your Chromebook. When you press these buttons together, it will boot into recovery mode and you will get a message such as Chrome OS is missing and insert a recovery stick to restore. Nothing to worry here, the Chrome OS is where it should be and you will have to press the Ctrl+D button to enable the developer mode.

Last chance! If you wish to proceed, press enter.

Finding the Saved Wi-Fi Password
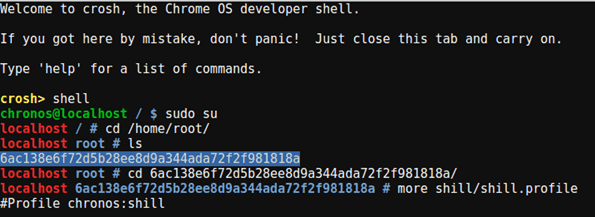
Now that your Chromebook is in Dev mode, you can get the password of any Wi-Fi network you connect to. To get started, connect to the Wi-Fi network you wish to crack the password for and then press Ctrl+Alt+T on the Chromebook keyboard. This will open up the Crosh shell.
Once you see the black shell screen, type in the following codes:
crosh> shell
chronos@localhost / $ sudo su
localhost / # cd /home/root/
localhost root # ls
Here you will get the list of a folder with a long string. Just type in CD and a tab and then press enter. You will be taken to the directory. For example
localhost root # cd 6ac138e6f72d5b28ee8d9a344ada72f2f981818a/
localhost 6ac138e6f72d5b28ee8d9a344ada72f2f981818a #
Finally, type the command “more shill/shill.profile” and press enter. You will see a line of texts which will have the Wi-Fi information of networks you have connected to till date.
Find the Wi-Fi SSID you wish to get the password for and spot the line which says “Passphrase=rot47:” followed by some random text. Well, this is the Wi-Fi password but it’s encrypted. To decrypt type in the command echo | tr ‘!-~’ ‘P-~!-O’. Replace the wish the code that you get as the passphrase.
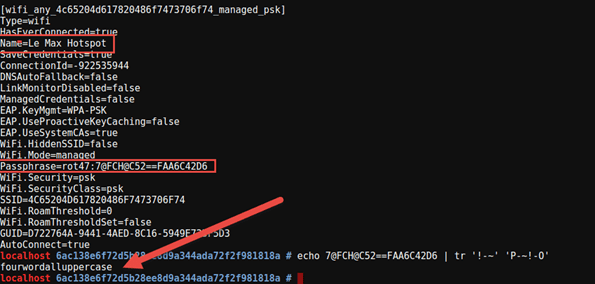
That’s all, you will have the Wi-Fi password on the screen.
Conclusion
I understand that the process is a bit too techy, but you can bookmark this page or save the commands to your favored notes app. When you need it, you can always refer back and even copy and paste the entire commands. In case of any doubts, please drop in your queries in our forum.
Was this helpful?
Last updated on 03 February, 2022
Read Next
 How to Remove Saved Passwords From Google Chrome
Google Chrome is undoubtedly the most popular browser.
How to Remove Saved Passwords From Google Chrome
Google Chrome is undoubtedly the most popular browser.
 4 Ways to Enable or Disable Dark Mode on Chromebook
Wondering how to get dark mode on your Chromebook?
4 Ways to Enable or Disable Dark Mode on Chromebook
Wondering how to get dark mode on your Chromebook?
 5 Ways to Lock Your Chromebook Screen
Picture this: you are doing something private on your Chromebook and someone walks in whom you don't want to see what you are doing.
5 Ways to Lock Your Chromebook Screen
Picture this: you are doing something private on your Chromebook and someone walks in whom you don't want to see what you are doing.
 Chromebook Buying Guide for Students in 2024
Choosing the right laptop for school can be daunting, especially with the diverse options available.
Chromebook Buying Guide for Students in 2024
Choosing the right laptop for school can be daunting, especially with the diverse options available.
 Top 10 Ways to Fix Chromebook Not Charging
Chromebooks remain the preferred choice for students and consumers on a tight budget.
Top 10 Ways to Fix Chromebook Not Charging
Chromebooks remain the preferred choice for students and consumers on a tight budget.
 Why Is My Chromebook Battery Light Blinking White: 4 Ways to Fix the Issue
Many Chromebook users noticed the LED near the power cord connector sometimes blinks white.
Why Is My Chromebook Battery Light Blinking White: 4 Ways to Fix the Issue
Many Chromebook users noticed the LED near the power cord connector sometimes blinks white.
 How to See Saved Posts and Comments on Reddit (PC and Mobile)
We've subscribed to more than a hundred interesting subreddits, therefore whenever we hit the refresh button, we see an entirely new feed.
How to See Saved Posts and Comments on Reddit (PC and Mobile)
We've subscribed to more than a hundred interesting subreddits, therefore whenever we hit the refresh button, we see an entirely new feed.
 How to Find Saved Posts and Jobs on LinkedIn
Are you struggling to track all the valuable LinkedIn posts and job opportunities?
How to Find Saved Posts and Jobs on LinkedIn
Are you struggling to track all the valuable LinkedIn posts and job opportunities?
The article above may contain affiliate links which help support Guiding Tech. The content remains unbiased and authentic and will never affect our editorial integrity.