Mapping a drive simply means to connect a local drive with a specially allocated shared directory or folder on another computer. After a drive has been mapped, you can access the shared resource and treat it as if it’s located locally on your own computer. More than one computer may map their drives to this shared resource and take advantage of this networked space. Does it sound very complicated? Believe me it’s not and right below we show you how you can quickly set it up and the uses to put it to.
How to Map a Drive
(This explanation is on a Windows XP machine and remains pretty much the same for the upgraded versions)
Step 1. To connect a drive from My Computer, click on Start, right-click My Computer, and then click Explore. Alternatively, to connect a drive from Windows Explorer, right-click on Start, and then click Explore.

The Map Network Drive dialog gives you brief on the process as you can see from the screenshot below:
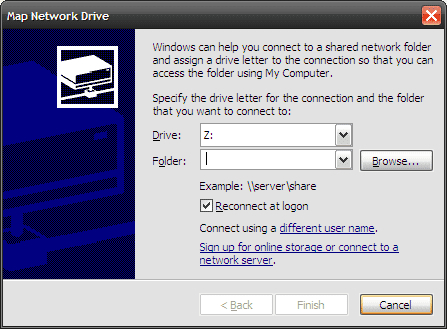
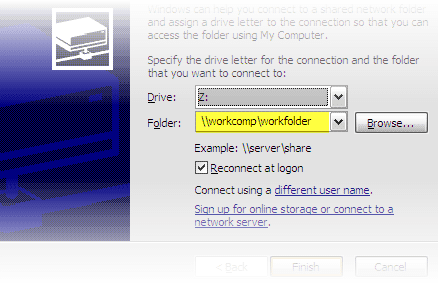
Step 2. Select a drive letter from the dropdown that you want to use to connect to the shared folder. Enter the UNC path to the shared folder on the other computer. UNC path is just a special naming convention for pointing to a folder or printer on another computer. UNC names consist of three parts – a server name, a share name, and an optional file path (to access sub-directories if any). These three are brought together using backslashes in this format is: \\server name\share name.
Step 3. More conveniently, you can also click Browse to find the computer and shared resource on your network. This is useful when you don’t know the name of the folder. You can expand the Microsoft Network and then each computer one-by-one to see the shared folders.

Step 4. Select Reconnect at login checkbox if you want the network drive to be connected permanently. Otherwise, the drive you created will ‘un-map’ when you log out of the computer.
Step 5. The networked computer with the shared folder might require a different username and password to log in. Click the different user name link and enter this information the username and password.
Clicking on Finish completes the mapping process.
With the help of these few simple steps, you can now share resources between computers. You can use applications, read and write to files, and do all operations as if the shared folder was on your own computer. With cloud based storage solutions, you can just as easily map one or even multiple cloud services as a network drive.
Have you ever tried mapping a drive? Where there any problems or was it a smooth drive (pun intended)?
Last updated on 02 February, 2022
Read Next
 What Does Locking the Taskbar Mean in Windows
Many features exist on our Windows PC that we seldom use.
What Does Locking the Taskbar Mean in Windows
Many features exist on our Windows PC that we seldom use.
 What Does Your Location Is Currently in Use Mean on Windows
Do you frequently use the Windows taskbar to check active apps and services running in the background?
What Does Your Location Is Currently in Use Mean on Windows
Do you frequently use the Windows taskbar to check active apps and services running in the background?
 What Does Reset App Preferences Mean? And How to Do It
Android is loaded with cool features and settings.
What Does Reset App Preferences Mean? And How to Do It
Android is loaded with cool features and settings.
 What Does Back up and Sync Mean in Google Photos on Android and iOS
On Android and iOS, Google Photos app asks you whether you want to enable Back up and sync when you open the app for the first time.
What Does Back up and Sync Mean in Google Photos on Android and iOS
On Android and iOS, Google Photos app asks you whether you want to enable Back up and sync when you open the app for the first time.
 What Does iCloud Private Relay Is Active Mean on iPhone
With add-ons like Hide My Email and iCloud Private Relay in iOS 15, Apple is doubling down on its privacy stance for users.
What Does iCloud Private Relay Is Active Mean on iPhone
With add-ons like Hide My Email and iCloud Private Relay in iOS 15, Apple is doubling down on its privacy stance for users.
 What Does ‘No Caller ID’ Mean on Any Phone
Mobile phones have made getting in touch with people easier.
What Does ‘No Caller ID’ Mean on Any Phone
Mobile phones have made getting in touch with people easier.
 What Does FaceTime Photos Must be Enabled on Both Devices Mean
Were you about to take a Live Photo on FaceTime but were greeted by the “FaceTime Photos must be enabled on both devices to use this feature” error message?
What Does FaceTime Photos Must be Enabled on Both Devices Mean
Were you about to take a Live Photo on FaceTime but were greeted by the “FaceTime Photos must be enabled on both devices to use this feature” error message?
 What Does Battery Service Recommended Mean on Mac
MacBooks usually offer a stupendous battery backup.
What Does Battery Service Recommended Mean on Mac
MacBooks usually offer a stupendous battery backup.
The article above may contain affiliate links which help support Guiding Tech. The content remains unbiased and authentic and will never affect our editorial integrity.